The main malfunctions of a rotary hammer and their external signs
All unit malfunctions can be divided into 2 groups: mechanical and electrical.
Mechanical breakdowns
If any mechanical malfunction appears in the hammer drill, its presence can be determined by ear (noise increases, a grinding sound appears).
You may also experience increased vibration or an unpleasant odor emanating from the unit body.
So, mechanical failures include the following:
- failure of the device operating mode switch;
- worn rubber bands of the striker and striker;
- failure of the impact mechanism;
- failure of the unit barrel due to wear;
- breakage of gear teeth;
- the chuck breaks, causing the drill to fly out.
Electrical faults
Malfunctions associated with the electrical part of the hammer drill may also be accompanied by an unpleasant odor from the device body and sparking. You may also notice that the engine gets hot and hums quickly without turning over, or that it emits smoke.
Electrical failures of the device include the following:
- the device does not turn on;
- breakage of the start button;
- brush wear;
- collector clogged;
- violation of electrical contacts;
- burnout of the stator or rotor winding of an electric motor.
Additional Tips
It is also recommended to follow simple operating rules to prevent defects:
- It is forbidden to unnecessarily remove the casing over the abrasive wheel; if this is unavoidable, then the tool must not be allowed to touch;
- the machine must be held firmly in the palm of your hand; if the disk jams, the device may break out of your hands, for this reason the machine may be seriously damaged and result in injury;
- sparks are generated during operation of the grinder, you must avoid getting them on wires and similar flammable materials;
- The part to be sanded must be firmly secured.
Moreover, you should not put pressure on the parts to speed up the work. Abrasive wheels work according to the principle of removing the top layer; based on these bases, they do not require pressure.
Algorithm for disassembling a hammer drill
To eliminate mechanical and electrical faults (with the exception of a broken electrical plug), disassembling the unit body is indispensable. The most popular brands among craftsmen, both home and professional, are Bosch, Makita, Interskol, and Energomash hammer drills. The design of units from different manufacturers is approximately the same, therefore the methods for disassembling the devices will be similar. But you should not completely disassemble the device, since it will be difficult to put it back together. The photo below shows what a completely disassembled hammer drill looks like.
Removing the cartridge
Disassembling the unit for troubleshooting should be carried out carefully, inspecting each removed part. To make assembly easier, it is better to photograph the disassembly process. If you do not find any external defects on the device, then it is recommended to start disassembling it with the cartridge.
- First, remove the boot (1), made of rubber.
- Carefully, so as not to lose it, use a screwdriver to remove the retaining ring (2) and then the plastic boot (3).
- At the next stage, it is important not to lose the small ball that is located under the washer (4). Remove the washer (4), plate (5) and spring (6), as well as the ball (7). It is when these parts wear out that the drill falls out of the chuck. Some cartridge models may have additional balls and washers.
We disassemble the case
If disassembling the unit housing is required, you must first remove the operating mode switch.
- Place the switch in the “Blow” position. Usually a hammer is drawn in this place on the body. If this mode is not available, set the switch to the “Punch + Drilling” position.
- Next, you should press the button located on the switch handle and turn it slightly below the hammer icon until a characteristic click is heard.
- After this, you need to pry the switch with a screwdriver and, pulling it towards yourself, remove it. In some models of units, this switch can be screwed to the housing.
Disassembling the electrical part of the hammer drill
To get to the electrical part of the device, if you suspect that this is where there may be a breakdown, you must perform the following steps.
- Unscrew the screws holding the back cover and remove it.
- Unscrew the fasteners holding the network cable.
- Next, you should remove the wires from the fastenings and remove the start button.
- Remove all wires attached to the stator.
- Remove the brushes by unscrewing the mounting bolts.
- Separate the housings of the electrical and mechanical parts of the device by unscrewing the corresponding bolts. Use a flathead screwdriver to separate.
- Remove the rotor from the gearbox. If you need to replace bearings, use a special puller.
- Remove the air intake located in the housing of the electric part of the hammer drill.
- Disconnect the stator from the housing. To make it easier to come out of the casing, it is recommended to pull the stator by lightly tapping the casing with a wooden object.
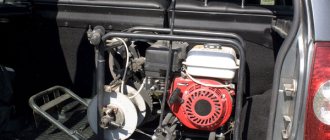
If you need to disassemble a barrel perforator with a vertical electric drive, first remove the handle, and then unscrew the bolts holding the motor.
How to remove a drill with a working chuck
With a working chuck, getting a drill is absolutely not difficult. If the cartridge has a key clamp, a special key is needed; in the quick-release fastener, manipulations are performed by hand. In the first option, remove it by inserting the key into one of the recesses on the cartridge and rotating it counterclockwise. Thanks to the teeth present on both objects, unwinding occurs.
In a situation with a quick-release fastening, the hammer drill is switched on in reverse rotation mode. Hold the outer body of the cartridge with one hand and press the start button with the other.
After removing the used nozzle and before replacing it, the shank is cleaned of construction dust and old grease. The shank of the drill being installed must be cleaned and lubricated. When prepared for work, it will last much longer; lubrication extends the life of the hammer drill and attachments.
Replacing motor brushes
The main sign that it is time to change the brushes is the formation of increased sparking in the area of the electric motor commutator, rapid heating of the brush holders, and a burning smell. When the brushes are not worn out, the spark can only be seen under them. Otherwise, the spark is visible throughout the entire circle of the collector.
The presence of a spark around the commutator circle with unworn brushes is a sign of bearing wear, rotor or stator insulation failure, commutator plate burnout, stator or rotor burnout.
Another sign that the stator has burned out is the presence of sparks under only one electrode. If you have a tester, you can use it to check the stator and rotor: measure the resistance on the rotor and stator one by one. If it is the same on both windings, then everything is fine with the stator. If you notice clear signs of problems with the rotor or stator in your hammer drill, you will have to take the device to a service center for repair. As for the brushes, you can change them yourself.
To get to the place where the brushes are installed, you will need to disassemble the housing in which the motor is installed, or simply remove the back cover. Opening the lid, you will see brushes secured in special holders. The photo below shows what these parts look like.
Brushes that are installed on rotary hammer motors come in 3 types.
- Graphite ones are durable, but since they are very hard, their rubbing into the collector is not ideal, which negatively affects the latter.
- Carbon - easily rubs into the commutator, providing good contact, but wears out quickly.
- Carbon-graphite is an ideal option, since they are a mixture of 2 components that complement each other.
It is very important not to wait until the engine sparks and then change the brushes. Replacement is needed after they are worn to 1/3 of the nominal value (8 mm). Even if one brush is worn less than the other, both still need to be replaced.
Pay attention to the condition of the spring in new brushes and the fastening of the contact. If the spring falls off while the engine is running, it will suffer significant damage. Also, if the spring is weak, then it will not be able to provide good contact.
Before changing the brushes, be sure to thoroughly clean the rotor and stator from any remaining graphite or coal dust. These parts can be cleaned using technical or medical alcohol.
Next, you should secure the electrodes in the holders and rub them into the collector. To do this, place a piece of fine-grained sandpaper on the commutator and grind the electrode in with rotational movements in different directions. The grinding continues until the contact area of the electrode is slightly rounded. This will ensure a better fit to the collector plates and, accordingly, better contact.
DIY repair
Repairing a rotary hammer with your own hands can only be partially done. But, for example, it is still better to perform such a unit as an electric motor in a special workshop.
It is best to carry out repairs in the warranty workshop of the company from which it was purchased.
To lubricate the hammer drill components, you must use only those materials recommended by the manufacturer.
Diagram of the impact mechanism, its malfunctions and repairs
The impact mechanisms of rotary hammers differ in their design, depending on which family the devices belong to. Therefore, the repair of these mechanisms will take place according to different principles.
Barrel perforators
Rotary hammers with a vertical engine usually have an impact unit based on a crank mechanism (CSM). Below is a diagram of this type of impact mechanism.
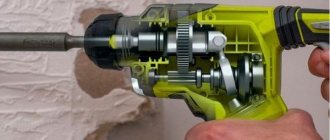
The following photo shows a section of the device, where you can see the location of the crankshaft.
The impact mechanism of a unit with a vertical motor may have the following malfunctions. The connecting rod mechanism has a separate bearing that is mounted on the cam of the wheel with an eccentric, but sometimes it can be located at the base of the connecting rod. In some models of rotary hammers, a plain bearing (instead of a rolling bearing) may be installed at this location, which requires constant lubrication. If it is not there, or it is already old, then this unit will wear out. During repairs, you will have to completely replace the connecting rod and eccentric barrel.
Another common problem is the firing pin breaking. This malfunction can be calculated if you notice that there is no longer any impact on your hammer drill. To get to the firing pin, you will need to completely disassemble the barrel of the device. It is done as follows.
- Disconnect the barrel from the hammer body, remove the cartridge (see description above). Tap the barrel on the table so that the piston falls out. Take a rubber mallet and knock the barrel out of the housing.
- Remove the retaining ring holding the bearing.
- Remove the bearing itself and lightly tap the table to remove the balls.
- After removing the 3 balls, you can pull out the raster sleeve.
- Also, as in the previous case, remove the balls located on the bushing, just do not confuse them with those that were removed earlier (these balls are smaller in diameter). After removing the balls, you need to insert a screwdriver into the sleeve and push out the firing pin.
In this case, the firing pin is intact. But if it is broken, then replace it with a new one. You should also pay attention to the rubber seals and seals in the barrel body. If they are worn out, they must be replaced.
Pistol type hammer drills
The design of the impact mechanism in a pistol-type unit is slightly different from the same-purpose mechanism installed in a barrel-type unit.
Its main difference is that the piston is driven not by a connecting rod, but by a swinging (“drunk”) bearing. Therefore, the most common breakdown of this unit is the wear of a “drunk” bearing that needs to be replaced.
The next photo shows a destroyed “drunk” bearing, which is the reason why the hammer drill stopped hammering.
The swing bearing is removed using a flat screwdriver, which you need to pick up the bracket and remove it. After this, the bearing is easily separated from the gearbox housing.
When replacing a collapsed bearing, you should thoroughly rinse the gearbox, since it is in its housing that fragments of the broken part may remain.
After cleaning and installing a new bearing, apply a thick layer of lubricant to this block.
Also, the reason that the device does not hit can be a broken firing pin. To get it out, you need to remove the retaining ring that is visible in the hole.
Take a small screwdriver, pick up the ring with it, and move it to the right (towards the gear).
Do the same steps on the other side of the part. Next, insert a screwdriver into the hole in the part and push through the removed internal parts of the mechanism.
After this action, you can easily get the locking ring and the housing in which the broken striker is located.
If you disassemble this case, you will see the “culprit” of the malfunction, due to which the hammer drill does not hammer.
When assembling the impact mechanism, be sure to generously apply lubricant to all parts.
How to lubricate the gearbox
Many leading manufacturers of electromechanical tools complete their products with special gear oil. This is due to caring about the buyer and maintaining its image. After all, a tool in high-quality lubricant will work much longer and without any interruptions.
But if there are no recommendations from the manufacturer, then you need to figure out on your own what kind of oil is needed for the tool. For example, lubricant for a Makita hammer drill can be successfully used for other models. The main thing is that the mechanisms of the devices are similar to each other. But the working conditions are practically the same.
Either a liquid product or its more consistent analogue can be applied to the working components of the hammer drill. But in the first case, the instrument must have a sealed housing. It must completely isolate the gearbox since liquid oil must be kept inside. And for this they use sealing seals on the shafts.
Gear oil Source ozone.ru
Liquid oil for the hammer drill is supplied to the working unit through a hole that has a special sealed plug. And such a system is considered very effective. After all, gears, like other moving parts, are evenly coated with an antifriction compound.
In addition, the latter is in constant motion when the tool is working. It turns out that the oil constantly washes away fine metal dust from the surface, preventing it from participating in friction. And it additionally cools the gearbox.
But long-term operation of the tool without periodic shutdowns can significantly increase the temperature in a hermetically sealed space. This creates dangerous pressure under the housing. This factor is a serious disadvantage for such structures.
Therefore, models for which greases are used are more popular. The density of the latter in a cold state allows it to be securely held on working units. And to prevent splashing during gear movement, a good seal on the tool body is sufficient.
Universal product for lubrication Source skidka-volgograd.ru
Basic requirements for consistency compositions:
- The adhesion of the product must ensure the presence of an oil film under any load.
- Since when the unit cools down, the humidity inside it rises sharply, the water resistance of the lubricant must be quite high.
- When in contact with water, the composition must maintain its density and not form an emulsion.
- The basic properties must remain unchanged, both during liquefaction during operation and when the original viscosity is restored.
- The drop point of the composition must be high enough so that the lubricant of the hammer drill gearbox is not thrown off the surface of the teeth during centrifugal movement.
- The composition must have good binding properties in order to neutralize dust entering under the housing from the outside.
- Anti-corrosion properties should be the same for any metal used in the manufacture of a hammer drill.
Most of the requirements also apply to liquid formulations. The latter does not need to have good adhesion. After all, in a sealed crankcase, all surfaces are constantly washed.
Other mechanical breakdowns and their elimination
In addition to breakdowns associated with the impact mechanism, other mechanical breakdowns may also occur in the hammer drill.
Mode switch
There are times when the unit mode switch fails. Basically, this occurs due to dust clogging of this unit. To repair the switch, you will need to disconnect it from the body (see how to do this above) and clean it from dirt. If you find any damage to the plastic parts of the switch, it will have to be replaced.
Helical gears
The reason that the device stopped working normally, namely, stopped drilling and chiseling, may lie in worn-out teeth on the rotor shaft.
If this happens, the teeth on the intermediate helical gear will also be worn.
This problem occurs when the tool is jammed or the clutch is malfunctioning. The breakdown is eliminated by replacing the intermediate gear and engine rotor.
The drill does not stay in the chuck
The reason that the hammer drill does not hold the drill lies in the breakage of the chuck and the wear of its constituent parts:
- deformation of the balls occurred;
- the restrictor ring is worn out;
- The retaining spring gave way.
You will need to disassemble the cartridge and replace problematic parts.
Drill stuck in hammer drill
The reasons that the drill is stuck in the chuck of the device may be the following.
- Before installing the equipment, you did not apply lubricant to its shank. You will need to move the sealing rubber of the cartridge and inject WD-40 into the place where the tool fits.
- Dust got under the balls. Perform the same operation as in the paragraph above.
- If you used a regular drill inserted into an adapter in a hammer drill, then also treat it with WD-40 liquid, wait a couple of minutes, and, lightly tapping the clamp surface with a hammer, loosen the equipment in different directions. Typically, after these steps, the clamping jaws open and allow the drill to be removed.
- The tool shank came loose. You will need to first add WD-40 and try to remove the drill. If nothing works, then you need to disassemble the cartridge and knock out the equipment. You can also use tips on how to remove a tool stuck in the device from this video.
The drill/drill is stuck in the wall - what to do
The drill getting stuck in the wall often happens when the hammer drill is used incorrectly.
The drill does not always get stuck in the hammer drill. There are situations when it cannot be removed from the wall. In this case, it is most often possible to get the tool out using the reverse turned on. However, sometimes this does not help and people do not know how to remove the hammer drill bit from the wall.
To avoid damaging the cartridge, it must be removed immediately and the nozzle left in the wall. Only after this can you begin to liberate yourself. This is done as follows:
- If the tool remains in the ceiling, you need to tightly wrap a chain around it and attach a weight to it. It needs to be lifted 5-10 centimeters and sharply released down. This must be done very carefully to avoid injury from the load.
- If the nozzle remains in the wall, you need to clamp it in a vice and try to swing it with a lever. This method may require the assistance of a second person.
To reduce the likelihood that the drill will get stuck in the wall, it is necessary to periodically remove it while working. You also need to gradually enlarge the hole so that it is slightly wider than the diameter of the drill.
Instructions for using the Zubr drill
Each device is accompanied by an instruction manual.
description of the device and its design features; procedure for installing and removing a drill from a chuck; description of abilities and all the actions necessary to perform them: drilling, speed adjustment, switching speeds on a two-speed machine, etc.; additional feature - reverse function, turning on the backlight, installing an additional handle; safety tips when working with metal, concrete, wood; rules for storing tools and consumables.
Maximum drilling diameter
For different materials and tools of different power, these characteristics differ:
the diameter of the largest hole when drilling wood is 20–35 mm;
in concrete the largest diameter is from 10 to 16 mm.
It is worth keeping in mind that working with concrete using a hammerless drill is prohibited.
Additional accessories
additional handle – holding the impact drill with 2 hands is much easier and safer.
The handle is rubberized, so you don’t have to worry about slipping;
depth gauge - most models are equipped with a depth limiter, in other words, the device drills a hole accurately not only in diameter, but also in depth;
backlight – installed on some models.