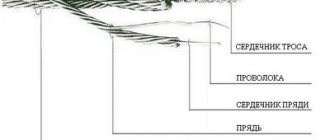
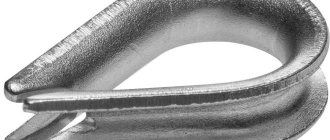
The example lanyard shown in the photo is called a chain ratchet. It is highly durable and reliable.
The word lanyard used by professional riggers may seem unfamiliar, but everyone has definitely seen this item at some point. For the first time, such a fastening device began to be used in the field of maritime cargo transportation by specialists in the reliable securing of cargo. This was the name of the device that is still used today for tightening, removing slack in rigging, building buildings, installing cables, poles and other supports, for example, buttresses.
What you need to know about the design of lanyards ↑
To understand what a lanyard is, get acquainted with its types, functions and specific examples of application.
Key details and design features ↑
The design of a lanyard, experts can also call it a ratchet, most often includes two screws with opposite threads, which are screwed into a ring with holes matching the threads. A classic lanyard consists of the following parts:
- durable cast coupling of ellipsoidal or elongated rectangular shape;
- two holes with the opposite direction of thread rotation, located in the center of the coupling roundings and strictly along the axis of the entire product;
- two screws with fastenings (rings/hooks/loops/forks) at the ends, made in the form of rods, providing the necessary tension (cables/ropes/chains) when they rotate in opposite directions.
The ends of the screws are produced both with an eye (eye) and with a hook - fork. It is to them that the cable (chain) should be attached. Tension adjustment occurs when the ring rotates, when the screws should gradually move towards the center. Ratchets are used in situations such as tensioning a cable between poles, when a large tension force is required. Lanyards vary in weight, starting from several grams, when a tension force of several kilograms is required, for example, when installing curtain strings, reaching tens of tons, when devices are included in engineering projects for the construction of buildings and bridges.
GOSTs and other normative documents of standardization ↑
The regulations for the manufacture of cable tensioners in the post-Soviet space have adopted the following regulatory documents:
- GOST 9690-71;
- OST 5.2314-79.
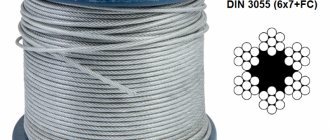
International standards for regulating the production and technical characteristics of lanyards are based on DIN 1478, DIN 1480. Obtain all the important information by simply looking carefully at the handle with the accepted markings, at the hooks indicating the permissible caliber (diameter) of the cable/chain.
Principle of operation and tension adjustment ↑
Proper functioning of tensioners ensures that two screws rotate simultaneously in opposite directions, which is possible due to the application of opposing threads. This process ends when a sufficient tension force is reached in the cable/rope/chain, which allows you to secure at a certain moment a specific object - cargo, real estate, pole, mast, etc. Riggers, builders, interior designers, antenna installers and even piano tuners do exactly this Due to the maximum skills in sensing the moment of sufficient tension of the fastening, they can be considered professionals in their field. Simple tension adjustment makes it easy to loosen, and the fastener installation technology provides comfortable dismantling if the need arises. A valuable advantage can be considered the simplicity of the design of such fasteners, which always eliminates additional risks of its destruction during operation. Craftsmen have the opportunity to pre-prepare/assemble a large number of elements for fasteners, if such preparatory work provides additional advantages in the speed of their installation directly on site, You can also use non-dismountable ratchets. Cargo devices reach a weight of 25 kg, withstanding a certificate-guaranteed load of up to 90 tons. This means that with the help of several fasteners you can fix almost any object by correctly calculating the load. Tension system design
Types of tensioners for cables and chains ↑
All tensioners can be divided according to several important characteristics, one of which is the material for their manufacture.
Classification principles and types of devices ↑
Due to the use of this fastener in conditions of constant adverse effects of atmospheric phenomena, lanyards are mainly used:
- made of stainless steel alloys;
- made of metal with a galvanized coating.
Elements of the tension system For the manufacture of tensioners, only the highest quality steel is suitable, from which the forging is used to produce products, which in the next technological step are subjected to a passivation process. Passivation is the application of a protective layer using exclusively hot-dip galvanizing, which provides the necessary anti-corrosion properties to fasteners used for continuous long-term operation in wet conditions. environments without loss of quality characteristics. In addition, it is important to break down the types of fastenings at the ends of the screws, among which the most commonly used products are those marked:
- C+C (hook/hook);
- C+O (hook/ring);
- O+O (ring/ring).
Such fasteners can be open or closed. The second type is more common in more modern models used to secure fiber optic cables.
Selection of fasteners for specific tasks ↑
Experts recommend using lanyards of a specific marking in the optimal configuration for each task. So, for example, “C+C” fasteners are most often used where it is necessary to lengthen the cable/chain or change their tension. Most often, these are masts and antennas. The “C+O” system serves similar tasks. And lanyards marked “O+O” are useful where ropes/chains/cables with hooks at the ends are used. Chain ratchets make it possible to effectively tighten loads that are quite distant from each other. The features of such fasteners are described in more detail in the next paragraph. Application in cabling
Chain ratchets - design and application ↑
The example lanyard shown in the photo is called a chain ratchet. It is highly durable and reliable.
Areas of application and main purpose ↑
This tensioner is intended primarily for fastening systems on trawls, as well as for rigging when transporting goods in the logging industry. A chain lanyard is necessary for high-quality tension of chains used when tying large-sized cargo. A chain lanyard in most rigging instructions is recommended for use when transporting particularly heavy loads (large diameter pipes, logs), as well as special special equipment (turbine parts, large oversized machines, for example , equipment for running in wheelsets of railway trains, or for turning large parts) on trawls. Such rigging devices are distinguished by their ergonomics - their device allows for tensioning with one hand, so that the other can calmly hold the chain during its execution.
Features of the design and operation of chain ratchets ↑
Chain ratchets using a ratcheting mechanism are often made with hooks, but models with eyes at the ends are also used. The standard design of a chain lanyard uses hooks that are suitable exclusively for chains of a certain caliber (diameter). The device is designed for the influence of exclusively axial linear force, therefore lateral loads are strictly contraindicated. They are never used for lifting loads. The standard chain tie kit includes:
- chain with hooks at the ends (3-5 m);
- chain lanyard
Each ratchet, based on the results of laboratory tests, must be certified, as it is a source of potential threat for injury to workers, damage to property, and the creation of emergency situations. When choosing devices of this type, always take into account the load power in relation to the caliber of the chain used!
Areas of application for tensioners ↑
Where can you see working lanyards? The answer is simple - almost everywhere where fixing objects of various sizes is required, ensuring symmetrical tension on opposite sides. The devices are not suitable for lifting/handling cargo, but are used only for securing during transportation by any means of transport, as well as at stationary objects - for guaranteed stability. It can be:
- TV/radio towers;
- lightning rods;
- satellite dishes;
- water towers;
- pillars;
- fastenings for racks in logistics centers;
- tower structures;
- auxiliary construction equipment;
- industrial/civil buildings/other structures;
- objects requiring reconstruction or maintaining a safe condition that protects from further destruction;
- flagpoles;
- sports equipment;
- heavy fencing;
- monuments;
- attractions, high-rise parks;
- temporary/transportable structures (tents, tents).
The areas of application are constantly expanding. But just a century ago, lanyards were used exclusively by sailors! This is true for both household and industrial applications of fasteners. You can see small products in the design of window openings with cornices/curtains/blinds. And you can’t help but notice the giant lanyards in the structures of modern bridges and buildings with a special architecture that requires additional supports and fixation.
Instructions for tensioning the cable ↑
Before stretching the cable between the poles, you should study all the rules for the safe use of lanyards - both for the installation process and for subsequent operation. To do this, you must first select a tensioner suitable for the task. Use the table below to make your exact selection.
Main stages and rules of work ↑
Having selected the required lanyard, you should proceed in compliance with the following technology:
- Clean the tensioner with gasoline.
- Polish it with a felt wheel.
- Apply lubricant (graphite additive/molybdenum bisulfate).
- Idle it.
- Turn it a couple of times during installation.
- If installed with sea water, rinse with fresh water (to prevent parts from sticking together).
- Install the cable tensioner by rotating the screws in opposite directions until the effective tension is achieved and the load or structure is effectively secured.
- If the cable is overtightened, you should release the tension by smoothly rotating the screws in the direction opposite to the original one.
- If necessary, replace bent parts.
- Make sure there is no load other than axial.
- Periodically check the quality of the cable tension, adjusting it if necessary using the same method that was used during the initial installation.
Important recommendations and videos ↑
For such devices, the most important thing is correct installation, which allows for further operation of the tensioners to devote a minimum amount of time to monitoring their condition and scheduled maintenance, while maintaining the guaranteed quality characteristics specified in the certification documents. By following all the points of the above instructions, you will always be able to efficiently and reliably tension the cable without outside help. Having studied the information about lanyards, and having understood what they are, what they are used for and how they are divided into types, you can independently select a fastening device for specific purposes, without risking the reliability of the structure being fixed. It is useful for beginners who want to improve their professional level, as well as those who use fasteners at home on their own, to watch a video with details of the correct installation technology for various types of lanyards. Video: What is a lanyard and how it works
Installing a mesh fence - rules and tips Construction of a sectional mesh fence How to install a metal fence Decorating and protecting your dacha Types of fencing in dacha plots
Installation of electrical wiring
Installation of cable wiring.
Installation of electrical wiring is carried out in two stages.
At the first stage, electrical wiring elements are prepared in the workshop, anchors, tension structures and supporting devices are assembled.
Measure the cable to the required length and “load” one end of it into the lanyard ring; at the other end, make a loop under the hook or close it to the lanyard if tension couplings are used on both sides. The cables are connected to the end fasteners by installing a loop at the end of the cable, made in various ways, for example, using the so-called thimble and bolt clamps.
| A | b | V |
Drawing. Making the end loop of the cable: a – cable termination diagram; b – thimble; c – bolt clamp-clip.
The sequence of operations to complete the loop is as follows.
| stage 1 | stage 2 | stage 3 |
The cable is looped around the thimble and a clip-clip is attached to the end of the cable (step 1). The second clamp is attached as close to the thimble as possible (step 2). Install the remaining clamps between the first two (step 3), while tightening the clamp nuts with force, but not tightening them completely. [The total number of clamps in the loop is determined by the calculated tensile force of the cable, which in turn depends on the span length of the cable wiring, the mass and number of electrical products attached to the supporting cable.] If there is a “slack” in the cable between the clips, then it is eliminated by tensioning the bending cable. thimble the end of the cable, and then finally tighten the clamp nuts.
Drawing. Bolt clamp K676 for making the end loop of the support cable
Below are several videos that show the principle of making an end loop on a support cable using various clamps.
In addition to bolt clamps, sleeves mounted by crimping can be used to make loops of the support cable.
Drawing. Making a loop on a support cable using a pressed sleeve
The sequence of operations is as follows. The cable is threaded into the sleeve with a loop so that its end protrudes from the sleeve by 1-2 cm. Next, the sleeve will be crimped using a special tool - a press (manual, electric, hydraulic), having previously selected a matrix for it (the size of the matrix depends on the type of sleeve, used for crimping). Crimping begins from the middle of the sleeve, then crimping is performed from the edges of the sleeve. After crimping is completed, its quality is checked using special templates.
It is possible to make the end loop of the support cable without the use of special devices (clamps, sleeves, etc.) and tools. In this case, the end of the cable is woven in a special way into the main part of the supporting cable. It should be noted that making a loop using this method requires much more time.
If steel wire or rod rod is used as a cable, loops at the ends are made without the use of clamps, by simply twisting the wire into a spiral at a length of 60-80 mm.
In addition, it is also possible to terminate the support cable without organizing a loop, using special tips mounted on the cable by crimping. An overview of these mounting products, as well as an example of how to terminate a support cable, is shown in the video below.
After completing the end seal of the supporting cable, branch, connection and input boxes are installed on the cable wiring and secured. Pre-measured wires and cables are attached to the supporting cable; the distance between the points of attachment of the cable to the supporting cable should not exceed 50-60 cm.
At the second stage, installation of cable lines to building structures at the installation site is carried out. Lamps are attached to the wiring, as a rule, at the second stage of installation, when the cable wiring is unwound on the floor, temporarily suspended at a height of 1.2-1.6 m for straightening the wires, hanging and connecting the lamps (if they were not mounted on the cable line in workshops). Then the electrical wiring is raised to the designed height.
Installation of end fastening structures to building elements of buildings and structures is carried out.
The most reliable fastenings of anchor structures to building surfaces are fastenings in brick and concrete walls and ceilings using through bolts and through anchors or fastening anchors using through studs with the installation of enlarged square washers on the back side of the fastening. In anchors with such fastenings, the pulling forces correspond to the actual strength of the material from which the anchor is made, depending on the grade of steel and the cross-section of the threaded part of the fastening rods.
Drawing. Diagram of end fastening using a through anchor bolt
Fastening of anchor structures to walls and ceilings is also carried out using grease-in pins or expansion dowels. Such fastenings are less reliable, since they largely depend on the quality of workmanship and the accuracy of the prepared holes in size and the reliability of embedding anchors in them. Therefore, these methods of fastening anchors are used for less critical intermediate fastenings of load-bearing cables and guy wires.
Notes from a lazy person: How we pulled the cable
It seems that everything is simple, the estimate was calculated on the knee (not by me, well, who isn’t mistaken). We started stretching the cable (FTP cat.5e street) in 16 corrugations. Since the route is not straight, but taking into account the “landscape”, we first measured it with a tape measure to the first large span, and then measured with a cable. The first is 7 meters, the second is 32 meters, the third is 79 meters, the fourth is 126 meters. Everyone knows that the maximum distance between points for a twisted pair cable is 110 meters, but here it is already 126.
dotted line - the cable is buried. I called the boss, I said this and that, 126 meters is impossible. He came, looked, and said to do the air thing. We had never encountered this, but we didn’t panic. I immediately looked at the footage diagram:
We calculated the hypotenuse, 76 meters, that’s another matter. We measured it with a cable, taking into account possible errors by eye (different heights of poles, the route is not in a straight line, etc.) and it turned out to be 78 meters in the air and 90 meters in total.
The gray squares are poles. The object is a car buy-back parking lot. The locals, having learned that we were going to stretch the cable, said to take it higher, the last time a tow truck tore off the cable. We estimated that the first pole was 4.5 meters, the second at most 4 meters, the third 2 meters. We will “increase” the second and third ones, the choice fell on a 50*50*3000mm pipe. For high-altitude work we had nothing (tower, scaffolding, etc.), only two ladders 5 and 7 meters. We prepared a pole on the ground (we drilled, installed anchors, secured the corners). I wrote above that we decided to “build up” the pole and, in order not to fasten it from scratch with a tensioned cable, we secured it “empty.” The post was removed and loops were made. The cable was not cut , installed the hinges without a thimble (the hook on the anchor is smooth on all sides).
Calculating the span length on the ground is not so simple, since, using the example of a right triangle, you need to calculate the hypotenuse in two planes: in the horizontal plane from pillar to post (the pillars are not located in a straight line) in the vertical plane from the top of the first pillar to the top of the other (pillars different heights) That is why the pole was removed several times to adjust the cable. It didn’t work the first time, and finally installing the pole with a tensioned cable turned out to be not so easy. Fastening the pole is the most commonplace (they suggested using welding, but at the time of installing the pole this is not the best option) - the corners: On both sides (the “this” hanging rope is not ours, it’s the one that was broken) were grabbed by roofers. One held it, the other grabbed the bottom one. Then the second one came down and pulled the pole towards himself with a cable, the first one finally secured the lower corner and the upper one: With the last pole it was already easier: firstly, it was shorter, and it was possible to throw a loop from the ladder; secondly, this is the end of the fly; thirdly, the final length of the air was 70 meters and we had a ten-meter tail left to pull back. Fourthly, a lanyard was used on this pole and an error of 2-5 cm is not terrible. They did it in almost the same order:
- Prepared the pillar
- They screwed it on (not very beautifully, but that wasn’t part of the plan at all)
- measured the cable
- We made a loop like the first one with a lanyard, thimble, double and single clamp
- The tail was threaded into the anchor, one pulled it back, the other threw a lanyard over the anchor ring
I note that a cable with a corrugation on a cable is not the same as a cable without a corrugation on a cable. The funny thing is that the corrugation can be visually free, but the cable in it is stretched. This is what it looks like in reality.
PS The design withstood the storm warning
This type of fencing is resistant to environmental influences. The mesh does not fade, does not rust and does not need painting. It can withstand temperatures down to – 35°C. Unlike closed fences, a chain-link fence will darken the neighbors’ plot, which will not prevent them from growing crops. After all, in the shade, plants wither and become weak. Sunlight is necessary for their growth.
Types of fastenings
There are several types of fastenings.
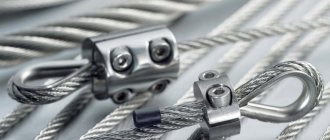
U-clamp
The design resembles the Latin letter “U”. It has threaded pins onto which a toothed pressure plate-washer is placed. The nuts are screwed onto the threads, pushing the cable fastening bracket upward, and it presses the steel rope to the base of the clamp. There are also U-shaped brackets with holes for mounting beads. They are made of galvanized steel and can withstand light and medium loads when transporting goods and equipment.
Flat cable clamp
It is a metal plate with two threaded studs. Another pressure plate is put on them, which is tightened with nuts from above. There are varieties with one (simplex), two (duplex) and three (triplex) studs. Manufacturing material – carbon steel.
Tubular clamp
This is an empty cylinder into which the ends of the ropes are inserted and flattened with a special press or hand-held hydraulic tool. It is also used to make loops at the ends of ropes. Clamps are typically made of aluminum, but stainless steel products are used for harsh environments. Copper clamps are used to work in aggressive chemical conditions.
According to design and factory performance, clamps are divided into:
- Wedges. Suitable for rigging and large diameter cables. They are popular with electricians who attach self-supporting insulated wires (SIP) to a pole. In addition to metal brackets, the design provides two levers that provide a highly durable connection.
- Bolted. The simplest design of such a lock can be seen when installing a socket or light bulb socket. The cable strands fall between the bolt head and the pressure plate. The structure is tightened with a nut. As a result, a fairly strong connection is formed.
- Screw. Such clamps are almost never used in rigging work, but are used in electrical work. For example, in terminal blocks, in grounding buses and zero busbars, where a cable is inserted into the hole, and the screw, when twisted, presses its end against the body of the part.
- Jamming. Designed for fastening ropes and cables without insulation to a special anchor support.
- Pressable. They are two plates that compress the cable together. There is another type of clamp: a metal tube bent at an angle. The ends of the ropes are inserted into it, and a threaded rod is screwed inside, which presses them together. This cable fastener is super strong and will withstand even the most severe loads.
- Canines. The main representative of the quick-release fang clamps is the same u-shaped clamping mechanism with a toothed bar that fits over the studs and two nuts.
Cable clamp - strong grip!
Required tools and materials
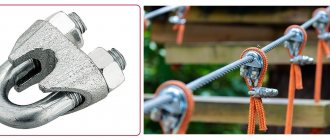
A wedge cable clamp is a special device whose purpose is to firmly connect the cables to each other. It can also be used to make a loop at the end of the same cables. But what else do you need to know about these elements?
Why is this detail in construction?
Typically, such devices are used where work is carried out under heavy loads, so only high-strength and high-quality metals are always used for the manufacture of clamps. Manufacturers produce these devices strictly in accordance with standards. The design of the clamps is very simple. They consist of two hex nuts and a steel bow. Professionals recommend installing at least three clamps on one cable; this is enough for safety and reliability of fastening. If the load is higher than the clamps you have chosen can withstand, then you should take a different type of this clamp, and not increase the quantity. Only high-quality and high-strength steel is always used for manufacturing. This is necessary to ensure a reliable connection at both ends of the elements. For greater reliability and strength, the clamps are often additionally coated with another protective layer. For these purposes, galvanic galvanization is used. The advantage is that with its help the device is provided with maximum resistance to external environmental influences. It is also excellent protection against corrosion. Although the design of this device is simple, you still need to read the instructions before use. Any tool or device has its own nuances that must be taken into account in the work. If the steel cable clamp is not installed correctly, the element may simply break. The end of the cable is inserted into the arc and secured inside using a special lock, in this case hex nuts. The nuts are twisted in different directions, and the cable will be between them. When fully twisted, the ends should be tightly pressed together.
Steel cable clamp - classification
Clamps come in different types. They are divided according to purpose, material used and design. You can also formally designate different lengths; the most popular is a cable clamp of 3 mm, 5 mm in diameter, but in special cases sizes up to 40 mm are used. Each species also has different subspecies. Clamps, which are divided according to purpose, are ordinary and reinforced, and according to the material used - steel and copper; an aluminum cable clamp is also popular; a galvanized steel version is used in particularly harsh operating conditions. Clamps, which are divided by design, are flat, arc-shaped, single and double. Regular clamps are the most common. Typically, they are made from galvanized steel of class 2. In appearance, such clamps resemble closed loops at the base, which have two strong bolts. This type of product is for household use and is not intended for heavy loads. The reinforced version speaks for itself, its design is more thoroughly worked out, the shutter mechanisms have reinforcements, so their scope of application may be more critical. Flat types of clamps are often made of high-strength carbon steel. The surface of these devices is galvanized. Their diameter can range from 2 to 40 mm. In shape, such clamps resemble a pair of plates that are connected to each other with a bolt and nut. They are typically used for splicing steel cables or other standing rigging. They are also quite suitable for creating loops at the end of the brace. Professionals recommend installing at least two clamps on one connection. Flat clamps can also be divided into single or double. The main difference is the number of bolts available. Single clamps are fastened with one bolt, and double clamps are fastened with two bolts. In terms of application, such clamps do not differ much. Arc-shaped clamps are made of a cylinder that is bent in an arc, and fastening occurs using two bolts that are located at the ends. Devices of this type are most often used for connecting metal cables, but it is quite possible to use them for making loops. This type of clamps is more industrial; they are designed for heavy loads. A typical standard arc clamp can withstand a load of about 97 kilograms.
Specialized and wedge clamps - what are their features?
Many construction jobs cannot be done without a strong clamp. Construction has always been characterized by the presence of a large number of operations. You definitely need to lift something up, pull a load, and in this case it’s building materials; you often have to fix various objects. For such work you need strong spring-loaded clamps. Not only do they allow you to connect the cables, but you can also attach a load to them. Such devices are not very different from standard clamps. In addition to the usual metal arc, they have a pair of levers that are equipped with movable brackets. This design solution helps ensure a highly durable and durable connection. With its help, you can securely fasten any object to a cable of different thickness. Lately, wedge clamps have become the most popular among specialists. This is an excellent connecting element for copper and aluminum wires, the cross-section of which can range from 35 to 100 square millimeters. Only this type of clamp is good for connecting steel-aluminum devices. Such devices consist of a body and a wedge, which is wear-resistant. For the manufacture of the body, forged cast iron steel is used, and the wedge itself can be made of bronze or from various aluminum alloys. If you need to install aluminum or steel-aluminum wires in bolt clamps, where the cross-sections are very large, then you need to use special gaskets that are made of soft aluminum tape . The use of such an addition in work will give the fastening the greatest mechanical strength. It is important to remember that after installation, such clamps must be tightened again ten days later . The lift should be done like this. The first step is to press the hinge part of the aluminum housing, then you need to insert a steel anchor, and then the aluminum housing is inserted again using a steel mechanism.
How to make cable clamps with your own hands?
Cable clamps are used in many industries. There is no industry where they would not find application. But often ordinary household work cannot be done without such a small device. Car owners especially need them. You will need a small diameter metal tube, a couple of metal plates and several bolts and nuts. The metal tube must be bent into an arc. The diameter of the pipe must be such that the cable that is planned to be used can fit into it. A cable must be inserted into the hole in the pipe until the end appears outside. Then the end must be pulled out of the pipe to a distance of 10-15 cm, then the end of the cable and the cable itself will need to be covered with plates from below and above, and the plates must be tightly connected to each other using strong bolts. This device is well suited for making loops. If you need to connect two cables to each other, then you need to choose a tube with a larger diameter. It must be taken into account that two cables need to be inserted into one hole, but only in different directions. The plates are also selected taking into account the diameter of the cables. Such a clamp will always come in handy in household chores, just keep in mind that it is not suitable for heavy loads, but it is quite possible to try to use it as a tug.
If the mesh suddenly sag, remove the metal bracket and thread it back into the mesh one or two rows closer to the other edge of the mesh. Then repeat the fastening.
Installation of rope clamps and fastening
The essence of pairing ropes is simple. When constructing a rope loop, you need to attach the free end of the rope to its body at such a distance that at least three clamps can be installed. There must be a distance of at least six diameters between them. The strength of the connection depends on their correct location. So, the body of the clamp should be located on the side of the rope body, and the clamping bar should press the end against its body.
As mentioned earlier, U-shaped rope clamps can withstand relatively light loads, and the recommended number of clamps per loop is three or more. If the load exceeds the expected one, you should not increase the number of clamps, but use a different type. In some cases, it is necessary to fasten the cable to a plane with a tensioner. In essence, this is fastening to the wall using a special washer and self-tapping screw.
Guess the riddle:
He is walking, and we are running, He will catch up anyway! We rush to the house to take refuge, There will be a knock on our window. And here and there on the roof! No, we won’t let you in, dear friend! Show answer>>
He walks, cuts the wave, grain flows from the pipe. Show answer>>
He paved the bridge - he didn’t ask for an axe. He hammered the pillars, but did not take the nails. At night he bound the rivers and covered them with blue ice. I painted the windows in the house, dressed the fir trees in frost, and replaced the old fur coats for the foxes and bunnies. And on New Year’s Eve he himself delivered gifts to the children. Show answer>>
How to make cable clamps with your own hands
There are situations when the engine in a car stalls and, despite all efforts, does not start. Then the car will have to be towed to the nearest service station. The quality of the cables sold at gas stations leaves much to be desired, so in this situation it is best to make it yourself.
For this you will need any thick rope. It should be large enough in diameter so as not to tear during towing, and of good flexibility to form a loop. You will also need a metal tube that can bend without breaking, it is better if it is made of aluminum. A rope is inserted inside the tube so that it extends about 10-15 centimeters from the other end. Next, the tube with the rope is bent into an arc, the ends are flattened with a hammer or sledgehammer and fastened with metal screws along the entire length of the contact of the end of the rope to its body.
Learn more about how to properly flatten a tube in this video:
If you need to figure out how to secure the cable of a children's swing, then you can follow the instructions given above, since the technology for making a loop is no different from making a similar one for automotive equipment.
6.3. Rigging work with cables
Home / Publications / Literature / Bookshelf / Handbook of maritime practiceBenzels, lashings, stoppers, stamps
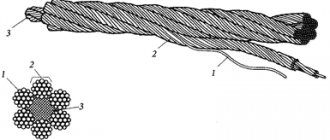
. Tying two cables together to hold them together is called benzelem. When connecting vegetable and synthetic cables, lines and skimushgar are used. Steel cables are connected with low carbon galvanized wire or benzene cable. Depending on the location and method of application, cable benzels are round or straight, main, flat, half-benzels, stoppers and stop bezels (Fig. 6.3).
Rice. 6.3. Benzels and stamps: 1 - round benzel; 2 — main benzel; 3 — stopper; 4 - simple brand; 5 — stamp with a snake; 6 — brand with punched hole
Round (straight) benzel is used to firmly connect two parallel cables. When applying a benzel to vegetable and synthetic cables, one end of the line is trimmed with a point. When applying benzel to plant ropes, they are connected together, oiled and wrapped in resinous castor. Having passed the running end of the line through the point, apply the first row of hoses as tightly as possible. A line (drawling) folded in a loop towards the beginning of the benzel is placed on the hoses. The second row of hoses is applied more loosely over the dragging. Then the running end of the line is passed through the pulling point, which is pulled out. Thus, the running end of the line is threaded under the top row of hoses. To prevent the straight bezel from spreading, it is covered (a sliding bayonet is knitted across it) and the running end is grabbed along the cable. Straight bezels are applied to synthetic cables in the same way, but the cables are not oiled. To prevent the bezel from slipping, the cables are wrapped with braid, on top of which the bezel is placed.
The application of benzels to steel cables has the following features. To prevent the bezel from slipping, the cables are caged at the place where it is applied. The wire bezel is applied starting from its middle part with one end over the other, stretched along the cables, and over the dragging. When the required number of hoses are installed, the running end is pulled under them using a pull. Then, in a similar way, the benzel is applied with the second end, which is also pulled under the second row of hoses. The ends of the benzel are tightly wrapped and lined with canvas.
It is recommended to apply the wire benzel hoses with a half-meshkel or a thick drake to prevent the formation of pins.
Root benzel is used when it is necessary to form a fire in the middle of the cable. To do this, a loop is made in the right place on the cable, which is secured with a benzel, placing it on both cables through the loop. The main bezel is always installed with a cover, and the outer hoses are made weaker, so that when bending the ends of the cable, all the bezel hoses are tightened evenly.
A flat benzel is used to connect two cables ending with lights. When making a flat bezel, the end of the line is attached to one of the ends, the other is threaded alternately through both ends in one direction, forming figure eights. Then the benzel is cut in the middle part. A flat bezel with a wire rope is made in a similar way, but the work is carried out simultaneously with both ends. Semi-benzel is used for temporary connection of cables when they are not subjected to significant tension. The half-benzel is always placed in one row of hoses, and then the running end is pulled under them using a puller. For greater reliability, the half-benzel ends with a snake (see brand with a snake).
The stopper is used for stopping adjacent ropes (lopars of hoists, mooring lines, rope turnbuckles). Apply a stopper with a skimushgar. Having secured the end with a noose on one of the cables, they encircle the hoses in a figure eight. Then they put straight hoses between the eights and make a roof. Stop benzel is a type of stopper and is used to firmly connect cables. Unlike the stopper, the stop bezel is applied from the middle with two ends. Having laid the hoses in a figure eight, the cables are surrounded by straight hoses between the eights until both ends meet in the middle of the benzel. Then they are punched towards each other and both halves of the benzel are cut.
M a r k i. To prevent spontaneous unraveling of cables during various rigging operations, marks are made at their ends. Marks are also used to finish various braids and mark the necessary places on the gear. On plant cables, lines or heels from the same cable are used for marking; on steel ones - resinous skimushgar or low-carbon galvanized wire.
A simple mark is made by wrapping the cable with 12-15 hoses. The running end of the line is passed into the loop and tightened with the root end under the mark hoses.
A mark with a snake is a type of a simple mark, which is supplemented with a snake for strength. The snake is made with the running end of the line.
Mark with a test is applied at the ends of the running rigging gear. To do this, the end of the line is laid along the cable between the strands and tightly covered with 10-12 hoses. Then the running end is pierced under the nearest strand, passed over the mark in the opposite direction, pierced under the next strand, etc. To prevent unraveling, a figure eight knot is knitted at the end of the mark.
Trapping plant and steel cables
(Fig. 6.4) are produced to level their surfaces to prevent the accumulation of water between the strands. The material for tugging is a resinous skimushgar, tench or thin cable.
Rice. 6.4. Rope tugging
Before threading, the cable is stretched tightly with hoists and lubricated with tree resin. The number of frictions must be equal to the number of strands of the cable. Each friction is placed between the strands of the cable and driven by a drag in the direction of the descent of the cable. Then the friction is strengthened with snake marks, and its ends are tightened and secured by punching it between the strands of the cable. When trenching cable cables, in addition to the friction, two half-frictions of smaller diameter are laid on both sides.
Stranding of cables
(Fig. 6.5) are produced to protect against chafing, dampness and rust. On steel cables, the cage is also placed under the bezel to prevent it from slipping. Old canvas, cut at an angle to the base, is used as castor; tench, skimushgar, low-carbon galvanized wire are used as cage.
Rice. 6.5. Cable whipping
The tangled and tightly stretched cable is covered with resin and wrapped in castor along the descent. The ends of the castor are secured with stamps. The cage is placed on the cable in the direction opposite to the descent of the cable, securing the root end with a noose. The last 5-6 cage hoses are applied with some slack, the running end is passed under them and the hoses are pulled tight. Thick cables are pulled with a half-fly, thin ones with a rigging spatula. When applying the white cage, the cable is not resinous, but slightly greasy.
Splicing (splicing) of cables
. A splice is the connection of two cables of the same thickness or one cable at the break point. Splashes can be short and long (accelerating). A short braid is more durable (reduces the breaking strength of the cable to 10-15%), but forms a thickening at the junction. Therefore, it is not used when the cable must be passed through a block. A long splice does not thicken the cable, but leads to a loss of the breaking strength of the cable up to 15-25%. A good splice is obtained if the position of the strands in the cable is not disturbed and all the strands break through in the same order. The tension of the strands being punched must be the same.
SHORT SPLIT ON GROWTH Rope (Fig. 6.6). Temporary marks are applied at a distance of 40-80 cm from the ends of the cables (depending on their thickness). The cables are unraveled to marks into strands, which are also marked. Then the cables are moved closely so that each strand of one of them is located between two adjacent strands of the other cable. Using a pile, the running ends of the strands of one cable are pierced under the root ends of the strands (after the mark) of the other cable according to the rule: through one under one and against the descent. After punching the first cable, carefully cut off the mark on the second one and begin to punch its strands into the first cable according to the specified rule. To gradually reduce the thickness of the braid, before the third punching, half of the heels are cut out of each strand (half punching), and when performing the fourth, another half (quarter punching). Before punching, the strands are rubbed with wax to make the work easier. To increase service life, the entire mold (except for the middle part) is caged (from the ends to the middle).
Rice. 6.6. Short splash on plant rope
A long (dispersed) splash on the growing cable (Fig. 6.7) is being prepared the same as the short one, but the strands spread to a greater length (up to 2-3 m). Having moved the cables close together, cut off the mark on one of them and weave a strand at a distance of up to 1.5 m. Instead of the braided strand, weave a strand of the first cable and tie them in a half-knot clockwise. In the same way, strands of the second cable are woven into the foam cable. Then all the woven strands are pierced under the nearest molars and the ends are cut off. The penetration sites are surrounded with a flyweight and caged. For the strength of the braid, it is necessary to strive to maintain a tight twist of the strands and place the half-knots at the same distance from the middle. So, on cables with a circumference of 40-45 mm, this distance is taken equal to 1.2-1.5 m; on cables of medium thickness - about 2 m; on very thick cables - about 3.0-3.5 m.
Rice. 6.7. Long splash on plant rope
The splicing of woven and woven fibers has its own characteristics. If the cable was not heat-stabilized during the manufacturing process, when making a short braid, its loose strands must be wrapped with braid every 10 cm to prevent unraveling. When making a long braid for the same purpose, the loose strands are wrapped with braid along the entire length.
When making a short splice, three full punches, two half and two quarter punches are made. Making a long splash is the same as making a plant rope. To smooth (melt) the cut ends of the strands, you can use a soldering iron or any heated metal object.
SHORT SPLASH ON A STEEL WIRE. When preparing cables for splicing, temporary marks are applied at a certain distance from their ends (for cables with a circumference of 50 mm - at a distance of 250 mm; for cables with a circle of 100 mm - at a distance of 800 mm). The cable is unraveled into strands, at the ends of which stamps are applied. Then the cables are brought together to temporary marks so that the strands of each cable are located between adjacent strands of the other. The strands are laid in pairs along the cables. Punching is done first with strands of one cable, and then with the other according to the rule: through one under two, against the descent, i.e., each running strand is passed over the nearest root strand and then punched under the next two.
Punching is done five times with full strands, then half and quarter. The thickness of the braid can be reduced: punch half of the strands into the cable four times; the rest - five times. At the end of the punching, the remaining ends of the strands are cut off, the mold is wrapped around and removed.
A long splice on a steel cable is used in rare cases, as it leads to a significant loss of the breaking strength of the cable (25-30%). When preparing for splicing, marks are applied to the cables so that the distance between the extreme splices is: for cables with a diameter of 12-15 mm - at least 2 m; with a diameter of 25 mm - 3 m and a diameter of 32 mm - 4 m. The ends of the cables are unraveled into strands, which are removed from the cable in pairs.
The cables are shifted so that the paired strands of one cable are located between the paired strands of the other cable. After removing the marks, paired strands of one cable are removed, and paired strands of the other are laid in their place, and vice versa. Tying opposing strands with half-knots is done one by one. Then the ends of the strands are punched into the cable according to the rule: through one under two and against the descent, after which the remaining ends of the strands are cut off. The places where the strands and punches are fastened are caged with soft tinned wire.
A type of long splice is the introduction of a second strand and instead of the damaged one. To do this, the damaged strand is twisted to the required length (as when making a long braid), and a new strand is inserted in its place. The new strand for the plant cable must be pre-wetted and stretched to 1/2 of its length. Tying the counter strands is carried out, as in the manufacture of a long braid. The introduction of a new strand reduces the strength of a vegetable cable by approximately 30%, and a steel cable by 20%.
Sealing the fires
. A permanent loop made at the end or in the middle of the cable is called an ogon***. Depending on the shape and method of manufacture, ogons are divided into simple, horseshoe-shaped, cut, tied and spar.
A simple three-row wire rope (Fig. 6.8) is sealed by placing marks on cable and strands. The cable is bent into a loop of the required size and two strands are pierced according to the rule: through one under one and against the descent. Then the fire is turned 180° and the third strand is pierced. A total of three punches are made, with the third being a half punch. To increase the strength of the fire, half of the splash is pecked.
Rice. 6.8. Simple fire on a plant rope
A four-strand cable is made using the method discussed above, with the only difference being that the first strand is made under two molars, the rest under one strand. Subsequent punches are made under one strand.
The punching of a synthetic rope is carried out according to the rules discussed above, and the punchings are performed in the following sequence: three full, two half and two quarter.
Simple cooking on a steel wire is prepared in the same way as on a vegetable one. However, punching has its own characteristics. For example, in a six-strand cable it is performed as follows. The cable is turned in a loop towards itself so that the strands are on the right. The first running strand is held against the descent of the cable under three main strands, the second and third under two and one, respectively. Then the fire is turned 180° and the fourth and fifth running strands are pierced under two and one molar strands, respectively. The fire is turned again and the sixth strand is pierced under one main strand, but in the direction of descent of the cable. Subsequent punches are carried out according to the rule: through one under two and against the descent of the cable. In total, 3-4 punches are performed, which subsequently fly away. Simple lights are made on mooring lines.
O g o n o s c o u m e n o n t h e r e s t i l e r rope (Fig. 6.9). After completing the preparatory work, the cable is placed in a thimble pile and secured to it with a line or skimushgar. Then the running strands are woven into the cable, as in the manufacture of a simple fire. The thimble protects the cable from chafing and sharp bending, and therefore increases its service life.
Rice. 6.9. Ogon with a thimble on a plant rope
The process of using a steel cable begins with placing a cage on the cable. The peeled off cable is bent using a rigging vice around the thimble, driving it tightly into the bale, and grabbed to the thimble with a line or skimushgar. Then the cable is marked and unraveled into strands, which are also marked. Spinning of running strands into a cable is carried out according to the rules for making a short splice on a steel cable. Once the punching is complete, the mold disappears. A fire with a thimble on a steel cable can also be made using special devices (yokes, clamps, etc.).
Flashlights with thimbles are widely used in running and standing rigging that experiences heavy loads (shrouds, stays, tugs, topenants, etc.).
The horseshoe run is made by weaving a jumper from a cable of the same thickness into the cable loop according to the rules for making a short splice.
A split end is made in the middle of the cable. To do this, the cable is either cut or laid at both ends. The ends of the cables are unraveled into strands and marked. Then the cables are weaved with their running strands in the required place. A total of three punches are made on each cable, which are then removed.
Depending on the nature of the splice, the number of punches (Table 6.1) on steel cables has been determined by practice.
Table 6.1
Making buttons and moussings
. To prevent the development of strands of the cable or to attach it to any gear, a knot called a button is knitted at the end of the cable. Buttons are knitted only on plant cables (Fig. 6.10).
Rice. 6.10. Buttons and musing: 1 - simple button; 2 — locking button; 3 — turnbuckle button; 4 — sliding button; 5 - turnip; 6 - musing
A simple knob is knitted from a half wheel, which is its base. To make a half wheel, a mark is placed at some distance from the end of the cable, the cable is unraveled into strands that are marked. Then the strands are alternated around the cable counterclockwise, so that each of them fits into the loop formed by the previous strand. By re-closing the second one over the half-wheel, a simple button (wheel) is obtained. A simple button is made on wedges, tiller handles, rope handles of fire buckets, etc.
The locking button is also knitted on the basis of a half wheel. The cable strands are evenly tightened and intertwined in the form of a cross. Then the half-wheel hoses are doubled, for which each strand is held parallel to its already braided part. After punching, the cable strands are punched parallel to the cross bars. If you need to make a locking button with a larger diameter, you should perform another punch. The locking button is made on portable stoppers, buoys, ends of pendants, etc. A type of locking button is the halyard button, which is embedded on the halyards of outboard ladders and sheathed with colored cloth.
A turnbuckle is knitted from a prepared cable (unraveled into strands and stamps are applied). Each strand is wrapped around the cable counterclockwise, overlapping the nearest strand and passing from bottom to top into the loop formed by the next strand. All three strands are carried out in this way. When tightening the strands, it is necessary to move the loops of the button onto the unraveled part of the cable, which significantly increases the strength of its neck. Subsequently, the running strands are punched into the button parallel to their parts under the strands intersecting them. If you need to get a large button, make another punch in the same way as the previous one. The lanyard button is knitted at the ends of hoists and cable lanyards, in the manufacture of storm ladders, pendants, etc.
A movable (cable) knop is used to splice broken standing rigging. Since the button is knitted with short ends, the cable is shortened a little and when the buttons are pulled, it tightens even more. To seal the button, the ends of the cables are marked and unraveled into strands, which are also marked. Then the cables are moved, as if spliced, and a half wheel is made on each one. Having covered the strands of the upper and lower cables, they are tied.
The turnip is used to seal the ends of the cable. To make a turnip, loose strands are intertwined in the shape of a cross, and then punched into the unraveled part of the cable according to the rule for making a short braid. To avoid thickening of the cable, the first strand is cut after the second punching, the second after the third and the third after the fourth.
M u s i n g is a type of knop, but is sealed in the middle of the cable. To make musing, three strands of equal length are cut from a cable or line (for a three-strand cable), the ends of which are marked. The prepared strands are inserted into the cable in the required place. On a three-strand cable, musing is knitted with six ends, on a four-strand cable - with eight. The strands introduced into the cable are drawn around the cable counterclockwise and into the loop formed by the adjacent strand, evenly tightened and a half wheel is obtained. Then the strands are woven in the same way in the opposite direction. Subsequently, the strands are pierced into the lower and upper half-wheel parallel to themselves. After punching, the ends of the strands are cut off or unraveled into heels and stubbled under musing. Musings are usually braided. In its simplest form, musing can be made in the form of knots on the cable itself. Musings are made on the pendants of shots and davits, on storm ladders for attaching the lower steps.
Weaving mats
. Mats are rugs or paths made from plant ropes. They are widely used when receiving and unloading ammunition, to protect cables from chafing, laid at the entrances to ship premises, etc. According to the manufacturing method, mats are: woven, stuffed, braided (Fig. 6.11).
Rice. 6.11. Making mats: 1 - woven mat; 2 — stuffed mat; 3 - wicker mat
A woven mat is made from resinous or non-resined shimushgar using a reed and a ruffle.
The reed is suspended from the horizontal crossbar of the machine so that it can move in a vertical plane. At the expected length of the mat, two horizontally located slats are strengthened. The base of the mat is led from one rake to another through all the gaps and reed points. Taking the weft (a thread passed across the warp), attach its root end to the outer warp thread and lift the reed. As a result, the warp threads passing into the glasses rise above the warp threads passing into the gaps and form a warp mouth, between the upper and lower threads of which the weft is threaded. The reed is lowered and the warp threads are wrapped around the warp threads, pressing them close to the weft. These steps are repeated until the mat of the required length is woven.
Having finished making the mat, the warp is cut 15-20 cm from the last weft stitch, and the ends are punched (3-4 times) into the mat.
The spiked mat is made from three- or five-heel skimushgar and strands of manila cable loosened into heels. The mat is woven in a wooden frame along which the warp threads are stretched between its bases.
Between the shimushgar of the base, short heels folded in half are tied in a loop, the ends of which form a uniform woven layer of fastening. To increase the strength of the mat, a skimushgar is inserted between the warp threads and the rows of heels using a wooden needle, forming the weft of the mat.
A braided mat is made from braids**** more than two times the length of the mat being made, as well as one long braid that will serve as the weft of the mat. The warp braids are laid close together on the deck and covered with a weft that divides them in half. The upper ends of the braids are pulled down, and the lower ends are pulled up. After this, the weft thread is again laid perpendicular to the warp and again covered with braids. After making a mat of the required size, the ends of the braids are pierced in its middle part (3-4 times) and wrapped around with a flyweight. In some cases, woven mats are stuffed with heels of Manila or sisal cable. Using a pile, the heels are pierced under the braided bases and carried around a wooden block placed on the mat in a transverse direction from above. The heel straps above the block are cut with a sharp knife, resulting in the formation of a layer of stuffing. Woven mats are stuffed in a similar way.
Making braids
. To prevent the ends of thick plant cables from unraveling, braids are used. Braids are also used to cover splashes, fenders, legos, etc. According to the method of making, braids are divided into Tatar, falrep, three-, four-, five- and six-strand and single-end braids (Fig. 6.12).
Rice. 6.12. Braids: 1 - Tatar; 2 - base of three-wire braid; 3 - braided at one end
Tartar braid is most suitable for braiding the ends of a cable. The cable is unraveled to the mark (approximately 40-50 cm) into heels and the required number of heels is separated, a multiple of four (for a cable with a diameter of 75 mm - 24; for a cable with a diameter of 100 mm - 40). In order to prevent thickening at the place of the braid, a third part is cut out of the inner heels of the brand, and a little lower - half of the remaining ones. Then use two or three heels to make a radish, wrapping the rest crosswise.
The Tatar braid is applied by two people. The heels are divided into 4 equal parts and taken in both hands. One puts the right heels on the left ones, the other - vice versa. Then the first worker passes the right heel to the second, who places it on top of his left heels, parallel to the right ones and below them, the second passes the leftmost heel to the first, which he places on top of his right heels, parallel to the left heels and below them. After this, the second one gives the first one his right outer heel, etc. The braid is finished with a mark and wrapped with a flywheel on all sides, giving it a round shape.
The heel braid is made similarly to the Tatar one, with the only difference being that instead of one heel, passed either from the right or from the left side, two are passed at once.
Three-strand braiding, like four-, five- and six-strand braiding, is used for braiding musings. The braiding is made with untarred tench or chalk thread. The base of the braid is put on the musing in the middle. Then the ends of the warp are drawn towards each other until the musing is completely braided. During operation, it is necessary to tightly tighten the braided hoses.
Four-, five- and six-strand braiding is performed in a similar way. They differ only in the basis. It should be borne in mind that the more hoses in the base, the thinner the line with which it is tied should be, and the more beautiful the braid.
Braiding at one end is used for braiding fenders, musings, light weights, etc. At the end of a line or skimushgar, a point is made into which the running end is threaded, loosely tightening the loop on the neck fender line, on the pendant near the musing or on the neck of the lightness line. The running end of the cable is made into half bayonets, passing the line from top to bottom to the right around the loop until the first row is completed, then the second row is woven in the same way, etc.
When in the previous row, when the object is enlarged, there are not enough loops, the running end is passed twice into the loop of the previous row. As the object decreases, the number of half-bayonets is correspondingly reduced, passing one loop at a time at intervals. The braid is finished by passing the line twice into one loop (blend knot) and making 3-4 punches into the braid, after which the running end is cut off.
The shkentel s m u s i n g a m i (Fig. 6.13) is made from a cable of the required length, at the ends of which thimbles are sealed. Musings are knitted along the pendant at a distance of 50-60 cm. Instead of a thimble, snares can be embedded on one of the ends of the pendant to attach it to the shot or davit top. A pendant with musings is widely used instead of a ladder for descending from a ship to watercraft standing alongside.
Rice. 6.13. Pendant with musings
STORM - ladder made of plant ropes (Fig. 6.14) - staircase made of plant ropes (strings) with wooden steps (balusters) for climbing people onto the ship from a craft standing at the side, and their descent, as well as for various outboard works.
Rice. 6.14. Storm ladder made of plant rope
Plant rope storm ladders are made from ropes with a circumference of 50-75 mm. In the middle of a cable of appropriate length, a thimble is sealed and below it a benzel is placed with a skimushgar or a thin line. The cables coming from the thimble are tightened and balusters with bales are inserted into them at both ends at a distance of 30 cm from one another. On each side of the balusters, a benzel is placed on the cable with a skimushgar, while simultaneously grabbing the balusters to the cable on both sides crosswise.
Storm ladders can also have flat balusters with side oval strips with bales. In this case, the balusters are fastened with two cables (tetevin). At the ends, storm ladders have thimbles or snores.
STORM - a steel rope ladder is most conveniently made from a six-strand cable so that the balusters on each side are covered by an equal number of strands. The balusters inserted into the cable are reinforced with benzel from tench. At the bottom of the ladder, a thimble is used to close the thimble, and at the top - snorers.
A cargo sling (Fig. 6.15) is made from a short vegetable or steel cable, the ends of which are connected by a short braid. A cargo sling can also be made from a sheet of thick canvas edged with a vegetable rope. In this case, the edges of the canvas are folded and hemmed with an overlock stitch, and the cable edging the panel is sewn with waxed or resin threads, passing a thread into each gap between the strands of the cable.
Rice. 6.15. Load sling
Cargo nets (Fig. 6.16) are made from resinous hemp or manila rope. The cable is folded in the form of a square, and thimbles are sealed into its corners using benzels. A cable is pulled parallel to the sides of the square, forming the base. The cable is attached to the upper and lower luffs by punching. The transverse threads of the mesh are also made from one long piece of cable. Like the warp, the weft works its way through the luffs, warp strands to form cages. The ends of the cables that form the warp and weft are woven into the luffs of the mesh. The cargo net, which does not have thimbles, is suspended from the cargo hook using loops formed by the luffs.
Rice. 6.16. Cargo net
The gazebo for above deck work (Fig. 6.17) is made from a wooden board and a sling (resinized hemp cable) threaded through special holes in the board. At the top of the sling they make a fire with a thimble.
Rice. 6.17. Gazebo for above-deck work
The arbor for outboard work (Fig. 6.18) is made of a board, two transverse stops and two slings. The stops are attached to the board with screws. In the upper part of the slings, using a benzel with a lid, a fire is made with a thimble for hanging the gazebo on cables.
Rice. 6.18. Gazebo for outboard work
A soft fender is used to protect the side of the ship from damage during mooring. Its basis is a bag, which is sewn from thick canvas and stuffed with cork, pieces of cable, tow or sawdust. The bag is tied with a loose rope with a fire in the middle part. A krengel sling is put on the fender fire and a fender braid is made (Fig. 6.12).
A deck mop (Fig. 6.19) is made from a straight-layered wooden block of circular cross-section with two grooves around the circumference in the lower part. Strands of the cable, loosened into heels, are laid in a dense layer along the bar and tied tightly at the top groove. Then the block is placed vertically and the heels are tied at the bottom groove.
Rice. 6.19. Deck mop
Sometimes mops are made without a stem; they have a braided loop at the top.
Safety precautions during rigging work
. When performing various rigging operations, especially work with steel cables, it is necessary to strictly observe safety measures. All items of rigging equipment and tools must be in good condition; items of rigging equipment used in the production of work (eyes, hooks, brackets, etc.) must have a test certificate and a working load mark. Rigging work can only be carried out under the guidance of an experienced specialist on the upper deck or in a sufficiently lit interior of the ship (rigging workshop).
Personnel participating in the work must have work uniforms, gloves and goggles with metal mesh. When cutting a cable with a chisel, you need to stand on the side of the cable line, since small pieces of wire fly along the cable. It is especially important to observe this when cutting a polished cable. When working with loose strands, you must protect your face and hands from injury. During rigging work, care must be taken not to damage the deck or the paint of the bulkheads.
The connection of two spar items using the methods under consideration is called lashing. Lashes are also called cables that secure loads to the deck.
To prevent spontaneous unraveling of the synthetic cable, its ends are melted.
*** A small loop made at the end of a cable for a thimble is called a point.
**** Braids are made from nine hemp or manila cables, taken three in a group and woven like an ordinary braid.
Forward Contents Back
Operating rules
Before starting work, you need to check the strength of the connections by applying a load to the cable once. If after several checks the cable and clamps continue to perform their functions, then it can be used. However, it is necessary to regularly check the condition of the clamps, since over time the connections can become loose, the nuts can become loose, and the metal can be destroyed.
The maximum service life of the clamps depends on the operating conditions. If this is a construction site with regular transportation of goods across floors by a construction crane, then replacement should be done every 4-6 months. In a domestic setting, you need to look at the state of wear to determine whether the clamp needs to be replaced or not.
In some cases, proper operation can save lives. This refers to the so-called lifeline. This is a tightly stretched cable with the ends attached to the sides of boats and ships. If a person accidentally falls out of a boat, it will be easier to save his life by grabbing onto it.
Safety requirements for cargo transportation determine the need to adhere to the technique of fastening steel cables and ropes. Before using the fastener, you need to check its load-bearing capacity. And if the connections are actively used, the degree of wear should be monitored.
A cable lanyard is a device that is widely used for installation, construction and rigging work. Thanks to this intermediate link, the tension of cables, ropes and cables can be easily adjusted. You are probably familiar with it, but you didn’t know its wonderful name!
What is this intricate tool used for?
Since the cargo lanyard has a special design, this allows it to withstand high stress and force, even when working with fairly heavy loads. Initially, this device was used to connect wooden and metal structures of various types. It is often used during rigging work, when it is necessary to secure transported or mounted equipment, or any other heavy load. If you need to install a metal mast or antenna, then this tool will help you cope with it.
Metal appliances tend to rust if they are exposed to moisture for some time. But a stainless lanyard is protected from this disease, since it is made of special steel or treated with a zinc coating. This measure was developed for the reason that this element is very often located outside the fixed structure, and therefore is always exposed to the influence of the atmosphere.
It is necessary to choose this device based on the length and thickness of the ropes or antennas, and, despite the impressive tasks, they are solved by such little ones as lanyards, their sizes vary from 5 to 20 mm. The overall success of any construction process depends on the choice of installation device. First of all, you need to decide why it is needed. Most often, such an element is used precisely to connect and tension cables or ropes on which a heavy load will be attached.
How does this mechanism work and why?
In order to understand the structure of this device, you need to pay attention to the drawing; from the side, the lanyard looks like an ordinary coupling, which consists of two screws . Moreover, the screws used are those on which the opposite thread is applied. They are then screwed into a metal structure, often cylindrical in shape. If this device is not available, then you can use a special ring. Thanks to the metal structure or ring, the screws are “pulled” closer to the center, as a result of which the steel cable is tensioned.
Also, in addition to rigging work, this device is widely used at home, mainly when it is necessary to tighten curtain fasteners, tune a piano (achieve a better sound, tighten the strings).
Often such a tool is made open, that is, the adjusting screws are visible. Its body is made by forging, welding or casting. After this, two holes are milled, which allow you to change the length and force using screws. They are made by turning. In cases where work is carried out in difficult weather conditions, a closed lanyard is used. Most often, this tool consists of three parts: a body, two screws (with right-hand and left-hand threads) and a screw head (fork, hook or ring).
Types of devices for tensioning cables
Before purchasing a tensioning device, you need to understand its markings, namely: C + C - hook and hook, C + O - hook and ring, O + O - ring and ring. These are the most commonly used, but there are others. In order to tighten or loosen the tension, it is necessary to rotate the “ring”, after which the screws will move either towards the center or away from it. The type of tool depends on what kind of work you are going to do. Galvanized tools are used when you need high tension force. The cargo type is used when it is necessary to either tighten the cables or attach a heavy load. Such devices can reach a weight of up to 25 kg, and this tool can withstand up to 90 tons.
The "hook-hook" type of device is used when it is necessary to change the length or tension of a chain or cable, mainly when installing masts or antennas. The “ring hook” is also used in such cases. The moving parts of this version of the device have threaded threads, thanks to which the length can be adjusted. Also now there are options using modern technologies, using which you can adjust the smoothness of the tension. Such tools are used when working with fiber optic cables. In order to tension wires and cables under light loads, you can use closed tools.
In such cases, there is no clear value of the permissible load, so it is necessary to be guided by the fact. It should also be remembered that such devices are not used for load-bearing structures. The fork-fork option is very popular and is used quite often. It allows you to quickly change or adjust tension and length. However, this tool is not used for lifting loads. It was created in order to adjust suspensions, braces and belays. But the chain lanyard is longer than its counterparts; it is able to grab two objects that are relatively far from each other, and then pull it together, giving the required tension.
How to stretch a chain-link mesh onto a fence - two ways with video instructions
Before moving on to a detailed consideration of the issue - how to stretch a chain-link mesh onto a fence - let's look at the reasons why it is very popular in our time, when there is a wide selection of affordable and seemingly more reliable materials for constructing fences. Chain-link fence for a garden plot In order to understand the reason, it is enough to know that the mesh is in high demand mainly among summer residents, since, thanks to its almost one hundred percent light transmission, it is perfect for fencing areas where berries, vegetables, ornamental herbs and flowers are grown, as well as greenery.
Types of chain link
- Non-galvanized – standard black mesh without additional decorative or protective coatings. It is used for the construction of temporary fences due to its limited service life, which averages about three years. But if desired, it can be significantly increased by using anti-corrosion paint annually.
- Galvanized is a much more expensive analogue of conventional non-galvanized mesh. Thanks to the protective coating, it is not susceptible to corrosion, resulting in a service life of tens of years;
- Plasticized is a relatively recently introduced option. It has a vinyl coating, making it much more aesthetically pleasing than its counterparts. However, this coating, unfortunately, fades very quickly in the sun. The advantage is that vinyl coating performs not only a decorative, but also a protective function, also significantly increasing its service life.
Vinyl-coated canvasesIn addition to additional coatings, the chain-link mesh also differs in the following two indicators:
- The size of the cells is quite important. Typically, the smaller the cells, the higher the strength and functionality, and, accordingly, the higher the price. However, the thickness of the wire also plays a big role in strength;
- The shape of the cells has practically no effect on the physical properties and qualities.
Manufacturing of fences
In the video attached to the article on how to stretch a chain-link mesh onto a fence, you can see this process in as much detail and step by step as possible. We will present it below in a more concise form. Fences made of this material are made in two ways:
- Stretching between pillars is the simplest and cheapest method, but not particularly reliable;
- Making sections from corners is a more reliable and durable option for a fence, thanks to the embedding of the material into support posts;
Fence installation consists of the following steps:
- Carrying out measurements and markings at the site of future installation;
- Installation of support pillars;
- Tensioning the fabric between the pillars and securing it;
Let's look at the listed steps in more detail. Using ordinary wooden pegs with a rope, we mark the fenced area around the perimeter. Upon completion of the marking, we measure the total length of the future fence. We add 2 meters to the resulting value and get the length of material that will be needed for the fence. Poles can be used either wooden or metal, but for maximum service life of the fence it is better to prefer the latter. The optimal distance between them will be 2.5 meters. At this distance from each other you need to dig holes to a depth of 1 meter. After that, supports are placed in the holes, and it is necessary to check that they stand as level as possible; after leveling, they can be filled with concrete. Note.
A chain-link fence is not massive or heavy, and it is also practically unaffected by the wind, so the support posts can easily be driven into the ground.
But only if the soil is dense enough and not heaving. As already mentioned, there are two main ways to install the mesh on support posts; let’s look at each of them in more detail:
- After the posts are installed and the concrete has hardened, you can begin to tension the mesh. It is best to start with one of the corner supports. Using wire, securely screw the canvas to the support, upon completion, stretch it to the next support and screw it again using wire. During the installation process, you cannot do without the help of an additional pair of hands. After all, it is necessary for one worker to hold the canvas taut while the second one screws it to the support.
- The so-called production of sections at the corners is carried out as follows. First of all, you need to cut off a small part from the mesh, the length of which is equal to the distance between the supports. After this, reinforcement is pulled through it along its entire height, which is applied strictly parallel to the supports, and then welded. The same thing happens on the other side. The reinforcement is also welded between the supports, above and below the mesh. After that, the hooks protruding from the top and bottom are twisted around the welded rods.
Note. When installing by making sections in the corners, it is quite possible to do without additional help. It is enough to fix the materials while working with the welding machine using metal wire. In conclusion, it should be noted that there is no strictly defined way to properly tighten the chain-link mesh onto the fence. And the methods listed above are far from the only ones; there are practically no restrictions, the main thing is that the result is a reliable and durable fence that can serve its owner for decades.
Successful work and proper operation of the lanyard
The forces that act on the mechanism of this tool should not cause deformation during loading. If this happens, then the tension must be reduced, and the parts that have undergone deformation must be replaced. If there is a chance of shock loading or critical conditions, then before starting work, you must clearly select the product to be used. The permissible load is only permissible along the axis line. There should be no overload.
The products are also not designed to withstand lateral loads. The tensioner used must always be checked before and after work for compliance with safety standards, otherwise unacceptable critical deformations may occur. If you correctly calculate the measurements and observe all the smallest details, as well as carry out preventive maintenance and inspect the condition of the instrument, then it will last as long as possible, and the likelihood of its breakage or deformation will be minimized.
Before starting work, it is recommended to wash the tool with gasoline, if possible polish it on a felt wheel, apply lubricant and run it dry. The best lubricants in this case are those with the addition of graphite or molybdenum bisulfate. It is recommended to turn them during work (two or three times will be enough). If the work is carried out in difficult climatic conditions where humidity is high, then it would not be a bad idea to spill fresh water on the mechanisms, which will wash off the salt water. It is these simple rules that will deprive the user of many problems, in particular, the painful unwinding of a “stuck” lanyard.
Thus, thanks to the universal tool, you can do both simple work (tensioning strings, curtains) and complex work (tensioning ropes or carrying heavy loads without the use of additional devices). Also, using this mechanism, you can achieve better vertical performance when installing an antenna or mast.