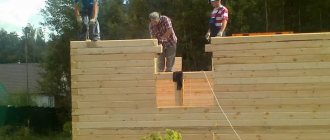
Each roofing material has its own installation technology, in which even the most insignificant nuances are important. To understand how to fasten metal tiles, we will understand the characteristics of the material, study the design of the roof with all the load-bearing and finishing elements and the features of special fasteners. We will also consider the rules for processing and laying the coating so that the result pleases with excellent appearance and quality.
Reliable and beautiful roof made of metal tiles Source gsm-alert.ru
What you need to know about the material
This roofing material is similar in composition to corrugated sheeting - a profiled sheet of steel with a protective polymer coating. But if corrugated sheeting is produced by rolling, then for the production of metal tiles stamping is also used, creating transverse stiffeners in the form of steps. In addition to giving the material greater strength and rigidity, they make the appearance of the sheets more elegant and visually attractive, since their relief resembles real ceramic tiles. Hence the name – metal tiles.
But more complex terrain requires a different approach to how to attach metal tiles to the roof compared to installing corrugated sheets. The latter can be fixed to the sheathing at any point along the wavelength. Whereas on sheets of metal tiles, for this you need to select standard attachment points located just below the stamping line in the deepest place of the wave.
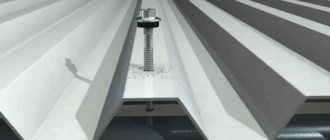
The photo shows the heads of correctly installed roofing screws Source proroofer.ru
Since the sheet must be fixed on the sheathing, it can no longer be attached to the rafters with an arbitrary pitch. It must correspond to the length of the stamping module. This is the main difference in installation between metal tiles and profiled roofing sheets.
Advice! In order not to have to dismantle and reposition the sheathing, the roofing material should be selected in advance, since the distance between the “steps” differs from different manufacturers.
Otherwise, these materials are very similar, and when working with them the following rules must be observed:
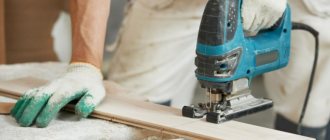
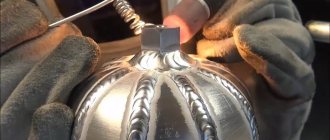
- In order not to damage the integrity of the protective polymer coating, which protects the steel base of the material from corrosion, sheets of metal tiles cannot be joined by welding and cut with a grinder with an abrasive wheel, since polymers burn at high temperatures. It is best to use electric scissors for this;
Cutting a sheet with electric metal shears Source i.ytimg.com
- for the same reason, it is recommended to set cutting and drilling power tools to low speeds;
- It is important to know how to properly attach metal tiles to the roof with self-tapping screws: in order not to deform the material profile and ensure sealing of the mounting hole, you need to adjust the degree of pressure when screwing.
Below, all these points will be described in more detail.
How many screws are required for 1 m2 of metal roofing tiles?
How many self-tapping screws per 1 m2 of metal tiles can reliably hold the roof?
It would seem that the more it is twisted, the more reliable the roof. However, it must be taken into account that each hole in the sheet reduces the tightness of the roof. Therefore, the optimal number of screws per square meter should be determined. It depends on the sheet’s own weight and the additional loads that it will have to withstand during operation.
6-8 fastenings per square meter of roofing is considered normal.
In regions with constant strong winds, this number will need to be increased.
The number of screws for metal tiles depends on the selected model and its profile parameters. Leading manufacturers offer online calculators for calculations. They help determine how many self-tapping screws will have to be screwed onto a sheet of metal tile. To the result of calculating self-tapping screws for metal tiles, it is necessary to add a 5% margin, since part of the fasteners may fall and get lost.
At the height of the construction season, there may not be screws of the required color in warehouses. The unused balance can be returned to the store using a receipt. Attempts to reduce the consumption of self-tapping screws on metal tiles below the norm recommended by the manufacturer can lead to the sheets being torn off in strong winds.
Preparatory work
Preparation for installation includes creating a base, determining the amount of base material and additional elements and cutting sheets, if necessary.
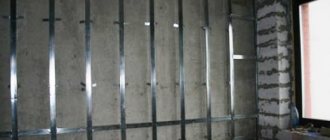
Installation of wooden sheathing
The steel sheet, which is the basis of metal tiles, is very thin, so the material is light in weight and does not require a continuous or low-density sheathing. However, this does not make its design any simpler; on the contrary: since the metal tiles should be correctly fastened in places determined by their relief, the sheathing slats should pass exactly under them. Otherwise, the sheets will have to be fixed not at the standard points, but where necessary, which will weaken the structure and spoil its appearance.
Incorrect fastening due to the lack of a frame under the stamping line Source krysha-expert.ru
When performing under-roofing, adhere to the following rules:
- the lathing is fastened over the waterproofing membrane, screwing the counter-battens to the slats;
- installation is carried out from the bottom up - from the eaves line to the ridge line;
- the distance between its center lines must correspond to the distance between the stamping lines;
- since there is an overhang of roofing material on the eaves, the step between the first and second rows of sheathing is smaller than the main one;
Sheathing installation diagram Source maxiprofil.ru
- all elements must have the same cross-section. With a pitch between rafters of up to 1 meter, these can be boards with a thickness of at least 32 mm or 50x50 mm bars, treated with an antiseptic compound before installation. If the distance between the rafters is greater, the thickness of the boards should also be increased;
- the first board of the sheathing and the board to which the ridge will be attached should be 1-1.5 cm thicker than the others;
- Before attaching the metal tiles, determine where to install stairs, snow guards, transition bridges, and roof railings on it, and reinforce the sheathing underneath with additional boards. Such reinforcement is necessary both along the ridge on both sides of it, and at the junction of two slopes of the sloping roof.
See also: Catalog of house projects with a second light and a combined roof
Calculation of materials
How many sheets you need depends on whether you will purchase standard products or order them from production according to your sizes. This refers to the length of the slopes, since the width is a constant value determined by the profile of the metal tile. When ordering long sheets that completely cover the slope, their number is easy to calculate, knowing the width of the roof and the size of the end projections. Don't forget to take into account the amount of overlap.
To calculate the material for a hip roof, it is better to draw a diagram to scale to minimize trimming Source dom-expert.by
On a note! The length of the products cannot be less than half a meter and more than 7 meters. If the roof slope is longer, you will have to make a transverse overlap of the top sheet onto the bottom one.
Standard sheets are usually 2 meters long. Despite the fact that they are cheaper, the final amount may turn out to be unreasonably high if the size of the slope does not allow them to be used in their entirety, without cutting off excess length.
In addition to the roofing itself, additional elements will be required, and they must be purchased immediately, since the metal tiles are attached only after installing the drainage system and eaves strips, lower valley strips and connections to the pipes.
The main additions are highlighted in red on the diagram Source fasad-exp.ru
Stage 2. Selecting related products for proper installation of metal tiles
Don't forget about related products for installation work.
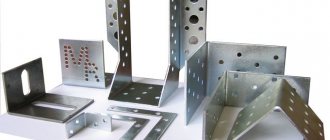
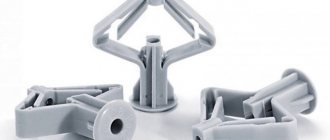
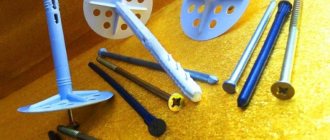
- Roofing screws are fasteners equipped with a washer with an EPDM gasket and made of zinc-coated steel.
- Sealing materials are needed to isolate the most vulnerable places from moisture - the joints and junctions of roof elements. They can be produced in the form of tapes or in liquid form.
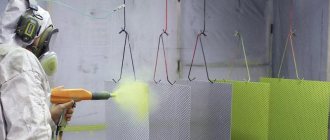
- Repair enamel aerosol. It will be useful if you need to restore the polymer coating (if it was damaged during installation or transportation of the material).
- Double-sided connecting tape. It is used to hermetically seal the joints of steam and waterproofing sheets. Otherwise, the vapor and waterproofing will not be able to perform its functions - it will allow moisture to pass through.
Installation
Before screwing the metal tiles, you need to check the geometry of the roofing structure again: the diagonals must be equal, the lines of the eaves and ridge are parallel to each other, like the sheathing boards, and located strictly horizontally. Defects are corrected at this stage, otherwise it will not be possible to lay the coating evenly.
Laying sequence
The laying pattern determines the size of the sheets:
- If their length allows you to cover the entire slope, first lay and align the first sheet along the cornice, making extensions from the side of the pediment and cornice. It is pre-attached with one self-tapping screw into the medium wave at the ridge. Then the second and third sheets are laid on it, fastened to each other at the crest of the wave and aligned together. After the final adjustment, the first two sheets are attached to the finishing sheet, and the next ones are adjusted.
- When the lengths are joined, installation begins from the bottom and 2 sheets are laid alternately, then the next 2 sheets are fastened to the first along the overlap ridge and the entire block is leveled before final fixation.
Schemes for laying metal tiles on pitched and hip roofs Source goldkryshi.ru
There are other methods of laying - in rows or in a checkerboard pattern. The main thing is that the edge is smooth, without steps, and parallel to the cornice. To do this, stretch a cord along the edge of the overhang as a guide and very carefully position the first sheet.
Note! When installing from the right edge, each subsequent sheet is laid overlapping on top of the previous one. If the installation is carried out on the left, on the contrary, the next sheets are placed under the already lying ones.
Installation from left to right and right to left becomes necessary when installing a hip roof, since in this case the metal tiles are attached to the sheathing from the center line of the triangle or trapezoid (see diagram above).
Stage 3. Installation of thermal insulation
The topic of the article is the features of installing metal tiles, so we will not focus on the installation of the rafter system. Let's assume that it is ready and it's time to install the “roofing pie”.
You can start by installing thermal insulation. According to statistics, approximately 25% of heat escapes through the roof. In other words, if the roof is not insulated, you heat the street. To avoid this, install insulation.
The roof can be made “warm” or “cold”. The slopes of a “warm” roof are insulated, and the floor of the attic is insulated for a “cold” roof. We consider the features of installing metal tiles using the example of a “warm” roof - it is more complex.
| "Warm" roof | "Cold" roof |
Thermal insulation slabs or mats are mounted between the rafters.
Advice from experienced professionals
- Metal tile sheets are quite thin. You can only walk on them in soft shoes, stepping on the lowest points of the wave at the locations of the sheathing strips.
- The self-tapping screw must not be allowed to turn when screwing, as this will reduce the adhesion force to the wood many times over.
- Installation of a pitched roof can begin on the right or left , whichever is more convenient, but if the roof is hipped, installation begins exactly in the middle, for symmetry in the design of the slopes.
- The self-tapping screws must be twisted strictly perpendicular to the plane of the sheet, otherwise a depressed area will appear on the side of the slope.
- Typically, the purchased metal tiles come with detailed installation instructions. It is recommended to study it carefully, since all types of material have their own characteristics, which must be known and taken into account during installation.
fastening metal tiles with self-tapping screws: diagram and tips
Stage 4. Protecting insulation from moisture
In order for thermal insulation to properly perform its functions, it must be dry. Getting wet by just 5% will halve the performance properties of the insulation.
To protect thermal insulation from moisture, vapor and waterproofing films and membranes will be required.
Vapor barrier
Protects thermal insulation from evaporation from the living space.
Laying sequence
The vapor barrier is installed horizontally on the roof slope, starting from the bottom.
Fixation
To fix the vapor barrier, it is attached to the bottom edge of the rafters using a staple gun.
Waterproofing
Provides protection of thermal insulation from condensation. Presented as:
- membranes (they are mounted without sagging, close to the thermal insulation);
- films (during installation, a sag of 20 mm is left).
Laying sequence
Waterproofing is mounted on the outside of the insulation, along the upper edge of the rafters.
Installation of waterproofing begins with the valley (if there is one) - the internal corner that is formed at the junction of the slopes. This roofing element requires careful sealing, since it often comes into contact with precipitation.
A roll of waterproofing is rolled out from the ridge to the eaves. The material should completely cover the valley area.
When the valley is waterproofed, they move on to the slopes. As in the case of vapor barrier, the roll is rolled out horizontally. First - along the cornice, then - higher (and so on - to the ridge).
Fixation
To fix the waterproofing sheets, you should install a counter-lattice made of wooden slats 50x50 or 32x50 mm.
Attention: do not forget about gluing the joints of the hydro- and vapor barrier sheets using double-sided connecting tape!
What fasteners should you use?
In order to fasten metal tiles with self-tapping screws, they need to be selected correctly. High-quality products will ensure the durability of the roofing. The advantage of self-tapping screws is that they cut holes in the metal tiles directly during the installation process.
High-quality fasteners must meet the following requirements:
- Roofing screws must be made of galvanized steel. Despite their higher cost, such fasteners begin to oxidize much more slowly when in contact with liquid.
- To ensure a tight fit to the surface and seal the hole, the screws must have rubber or latex heads or press washers. These elements expand as the screws are tightened and close the gap.
- The color palette of fastenings is selected so that they match the roofing.
It is noteworthy that the length of the roofing screws must exceed the thickness of the roofing pie by 1-3 mm to ensure reliable fastening of the covering.