Any process of laying ceramic tiles is not complete without trimming it. There will be a lot of it especially if you use some kind of non-standard layout, for example, diagonally. In the last article we talked about which layout is best to choose in order to get uniform and beautiful trimmings everywhere. Now we will talk about how to properly cut tiles at home.
As you know, tiles are made of baked clay, which is covered with glaze on top. It’s difficult to break it just by hand, but if it lies on some uneven surface, it easily cracks from a small load. To simplify this process and make the required break line, you need to weaken the top layer of glaze - that is, cut it, and therefore apply force to break it.
There are 3 main ways to do this:
- Special tool - manual, electric tile cutter or special tongs.
- Bulgarian.
- Other sharp tools at hand.
Let's talk in more detail about each method of cutting tiles.
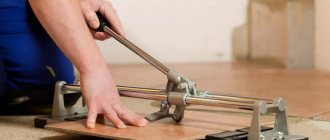
Cutting tiles with a manual tile cutter
This is the most popular option, used by both professional tilers and amateurs. You can find it in the store at a price of 300 rubles and above, depending on the size, quality and additional bells and whistles, such as a swivel base and a built-in ruler for easy cutting of tiles at an angle of 45 degrees. At the same time, it is better not to buy the cheapest models; they will often break the tiles incorrectly, due to poor pressure on the flimsy base.
How does a manual tile cutter work?
How to use a tile cutter:
- The tile is inserted into the tile cutter, and the markings on it are aligned with a special mark.
- The handle is lowered and drawn away from you. It must be carried out at the same speed and with uniform pressure so that the roller cuts the glaze to the same depth. It will be enough to run the roller once. If you drive several times, the break may turn out to be of poor quality.
- Next to the roller there are special paws that lower and break the tile into 2 parts after sharply pressing the lever. Moreover, all tile cutters have a metal tubercle on their platform, and soft linings along the edges. When you press down on the edges of the tile with your paws, maximum tension will be created at the cut point if you line it up correctly with the backing and it will chip straight away.
It’s difficult to explain this in words, so it’s easier to watch a video that shows how to cut tiles with a tile cutter correctly:
High-quality tile cutters allow you to cut even tiles 10 mm thick without any problems. And it doesn’t matter at what angle you cut it: at least 45 degrees, at least 30.
How to cut tiles with the letter "L"
Since a tile cutter can only cut tiles straight, many people have difficulty with L-shaped cuts. The simplest option is to divide this tile into 2 rectangular elements, but then you will end up with an extra ugly seam that will catch your eye.
But this can be avoided if you cut the short side with a grinder, and then the long side with a tile cutter.
Step by step instructions on how to make L-shaped cuts on tiles
You can cut the outer corners in the same way. When marking them, you need to subtract approximately 4–5 mm, 1.5–2 mm for the grout joint and a small distance from the wall.
The second method: using any method available to you, a cut is made on the glaze, and the excess is gradually broken off with pliers. Irregularities are processed with sandpaper. This option will even allow you to get a rounded cut for connecting to the risers.
How to cut porcelain tiles
It is believed that porcelain stoneware is the hardest material from which floor tiles are made. You can trim it in the same way as regular tile.
Sometimes simple floor tiles are more difficult to cut than porcelain tiles. There are hardened tiles, on which, after cutting with a tile cutter, the cut in the glaze is almost invisible. And even a diamond disc on an angle grinder doesn’t take it - the cut turns out torn, like after a tractor. In such cases, you need to use a grinder and file a 2-3 mm groove on the back side to mark the location of the break.
Features of the electric tile cutter
An electric tile cutter is much more convenient and does its job faster. And his cut is just perfect. They can cut shaped elements and complex angles. With such a tool you will finish the job 2-3 times faster. And of course, you shouldn’t forget about the defects, so, the waste of an electric tile cutter is also 2 times lower.
The operation of an electric tile cutter is quite noisy and dirty, because... the disk is cooled by water
When working with such a tool, you need to be extremely careful; you need to properly protect your hands and eyes.
The process itself is quite simple and requires mostly little skill.
- Mark the cutting line on the tile.
- Align the cut line on the tile with the pointer on the tool (guide).
- gently pushing the tile forward to cut it
- All irregularities need to be sanded with sandpaper or a sharpening disc, which is much faster.
Quite often, at the end of the cut, the tile goes away and a small edge becomes uneven; in this case, the tile is turned over and the cut is leveled
To cut tiles in shapes you need to get used to it. Therefore, if you are working with a tile cutter for the first time, then it is better not to take on such work. Although the process itself is not considered difficult, it does have some nuances.
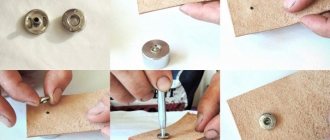
Tile cutter-tongs
Tile cutter-tongs are the cheapest (200–400 rubles), and they are only suitable for small volumes of work with thin ceramic tiles at home.
After making the cut, press the tile down with the breaking pliers.
How to use a tile cutter:
- Make markings taking into account all gaps and seams (–5 mm).
- Attach a metal ruler to the marking line and run the cutter along it once. The pressure should be moderate to form a visible strip. Lead him from the far edge towards you.
- Place the tongs with the claws along the break line near the edge. The lips should be on top of the icing and the straight part at the bottom. The break line should be right down the middle between the edges of the top jaw.
- Gently press the handles to break off the tiles. However, do not lift it high, otherwise it will break after falling.
Required tools and materials
Cutting ceramic tiles is a labor-intensive process that requires maximum concentration.
The complexity is largely due to the fact that the tiles are made of durable material. Without dust, tiles can be cut and sawed with a tile cutter, but such a tool is not cheap. It is almost impossible to do this with conventional cutters and saws, and the cut will certainly be uneven and unattractive. An ordinary grinder is best suited, the cutting wheel of which allows you to carefully cut the tiles even at home. Despite the fact that this process is relatively complicated, if you get the hang of it, it won’t take much time and won’t require much effort. An ordinary homeowner who has not dealt with such work can cope with this task and can even cut off a “hog” without the help of a tile cutter.
You can cut tiles using the following tools:
- special tile cutter;
- diamond tools;
- Bulgarian.
To perform the work in question, you do not need to purchase any special equipment. A household grinder and grinder are ideal for creating a high-quality cut. You can purchase these tools at any hardware store at an affordable price.
The main thing you need to pay attention to when choosing is the quality of the disc.
For cutting ceramic tiles, those that have diamond coating are suitable. Their use minimizes the formation of cracks and chips. It is forbidden to use discs used for metal work, as they will only damage the tile. Even if you manage to make a cut using such a circle, it will be uneven and of poor quality. This is due to the disc sliding along the tile, which is why the presence of small cracks is inevitable
Moreover, when it comes to home surface finishing, these damages can be ignored, since they will certainly disappear during subsequent processing.
When cutting using an angle grinder, be sure to take protective measures
It is important to have safety glasses, since during work you can damage your eyes due to sparks or tile particles getting into them. You can buy them at any hardware store
Be sure to have the following attributes with you:
- glasses;
- mask;
- thick gloves.
Please note that the selected grinder or grinder must have a speed regulator, since many modern inexpensive tools do not have this function. Such models operate at the highest speed, which is why it is impossible to cut tiles with their help.
Cutting tiles with a grinder
Sometimes there are cases when you need to cut a narrow strip of tiles 0.5–2 cm, and a regular tile cutter will not take it because its legs are too wide.
In such cases, you need to draw a cut line with a pencil and make a cut with a grinder and a diamond blade. But if you try to cut it off at one time, the narrow strip will break off in parts. Therefore, you need to smoothly and without pressure go over the markings with a grinder to make a cut about 2 mm deep. You need to walk the disk along the line, and not directly along it, then the width of the already narrow strip will not decrease.
Using the same method, passing along the same seam several times, you will cut a narrow strip. The second and subsequent times you can drive the grinder faster, but try to press it to the opposite side, then there will be no chips.
It is better to do this work in weight, so the vibration will go into your hands. When you see that the strip will soon fall, it is advisable to place something soft so that it does not break.
Cutting tiles with a grinder using a special diamond-coated tile disc
If any irregularities remain, they can be sanded with the same grinder.
Be sure to wear glasses when working with an angle grinder.
How to choose the right disc for tiles
For cutting, metal discs with diamond coating on its edges are used. But they are different: for concrete, brick, stone. Tile disks do not have any holes, the soldering on them is uniform and smooth. Concrete discs have slots on the solder and will create chips when vibrating. If you cut ceramic tiles with it, these chips can fly into your face.
We make a cut at 45 degrees
Ceramic pencil skirting is best for protecting sharp outer corners of tiles
To beautifully join external corners, many craftsmen file the edges at 45 degrees so as not to use ceramic corners. But in dangerous places where it is possible to slip, it is still better to use so-called pencil curbs, although some consider them a “collective farm”.
If you use a professional electric tile cutter, then the inclined platform there makes it easy to make a 45-degree angle on the tile bevel, but not everyone has such a tool. You can easily make such an angle yourself using the same grinder “by eye”. The disc is drawn along the cut line, and it should be slightly inclined inward.
Sawing the tiles at 45 degrees
Terms of use
Before you start working with a tile cutter, you need to check it for serviceability. In particular, the smooth running of the carriage along even and smooth guides. The cutting roller must be free of defects and rotate freely. If these conditions are met, it is possible to form a groove that is uniform in depth and even, along which the tile will be broken.
If nicks or other damage is noticed on the roller, it must be replaced. Before work, the guides must be cleaned of dust and dirt, treated with machine oil or another means to ensure free movement of the carriage. If necessary, the threaded fasteners are tightened. Some models provide the ability to configure the tool to work with a specific tile size.
An example of a professional tool with wide functionality Source yandex.net
How to cut tiles without a tile cutter
If you only need to cut a few tiles, you don't necessarily need to invest in a tile cutter. You can use the tools at hand:
- Glass cutter.
- Drill. It should preferably have a pobedite tip, as it will scratch the tile better.
- Nail.
- Construction knife.
Attach a metal ruler to the cut site and draw 1 time with a glass cutter or drill. There should be a deep scratch on the enamel. If you use a knife, you will need to do this several times.
Place the tile at the corner with the cut and press firmly on its edges. The cut will not be perfectly straight, unlike a tile cutter, but you won’t have to spend extra money.
To make cutting ceramic tiles easier, many craftsmen soak them in water for about 1 hour.
Glass cutter - basic rules and little secrets
But before you begin the process itself, it is important to familiarize yourself with the basic rules for cutting tiles, as well as little secrets that will allow you to cut the desired piece of tile efficiently and evenly
- Use a straight ruler and marker to mark the surface of the facing material.
- Use a glass cutter to cut along the markings.
- Place the tile on the table so that the cut line is level with the edge of the table.
- Using light pressure, separate the cut piece.
But there are still some tricks that will help you cope with the task perfectly.
- The cut with a glass cutter should be made once, starting from the far edge and towards you.
- if it is necessary to make the cut line as even as possible, before pressing on the surface of the facing material, it is necessary to place a nail or match under it. Apply pressure on both sides of the marking line.
- Before cutting the tiles, you need to keep them in a bowl of cold water for at least 1 hour.
Figured carving
Shaped cutting is performed if the tiles must bypass communications or plumbing equipment (sinks, toilets, sockets, etc.). Here are the tools that are suitable for curved cutting.
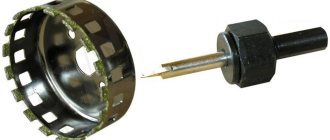
- A drill with a ballerina attachment or a crown bit is used to cut circular holes.
- A manual or electric jigsaw can be used for shaped cuts of thin tiles.
- Electric tile cutter depending on the design.
- Nippers allow you to break off small pieces of ceramic from the edge of the tile.
- Cutter tongs have a cutter and nippers that first make a cut and then flip the tool over and clamp the tile along the cut line until it splits.
- with a grinder , but this must be done with certain skills, and it is also important to follow safety precautions.