Hand tools have never been canceled in a carpentry workshop, and one of the important tools is a marking thicknesser. The thing is reliable and practical. It is clear that now you can easily buy any instrument, but this is not always profitable when you are balancing between price and quality. It is quite possible to make a surface planer in your workshop.
Here are 8 options for different surface planers as a source of ideas for flights of fancy and gaining experience:
- Marking thicknesser from Yuri Raevsky
- Manufacturing of marking thicknesser from Mikhail Rebitator
- Curvilinear manual thicknesser from “Voxa 54”
- Carpenter's thicknessing compass for marking workpieces from "Drevo Woodwork"
- Homemade marking thicknesser from Sergei Petreev
- How to make a marking thicknesser in 5 minutes from Sergey Sergeich
- Thicknesser made of metal parts from Ilya Gonchar
- Homemade marking thicknesser based on a railing pipe from AlfFisher
Factory equipment for converting a plane into a machine
You can find special beds for sale on the domestic tool market. By attaching an electric planer to it, you can make a simple thickness planer. It is included in the delivery set with some models of planes.
A thickness planer allows you to plan wooden blanks much faster and more accurately. That is why it should be in the arsenal of every owner. We hope that after reading the article, everyone will be able to make such a machine on their own.
Scope of application
This technique is found at all wood processing bases without exception. With its help, the following tasks are solved:
- equalizing the thickness of the workpiece;
- precise cutting of panels and boards for finishing floors or walls in public spaces;
- production of a perfectly smooth surface;
- flat processing.
Before getting behind the thicknesser, you need to carry out a thorough debugging procedure, paying attention to:
- on the accuracy of the installation of the machine - it should be installed evenly and without distortion;
- eliminate low placement of the corrugated shaft;
- adjust the pressure on the processing surface in the rear block (pressure block);
- set the parameters in such a way as to avoid high pressure on the lower rollers working to feed the workpiece above the level;
- check the functional part of the exhauster. If there is a malfunction, you may encounter chips getting into the rear main roller;
- Finally, you need to make sure that the cape visor is present and in the correct position;
- check the functioning of the exhauster. If it malfunctions, chips may end up in the rear main roller;
- look at the installation of the cap visor.
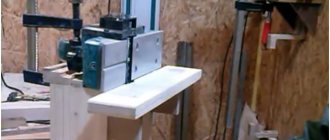
Step-by-step manufacturing instructions
To make a household thicknessing machine, you need to prepare a workplace and perform the following steps:
- Attach a sheet of plywood to the side edges of the plane. Mark along the contour of the protective casing and cut out a template. It should go around the electric motor casing without gaps.
- Make a template of another shape in the same way.
- Transfer the contours of the templates onto 10 mm thick plywood sheets and cut them out. Then you need to make two strips 10x10 mm thick, which will subsequently serve as guides.
- Make holding crossbars from a block. They should fit as tightly as possible to the front and back parts of the electric planer handle.
- Using a milling machine or jigsaw, cut out longitudinal grooves according to the previously applied markings. In the future, they will be necessary to adjust the thickness of the planing.
- By passing the crossbar under the back of the electric planer handle, connect the cut out parts. To fix the jumper, it is better to use screws with a countersunk head.
- Attach the slats prepared in advance to the back side of the workpiece and apply markings on them. Then you need to trim them according to the applied markings.
- For further fastening of the workpieces to each other, a through hole for bolts is drilled in the upper part. In the same place, using a cutter, a hole 4 mm deep is made. Then the fastening nuts are hammered into it with a hammer.
- Having combined both blanks, they must be fastened using bolts with pressed wooden washers. As an alternative, wing bolts can be used.
- Make a hole in a wooden block to install a guide pin into it. For secure fixation, it is better to use a lock nut.
- Install a block with a guide pin in the front part of the future machine. Secure it with countersunk screws.
- Assemble the outer frame in the same way as the inner one. Place a wing nut on the guide pin to adjust the position.
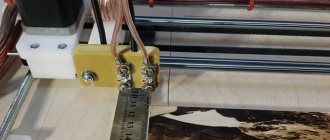
- Make a guide sheet. To do this, use a chisel or milling machine to make rounded grooves in wooden blocks, the diameter of which will correspond to the diameter of the guide pipes, and install them as shown in the picture below.
- Prepare your desktop. It consists of a sheet of plywood 10 mm thick. Stoppers are installed along the edges, on which the guide rails will subsequently be fixed.
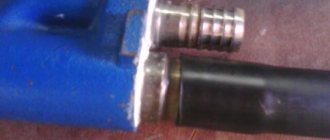
- The guide pipes must be connected to each other using plywood strips and the vacuum cleaner pipe must be connected. After this you can start working.
After watching the video, you can get acquainted with the nuances of manufacturing a thickness planer, as well as see its practical application.
Main parameters and GOST
Planer-thicknesser machines, mostly manufactured in the Russian Federation, will comply with the set of technical characteristics. The latter are enshrined in the official standard GOST 7228-93.
Among the parameters you can find:
- dimensions of wooden blanks (taking into account the thickness and width of the raw material);
- permissible length, specific value;
- number of knives on the shaft;
- sides processed in one pass;
- shaft rotation speed;
- power plant power indicator;
- speed of progress of the operation;
- total weight of the product.
Most machines support the processing of wood raw materials in the following dimensions:
- 315-1250 mm - permissible width;
- 5-160 mm – minimum and maximum thickness.
These parameters should be taken as average and generalized; they may differ depending on the specifics of production. The minimum length of wood is indicated by the diameter of the drum. Modern values set the minimum possible parameter for a given value to be >30 mm.
Depending on the area of use, one or more knives will be attached to the shaft design, rotating at a frequency of five to ten thousand revolutions per minute. The value is average, by analogy with the others it can be higher or lower. For example, a desktop model rarely has a shaft rotation speed of 5,000 revolutions, but if necessary, in a somewhat universal device you should strive for this value. If you ignore this factor, you may encounter difficulties in completing the task.
The feed speed of workpieces for standard and professional devices will be in the range from 6 to 24 meters per minute. This is the optimal threshold value that allows you to create more than a hundred products within one shift. The weight of the structure will depend on the completeness of the equipment and the presence of additional optional blocks. When choosing a product for your home, it is better to focus on a desktop copy. Accordingly, the production apparatus should also have no compromises.
Design Features
The main task of jointing machines and planers is to ensure the beauty and quality of processing of the finishing part of the workpiece. They remove every defect and unevenness, which ensures an attractive aesthetic appearance and practicality of the product. The device can be used both in a home workshop and in a large enterprise that requires daily operations.
At the finish, a smooth and clean board comes out of the machine, preserving its natural structure. In some models, the functionality does not end there - they allow chamfering. It is important to remember that the wood must be completely dry before starting work. This is the main condition for trouble-free operation.
How to make a thickness planer for wood at home
If necessary, such a machine can be made at home. This does not require the use of special equipment or special technical skills.
The simplest machine can be made by fixing the plane on the table in a sideways or upside-down position. More advanced models require more time and effort.
What is needed for making
To make a homemade thicknesser, you need a minimum set of materials and tools, which are often in the arsenal of every owner. It includes:
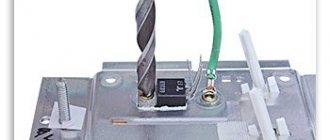
- electric plane;
- jigsaw;
- metal sheet 0.5 mm thick;
- laminated chipboard sheet;
- metal pipe;
- hand drill;
- set of drills for wood and metal;
- fastening hardware;
- set of wrenches.
Which plane to choose for this purpose?
The electric plane is the main working part of the machine. Therefore, before starting assembly, it is necessary to select a tool with optimal parameters. The main technical characteristics that should be taken into account when choosing a plane are:
- planing width. Most modern electric planers are equipped with a support sole and blades 82 mm wide. This is quite enough for household work;
- electric motor power. To carry out high-quality planing of workpieces, it is best to use planes with an electric motor power of 800 W or more. This will allow for high-quality planing;
- blade rotation speed . There is a direct relationship between the number of revolutions of the knife block and the quality of planing. In other words, the more revolutions the blades make, the cleaner the processed surface is.
The best choice for making a thickness planer would be the following tools:
- RESANTA P82/800;
- DIOLD RE-1100-01;
- INTERSKOL R82/710.
What it is
The answer to the question of what a surface planer is and why it is needed can be configured in the following words: a tool for applying precise markings of lines, holes and other elements on a wooden surface. This description applies to a manual marking device.
There is also a woodworking thicknesser machine designed for adjusting thickness and simultaneous finishing. The device belongs to the category of planing devices used for planing a workpiece to a given size and a specified thickness. Mostly, workpieces that have been previously planed on jointing machines are processed in this way.
Manual surface planer
As already mentioned, a manual thicknesser is a tool designed for drawing a marking line parallel to selected baselines, or for transferring dimensions from a drawing to workpieces.
Manual wooden and metal surface planer Source wikimedia.org
Healthy! In most cases, a manual surface planer is presented in the form of a stand with a clamp in which the scriber is fixed.
The body of the instrument is made of hardwood and is made in the form of a block with a rectangular hole. A rail (one or two) is fixed in it; fixation is carried out by wedging. For example, a two-slat thicknesser is used when applying marking lines for tenon joints.
If it is necessary to create large volumes of markings, or if there is no need to change sizes, the surface planer can be replaced with a bracket (bracket).
Marking bracket Source wikimedia.org
Healthy! A bracket is a marking device in the form of a wooden block with a protrusion that acts as a guide into which the required number of nails is driven.
Thicknesser
From the information provided earlier, it becomes clear why the manual thicknesser is narrower. It is intended directly for marking. The machine of the same name is used for finishing planing to specified dimensions. Passing through the knives, the workpiece receives the specified thickness and a perfectly flat and smooth surface. Such equipment is often used in the production of furniture blanks from natural wood.
Thickness woodworking machine Source rmnt.ru
Comparison of thicknesser and jointer machines
In addition to the surface planer, carpentry professionals actively use a jointer - a device with an elongated frame, designed for installation in a workshop. The main advantage is working with a long board. However, the thicknesser is not inferior in popularity. To understand why, you need to familiarize yourself with the advantages and disadvantages of each.
| View: | pros | Minuses |
| Jointer |
|
|
| Thicknesser |
|
|