Formation of the cross
Another type of level that you can create yourself is a laser cress.
This device is convenient to use when hanging cabinets in the kitchen or paintings indoors, as well as in many other cases. To create such a construction tool, you need to prepare a tripod from a video camera, a non-working player and several unnecessary disks. Creation scheme:
A cross made of laser pointers is installed on a tripod so that it begins to rotate around its axis
You can also use a drive from the player for this. It is also important to take into account that the level can freely move from one vertical to another to the desired height. The discs are glued together and attached to the old player. At the end of the work, a cross of laser pointers is attached to the disks. To install it, you need to use tape or other convenient means.
Due to the fact that the device will be in a stationary position on the tripod, it can be rotated in any direction without changing the height level. Having set all the necessary marking indicators, you can accurately set the level to any desired height in the room without regularly adjusting the device.
CALIBRATION
To adjust, it is most convenient to use a reference additional laser level; if you do not have one, then to adjust the vertical, use a simple thread plumb line, and to adjust the horizon, use a pre-marked point at a distance of ≤ 5 m from the wall, through which you will need to pass all sides of the horizon.
Rotate the level around its axis in one place, and ensure by adjusting the adjustment screws that when the laser level is rotated 4 times around its axis, the horizontal line passes through the same point.
In this case, the stated error is allowed, that is, the discrepancies between the line and the point should not exceed 2 mm. If the distance between the line and the point is more than 2mm, further adjustment is required.
Do not remove or disconnect the board, and after adjustment, be sure to coat the adjustment screws with regular varnish or simple glue to securely fix the adjustment.
If for adjustment you need to remove the side and end protective glass, then you should unscrew the three screws shown in the photo with white circles. After removing the glass, it is necessary to install the pendulum back to its original position for further calibration.
How to adjust the bubble level
If there is a need to adjust the construction bubble level, two tests must be carried out: vertically and horizontally. In the latter case, the procedure is simple: apply the level to the wall, and draw a line on it with a pencil along the bottom edge of the device. The extreme point of the frame is marked. The tool is rotated 180 degrees and the lower boundary is drawn again. In this case, you need to position the edge of the frame at the previously marked point.
If the fixture readings are incorrect, the two lines will be at an angle to each other. It is necessary to find and draw the bisector. After this, the level is applied to the new line and the flask is adjusted using a screw that changes the position of the holder. To achieve the correct reading, be sure to test in the opposite direction, turning the device 180 degrees.
Checking the building level along the vertical horizon is done plumb. All adjustments until the correct readings are achieved are also made by turning the bulb holder screw.
The situation is more complicated with inexpensive devices. As a rule, their flask holder does not provide for adjustment, and the cylinder with liquid itself is glued. But even such a device is easy to calibrate with due patience. You can adjust the bubble level using a Phillips screwdriver and a hammer. First you need to determine in which direction you need to move the flask. Using a screwdriver, by applying light blows, drive the upper (protruding) edge of the container down to move the bubble to the left or right. After completing such a barbaric adjustment, if the flask has survived, it is tightly filled with superglue in the holder.
How to calibrate the horizontal line of a laser level
Before marking the room with a new device, it is necessary to make adjustments. Do-it-yourself laser level calibration is done in a large room.
The level is installed between walls located at a distance of 5 m. Turn on the device and mark the location of the pointer. Alternately turn the device 180 0 and mark the location of the pointer on the opposite side. The points are conventionally called a1 and b1.
Adjustment of a laser level with conical or cylindrical prisms is carried out through marks located at a distance of 5-10 m from each other
The level is transferred to the wall and installed at a distance of 60-70 cm. Perform similar actions and mark the points of the pointer. The points are called a2 and b2.
Measure the distance between a1 and a2 and between b1 and b2. Find the difference between the obtained values (a1 and a2 - b1 and b2). If the deviation does not exceed the value specified in the instructions, it means that the device is calibrated correctly and shows the correct level of the horizontal plane.
If the value differs greatly from the declared accuracy, manual adjustment is made. Using a hydraulic level, a straight horizon is found. Draw a line and begin to tighten the screw. As soon as the lines match, the setup is considered complete.
The prism level is adjusted in two planes at once, since it emits two beams simultaneously
Design features
The construction bubble level belongs to the category of simple, but most popular devices for repairs. Ampules with air pumped inside are installed on the bar protruding as a solid base. The ampoules have marks for measuring and determining the position of the air. When the bubble is placed in the middle, the surface is considered flat. If it moves away from the central part of the ampoule, then there is a tilt, the magnitude of which is estimated by the nature of the deflection of the air relative to the center.
The ampoule containing the air bubble contains liquid, usually industrial alcohol. The integrity of the ampoule must not be compromised.
Instruments vary in length - from several tens of centimeters to 2-3 meters or more. When working on limited surfaces, short structures are used, and in plastering work, longer ones are used. For example, for laying tiles, choose a level length of 400-1000 mm.
Long structures are susceptible to damage during transportation and operation. Therefore, shockproof structures are in demand.
Various materials are used to make the base. In the photo of the bubble level you can see products with a solid wooden or hollow aluminum and plastic base.
For metal, devices with built-in magnets are more suitable, and the presence of a ruler on one side of the bar makes marking work easier.
The accuracy of the work is ensured by several ampoules included in the design:
- the first is located on the surface of the wide part of the level and is used for horizontal alignment;
- the second is placed on a narrow and short surface for operations with a vertical orientation;
- the third is not available in all models, but its presence on the back side of a narrow plane at an angle of 45 degrees is useful for monitoring the correct operation.
The level should be applied to the wall, first leaning it against the nail. It is necessary to level the position so that the bubble shows alignment. A line is drawn on the plane of the wall. The device is turned over and the line is drawn again.
If the lines match, then you can be sure that everything is configured correctly. Otherwise, you need to make corrections:
- on the right, where the marks diverge, a mark is placed in the center between the lines;
- a level is applied to the screw, but this is done so that the other end coincides with the marking point;
- the position is fixed;
- The ampoule must be adjusted to the required position.
Useful tips for creating homemade levels using laser pointers
Despite the convenience, compactness and low price of self-made devices, they have two main disadvantages: relatively low accuracy and a short period of operation with constant use of laser emitters. The first issue is solved by setting up the device. To eliminate the second drawback, experts advise replacing the coin-cell batteries in laser pointers with an external power source
It is important to select a source with the required voltage. Usually it is 4.5 V, but it may vary for different models
When buying a laser pointer for a level device, you should carefully select its power and the color of the emitting diode. The best option is a green beam, it is less harmful to vision and is better visible even in relatively bright rooms.
By slightly increasing your budget, you can purchase a simple laser level with or without a tape measure. In this case, you can attach a ready-made device to any base, rather than a combination of a bubble level and a laser pointer.
Often these devices already have places for mounting on a tripod or tripod.
You can also use a laser tape measure as a source of laser radiation.
One more nuance: if a ready-made tripod (tripod) is used to install the laser, a useful addition to it will be a strip with markings or an ordinary metal (wooden, plastic) ruler. This will allow you to raise or lower your homemade level to a certain height without additional measurements. By the way, it is convenient to make the tripod itself from PVC pipes.
How to Adjust a Laser Level for Accuracy
Level calibration begins with adjusting the vertical beam. Then tighten the horizontal guide and set the angle to 900. The stages of work are as follows:
- The device is mounted on a tripod.
- Set the horizon by rotating the bubble level.
- Adjust the vertical and simultaneously check the ray indicator.
- Adjust the angle and speed of rotation of the beam.
- Install the laser pointer receiver.
Disabling unnecessary functions at the time of use allows you to extend the operation of the meter on batteries or a rechargeable battery. Attention! A self-leveling laser level may have a slight error. Therefore, the device is adjusted manually.
Laser Level Calibration
To adjust the laser level, you will have to open its housing. Depending on the model, this is done in different ways. Before starting work, it is recommended to look for visual materials from people who have already dismantled a particular product. There are some useful tips.
The housing screws must be unscrewed carefully, using a smooth force. Do not use pliers to remove O-rings. The elements can be unlocked by winding a nylon thread into the slot at the junction of the parts.
The case with latches should not be disassembled with a screwdriver or force.
The fixing elements should be found with a thin knife, running it along the gap between the parts of the structure. The latches are sequentially released without excessive effort.
After disassembling the housing, the main power structure of the laser device is revealed. This is a metal part, inside of which horizontal and vertical emitters are fixed. It has fixing screws for each of the lasers, as well as adjustments for the light front. The smaller screw on the side changes the inclination in the vertical plane, the large one in front changes the angle of attack relative to the horizontal.
The laser level is adjusted according to the angle of attack using the method already described above.
- The device is installed 1 m from the wall, a mark is made on it and the opposite one.
- The device is installed to the opposite side, the tripod is adjusted until the beam hits the mark.
- The beam is directed to the opposite direction.
- The adjustment screw is turned to understand in which direction the beam is shifted.
The check is done multiple times. Marks are applied with each new test.
Advice! For such an adjustment, it is advisable to choose a room with smooth floors. If this cannot be done, it is worth constructing installation platforms for the device, the surface of which is adjusted to the horizon verified using a water level.
Similarly to the method described above, the tilt of the laser plane or line is adjusted. A mark is made on the wall, the device is rotated, and at the same time adjusted with the appropriate screw. The most difficult thing to calibrate a laser level is vertically. To do this you will need a plumb line. The laser line is directed clearly along the thread. If it is not illuminated along its entire length, you need to do the following:
- loosen the screws securing the vertical emitter;
- with some effort, rotate the laser block in the adhesive layer of the socket;
- tighten the screws;
- repeat the check.
Great accuracy cannot be achieved using this method. However, with some patience, the beam vertical will be almost perfect. Upon completion of the adjustment, you need to carefully fill with glue the areas in the socket that were deformed when turning the emitter unit manually.
How to set up a laser level
A laser level is an accurate and easy-to-use device, but its calibration and adjustment are associated with certain difficulties. To carry out the work you will need to gain access to the internal structure of the level:
- The first step is to open the housing of the device. Before doing this, it is imperative to dismantle the batteries - if you leave them in place, when removing the casing, a short circuit may occur and the thin wires inside the device will burn out.
- The screws are unscrewed from the body with smooth movements and without unnecessary effort.
- The plastic casing is carefully removed, while the additional latches are pressed out with a thin knife without applying strong pressure, so as not to break the fixing elements.
After dismantling the housing, they examine the exposed metal structure, which requires calibration and adjustment. The large front screw is responsible for adjusting the so-called angle of attack relative to the horizontal plane, and the small side screw is responsible for the vertical tilt.
Adjusting the laser level horizontally
The sequential algorithm for setting up and adjusting a laser level with your own hands looks like this:
- The level is installed at a distance of 1 m from the wall and a clearly visible mark is made on it and on the opposite surface.
- The device is moved to another wall and adjusted until the beam hits the set mark.
- The laser is again pointed at the first wall and calibrated using a screw to understand which way the projection is shifting.
The check is carried out repeatedly and new marks are applied each time until the level begins to provide accurate readings.
The adjusting screws under the level cover are also responsible for fastening the pendulum of the device
Vertical adjustment
In a similar way, the laser level is adjusted and calibrated vertically. However, the procedure is more complicated, since you have to work with a plumb line. The algorithm is as follows:
- A tight thread is suspended in a vertical plane. It should be positioned completely vertically, without deviations or bends.
- The laser level is put into operation and its beam is directed exactly along the formed line. Ideally, the latter should be illuminated with a red or green tint along its entire length - this will mean that the construction device does not need calibration.
- If the laser level goes wrong, you will need to adjust it using the same screws hidden under the housing cover. It is necessary to loosen the clamps holding the vertical emitter and, with a little effort, turn its block in the socket.
- Once the laser beam is exactly aligned with the plumb thread, the calibration is completed and the screws are tightened again. For reliability, the check is repeated and only then the level is assembled back and the housing is mounted in place.
Advice! Rotate the laser unit in the socket manually very carefully so as not to tear it out of place. After calibration is completed, it is recommended to carefully secure the emitter with fresh glue.
Instead of a plumb line, you can take a tape measure with a weight or other suitable device
Adjusting the laser level at an angle
Adjusting the inclined laser is carried out in the same way as horizontal adjustment:
- The device is installed at a short distance from the wall and marks opposite each other are made.
- The unit is rotated and checked to see how smoothly the beam lies between the marked points.
- As the adjustment progresses, the level is adjusted using the screw responsible for the tilt, and new marks are constantly set.
When using a laser device, it is necessary to take into account that calibration and adjustment may be required even for expensive professional models. First of all, levels require debugging after a fall. However, physical shock is not the only event that can affect laser accuracy. When tested, many levels show a strong error simply after intensive use or normal transportation.
It is necessary to adjust the level until the error reaches at least the values specified in the instructions
How to fix stuck buttons
If the laser level's buttons stick or stop switching, it is because they have been pressed too hard during regular use. You can carry out the repair yourself. You need to disassemble the device and solder the detached contact using a special device - a soldering iron.
Advice! To ensure that the solder does not fall off during further use, the work is performed using special solder. The main constituent substance is flux.
The laser level requires very careful handling. Therefore, if during use you find defects, you should immediately try to eliminate them. You can do minor work yourself. But in case of serious damage, contact a specialist. If you don't understand anything about this kind of repair, it will be better. Otherwise, you will not only not repair the product, but also worsen it. And buying a new one will cost much more than repairing it at a service center. In any case, it's up to you to decide. Good luck!
All plane builders have a certain error within the tolerance. Usually for cheap models it is 0.5mm/1m. For a 3-4 meter wall there is a 2-3mm run-up. And if you lay tiles in the bathroom, then at this level the discrepancy along the 4 walls will lead to a 5-6mm mismatch in the seams. More expensive models from 7-8 thousand. rubles have a smaller error, from 0.2 to 0.05mm/1m. Of course, they give a more uniform beam and a wider angle. But even a cheap level needs to be adjusted and this is very easy to do. Let’s look at the adjustment using the example of the cheapest Chinese level from Leroy, which did not even fall within the tolerance of 0.5mm/1m. There are adjustment screws at all levels. By tightening or unscrewing the screws, we change the position of the center of gravity of the pendulum and change the level setting.
It is very easy to disassemble. Unscrew the screws of the lower base. Remove the retaining ring using pliers. Can be stretched with threads. Unscrew the bottom and unscrew the body. For convenience, I screwed the bottom to one half and adjusted it that way. First of all, you need to check the level of the horizontal line. Place the device on a base or tripod. On the right side of the beam we make a level mark on the wall. Turn the device to the right so that the left edge of the beam hits this mark. If it diverges, then you need to adjust the horizon level using the side screw. After several iterations, the left and right edges of the ray should hit the same mark. The horizon is set. The second step is to adjust the plane of the beam. We take a large room, maybe a long corridor. From one wall we direct a horizontal beam to another wall. We put mark No. 1, turn the beam to the near wall and also put mark No. 2. Then we move the tripod to the opposite wall, set the height of the tripod to hit mark No. 1, then turn the device and look where the beam hits. The plane of the horizontal beam is adjusted by the front screw. After each adjustment, the marks are drawn again. The first marks are placed crookedly. Therefore, each time we make new marks and compare. We adjust until the beam hits both marks, from any wall. This way we have a guarantee that the tiles laid on opposite walls will be at the same height. The third step is to check the vertical beam. For me it was blocked and not perpendicular to the horizontal. We unscrew the screws securing the vertical sensor, loosen the glue and rotate the sensor in the desired direction. We tighten it and check it against the plumb line of the rope. It's more difficult to get here. It is difficult to turn hundredths of an angle by hand. But with some attempt you will be able to get there.
We tighten the screws and check the horizon again. I set mine with an accuracy of horizon 0.5mm/10m=0.05mm/1m, vertical 0.5mm/2.5m=0.2mm/1meter. The result was accuracy at the level of expensive devices.
Setting up the Bosch PCL 20 laser level
A laser level is a capricious instrument and does not tolerate rude treatment. As soon as he gets upset, he begins to lie shamelessly. In most cases, the situation can be corrected; all you need to do is configure the device. By the way, it is not necessary that the level will give incorrect readings only after a fall. New, fresh-out-of-the-box levels also often suffer from the above-described problem.
Today we will look at the process of disassembling the Bosch PCL 20 laser level and the necessary steps to bring its accuracy in order. There is information on the Russian Internet that this model is disposable - after it falls, you can throw it away. This is wrong. Like almost all laser levels, it can be adjusted. Another thing is that, like many models from Bosch, it has a number of obstacles that complicate this process.
An inspection should be carried out to assess the scale of the problem. I already described how to do this quickly and simply in a previous article https://www.mastergrad.com/blogs/post/12565/ For those who don’t want to follow the link, I’ll briefly describe the procedure for manipulation:
1) set the level at a distance of 5 meters from the wall onto which the beam is projected;
2) turn on the device, turn it to the left (or right, it doesn’t matter), put a line in the middle of its end line; 3) now turn it to the right, look at the difference between the current position of the tail of the line and the set mark. This will be our horizontal error;
4) hang up the plumb line, turn on the vertical, and watch how the plumb line is illuminated. Ideally, it should be evenly illuminated along its entire length. Since Bosch PCL 20 lasers are not particularly powerful, it is best to check the vertical in a room with low lighting. Using the described method, we will check our specimen. Everything is fine with the vertical, but the horizontal is upsetting: 3.5 mm by 5 meters. Therefore, to obtain accurate measurements, the level must be calibrated.
First of all, it needs to be disassembled. To do this, you need to unscrew 5 screws, which can be reached on the right side of the case. A Phillips screwdriver will help us with this.
Then remove the battery compartment cover and remove the batteries. Here the first unpleasant discovery awaits us - to check the result of our configuration manipulations, the case must first be assembled so that the batteries do not fall out.
The board with a pendulum design is tightly fixed to the left side of the case, so you need to hold it and pull the left one to the side.
This is what the Bosch PCL 20 looks like from the inside. We take out, so as not to get in the way: an element with a threaded hole, a lock, a front insert and a protective glass with a rubber gasket.
Despite the position of the LEDs, the upper laser projects vertically, the lower one projects horizontally.
At this stage, for the second time we encounter an obstacle that makes it difficult to adjust this unit: the screws for fastening the diodes, with the help of which the accuracy is adjusted, are located on the other side of the pendulum structure. Therefore, in order to get to them, you need to pull the control board out of the groove. Thus, the top screw is responsible for adjusting the vertical (HV), the bottom screw is responsible for adjusting the horizontal (H).
The tool for adjustment is either a hexagon or a screwdriver with an attachment of the appropriate shape and size. You don’t need to have any sacred knowledge either: turn the screw clockwise - the right side of the horizontal soars up, the left goes down; rotate this element counterclockwise - we get the opposite situation. The actions and their consequences are similar for a diode generating a laser beam in the vertical direction.
To summarize: you can easily set up the Bosch PLC 20 laser level model yourself. The position of the LED is adjusted with only one screw, and if it weren’t for the tedious disassembly and assembly process, the setup would be simple and pleasant to carry out.
Setting up the laser level
Let's move on to the question of how to set up a laser level. In principle, manufacturers write about all this in the instructions. But not everything in them is always clear.
It should be noted that the setup procedure for most devices is the same. For example, the simplest tool. As mentioned above, first you need to align the device horizontally; to do this, tighten the screws and look at the two bubble levels.
If a prism level is used to draw lines, then two lines can be applied to the plane at once: horizontal and vertical. But you can disable one of them if this is not required. Using such models, you can draw plumb lines - zenith, or install only laser points - nadir. Both features can be turned on and off as needed.
Setting up a laser level Source instrumentru.ru
Rotary levels, in addition to the above functions, have two more that can be configured. These are the scanning angle and the rotation speed of the laser beam. The only thing to note is that the rotary instrument projects the beam only in one plane. Although today modifications have already appeared, with the help of which you can additionally beat off the vertical axis at the same time.
As you can see, setting up and working with a laser level is not difficult. But if you purchase several additional accessories for it, the quality of the final result will be higher. So let's talk about these additions.
Capabilities of laser plotters Source avatars.mds.yandex.net
Additional accessories
Let's start with the ray receiver already mentioned above. An excellent addition to a laser level if work is carried out outdoors. With this device you can see the laser beam, even if the sun is shining brightly outside. In this case, the maximum operating distance specified in the passport or instructions increases two to three times. The most important thing is that you need to purchase a receiver of the same brand as the laser level. Devices of different brands, as practice shows, may not fit together and work incorrectly.
And one more thing - not all laser tools can work with receivers.
Target
This is a plastic plate on which concentric circles are drawn and horizontal and vertical rulers are applied. It is very similar to a paper shooting target, hence the name of the device.
The plate is used in cases where the distance between the planes is large. For example, 40-50 meters. And the point relative to another, located on the opposite wall, must be shifted a few centimeters above or below the horizon. It is impossible to see at such a distance whether you have reached the required place. Because the mark of a marker or pencil on the wall will simply not be visible. So they hang up a target that won’t be too difficult to hit.
Here I would like to add that some brands of laser levels are equipped with sights. It is installed on the instrument body. It has its own name - optical sight. With the help of such a device, you can hit the target accurately even from 100 m.
Laser level target Source i.simpalsmedia.com
Rail
This device is necessary when you need to apply several parallel lines at the same time, the distance between which is the same. Using the rail, you can also change the installation height of the laser tool itself, if the latter is mounted on a tripod.
Setting up laser levels, step-by-step instructions
Calibration of the Firecore 3D 93T laser level Adjustment of the laser level with cone prisms 3-360 model Firecore 93T, also suitable for Green configuration.
Setting up the KaiTian 3D laser level Adjusting a laser level with three planes 360 degrees, using the Kaitian 3D level as an example
Adjusting the error of ADA CUBE 2-360 There is a common opinion that levels with new cone prisms are practically not adjusted, in part one can agree with this, but ...
Setting up a Chinese 3D laser level Heng Chang Adjusting a 3D laser level from China with a 3-360 optical design
Disassembling and setting up the Bosch PCL 20 After unscrewing the bolts, the Bosch PCL 20 folds into two halves, and here the first drawback becomes clear, and it lies in the fact that when disassembling the level...
How to disassemble and configure the ADA ARMO 3D Adjusting the laser level is performed with various adjustment screws; the number of screws affected depends solely on how much the laser level “lies”.
Setting up the 3D laser level LAISAI LS666-120 The Laisai LS666 laser level has an excellent opportunity to adjust the position of the laser lines without opening the case within ± 3mm
Adjusting the FIRECORE F190R laser level Self-adjustment of the combined laser level is more than possible, just watch and everything will work out
Setting options for the SHIJING 3D GREEN laser level How to disassemble and adjust the ShiJing 3D Laser laser level with a green laser beam
Adjusting the accuracy of the Chinese XEAST laser level We offer you to look at the fairly detailed adjustment of the 3D laser plane builder from China XEAST
Adjusting the accuracy of the Aculine AK 435 laser level Adjusting a laser level such as the ACUANGLE A8826D or Aculine AK 435 is very simple, since only two adjustment bolts are involved in adjusting the accuracy...
Setting up the Firecore F112R laser level Detailed analysis of the adjustment bolts. Which screws to turn in different situations.
Adjusting the ADA 2D Basic Level laser level As a rule, after a series of mechanical impacts on the device, over time an error appears greater than the stated one; fortunately, you can do the adjustment yourself.
Over time, each laser level will require adjustments or adjustments as they may be dropped on construction sites or subject to prolonged vibration during transport. Of course, this happens infrequently, but it still happens.
By and large, the principle of adjusting a laser level is applicable to all models from different manufacturers, but there are exceptions, for example, adjusting a laser level with an electronic compensator is very different from adjusting a laser level with a conventional magnetic pendulum compensator.
The latter, in turn, are not all regulated, so household levels are often not amenable to such repairs.
Loading navigation
How to make a laser level with your own hands
Everyone knows that laser levels are very convenient and practical to use, but they cost a lot of money. Therefore, anyone who does not want to spend money on a factory copy of the device can try to assemble it themselves at minimal cost.
Moreover, we will try to give step-by-step instructions for assembling the device.
There are several ways to assemble a homemade laser level. The easiest way is, of course, using a regular laser pointer.
Second option
more complicated, but more advanced using a special laser module, which is freely available and costs literally several hundred rubles. Let's look at it in more detail.
First step
To make a laser level with our own hands, we need, and perhaps most importantly, the emitter itself with a cross, into which two small prisms are already built-in, responsible for projecting a horizontal and vertical line.
Second step
We need to find or create a mechanism similar to a pendulum. You can take the insides of an old joystick, as shown in the video below, or assemble it yourself from metal, plastic or wooden parts, the main thing is that all connections move freely relative to each other.
You can see the structure of the pendulum using a real laser plane builder in the photo:
Third step
Next, we install our module into the pendulum; to do this, we make a corresponding hole in the lower part of the pendulum with a diameter the same as the thickness of the module.
When our conditional compensator is assembled, we need to make weights that will help us in setting up a homemade laser level.
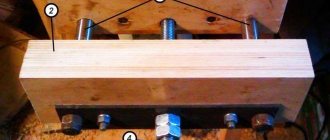
Fourth step
- We make two holes in the pendulum barrel, namely transverse and longitudinal, for the subsequent installation of threaded studs on both sides.
- You need to screw two or three nuts onto all four resulting ends, depending on the weight from which the pendulum will react to the overweight.
- Thus, we have a device in which we can shift the center of gravity, and, accordingly, the position of the laser lines.
Fifth step
We take a battery compartment from some old toy for 3 or 4 batteries, two will not be enough, so our homemade laser level will quickly run out, and more than four will be heavy.
It is advisable to make the compartment through a switch, it will be much more convenient. The switch can also be taken from an old unnecessary toy, fortunately this goodness is now in bulk.
Sixth step
Our entire self-assembled device needs to be installed in some kind of housing, here you can take, for example, a part of a plastic plumbing pipe with a diameter of 110 mm with a plug.
Screw the homemade compensator to the lid and insert it into the pipe, but first you need to cut apertures (windows) for laser beams.
Seventh step setup
When the entire assembly of the laser level with your own hands is completed, it needs to be configured. For precise adjustment, you can use a cheap water level, which we make two marks on the wall at a distance from each other, about 5-6 meters.
Using these two points we check the horizontal; if it passes evenly through these points, then no adjustment is required. When the laser line deviates from a given line, we use our nuts on studs, moving which will change the position of the laser plane.
The vertical line can be checked using a simple plumb line.
The advantages of such a homemade level
- – very low cost
- – projects visible laser lines onto walls rather than a dot
- – self-aligning mechanism
- – the ability to make very precise adjustments to the minimum error.
Disadvantages of a homemade laser level
- – takes a long time to install, since there are no magnets at the bottom
- – small ray scan
- - painstaking work
- – has an unfinished appearance
Where to buy a laser module
To purchase, you can use two well-known international online stores. There is nothing complicated about ordering, just follow the navigation instructions and you will have the emitter for mere pennies.
- 1. store
- 2. store
- Try it, assemble it yourself, if it doesn’t work out or you don’t have enough perseverance, you can always buy a finished product, at least from a selection of cheap laser levels.
- Recommended reviews and articles
Join our Telegram channel: @izmerilovka and the VKontakte Group, and you will be the first to know about the latest reviews of laser levels! We hope that our reviews will help you make your choice and save money.
Adjusting the Longyun 4V/1H laser level
How to calibrate a laser level after a fall or with incorrect factory settings
A laser level is a measuring tool, therefore the main indicator of its operation is accuracy. You should not rely on the stated error value in the user manual; even for a new device, the actual indicator very often has significant excesses and does not depend on cost and branding. This is due to the fact that all devices are adjusted manually (we are talking about devices with a pendulum magnetic damper compensator, which make up the lion's share of total sales) using pins for attaching the emitter to the pendulum structure or counterweight screws. Well, if the device has already survived a fall or a strong blow, this is a 100% sign that its accuracy is not all right.
It is quite simple to make sure that the laser plane builder is working correctly - you need to check it, which only requires a pencil and a plumb line. Our test subject will be the Longyun 4V/1H laser level, which has never taken part in work before. The order of actions is absolutely not important, but most often the horizon is “cluttered”. There are several options for testing it, the simplest of which is to check the correspondence of the beam endings. To do this, you need to rotate the device body to a position where only the “tail” of the projected line remains on the wall. A mark is placed in its center with a pencil. Then we turn the body 180 degrees and look at the correspondence of the mark with the middle of the other “tail”. This procedure is carried out at a distance of at least 5 meters from the wall on which the beam falls.
Checking the vertical is also simple - the emitter is aimed at a plumb line. If the error is minimal, then the beam will evenly illuminate the thread along its entire length.
Based on the methods described above, let’s check how accurate our device is in its readings.
The diagnosis is not exactly disappointing, but it could have been better. For our device, the horizontal error is 2 mm per 5 meters, with a minimum value of the same indicator for all 4 verticals. By and large, for a household device you can leave everything as is, however, the manufacturer provides mechanisms for setting it up in the design of the level. And to use them we need to disassemble the Longyun 4V/1H.
When starting to disassemble the device, it is MANDATORY to remove the power source(s) from the battery compartment. If this is not done, there is a high risk of a short circuit, which will result in the copper wires coming from the power board burning out.
Level adjustment
After making a homemade device, you need to configure it correctly. When using the option with a water measuring system, there are no problems; the main adjustment requires the supporting structure.
Level adjustment
The process goes like this:
- The peg is installed into the floor by driving it in or using a mounting stand. The support is screwed in until it coincides with the bubble level in the ideal position.
- The indicator turns on and is aimed at the required surface. By carefully rotating it is possible to mark the walls.
- A self-tapping screw is screwed in in the marked area, a second place is marked nearby, after which the rail is installed.
After adjustment, the level is moved a short distance to check, if the values match, it is possible to continue working
When working with the tool, you must take precautions, wear safety glasses, and avoid direct exposure of the beam to your eyes.
Adjustment diagram
When using a homemade structure, it is important to monitor the exact markings; if the device goes wrong, you can get incorrect readings. It is necessary to monitor the vertical or horizontal position of the beam, and when using a foam component, wait until the device takes the desired position
Option No. 1 – Use a flat stand
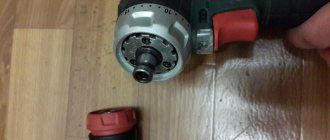
In the first case, in order to make the device ourselves, we will need the following materials:
- a regular laser pointer (shown in the photo above; if you don’t have it lying around from previous years, you can buy it, the price is low);
- bubble building level;
- wooden peg, 1 to 1.3 meters long, 5 to 6 cm in diameter;
- a small piece of rubber;
- a sheet of plywood or board along the length of the level.
Having prepared all the materials, you can proceed to assembling a homemade device. To make it clearer to you how to make a laser level with your own hands, we provide a step-by-step guide:
Prepare the laser pointer. To make the beam brighter and clearer, break through the glass in the nozzle. To do this, cover the nozzle with cardboard and carefully break the glass. We will improve the construction level. You need to attach a pointer to the top of the instrument, for which it is better to use clamps. To be able to slightly adjust the direction of the laser beam in the future, place a piece of rubber between the level and the pointer, as shown in the drawing. Assembling the stand. First, one of the ends of the bar needs to be sharpened so that it fits well into the soil. After this, you need to assemble a reliable stand from a peg and a sheet of plywood with your own hands, screwing the sheet to the second end of the block with a self-tapping screw
We draw your attention to the fact that the plywood must be screwed strictly perpendicularly, otherwise the accuracy of the measurements will leave much to be desired.
That's all the manufacturing instructions. As you can see, it is not difficult to make a simple laser level with your own hands, but the problem is that such a homemade product cannot be installed on a hard surface, for example, a concrete screed. To solve this problem, you can also evenly screw a board from the second end of the peg, which will serve as a stand. In addition, you can make a stand, like a real level, but making a tripod will take more time.
Using such a homemade laser pointer device is not difficult. First, the stand is driven into the ground, after which it is leveled with a bubble level - the bubble should be strictly in the center. Next, you need to turn on the pointer and mark the point projected on the wall with a pencil. After this, the stand carefully rotates along its axis in a horizontal plane to the next mark. The two points are connected to each other and that’s it – the straight line on the wall is ready, you can start installing the electrical wiring!
It should be noted right away that you should not rush and start important marking work from the very beginning. First of all, you must make sure that the homemade product works correctly so that the result does not become disastrous for you. To do this, you need to adjust the homemade laser level (in other words, check the accuracy of the work).
You can make the adjustment yourself like this:
- You need to screw a self-tapping screw no more than 120 mm long into the sheet of plywood on which the level is installed. The head of the screw must coincide with the projecting line of the laser pointer, as shown in the drawing.
- Next, you need to turn on the pointer and point it at one of the walls, then make the appropriate mark with a pencil. The second self-tapping screw must not be completely screwed into this point.
- Now a profile for drywall or any other plank of light weight is carefully installed on the heads of the screws.
- A homemade laser level is installed on the profile and, if required, the bar is aligned in a horizontal plane at the base of the bubble. Alignment must be done by tilting higher/lower the edge of the profile that is located closer to the wall.
- Having leveled the profile, you need to screw a new screw into the wall, if necessary, and then remove the profile.
- In the end, the homemade level is installed on the stand and the pointer is adjusted to a new point (the screw head). Now your device is perfectly level.
With the help of such a homemade laser device, you can independently make horizontal lines to conduct hidden wiring in the house. However, you should not trust the accuracy of the measurements too much, because... This is not a professional tool and the error here is quite high.
Video review of a more complex self-regulating cross-type model
How to make a level with your own hands
Unnatural movement of the switch or pendulum
After a strong impact or prolonged vibration, foreign objects may get under the pendulum, thereby blocking the movement of the pendulum rod and the correct movement of the level switch.
To check and correct this case, you need to remove the compensator by unscrewing three bolts (as indicated in the photo above) and clean the magnets from foreign objects, and also open the lock manually inside the case.
How to make a laser level on a tripod
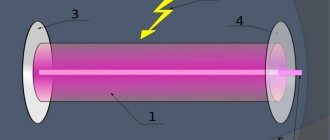
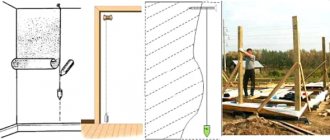
If you have a tripod and a construction bubble (“spirit level”) level, creating a device comes down to installing a tripod and attaching a level to it with a laser pointer fixed on it. The illustration shows a level with an existing groove for the pointer, but in fact the fastening is simply done using clamps, wire or even tape.
The most difficult part is the correct orientation of the laser beam. To do this, it is advisable to insert a piece of hard rubber or foam between the pointer and the surface of the level, securing it with clamps or elastic bands, as shown in the diagram.
Here 1 is a pointer, 2 is a piece of dense and moderately elastic material, 3 is clamps or elastic bands. After setting the bubble level strictly horizontally (this can be done on any flat surface), the laser pointer turns on. By cutting the insert and tightening the clamps tighter or looser, we carry out a kind of adjustment of the level (of the future). Once parallelism between the horizontal plane and the laser beam has been achieved, you can mount the resulting device on a tripod in any convenient way.
Preparing the level for work
The quality and correctness of markings at a construction site depend on the device settings. Before setting up the laser level correctly, carry out the following preparatory steps:
- fully charge the level battery and place it in the device;
- adjustment begins if a laser beam appears when the meter is turned on.
To obtain accurate markings, the laser level is placed on a flat surface. When installing the marker, the following requirements are met:
- There must be no obstacles in the way of the device: objects, people and animals;
- the distance between the object and the level should not exceed the maximum mark, the value of which is indicated in the instructions for use by the manufacturer;
- a perfectly flat surface will allow you to take measurements with high accuracy; choose a table, tripod or homemade holder for the base;
- to prevent the meter from moving during marking, the device is fixed on a flat surface;
- Some models have a built-in self-leveling function; if the device is installed on an uneven surface, the device emits a signal.
Purpose and classification of devices
The principle of operation of the device is quite simple: you need to place the laser level on the surface of the floor or wall, start it and wait for the device to create vertical or horizontal marking lines, depending on the surface used.
But such a device in construction stores costs a lot, so it’s best to figure out how to create a tripod for a level with your own hands, especially since such a procedure does not require much labor.
In appearance, the alignment looks more like a compact device that can be installed on different surfaces. The most common mounting of the device is carried out using the following settings:
- tripod stand;
- magnetic mounts;
- bracket;
- special fastening belts.
In addition to the principle of fastening, construction devices differ from each other in the features of the projection of the laser beam onto the wall surface and its direction. Devices that are used to determine direction create a projection on the surface in the form of a point. The levels that delimit the plane include in their structure a special optics system that turns the beam into the plane itself. Today, experienced builders identify the following types of laser systems:
- A rotating device that can rotate around its axis, while forming clear outlines. This device has a durable body, well protected from external factors. This product is often used for various construction works: from pouring the floor to creating a ceiling.
- A positioning apparatus, which includes two radiation sources, helps to project the plane visible to the builder. This device is most often used to furnish a room.
- A self-leveling device is a level that includes a special pendulum that can emit about five rays. Such a device may also have a cross-type sight.
Checking the device for correct installation
Much depends on the accuracy of the measurement results carried out by the device. If the plane for laying tiles is knocked off, then the evenness of the installation of the tool will affect the interior design. If the plane is checked during the construction of a house, then the installation of the level will affect the quality of construction and the reliability of this structure.
Each device (depending on the model and its cost) has corresponding error indicators
The permissible error values are indicated directly in the instructions for the equipment, which should be taken into account when purchasing a tool. Acceptable error values are indicated in the appropriate units of measurement, which are mm/m
Errors are not so important when using the device indoors, but they are extremely necessary when carrying out external work on beating a plane and leveling walls.
The error is one of the main technical parameters of the instrument, and some manufacturers indicate the magnitude of deviations not only in the technical documentation, but also on the body of the device. If the magnitude of the error is known, then the permissible deviation from the norm can be calculated. If the deviation value is higher than permissible, it is recommended to use a level with a smaller error value.
It doesn't matter if the laser level is being used to level a floor, wall or ceiling, but before taking the corresponding measurements, you will need to check the accuracy. The check is quite simple, for which the following steps are performed:
- First you need to put marks on two parallel walls in the room, according to which the check will be carried out
- One mark is placed on the wall that is closer to the device (at a distance of up to 1 meter)
- The second mark is placed on the opposite wall, located at a distance of more than 2 meters. The further the distance between the walls, the more accurately device deviations can be identified
- After marking with a marker or pencil on the wall, you need to move the level directly to the wall, which was further from the level
- Align the directional laser beam with the point that was marked. Then project the beam onto the opposite side and see if it matches the mark
- If it matches, then the instrument has an insignificant error (note that the greater the distance between the walls, the higher the error, and the smaller the gap between them, the correspondingly lower the error)
- If the laser beam does not coincide with the mark, then there is an error, and its magnitude is quite high. There are special adjustment screws in the device body, which also allow you to adjust the level, reducing deviations from the norm
Before using a laser level to level walls, you need to make sure that there are no large deviations, otherwise the indicators will not correspond to reality. Below is a video instruction and training on how to properly check the level for measurement accuracy.
https://youtube.com/watch?v=ffrWqniqrfs%3F
Checking the accuracy of 3D laser level
“Trust, but verify” - this saying applies to any measuring instrument. And since the laser level belongs to this class of devices, it also belongs to it. To be confident in your partner, you must first check him. The need for this procedure is explained in this article. The level model used in it is the so-called. "bucket". To check the 3D level, the list of required manipulations will be slightly different, since the type of emitters in their design is different. 1. HOW NOT TO CHECK THE LASER LEVEL?
I would like to start from this point. The instructions for the device (at least this is true for Chinese levels) show in pictures how the test is done. It is impossible to understand anything from the accompanying Basurman explanations, but in general the meaning is captured from the pictures. However, many people check the laser level (if they check it at all): with another device, along a masonry seam, “by eye” :) By and large, if there are no special complaints about the measurements, then these methods are suitable. Otherwise, it is done differently.
2. HOW TO CHECK HORIZONTAL?
The test begins with a diode projecting a horizontal beam. He is the weak link among the present emitters. This circumstance is due to the larger distances at which the measurement takes place. Those. Most construction work is carried out in rooms with a height of 2.7-3 m. Even a deviation of 2 mm at 5 meters at such a height will be practically unnoticeable. At the same time, if a horizontal diode has similar accuracy, then it will not be pleasant.
As a rule, 3D laser levels are a symbiosis of the device itself with an eccentric rotating base. At the time of checking the horizontal line, it is necessary to get rid of the metal pedestal - due to the play in the design of the accessory and the shift in the center of gravity of the body, after the next turn the beam line may be slightly higher/lower than the reference mark, and this has nothing to do with the settings of the device. Distance to the wall , as when checking a conventional laser level (LINK TO PAST CHECK), there must be at least 5 meters. We set up the device, turned it on and put a line in the middle of the line.
Now we sequentially rotate the level body 90 degrees. After the beam settles down in the new position, look/mark the middle.
Based on the characteristics in the instructions, the result obtained should not exceed 1mm per 5m (to be honest, I don’t know what this means). If you use common sense, then with each rotation the center of the line should coincide with the previously set mark. Anything more—the level needs to be adjusted.
3. HOW TO CHECK THE VERTICAL?
Verticals are checked in the same way, only the construction plumb serves as a reference sample. The sequence of actions is presented below in the pictures.
4. HOW TO CHECK A RIGHT ANGLE?
And the finishing chord is checking the right angle formed at the intersection of verticals. By and large, the need for it does not arise often, but it is still necessary to check. We hook the rotating base back to its rightful place, because it has such a wonderful thing as displacement or precise positioning screws. With their help, the body can be shifted by fractions of millimeters in the longitudinal or transverse direction, and in the same way rotated around its axis. Which couldn't come at a better time for us.
We draw an Egyptian triangle on the floor and use it to check the right angle.
How to make a laser level with your own hands
Before you start assembling a homemade level, you must clearly decide why you need it and in what situations it will be used. If you are not going to measure something very often, then we recommend not making it. But, if you are planning a large construction project, then you won’t be able to do without it. To make a laser level with your own hands, you need to collect the following materials:
- Regular building level.
- A piece of plywood or board.
- A laser pointer, you can buy it in any children's store, the price is pretty cheap.
- A peg with a round diameter d=5-6 cm, its length should be 1 or 1.3 m, if desired, you can take any convenient holder.
- A small piece of foam rubber.
Step-by-step instructions will help you understand the question of how to make a laser level with your own hands and help you avoid making mistakes. Learn how to make a mobile projector.
- We take a laser pointer and break through the glass, so the beam will be clear and bright.
- We are improving the building level; to do this, you need to attach a pointer to the top. You can use clamps or other devices for fastening. But, remember, the pointer must be adjusted in the future; to do this, we place a small piece of rubber between the pointer and the level, this is how it looks in the photo.
- Let's put together a homemade product. Initially, one piece of the block needs to be sharpened a little so that it fits into the soil; if you are going to use a homemade laser pointer, then try to make a special mount. Using a peg and a piece of plywood, we assemble the stand with our own hands; the sheet can be screwed to the block with self-tapping screws. We screw the sheet strictly in a perpendicular position, this is the only way to achieve normal measurement accuracy.