Details Any well is a complex engineering structure. If the lower part usually has a small diameter and is created with special equipment, then the upper part, to reduce cost, is made in the form of a pit and finished with available materials.
To an outsider's eye, such a structure does not seem to present anything complicated: a foundation pit is torn out in any available way, special concrete rings are installed there, or the wall is lined with any available building materials. The most commonly used materials are remnants of brick and natural stone. Sometimes owners prefer to fill the walls with cement mortar. And this could be the end of it, if not for certain nuances that we would like to talk about in more detail.
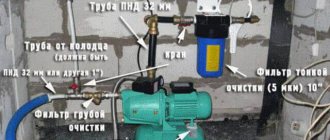
Construction of a pit for a pumping station for water supply to a country house
A comfortable home in the understanding of modern people implies the mandatory presence of running water. To reliably supply water for domestic needs and water the adjacent area, a well was drilled. The depth of groundwater turned out to be less than seven meters, which made it possible to use an automated pumping station for lifting.
Due to geological features, it was not possible to install a well directly under the house. To install the pumping station, a buried structure was required, which it was decided to make from the remains of bricks. It was planned to make the recessed unit at least 1.8 - 2 m deep with an insulated chamber above it, under the slate roof. Access to the structure was supposed to be through a hatch using a wooden ladder.
How to choose?
But in any case, there is: A suction pipeline that is lowered into a well or well.
In the well, a shelf is attached to the wall; in the case of a well, the pit is deepened. Place the ring with the bottom down, and the ring with the lid on top.
Before starting the installation with a surface pump for the first time, it is necessary to fill the working part of the system with water.
The most important benefit of civilization that owners strive to equip their country house with is a water supply system. Selecting an installation scheme Depending on the depth of the hydraulic structure, one of two pumping station connection schemes can be used. Depending on the depth of the hydraulic structure, one of two pumping station connection schemes can be used: a single-pipe scheme is suitable when water is lifted from a depth of no more than m ; a two-pipe scheme is used when pumping water from a well or well more than 10 m deep. Water supply pipelines must pass either below the freezing depth of the soil or be properly insulated. This method of installing a pumping station is good because if everything is done correctly, the system works without problems.
Screw P is used to adjust the switching pressure, and screw DR is used to adjust the shutdown pressure. If necessary, air must be pumped up using a compressor or car pump. Water is poured in until it begins to flow out, and then the valve is tightly closed.
If there is a connection, it is advisable to make an inspection well. In a separate building located above the wellhead or well.
Basic installation and connection diagrams
The end of the pipe is placed in a well or borehole. The pumping station provides the following benefits: Increases the efficiency of the water supply system. This scheme makes access to the station somewhat difficult. If water is taken from a river, lake or pond, it must be used only for household needs or irrigation.
When using a surface pump, a plastic water pipe is installed in the well. You can also secure the legs more securely using anchor bolts. It is possible to construct large-sized caissons in which pumping equipment can be placed. It is best to connect them using a five-pin fitting, which is mounted in the pressure pipeline in a convenient place. How to quickly start a pumping station. The film was shot with a Bravis A3 action camera
Preparation for work on pit arrangement
The construction of the well pit was carried out on our own without the involvement of builders. To construct the unit, the following materials were required:
- Brick, possibly used;
- washed and sifted sand;
- crushed stone of medium and large fraction;
- slate;
- wooden beam,
- edged board;
- steam-hydrobarrier membrane;
- polyethylene pipe.
During the preparation process, preliminary calculations of the need for materials were made, after which the purchase was made. The following tools were used to carry out construction work:
- bayonet and shovel;
- trowel;
- buckets for water and bulk materials;
- bushhammer;
- angle grinder;
- jigsaw
A tape measure and a building level were used as measuring and control tools.
Connecting a surface pump to a well or well
The easiest way is to connect mobile equipment to a country well, which is used exclusively for irrigation. It is more difficult to connect a stationary pumping station to an autonomous water supply system. This will be discussed further.
What is needed to connect the pump to the water supply
In addition to the electric pump, to connect it to the water supply system of the house you must have:
- inlet and outlet pipes or rigid hoses with a cross-section of 32 or 25 mm, the length of the pipe is calculated so that the lower end is immersed in water by at least 30 cm, while the total length should not exceed the size specified in the passport for the device;
- connecting fittings;
- storage tank with a volume of 30-60 liters;
- flexible hoses for connecting the tank to the pump;
- five-pin adapter for the second output;
- pressure switch;
- pressure gauge
In order to reduce the number of starts, it is recommended to connect a self-priming surface pump to a storage tank and an automatic start-up control system. The storage tank also functions as a hydraulic accumulator, regulating the pressure in the pressure system and protecting it from water hammer.
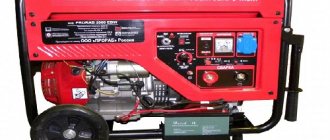
Many manufacturers produce ready-made pumping stations, which include all the necessary equipment. If a separate device was purchased, the missing components will have to be purchased additionally.
Choosing a location for installation
Surface pumps are always mounted on land - water should never get into the device body. Ideally, the electric pump should be mounted as close as possible to the well or well. The room should be dry, relatively warm (positive temperature) and well ventilated. It is possible to install a pumping station in the basement, but in this case you will have to put up with constant noise.
To place the device next to the well, small buildings are built or the equipment is placed in underground caissons - concrete, plastic or metal insulated structures with ventilation, equipped around the well casing. Caissons are built below the ground freezing level. In this case, water pipes to the house are laid in a trench, also dug in non-freezing layers of soil.
Installation and connection diagram of pumping equipment
Instructions for connecting to an autonomous water supply
This step-by-step description of how to properly install a surface pump in an autonomous water supply system is relevant for all types of pumping equipment. Failure to comply may lead to breakdowns and emergency situations.
Before connecting the surface pump to the water supply system, it is secured to a fixed base with bolts. To neutralize vibrations, it is recommended to use a rubber mat or special attachments for the legs as a pad. A hose is connected to the outlet, to the other side of which a check valve and a coarse filter are connected, sealing the connections with special tape or flax. Outgoing pipes leading to the water supply are connected to the second outlet, located in the upper part of the housing. The check valve is immersed in water, allowing a slight slope in the line of pipe or hose running from the valve to the pump. At the next stage, the system is filled with water through the outlet holes or filler plug.
It is important to remove all air from the system! Next, connect the pressure part with wiring throughout the house. At this stage, close the filler hole and check the pressure in the accumulator (tank). If the pressure does not correspond to that specified in the instructions, it should be increased (pump up) or decreased (bleed)
Having clearly completed all the steps, the electrical equipment is plugged into the outlet and started up. The switched on pump should start and fill the system and accumulator with water. Turning off the engine indicates that the pressure in the system has reached its maximum (from 1.5 to 3 atmospheres). Now you can open the tap and make sure the installation is working. If, when the valve is open, the pressure does not correspond to the parameters specified in the instructions, it is necessary to adjust the operation of the relay.
If the pressure does not correspond to that specified in the instructions, it should be increased (pump up) or decreased (bleed). Having clearly completed all the steps, the electrical equipment is plugged into the outlet and started up. The switched on pump should start and fill the system and accumulator with water. Turning off the engine indicates that the pressure in the system has reached its maximum (from 1.5 to 3 atmospheres). Now you can open the tap and make sure the installation is working. If, when the valve is open, the pressure does not correspond to the parameters specified in the instructions, it is necessary to adjust the operation of the relay.
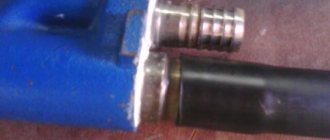
Connecting a check valve and filter to the pipe
Excavation work - excavation excerpt
Excavation was carried out around the casing, which was installed in the well. The marking of the site for the pit was carried out taking into account the thickness of the walls of the structure and ensuring the minimum necessary access to the pump for its installation and maintenance. The soil on the site turned out to be sandy loam, and there were no difficulties with its removal; ordinary shovels were used to carry out the work.
To ensure safety from collapse, the walls of the pit were reinforced with wooden shields. Clean sand was discovered at a depth of about one meter and was subsequently used during construction. The total volume of the pit was about 6 - 6.5 cubic meters. meter, work on its fragment was carried out in approximately 5 hours.
Features of designing a water supply system diagram
diagram of the water supply system, connection of the boiler installation.
There are two ways to decouple pipes, which directly affects the pressure in the water supply system, namely:
- Sequential, involving the use of a main pipeline and tees that supply water to several separate points. With such an organization, using several of them simultaneously becomes problematic due to low pressure in the network;
- Collector, which involves supplying pipes to all points separately, which contributes to the same level of pressure in each of them. Of course, this method will entail additional costs for purchasing pipes, but its effectiveness is worth it.
Laying the foundation and laying the walls of the pit
The next stage of construction consists of preparing the foundation and erecting enclosing structures. Laying the foundation is carried out in the following order:
1) At the bottom of the pit along the contour from the inside, formwork was installed, assembled from trimmings on a frame made of timber.
2) A solution of the following components was mixed in the trough: cement 1 part, sand 3 parts, crushed stone 3 parts.
3) The formwork was filled with the prepared solution up to its upper cut.
Helpful advice: in order to compact the concrete, you should periodically pierce it with a piece of metal rod. This action will minimize the formation of voids in the foundation.
4) After completion of work, the base is protected from direct sunlight and left alone until dry for a period of 48 hours to one week.
5) A brick-thick masonry is made on the foundation and brought to ground level.
The floor in the ruined structure is compacted, and wooden or metal supports for an automatic pumping station are laid on it.
Installation location
Usually the pumping station is assembled in a heated room. The ideal place would be a boiler room with well-equipped sound insulation. There are other options for installing a water supply station. Often it is placed in the basement or basement, but subject to their heat, sound and waterproofing. You can also use a special box - it is placed in the underground with a hatch providing access to the equipment.
A platform is used to place the station in the well. It is installed below the freezing level of the ground. In this case, the structure of the well should be insulated from above. But this method of placing a water station is characterized by problematic access to it.
You can also build a house for a pumping station or place equipment in an extension. If this is a separate building, it must not only be insulated, but also heated in cold weather.
Self-installation allows you to significantly reduce the cost of installing a pumping unit. Depending on the type of source, different connection schemes for the water station are used. Correct installation depends, among other things, on small elements such as an oil seal, check valve, filters, etc. They can improve and make the operation of pumping equipment longer.
Outdoor structures
On the resulting base, a frame was installed, made of wooden beams and boards with a bevel on one side. The outer contour of the structure was lined with slate sheets installed vertically. The upper edge of the wall served as a support for a wooden flooring covered with a steam-hydrobarrier membrane. The thermal chamber was partitioned approximately in half: in one part there was a hatch, the other was filled with insulation - sawdust.
On top of this structure is covered with two sheets of slate, one of which is fixed. A pipe is removed from the above-ground part of the well pit, to which the irrigation system of the land plot adjacent to the house is connected. Water is supplied to the house through a buried pipeline that is laid in a ditch and placed under the foundation. The well is supplied with electricity via a cable laid in the ground.
All work on constructing the pit for the pumping station took about a week, no assistants were involved.
Subsequent winter operation showed that the thermal insulation of the structure was sufficient, with frosts of about -30 C outside and no freezing of water in the pipes occurred.
Maintenance and repair work at the station was carried out without lifting the equipment outside; there was enough space in the structure.
Choosing an installation location
Pumping stations are installed near a water source - a well or a well - in a specially equipped pit - a caisson. The second option is in a utility room in the house. The third is on a shelf in the well (this number will not work with a well), and the fourth is in the underground.
Installing a pumping station in the underground - the noise from its operation may be too audible
How to Determine Suction Depth
When choosing a location, they are primarily guided by the technical characteristics - the maximum suction depth of the pump (from where the pump can lift water). The thing is that the maximum lifting depth of pumping stations is 8-9 meters.
Suction depth - the distance from the water surface to the pump. The supply pipeline can be lowered to any depth; it will pump water from the level of the water surface.
Wells often have a greater depth than 8-9 meters. In this case, you will have to use other equipment - a submersible pump or a pumping station with an ejector. In this case, water can be supplied from 20-30 meters, which is usually sufficient. The disadvantage of this solution is expensive equipment.
Suction depth is a characteristic that determines the installation method
If you are just a meter short of being able to install conventional equipment, you can install the station in a well or above a well. In the well, a shelf is attached to the wall; in the case of a well, the pit is deepened.
When making calculations, do not forget that the water level “floats” - in summer it usually drops. If your suction depth is on the verge, there may simply be no water during this period. Later, when the level rises, water supply will be restored.
Security Considerations
Another point that must be taken into account is the safety of the equipment. If you plan to install a pumping station near a permanent residence, there are fewer problems - you can choose any option, even in a small shed. There is only one condition - it should not freeze in winter.
Installing a pumping station in a barn is suitable for permanent residence and insulation/heating conditions for the winter
If this is a dacha where people do not live permanently, the matter is more complicated - you need to arrange a room that does not catch the eye. The safest way to install a pumping station is in the house. Although they can take it away in this case too.
The second place where you can install a pumping station is a buried camouflaged caisson.
Installation diagram of a pumping station in a well
The third is on a shelf in the well. Only in this case there is no need to make a traditional well house. You need a steel lid that can be locked with a reliable lock (weld hinges to the ring, make slits in the lid on which to hang the locks). Although, a good cover may also be hidden under the house. Only the design needs to be thought out so that it does not interfere.
Convenience and operating conditions
Installing a pumping station in the house is good for everyone, except that the equipment is noisy during operation. If there is a separate room with good sound insulation and this is possible according to the technical characteristics, no problem. Often a similar room is made in the basement or on the ground floor. If there is no basement, you can make a box in the underground. Access to it is through the hatch. In addition to sound insulation, this box must also have good thermal insulation - the operating temperature range starts from +5°C.
To reduce the noise level, the station can be placed on thick rubber to dampen vibration (created by the cooling fan). In this case, it is even possible to install it in the house, but the sound will certainly still be there.
Caisson made of concrete rings
If you choose to install a pumping station in a caisson, it should also be insulated and also waterproof. Usually, ready-made reinforced concrete containers are used for these purposes, but a caisson can be made from concrete rings (like a well). Place the ring with the bottom down, and the ring with the lid on top. Another option is to build it out of brick and fill the floor with concrete. But this method is suitable for dry areas - the groundwater level should be one meter below the depth of the caisson.
The depth of the caisson is such that the equipment is installed below the freezing level. Insulation foam polystyrene. Better - extruded. Then at the same time you also get waterproofing.
For a caisson made of concrete rings, it is convenient to use a shell (if you find a suitable diameter). But you can also slab polystyrene foam, cut into strips and glue it. For rectangular pits and structures, slabs are suitable that can be glued to the walls using bitumen mastic. Coat the wall, apply insulation, you can additionally secure it with a pair of nails/dowels.