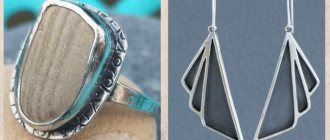
Types of protective corners: from what materials
According to the area of application, corners are available for external (outdoor) and internal use. For now, let's talk about how to protect corners in an apartment and a house - indoors. Let's start with the materials. Corners for protecting wall corners can be:
- Made of plastic (PVC). Different colors, textures, there are even transparent ones.
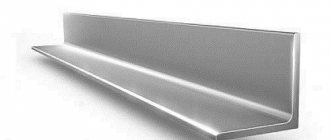
- Made of metal. Brass, aluminum (polished and not), stainless steel, with or without painting.
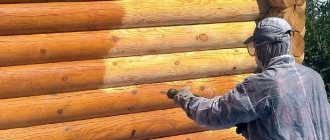
- Wooden. Made from different types of wood, smooth, with relief.
The corner on the arch is covered with a flexible plastic corner
- MDF. With imitation of various types of wood, smoothly painted, with various patterns.
- From a traffic jam. It could be an interesting move to add cork trim to more than just the corners.
Cork corners to protect corners - Rubber. Typically used in hospitals or kindergartens. Perfect for protecting corners in the garage.
- Foamed rubber. Same as rubber ones, but softer. Suitable for protecting overly active children from injury.
- Decorative - with carvings, rhinestones, patterns, etc.
The most popular are plastic corners for protecting wall corners. Don’t think that such protection looks poor. In any case, no worse than frayed corners. It’s just that there are different types of plastic – polished, with a metallic effect, with a satin (matte) surface, with different reliefs. It is clear that in order to find something specific or special, you will have to run around construction stores and markets. But there are many types of design. If the corners for protecting the corners of the walls are chosen correctly, they fit organically into the design without attracting attention at all. At the same time, they protect and decorate the joints very reliably.
Types and types of anchors for concrete
An anchor is a type of finished fastener for securing heavy products by wedging into the wall. Anchor translated from German means anchor. Practically, this is the same dowel and self-tapping screw, but the difference is that the dowel is made of metal, and the self-tapping screw is a bolt or stud with a metric thread that screws into a conical nut. The conical nut, entering the tubular split base of the anchor, pushes it apart, creating a large moment of friction with the wall material. The use of anchors is only possible when fastening in very hard materials, dense brick, concrete and stone. In everyday life, such cases may arise when attaching a heavy chandelier to a concrete ceiling or when installing a large suspended ceiling. The use of an anchor is justified, for example, for fastening sports equipment in an apartment - rings, wall bars. Children's swings on anchors will also hold securely.
| Types of anchors and their purpose | ||
| Appearance of anchors | Name of anchors | Purpose of anchors |
| Anchor bolt with nut | Simultaneously performs the function of an anchor and a bolt. Indispensable if you need to fasten two parts at once, for example a corner or sheet to a concrete wall. This type of anchor is convenient for securely mounting a heavy TV on the wall | |
| Drive-in anchor | The drive-in anchor is designed for fastening heavy objects on walls and ceilings made of concrete, non-hollow brick, and stone. | |
| Anchor with stud, nut and bolt | Allows you to attach any product to the stud of an anchor fixed in the wall with an additional nut | |
| Anchor hook | For hanging stationary products that need to be hung and removed periodically. For example, a chandelier or stretchers between two walls. | |
| Anchor ring | Used for the same cases as the anchor hook, but eliminates accidental slipping of the fixed product | |
| Anchor Molly | For fastening hollow structures to walls | |
| Frame anchor | Universal for fastening wooden and metal frames, wooden boxes to concrete and brick | |
Anchors are expensive and therefore their use is justified only if there is no alternative method of fastening. The anchor is indispensable, for example, when attaching a heavy chandelier to the ceiling. In practice, in many cases, fastening with an anchor can be replaced with fastening with plastic dowels paired with self-tapping screws, increasing their number.
How to properly glue corners to slopes: step-by-step instructions
Plastic corners must be glued at temperatures above +15 degrees with doors and windows closed.
Instructions:
- Prepare the surfaces: if possible, level, clean, wipe off dust, degrease. If textured wallpaper is pasted on the wall, it is better to cut a thin strip with a stationery knife for better adhesion of the glue.
- Take the corner and apply it to the top of the opening. Apply marks on the inside. Measure the width of the shelf. Add the resulting number on one side and the other of the serifs. Draw a diagonal between the serifs. The result is an angle of 45°. Cut the inside of the corner at 90°.
- In the same way, measure and cut the corners to the side parts of the opening.
- Apply glue down the center of the corner in a continuous line or in a zigzag pattern. Don't feel sorry for him, but don't overdo it either. The glue should fill the entire internal space of the corner, but not protrude along the edges after installation on the slope.
- Install the corner on the slope. Please note that some types of glue must reach the desired viscosity in air. In this case, the corner is attached to the wall 3-5 minutes after applying the composition. Read the instructions carefully.
- Press down the part with your hand or install supports.
- If there is excess glue at the edges of the plastic, remove it. Try not to smear the glue on the surface. Traces can be removed with a solvent.
- Keep the corner under pressure for as long as written in the instructions.
Materials and tools
The corner has a central stiffening rib and side strips with perforations, which help the element to be securely fixed on the edges of the outer corner. You can attach the corner to gypsum plaster or starting putty; as a rule, a putty mixture is used for fixing to plasterboard, and a gypsum plaster composition is used for fixing to plaster. External corners are not only vertical corners at the junction of two walls, but also sections of plasterboard ceiling structures, as well as window and door slopes.
Shapes and sizes
Finished versions of the product are standardly made with a 90-degree angle. The angle is created acute, but rounded types are also found. According to the degree of protective properties, the material can be divided into the following:
The latter type is so called because of the ability to glue them at different-degree angles, due to the flexible central part, which is soft. For this reason, protective functions are somewhat reduced in this zone.
Shelves of material can differ in size; they are more popular with the same sides, but they are also found with different widths. The width can also be varied; here the choice is made based on the specific angle and preferences of the owner.
Level installation of painting corners
There are two methods for installing corners: first, putty is applied and then a profile is mounted on top, or first, the profile is fixed to the corner and only then “frozen” into the putty. I think the second option is more correct and convenient, and we will discuss it.
The exception is installation on a concrete base, when the self-tapping screws for temporary fastening cannot be screwed into the base - in this case it will be more convenient to place the corner directly on the putty.
It is recommended to manually make the plastic corner sharper before installation: bringing the “wings” together and walking along its entire length. The profile itself already has an angle of less than 90 degrees from the factory, but this is often not enough and it is better to immediately bend it even sharper.
The main thing is not to break the profile, and if it turns out to be very sharp, it’s okay, because it’s easy to make it “dumber” during installation, but “sharpening” it during installation is almost impossible.
In a good option, the corners are installed when the walls are leveled (with plaster), when there is already an established wall geometry. In some cases, the profile can be installed on pre-curved walls, and then stretched with putty on both sides of the evenly placed corner. There are plenty of options.
The gypsum board structure is partially recessed. Where the thinned edge goes, no additional action is required.
The first step is to secure the profile to the corner using self-tapping screws, small nails, etc. This is the most labor-intensive process on which the future geometry of the corner depends.
Installation involves simultaneous alignment in several planes: on both walls, their planes should not protrude due to the “spike” recesses, and the entire profile should be even in two projections.
A spatula is used to control the correct position of the profile relative to the plane of the walls. When the spatula is leaning against one wall, fasteners are fixed into the other, then the same is done with the second wall.
Here the task becomes more complicated: you need to press the profile as close as possible to the corner, but at the same time, there should be at least some minimal gap on the “wings” for the putty.
The straightness of the profile, namely the “spike,” can be checked using a rule or a long level. If a vertical angle is made from floor to ceiling, then the best option would be a rule that is slightly less than the entire height of the room. The 2 meter rule can be considered universal. Shorter rules or levels can of course be used, but they will give a larger error.
Straightness is checked alternately from the side of each plane. There is no point in applying the rule to the end of the corner in the middle (as in the diagram above), because this will not give a real picture.
Even on well-plastered walls, with a perfectly straight profile from floor to ceiling, there may be areas where the plane of the wall protrudes beyond the “thorn” of the corner when controlled with a spatula. Therefore, it is better to measure both angle planes in advance and start installation from the most protruding areas.
If you have a laser level, it is convenient to project a laser line on one side and use the rule on the other - this will simplify the work somewhat. In addition, the laser line is convenient to use on long sections where the rule will have to be rearranged. The line should be projected from the side that will be more noticeable in the interior of the room.
When joining a profile in the corners, you don’t have to be afraid to make one side a few millimeters longer than necessary. After “smearing”, the “thorn” that sticks out too much can be carefully cut off with a knife
After placing the corner, it must be carefully covered, without knocking down the fastening screws. For this purpose, it is better to use gypsum putties, for example “fugen”. You can, of course, use polymer putties, but: the layers are usually more than 2 mm, so the layer will take a long time to dry; polymer ones have less strength and the corner will have weak mechanical stability.
Please note that the top of the profile is not covered with putty and sticks out from the plane of both walls.
The space of the “wings” where there is no temporary fastener is filled; after setting, the screws are removed and the vacant areas are filled. Well, then the final finishing is carried out according to the planned project.
The next day, the screws are removed, the excess putty is cleaned off...
...and the corner is stretched with putty along the entire length and both planes
I think we can draw the line at this. I would like to add: painting corners with recesses for wallpaper are used not only on external corners, but also in pairing different finishing coatings, both in internal corners and on straight sections. But this is a topic for a separate publication.
A direct joint between a wall for wallpaper and brickwork for painting will look better. The wallpaper will not be adjacent to the bricks, but to the top of the corner, which acts as a separator.
or you can discuss the topic on our Yandex Zen channel.
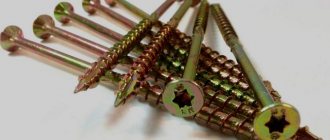
Dowel selection
When choosing dowels for concrete, the operating conditions, expected loads, type of material, and other features of the fastener are taken into account.
How to choose dowels for concrete:
- For heavy structures, choose dowels with a mounting depth of at least 85 millimeters.
- Horizontal fixation requires a fastening depth of at least 30 millimeters, and an external dowel diameter of 7 to 11 millimeters.
- When arranging suspended ceilings and lighting fixtures, where the main load comes from below, fasteners must be made with transverse notches and spacer antennae of different lengths.
- When choosing a dowel for a finished hole, you need to ensure that the diameter (mm) of the fastener and the hole is the same. If the hole diameter is larger and the dowel goes in without force, the fastener may become loose.
- In weak walls, dowels act as a softening pad. The fastener must fit tightly to the fastener so that the load is distributed evenly throughout the product.
- Depending on the load, the sizes of dowel nails for concrete are chosen - the larger the diameter and length, the more reliable the fastening. The exact parameters can be viewed in special tables or in the product labeling.
- For old concrete, it is better to use universal fastening, since there may be voids in the monolith.
Classic dowels for concrete surfaces
Naturally, dowel fastening of various objects on concrete must be of high quality. The classic option is a plastic bushing with notches along the length and so-called “whiskers” used to prevent the fastener from turning through the hole. The main element of such fastening is a special rod, which contributes to the strength of the fastening in the wall, because when it is used, the bushing in the mounting hole expands. The classic mount is also quite easy to remove. The notches on the rod make it easier to unscrew with a screwdriver.
Options for installing corners on walls
Before gluing the corners, decide on the installation method. There are two of them.
This option is suitable for wallpaper with shallow relief, but be careful when finishing slopes with deep embossing, as due to the loose fit of the corners, cracks may form in which dust collects.
- With cutting a strip on the wallpaper to apply the glue directly to the wall. To do this, follow this action plan:
- Attach a corner to the installation site, level it and press it to the wall surface;
- using a sharp knife, cut off the wallpaper on both sides of the overlay;
- Apply glue to the plastic corner and install it in the intended place;
- secure the corners with tape designed to set the adhesive;
- After 24 hours you can remove the tape.
If you are not sure of the accuracy of cutting the blanks, you can first try on the part for the finishing area, and mark the place of the cut with a pencil.
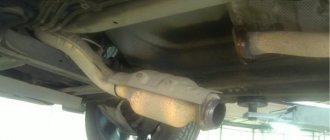
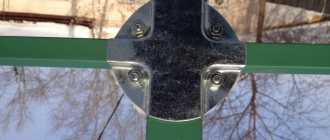
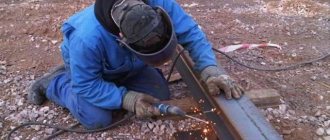
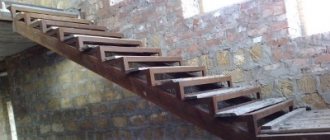
How to fix a clothesline on the concrete walls of a balcony (loggia) yourself
In general, we have approximately the following picture. On the side concrete walls of the loggia, duralumin corners were screwed onto a pair of self-tapping screws. And four pieces of stainless steel wire are tied to the corners, in pre-drilled holes. In principle, this design served for quite a long time (decades), with periodic repairs, of course. Over time, the old wooden plugs became loose and flew out of the concrete; new ones made of plastic were installed in their place. But as they say, nothing lasts forever. At some point, a self-tapping screw, or rather a Euroscrew along with a PVC dowel, was torn out of the wall again.
Types of plastic corners
Plastic corners for finishing joints differ in the material from which they are made, shape and size. They are for external and internal use, decorative and finishing. Before buying a corner, you should find out which type will be most suitable.
Depending on the material from which they are made, the corners are:
- plastic;
- wooden;
- MDF;
- ceramic;
- metal.
PVC corners come in different shapes and sizes:
- in the shape of the letter L - shelves can be the same size or different, 10–50 mm wide and up to 3 m long;
- in the shape of the letter T - masks the joints between slopes and walls;
- arched - curved, designed for finishing arches and other non-standard openings.
Testing modern technologies
Fix hanging kitchen cabinets, install radiators or stair railings... For such tasks, you need to choose the right fasteners depending on the material in which you will install them. After all, a fallen dowel will cause a lot of problems when fixing critical structures and variable loads. The cabinets may be damaged, the radiator may leak, and a significant piece of the wall around the hole may fall off along with the fasteners! We list the main solutions for the most common loose materials.
Dowels for gas and foam concrete
For example, you want to install an air conditioner in a private house made of foam blocks. Which fastener should I choose? The most common mistake is using concrete dowels. They will not stick to a loose wall! Moreover, the thinner the element, the greater the likelihood of falling out. There is no point in trying to strengthen the dowel using traditional methods: after all, there are special fasteners.
Dowels for aerated concrete and foam concrete come from different materials. Plastic ones are suitable for attaching lightweight objects, such as paintings, lamps, shelves and mirrors. Metal ones can withstand heavy loads and are intended for installation of equipment, partitions, plumbing fixtures, etc.
It is important to know: the foam block has a cellular structure and is quite fragile. Therefore, for fastening heavy objects, it is better to use dowels of large diameter, for example, 10 - 14 mm. It is worth considering the shape of the element. If it has longitudinal ribs , there is a risk that the fasteners will become loose and fly out of the wall due to changing loads. The transverse ribs better engage the material inside the hole, so they are not afraid of dynamic loads. They are great, for example, for hangers or shelves.
We'll tell you how to secure a dowel in foam concrete. We drill a hole, screw in the plastic element using a hex key, and then fix the suspended object with a screw or self-tapping screw. You will need a screwdriver, or better yet, a screwdriver.
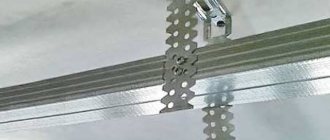
Drywall dowels
Partitions, niches, suspended ceilings... Increasingly, they are made from gypsum plasterboard - plasterboard sheets. These are literally two sheets of cardboard with compressed plaster between them. The structure of the material is very loose, so heavy shelves or air conditioning units cannot be attached to it. However, you have to fix lamps, photo frames, baseboards or cable ducts. For such purposes, there is a special fastener - drywall dowels.
Note : now there are elements that do not require pre-drilling the wall. This solution reduces the risk of the hole becoming loose. You can take so-called self-drilling dowels with a drill-shaped tip. There are also classic ones, but they require a special attachment for the drill. The butterfly dowel is suitable for structures with variable loads, as it has spacers and is securely fixed in the wall without the risk of twisting.
Chemical anchor
An almost win-win way to strengthen a dowel in a loose wall. Suitable for brick, thick layer of plaster, foam and aerated concrete. Fixation occurs due to the spacer of the shell at the base, and the adhesion is created by the chemical composition that secures the stud or reinforcement. It has been proven that a chemical anchor can withstand 2.5 times more load than a standard threaded fastener. Suitable even for installation of equipment. You can read more about the installation process in a separate article.
How to install an anchor?
A few years ago, in order to attach something to a hard surface, you had to use nails and screws. Today, these outdated methods are no longer relevant. An innovation in such situations are anchors, with the help of which it is much easier to cope with the fastening of two elements. The anchor is quite easily screwed into a concrete wall and securely fastened. What is an anchor? This is a part designed to be screwed into a hard surface, in which it expands, and thereby ensures reliable fastening. It also has an internal thread, and the mount is screwed into it.
Types of anchors
There are several different types of anchors, which differ from each other in design. Each type should be analyzed more specifically:
- Wedge anchor. It differs from others in that it has a wedge that tends to expand when the anchor is screwed into the wall. When working with this type, you first need to make a hole in the material, and then hammer an anchor into it. The last step is to tighten the nut; it secures the rod as the sleeve expands.
- The second type is an expansion anchor. The peculiarity of its design is as follows: the sleeve runs along the entire rod and has a thread with a wedge-shaped head. When the anchor is screwed in, the sleeve expands with the help of the head, and the fastener is fixed.
- An expanding anchor is a part that has a sleeve with petals inside its structure. There is also a sliding nut inside the anchor; it helps the petals move apart while the anchor is screwed into the wall.
- There is such a type of anchor as a driven one. This type of bushing has a wedge and cutouts. These cutouts allow the bushing to expand when the bolt is struck. It is not necessary to hit the bolt; this can be done either against the anchor or using a mandrel. But one part cannot be replaced: the hammer, which is what needs to be struck.
- The chemical anchor is significantly different from previous types. Because it is attached with glue. The briquette with glue must be inserted into a pre-made hole and pressed down with an anchor. There is no need to be afraid that such fastening will not be reliable; chemical fastening is just as reliable as mechanical fastening.
What is the load-bearing capacity of an anchor?
Any type of anchor must have a certain load-bearing capacity. What does it mean? This means one thing: any anchor must be characterized by a load that will not lead to destruction. The stronger the material from which the anchor is made, the greater its load-bearing capacity. In the manufacture of anchors, materials such as stainless steel, structural, anti-corrosion and non-ferrous metal are used. As for the latter, this material has the least strength. The load-bearing capacity can be seen on the packaging or on the anchor itself.
How to calculate an anchor for pullout?
As a rule, such calculations take place on site. After all, you need to take into account what material the wall is made of. How reliable the anchor connection is depends on this. So, for example, if the wall is concrete or brick, then the pullout load of the anchor will be 350 kg. This means that even fairly heavy objects can be secured. As for a material such as cellular concrete, its load will be equal to 230 kg. That is, it is not suitable for the installation of high-rise buildings, and it is worth choosing chemical anchors for the job, because their maximum pullout load is as much as 700 kg.
Anchor installation
To reliably install an anchor of any kind, you first need to make a hole in the desired material, and it should be slightly larger than the diameter of the anchor. The hole, of course, should be cleaned so that there is no dust, then place the anchor in it and fix it. If the surface is made of hollow brick, then you should take an anchor with a steel sleeve and bendable ribs. When such an anchor is screwed in, its ribs move apart and the anchor is fixed.
How to install a chemical anchor?
As for the chemical anchor, installing it couldn’t be easier. To do this, you just need to arm yourself with a special pistol. You need to squeeze the glue into the hole and insert the anchor. This glue quickly penetrates the material and hardens.
If you take a chemical anchor for aerated concrete, you can use it to connect parts made of any material, even cellular and granular. This type of fastening can be safely used when installing high-rise buildings and even water structures.