Anton Sviridov
592 0 0
Anton Sviridov March 30, 2019
Jbrauer from instructables.com shared his experience making a vise and installing it on a workbench. Further from his words.
I have owned this maple workbench for 25 years and have never used it for its intended purpose. Just recently I got inspired and decided to retrofit it with a vise to increase functionality.
Do-it-yourself workbench for the garage: how to make it correctly
A homemade workbench for the garage is a workbench for performing numerous plumbing operations, electromechanical and installation work. For convenient storage of tools and small parts, the design has drawers and shelves.
The article suggests getting acquainted with the types of workbenches and how to build a workbench for a garage.
What types of workbenches are there?
Three types of workbenches are usually installed in the garage:
- For metal processing or metalworking.
- For woodworking or carpentry.
- Universal - for all types of work in the garage.
The products differ in the material used to make the countertops. For plumbing work, it is made of metal, otherwise machine oil spilled on wooden surfaces will leave oil marks.
In addition, the processing of metal products requires great effort and the use of fairly sharp tools, which can harm the wood.
Do-it-yourself carpentry workbenches for the garage are used for processing wooden parts; they can be made of less strength, which means their price will be lower. The cover for such models can be made of wood or covered with linoleum.
The best option for a car enthusiast is a do-it-yourself universal workbench for the garage. The advantage of such products is the different configuration of shelves and drawers, for storing all kinds of tools, for the work of a mechanic or carpenter.
Excellent appearance guarantees reliable surface coating with powder material, as shown in the photo, for a long time.
Types of vices: which devices to choose for different jobs
There are several types of vices, which are classified according to various parameters. One of the main identifying elements is the type of clamping mechanism. Based on this factor, the following types of vices are distinguished:
- screw;
- wedge-shaped;
- with installed diaphragm;
- eccentric;
- with pneumatic device.
Depending on their purpose, vices are divided into the following types:
- carpentry;
- metalwork;
- machine tools;
- manual.
Taking into account the material used, these devices are also divided into types. Carpenter's vices for a workbench are most often made of wood, and metalworking vices are made of metal.
Interesting to know! Vices are also called yews - both definitions are correct. Construction dictionaries characterize this tool as equipment for plumbing or carpentry, used for the purpose of fixing workpieces during various types of machining (this can be drilling, planing or sawing).
Vices come in wedge-shaped, screw, eccentric and with a pneumatic device
A bench vise is the most common type of tool in question. These devices have their own subtypes; they differ in size, or more precisely, in the width of the jaws. This figure can vary from 63 to 200 mm. Small vices are used mainly for household purposes. They are fastened using a lower screw-clamp on a small machine, but more often - on a table or an ordinary stool. Larger vices are installed in industrial workshops and large workshops for the purpose of processing large parts.
Bench vices: price, features and varieties
A vice for metalwork is a necessary part in any industrial workshop. Such equipment is necessarily present in the workshop of an experienced, self-respecting master. Moreover, depending on the shape, type of fastening and the material being processed, they are divided into several types.
Pipe vices are used for fastening pipes or cylindrical parts.
The main advantage of a rotary vice is the ability to fix a part in the required plane and at the desired angle to organize the work process. With their help, you can process the most difficult to reach parts and their areas. At the same time, it is almost impossible to do this with a conventional vice. Like all installations of this type, rotary products can be stationary - these are benchtop carpentry vices that are mounted on workbenches. Another subtype is a vice with a built-in clamp for attaching to a table.
Vices for metalwork are a necessary tool not only in the industrial workshop, but also in the home workshop
Hydraulic vices are designed to provide more reliable fixation of particularly large parts. They are clamped under compressed air pressure. Basically, such tools are installed at large industrial enterprises. The price of this type of carpentry vice is high, and the device is quite complex, so the tool is not intended for home workshops.
Self-centering vices are necessary in high-precision production, that is, where precise fixation of a part in a certain position is required. Typically, the structure of this type of vice requires the presence of a bearing base.
Features and types of carpentry vices
Carpenter's vices are used for processing wood parts. This type of work is specific, and therefore requires a special design of the tool itself, different from the design of a bench vice. Most often, carpenter's vices are made of solid wood, and parts are secured using wooden jaws for a vice. In this regard, they must be wider than a bench vice, and in addition, they require a significantly larger clamping area.
Carpenter's vices most often have one base, but with two guides. With their help, the movable sponge is held in place, which helps prevent distortions. In this case, the guides can be an integral part of the workbench or can be removed if necessary.
Carpenter's vice is designed for processing wooden and plastic workpieces
Interesting to know! Even manual models of a certain design allow manipulation of elongated workpieces. For this purpose, a special wide anvil is used with the ability to fasten the workpiece in a vertical position. They also produce models that are used for fastening round-shaped parts.
Carpenter's vices are also classified based on the technology used in the process of activating the screw. According to this feature, they can be manual or pneumatic. If the classification takes into account design features, then the vice is divided into rotary and non-rotary.
As mentioned above, carpentry models are used for processing wooden and plastic blanks. Therefore, wooden parts are mounted on the jaws, which helps to avoid clamping marks. When the device is mounted at the front, there is a chance to work vertically with fixed parts.
How to make a metal workbench
Before you build a workbench in the garage, you need to purchase the following tool:
- A grinder with a wheel and a grinding disc.
- Apparatus for welding with electrodes.
- Working clothes and devices for protection against welding.
- Building level.
- Roulette.
- Screwdriver.
- Electric jigsaw for cutting plywood.
- Electric drill.
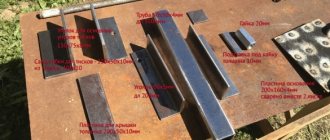
Materials for work:
- Equilateral profile corners 50x4, 6.4 meters long and 40x4, 6.75 meters long.
- Rectangular pipe 40x60, with a wall thickness of 2 millimeters, 24 meters long.
- Steel strip 40x4, 8 meters long.
- Steel sheet, two millimeters thick, dimensions 2.2x0.75 meters for the manufacture of table tops.
- Tabletop boards, 50 millimeters thick.
- Plywood sheets for drawers and table walls, 15 millimeters thick.
- Guides for table drawers.
- Screws.
- Self-tapping screws for metal.
- Anchor.
- Paint for metal and wood.
Tip: A workbench from such materials will be made in the following dimensions: table - length 220 centimeters, width -75 centimeters. It can accommodate two vices at the ends of the table, sandpaper and other tools.
The procedure for making a workbench with your own hands:
- The existing material is cut out.
To make the frame, a profile pipe is taken, for the stiffeners - a corner, from which the frame of the workbench is formed and the edging of the table top is made.
The guides for the side panels will be made from the steel strip. Brackets for fixing boxes and plywood are also made from it. Plywood is used for the boxes.
- Assembling and welding the frame for the workbench:
- the tabletop frame is welded from two pipes 2.2 meters long and two pipes 0.75 meters long;
- four side legs 0.9 meters long are welded along the edges of the workbench;
- jumpers are installed between them for structural rigidity;
- the structure for the drawers is assembled from pipes and welded to the tabletop;
- their frames are reinforced with stiffening ribs.
- Assembling the frame for the table top. To do this, take two corners of 2.2 meters and two of 0.75 meters and weld them with the shelves up. After 40 centimeters, stiffening ribs for the structure are welded;
- The frame for the device is laid on the pipes of the workbench frame and welded.
- The panel sheathing for the tool is assembled from one corner 2.2 meters long and four 0.95 meters long. Two of them are fixed on the sides and two in the middle of the structure. The tool mounting panel is welded to the table top.
- In order for the do-it-yourself workbench to have good stability, strips of metal are welded into the garage, which will serve as stiffeners. The video shows how to install them well.
- Boxes are made for homemade workbenches for the garage. To do this, blanks are cut from plywood and screwed together.
Tip: The number of boxes is selected according to the wishes of the owner of the product. They can be placed on both sides or with drawers on one side and open shelves on the other.
- The drawer guides are installed as shown in the photo.
- The boards are laid on the tabletop frame.
Tip: Boards should be 2.19 meters long and 245 millimeters wide. But if they are not there, the blanks are laid crosswise, 740 millimeters long. Before laying the boards, they should be treated with an antiseptic, which will protect the material from rotting.
- Homemade metal workbenches for the garage are painted. This will prevent corrosion from forming. Particular attention should be paid to welds. They need to be thoroughly cleaned with a sander.
- The top sheet of the tabletop is attached to the wooden boards with self-tapping screws.
- Boxes are installed.
- Plywood is attached to the side walls, a shield under the table, and shelves.
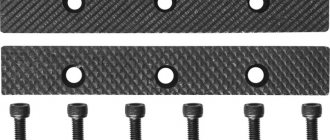
Vise parallels and jaw steps
Setting the workpiece on the outside of the vice
Increased rigidity
Increasing rigidity is always important. This operation uses two 2-4-6 blocks as a vise jaw extension to better hold the plate at the end.
Using several vices, jaws, and modifying the vice
There's an old rule that if you want to get the most out of your machine, you need to use every square inch on the table. Most machine tables can accommodate multiple vises, and this is very common.
Our photo above of two vices shows one such setup. It is not uncommon to see four or even six vises on a large router. Bigger is better because the more vises you have, the more parts you can handle before machining has to stop so the operator can load new workpieces.
If several vices are installed on the machine, it is convenient if they coincide in all main dimensions within the tolerance. This way, if you duplicate the setup and get the vise in a different order, you'll be fine. Most vise manufacturers will sand the vise for you, or you can do it yourself using a grinder.
Another trick that is possible with two vises is to use the jaws for two vises when working with very long parts:
Connecting two vices with one set of jaws
I made this kit for a project that required machining a thin aluminum panel for some electronics and they worked great.
How to install a vice on a bench
A vice is a necessary attribute of a metalworking bench.
Tip: Due to their heavy weight, they should not be attached directly to the tabletop. Between the metal on the table and the vice you need to put a metal spacer one millimeter thick.
Holes for anchor bolts are drilled in the gasket. The same holes are drilled in the tabletop. The structure is fixed with anchor bolts.
What are the safety requirements for the workbench:
- The structure must be stable, not sway, and not move when little force is applied to it.
- The organization of the workplace should be such that nothing interferes with work.
- All corners and protruding elements must be rounded without cutting edges.
- After finishing work at the workbench, the workplace is cleared of chips, oil and other materials.
- A properly made workbench can withstand a load of up to 200 kilograms.
Using a high-quality workbench in your garage is the key to convenient work for its owner.
I install the vice on the front side
Before attaching the vise, I make a solid wood edge for the table top. I mark the holes on it for the guides and the threaded rod.
I install the vice on the new edge, screwing it onto the brackets. I check the operation of the vice, additionally grinding the jaws so that they and the edge are in the same plane.
Arrangement of the front and rear vices of the workbench.
Ensuring labor safety.
Proper organization of the workplace as a factor in increasing labor productivity and product quality.
Proper organization of the workplace promotes convenience at work, reduces worker fatigue, increases productivity and satisfaction from the work performed. The concept of “workplace organization” includes the availability of a set of equipment, tools and accessories; convenient arrangement of the material needed for work; storage place for workpieces and working tools; normal lighting with natural and artificial light; sanitary and hygienic working conditions.
An important stage in carpentry and carpentry work is the organization of the workplace, designed to increase labor productivity and product quality while observing safety regulations.
The nature of the operation performed determines the carpenter's workplace, however, during manual processing, the main equipment is a carpenter's workbench.
Special milling vice
By using multiple vises, double vises, moving jaws, and even using jaws spanning multiple vises, quite a lot is possible. In fact, you can even use a vice to attach other fastening devices. A very common trick is to place small ones in a machinist's vice to turn the jaws in a different direction:
Small vices in big ones
You can also create small plate fixtures that are designed to fit in a vise, creating what is often called a "vice tray" since individual plate fixtures can be pulled out of the vise in the same way as pallets.
Vise Pallets are simply small insert attachments designed to be held in the jaws of a router vise.
In general, solutions such as pallet vises are designed to allow the vise to be left on the machine in shops where the flexibility and ease of clamping of the vise is ideal for most of their jobs.
Tormah made a great suggestion on his blog which was to use a Sine (Toolmaker) vise as a vise tray.
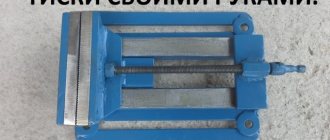
How to make a simple carpenter's vice for a workbench
A workbench without a vice is nothing more than just a table. A carpenter's vice is a necessary tool for every craftsman. They provide reliable fixation of wooden and metal parts during processing. The design is based on a Moxon vice with two screws - a reliable, budget-friendly and easy-to-manufacture option. In addition, a handmade tool is twice as pleasant to use as a purchased one. Therefore, catch the instructions on how to make a carpenter's vice from wood with your own hands.
You will need Necessary materials:
- 2 pieces of plywood 10 mm thick (the sponge on the workbench is 480 x 90 mm, the second no more than 250 x 80 for the handles),
- Beam 45x90 mm, length 480 mm;
- Drills of various diameters - 1, 4, 8, 10, 12 mm;
- Studs M10x250 – 2 pcs. (I would recommend using all M12 fasteners, but I couldn’t find any driving nuts of that diameter);
- Wood screws;
- Drive nuts M10 – 4 pcs.;
- Ring crowns for wood of various diameters;
- Forstner drill (for lack of availability, I used a 22 point drill bit);
- Wood glue;
- A short piece of steel wire with a diameter of 1 mm.
- Screwdriver;
- Clamp – 2 pcs.;
- Hammer;
- Square;
- Pencil;
- Chisel (not needed if you use a Forstner drill);
- Wire cutters.
Step-by-step instructions for making a carpenter's vice: 1. Measure 10 cm on both sides of the plywood, center and mark the points of future holes for screws.
2. For convenience, we secure the plywood and timber together with a clamp. 3. Drill through the marked points a hole with a diameter of 12 mm. Use a drill depending on the diameter of your studs plus 2 mm. 4. Using a drill, we make 3-4 mm holes for self-tapping screws for further fastening the future fixed part of the vice to the workbench. We place the holes 2 at the edges and 2 in the middle, making a small indent from the edges. 5. To ensure that the heads of the screws are hidden using a metal drill with a diameter of 12 mm, we make small indentations in the holes made. 6. Attach the plywood to the workbench using wood screws. The stationary vise jaw is ready. 7. Next, using the holes for the studs (12 mm) in the plywood as a guide, we drill the workbench itself. 8. Take 2 M10 driving nuts (they are also called mortise nuts) and drive them into the workbench from the reverse side. 9. Take a small piece of plywood, mark and center the diameters of the future handles on it using wood bits. Select the diameter of the handles to suit your hand - I chose 67 and 54 mm. 10. It is necessary to mark 2 large washers and 2 smaller ones with a diameter of 1.5-2 cm. 11. Drill a hole in the middle of each marked diameter, the diameter of which will coincide with the diameter of the guide drill in the crowns - in my case it is 8 mm. You can skip this step and immediately drill the hole with a standard central drill bit for ring bits. 12. Using crowns, cut out the washers and sand their edges with sandpaper. 13. Using a drill equal to the outer diameter of the cage nut (12 vv), we expand the holes in the small washers. 14. In the large washers, we drill small recesses with a 22 Forstner drill so that the caps of the driving nuts can be inserted there without gaps. In the absence of it, I had to make holes with a feather drill and work a little with a chisel. 15. We insert the mortise nuts and drive them into small washers. 16. Screw the studs flush with the nut head. 17. Now you need to lock the threaded connection. Attach both structures with a clamp to a convenient surface. I used a timber for future vices. 18. Using a 1mm metal drill, make holes in the caps of the cage nuts along the thread boundary. The drilling depth is no more than 1 cm. 19. Bite off pieces of steel wire of the same length and insert them into the drilled holes to secure the structure. 20. Lubricate the sides of the washers with wood glue and tightly fasten them together coaxially, securing them with a clamp until completely dry. 21. Using a 3-4 mm drill, make two holes on the inside of the handles on each side of the stud with a depth of no more than 10 mm. 22. Make hidden chamfers for the screw heads. 23. For reliability, secure the parts of the handle with wood screws. 24. Insert the pins into the holes in the large block and screw them to the main part on the workbench. 25. The vice is ready. Watch the video For detailed instructions on how to make a vice for a workbench with your own hands, watch the video.
Purpose, installation and design of a vice
A vice is a very useful mechanical tool that is used to hold parts during processing. They are especially needed when it is necessary to firmly and securely fasten the workpiece or install it at a safe distance.
The vice consists of a lead screw, a frame and jaws with a screw fastening
The design of the classic vice itself consists of two jaws. One of them is stationary and fixed on the body or on the frame, the other can change its position. The object is secured between the jaws by compressing them using a locking mechanism, which consists of several elements:
- The lead screw is made of metal with a trapezoidal thread. The screw is driven using a special handle.
- A frame or slab made of cast iron or other heavy material that serves as a support. It can be made of steel or duralumin.
- Jaw with screw fastening. When the screw rotates clockwise, the jaw that moves approaches the frame. This way the part is fixed. When the screw is rotated in the opposite direction, the workpiece is released.
To fix the vice itself to the support, several methods can be used:
- permanent installation in one place with constant use;
- on a clamp, this implies less reliable fixation, but makes it possible to use it in different places;
- using suction cups - in this case it is necessary that the surface is perfectly smooth and even.
Fixation of the vice to the support can be stationary, on a clamp or using suction cups
Vise for a workbench from an old clamp
Antagonizer from instructables.com shared his experience building a bench vise. Further from his words.
When the vise on my workbench broke, I decided to replace it with a new one. But in the store I was unpleasantly surprised by their cost. Depending on the manufacturer, the price runs into hundreds of dollars.
Therefore, I decided to make a vice myself, using only hand tools and using only available materials. I'm showing you how to create a fully functional woodworking vice.
Collecting parts
Upgrading the workbench will involve installing a screw vice on the side and on the front. I purchased the drive mechanisms for the vice in the store, and I will make wooden jaws, brackets and guides myself.
I'm disassembling the clamp
I begin to disassemble the clamp:
- I cut off the locking (clamping) plate from the screw.
- I unscrew the screw.
- I cut off the threaded part at the end of the clamp just before the bend.
I make wooden parts
- First, I cut a piece of board measuring 5.08 x 15.24 cm, which exactly matches the height of the table surface as a mounting base.
The vise itself will be attached to the table leg, and its length will provide more reinforcement.
- I also needed a second piece of 5.08 x 15.24 cm, and a clamping board 60 cm long.
- Next, I mark and drill a hole for installing a threaded bushing and a hole for the screw itself
The higher the bushing is to the edge of the vise, the greater the clamping force, and the lower it is, the greater the range.
- I insert a nut into the hole for the screw and drive it in tightly. When tightening the vice, the nut must be securely fastened.
Making guide pins
To make guides, I weld the threads from the bolts to a steel rod, having first cut off the head with a grinder. On the other side, I weld washers, with the help of which they will be attached to the bracket of the threaded bushing of the vice.
Creating a hinge joint
- I cut two blocks from the base of the pressure board, each 3.8 cm wide and 8.9 cm long.
- I drilled a horizontal hole through the remaining part, 2.54 cm from the end.
- Adding summary blocks. I shorten them to 10 cm, then drill a hole, retreating 5 cm from the top edge.
- I cut grooves to the size of the blocks in the workbench racks.
- I lubricate the parts with glue and connect them.
- I install the bolt, but do not tighten it, checking that the entire mechanism moves freely in the grooves of the blocks.
Making a second support
The second vise support will be attached to the opposite side of the workbench under the tabletop. This is why guide pins are needed, thanks to which the vice will always move in the same plane.
- For the threaded ends of the guides, I cut out a support from a metal strip in which I drill holes.
- I insert the guides into them and fasten them with nuts and washers.
- For the second pair of vices, I assemble a similar structure of 2 brackets and 2 guides. But for smooth and uniform movement, I equip them with a homemade unit consisting of 2 bushings and a mounting plate welded to them.
I initially drilled holes in the plate itself so that it could be screwed to the carriage at the back of the vise.
Assembling the clamp
To prevent the screw from clinging to the workbench, I make a spacer for it.
- To do this, I used a hole saw and cut a 5 cm disc from a 5x10 cm board.
- Then I drilled a center hole equal to the diameter of my screw.
- I lubricated the hole with oil and screwed in the bolt.
In the last photo you can see that I have 2 spacers installed. While using the vice, I realized that there was not enough room for my hands, and I substituted another spacer.
Once the clamp was assembled, I needed to attach it to the workbench leg. To do this, I used 80 mm screws, with which I screwed the vice at 150 mm intervals through the mounting base directly to the workbench leg.
Installing a milling vice
Before placing any vise on the machine table, be sure to clear the table of any shavings. If you have a T-slot table that you're mounting the vise on, you'll probably want to move the vise around for better placement as well.
Vise alignment is the procedure of using an indicator to move the vise jaw (you want a fixed jaw, not a movable one) so that you can adjust the position of the vise until the reamer shows that the vise jaw is parallel to the axis as it moves.
Learning to "square" a machine vise is one of those basic skills that every machinist should learn early on.
Place the machine vise on the milling machine table
A machine vise is usually attached to the milling machine table.
I used the step clamps that came with my table clamp kit until I purchased my Glacern 6″ Premium Vise:
Step clamps
The new vise came with a nice clamping kit that I like much better:
- New set of clamping jaws
The new clamps are simpler and more compact. It also helps that I switched to a couple of socket head screws for these clamps.
Once the vise is properly installed and secured, the next issue is proper use. In most cases we want the workpiece to be fairly high in the clamps. This is done both to provide access to the workpiece and because it allows for greater repeatability; the smaller the part being machined, the less room there is for unevenness to affect processing.
We typically set the workpiece high in the jaws, either with a parallel vise set or because we have the jaws set in a vise whose step is machined quite high on the jaws. We can either process the step ourselves (in the case of soft sponges), or purchase sponges with the step already processed.
I make wedges
I made the wedges from a hardwood pin with a diameter of 25 mm:
- I narrowed the lower part, 38 mm long, to a diameter of 15 mm, then sanded it.
- I drilled several holes with a diameter of 15 mm directly into the table at intervals of 635 mm at a distance of 100 mm from each other.
Final result
The vice is ready. Thanks to this design, I can clamp and process fairly large workpieces. And the presence of wedges allows you to fix entire pieces of untreated wood.
Carpenter's vice for a workbench: do it yourself
It is difficult to imagine the workshop of a home craftsman who often works with wood products without such a useful device as a carpenter's vice. Using this clamping device, which is easy to make with your own hands, you can perform various technological operations with wooden parts.
The design of a carpenter's vice is not so complicated as to give up the idea of making one yourself
Preparing parts for installation
I clean all metal parts with a grinder to remove burrs and welds. I sand wooden elements using a sander.
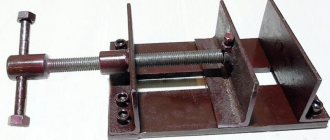
How a vice works for carpentry work
The design of a vice for carpentry work consists of the following elements:
- a support, which is also a stationary clamping jaw;
- movable clamping jaw;
- two metal guides along which the movable jaw moves;
- a lead screw that ensures movement of the movable jaw;
- a crank through which rotation is imparted to the lead screw.
Main parts of a vice for a carpenter's workbench
The fixed support of the carpenter's vice is securely fixed to the surface of the workbench, for which long screws or bolted fasteners are used. Many serial models provide the possibility of using replaceable pads on movable and fixed jaws. Such overlays, which increase the versatility of carpentry vices, can be made of metal and polymer materials.
Since bench vies are often used for processing large wooden products, the design of many models includes a spring mechanism that facilitates the manipulations. Such a mechanism, which can also be installed on a homemade carpentry vice, provides preliminary clamping of the part (it is finally fixed using a lead screw). If this mechanism is absent in the design of a bench vise, then the carpenter will have to hold the wooden workpiece suspended for a long time before the movable clamping jaw is brought to it.
Homemade jaw clamp
Forming a fastening for the edge
To attach such a massive edge to the tabletop, I decided to make a side support, which I would connect using a wedge-shaped tenon. To do this, I make a tenon on the edge and a groove on the support.