Having water supply in a home or technical room today has ceased to be a luxury. Previously, many residents of private houses could only dream of running a water supply directly into the building.
Now, thanks to modern technical advances, even in the absence of a centralized water supply system, you can make your own separate well and supply water directly from it using special equipment - a well pump.
In order to correctly install all technical elements for water supply, you must carefully and in strict sequence perform the following steps for piping the well itself. But first you need to figure out what you will need for this.
To install you need
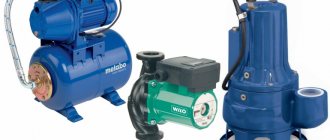
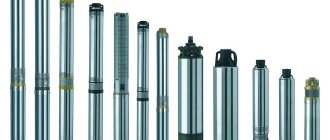
First of all, you need to purchase a special well pump. Its performance is selected based on future needs for the volume of water consumed during use. Additionally, you will need to pay attention to the presence of a check valve in the well pump. If it is missing, additional installation will be required.
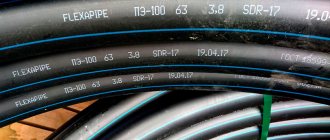
Additionally, to install a well pump you will need a HDPE pipe. The length of the pipe should be greater than the depth of the well itself, so that later it does not turn out that there is not enough pipe and you will need to think about what to do next.
Be sure to have a safety rope of appropriate thickness. It will be needed to directly suspend the well pump itself. And also, with the help of a well pump, it will be possible to remove the pump back from the well for preventive work, for example.
And to provide the well pump with electricity, a cable is purchased separately, the length of which will be sufficient to lead out of the well itself and connect it to the electrical circuit.
You will also need automation to provide the water supply system with the necessary operating pressure. The automation includes a built-in check valve and a flow switch. With its help, no additional actions are required from the user. All you need to do is open the tap and that’s it.
Additionally, you will need to purchase all the necessary connecting elements and adapters. So that it doesn’t turn out that because of one missing fitting you have to go to the store again.
Only having all of the above can you begin to assemble all the elements.
Determining the depth
A preliminary search for water on the territory of a private house is carried out using geophysical research methods, the distance of water occurrence, its quality and quantity are assessed:
- Vertical electrical sensing method. To determine the depth, a device that measures ground resistance is used.
- Method of wave reflection under seismic influence. Such reconnaissance is first carried out near the dacha plot, then in the survey area. The generating waves reach aquifers that differ from the upper clay and sand layers, are reflected and read by instruments.
- Exploration by drilling. The effectiveness of the method is high, but the cost limits its application. Used for workings serving villages.
After drilling, using the mechanical option, the exact depth of the well and the level of the aquifer are established.
A rope with a load, on which a meter marking has previously been made, is lowered into the excavation to the bottom. The depth of the shaft is determined by measuring marks on the twine above ground level. Then the cord is removed, and the size of the wet part can be used to judge the layer of liquid. For more accurate measurements, a flexible hydrogeological ruler with a weight is used.
Determining the exact depth of the aquifer will help you select the right pump with the required parameters and prepare the material for installation work.
In order to select a device of the required power and performance, and purchase the required number of components, it is important to correctly determine the depth of the aquifer.
Important points
When performing work when installing a well pump, observe safety precautions at every stage.
It is necessary to use special work gloves that will protect your hands from unwanted damage.
When installing a well pump with a pipe into a well, it is advisable to use welding gloves. They will reliably cover not only the fingers and palms, but also the areas of the hands above the wrist. So the assembled structure has a fairly large mass and if it accidentally slips in your hands, deep cuts are possible.
Installation yourself or order services from specialists
Types of wells for installing a submersible pump
When installing a well pump, various difficulties may arise. If a person has experience in the construction of hydraulic structures or other similar structures on the site, has experience in designing similar systems and understands the operation of certain elements, he can cope with the task on his own. If difficulties arise, you can always turn to the Internet for help.
If there is no similar experience, and a person has no idea how a hose differs from a pipe, then it is better to turn to specialists. The cost of services may be high, but the experts will do everything correctly and reliably.
An important factor is what plan the well is being built. If this is an artesian well with a depth of 70-100 m, it is better to contact specialists. It is very important that the well itself is equipped with a professional team. After all, vibrations from a running pump can seriously damage any amateur structure that is not designed for certain loads.
Well pump assembly
Installation of all elements is carried out in the following order:
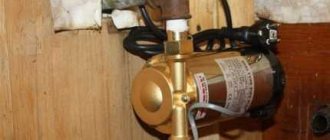
1. If the well pump does not have a check valve, it must be purchased and additionally installed first.
2. Next, the transition fitting and fitting are installed. Their purpose is to ensure a tight connection between the HDPE pipe and the well pump.
When installing these elements, care must be taken to ensure the tightness of all connections . Otherwise, subsequently, under pressure, a leak will form in these places and some of the water will return back into the well.
You also need to pay attention to the required dimensions of the connections. Otherwise, the connecting elements will have to be changed again, going back to the store.
3. The well pump is fastened to the safety cable. The diameter of the cable is selected based on the depth of the well. The larger it is, the greater the mass of the water supply structure, but with the water in the pipe it will be pulled down.
For fastening, the pump has 2 ears symmetrically located opposite each other. It is recommended to pass the cable through both ears. In this case, the pump will hang straight and, if necessary, it can be easily pulled out of the well.
When the pump is tied by only one ear, when it is pulled out, it begins to warp inside the well, and difficulties arise.
4. To fix the end of the cable, special clamps are used, which will prevent the cable from being disconnected from the pump. Don't try to tie a knot that will eventually loosen and cause the cable to slip out.
5. A sleeve is inserted into the HDPE pipe and the fitting is assembled. The fitting consists of a nut, a ferrule, a pressure ring and a rubber sealing ring.
When installing the crimp ring, you need to pay attention to the direction of the teeth on the inside of it. If this element is not installed correctly, the pipe will not be tightly fixed.
6. HDPE pipe is inserted into the pump. Fitting connections are pulled. When installing, you must carefully handle the rubber sealing ring, which must not be damaged.
When tightening all threaded connections, special wrenches are used.
7. The cable is being connected to the pump cable. Here it is necessary to take into account that the connection point must be absolutely sealed.
Otherwise, moisture entering the loose connection will oxidize all contacts, and then close. As a result, the pump may fail. In order to avoid this, you need to use heat-shrinkable sleeves or filler sleeves.
8. The safety rope and extension cable are fastened to the HDPE pipe.
It is strictly forbidden to tightly fix the cable and cable to the pipe itself. Otherwise, for example, a cable may break as a result of the pipe itself being stretched by water pressure.
For fixation, plastic clamps are used at intervals of 1 meter.
9. An HDPE fitting is also installed, which will be necessary when installing the downhole adapter.
Or if a borehole caisson head is installed. You should not immediately fix the head on the pipe, so that after immersing the pump in the well, you can select the place where the pipe will be cut off and tighten the fasteners of the head there.
10. Be sure to secure the opposite end of the cable to any large and immovable object for safety purposes.
Preparation of materials accompanying installation
To install the pump in the wellbore, it is necessary to prepare materials and fasteners. In most cases, a cable is used to secure the unit. It will last longer if it is made of stainless materials. You can use steel in a plastic braid.
Water supply pipes can be metal or plastic. In most cases, HDPE products are used. The diameter of the hose and the pump discharge pipe must be the same. When using a central pump together with a hydraulic accumulator tank, it is not advisable to install a check valve on the outlet pipe of the pump, since a similar one is mounted in front of the pressure switch on the hydraulic accumulator piping.
To install a submersible pump, a special cable is used, which is designed for long-term operation under water. Its cross-section must comply with the technical requirements specified in the product passport.
To fasten the pump and seal the casing, a head is used, consisting of a lower flange, a rubber O-ring and a cover. On the inside there is an eye for connecting a cable. It is better to install the pipe without connections - this reduces the likelihood of a leak.
If there is a need to extend the electrical cable, the connection is insulated using heat-shrinkable tubing. The cross-section of the cores of the additional conductor should not be less than the main one.
Checking the work done
Before you start lowering all elements into the well, you must carefully check:
- Check valve;
- Tightening fittings;
- Cable connection tightness;
- Cable fastener;
- Fixing the cable and cable to the pipe;
- Fastening the opposite end of the cable to the surface of the ground;
- Reciprocal fitting.
This is necessary in order to eliminate all problems and obtain a successful result after a test run of the equipment.
Otherwise, if the element check was not performed properly or was missing altogether. And after lowering the system into the well and starting it up, it turned out that there were problems. It will be difficult to lift the entire structure back, since it will be additionally filled with water. In this case, the mass can increase two or more times.
It is advisable to carry out a test run before lowering the system into the well, and if problems are detected, fix them immediately while the structure is within reach of your hands.
Some useful and important tips
The installation of a well will affect the operation of the water supply in the house. Before installation begins, a number of conditions must be met:
- Work should begin by studying the instructions for installing the equipment.
- Before installing a submersible central pump, it is necessary to check whether the well flow rate corresponds to the flow characteristics of the unit.
- To seal the well, you need to install a cap. This will prevent foreign objects from entering the barrel.
If you are not sure that the work on installing the pump will be done efficiently, it is better to entrust the installation to specialists.
Lowering
Photo taken from the site https://kolodec.guru/
The well pump is lowered directly into the well itself with a pipe and cable.
When lowering the entire structure, it is necessary to seek help from another person who will provide insurance support. It may be needed when the well depth is more than 50 meters. Then the mass of the entire assembled structure may be too much for one person to handle.
After all, it is possible that there will not be enough strength, and there will be no one to support you, and you will have to let everything go into the well. To avoid this, you need an assistant.
Criterias of choice
When it is planned to install a pumping station in a private house, it is selected so that it fully performs its function, and therefore meets the needs of people who live there permanently or who often come to visit.
Before installing a pumping station in a private house, certain criteria are taken into account:
- Technical features of the equipment.
- Features of the operation of water sources.
Connection to the system
It is also performed in strict order of each subsequent element:
- The end of the cable can now be secured to the well head, where there is a special loop.
- If necessary, connect the heating cable. It will prevent the water supply system from freezing during operation in the cold season.
- The cable is connected to the automation.
- There is a connection to the hydraulic accumulator.
- The filter element is installed and after it the shut-off valve is installed.
When the well is located directly in the house, the basement of the house will be a caisson, which will always have a positive temperature at any time of the year.
If the caisson is located outside the premises, then the pipeline from the well itself must be laid at a depth below freezing using a sealed well adapter. Depending on the region of Russia, the freezing depth ranges from 1.5 to 2 meters in the Far North.
The entrance to the caisson located outside the room must be waterproofed, just like the caisson. This is necessary so that during the spring flood, groundwater does not get into the well itself. Otherwise, the water from it may become unusable.
Diagram of how to connect with your own hands
For trouble-free and long-term operation of an autonomous water supply, the installation of an automatic control system for equipment operation is mandatory.
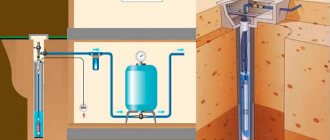
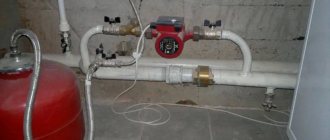
The equipment installed in the technical room of the house includes:
- Hydraulic accumulator. A membrane tank is used to maintain pressure in the water supply system, which should be at 3.5 atmospheres. When the hydraulic tank is full, water is consumed within 3–4 hours, preventing the well pump from being turned on frequently. It protects the water supply system from water hammer, which can rupture pipes.
- In the body of the product there is a chamber made of hygienic rubber for water with a pressure valve, and the rest of the tank is filled with air, which creates pressure through a pneumatic valve using a compressor. A line from a submersible pump is connected to the hydraulic tank, through which water enters the water chamber.
- The operating principle is based on maintaining pressure in the water chamber using air. When water flows and the pressure in the system decreases, the well unit is turned on and water is supplied to the chamber.
- A cabinet with electronic and relay equipment control and protection devices, which control the operation of autonomous water supply through supplied sensors.
- Mini-blocks installed in the pump control the pump and, when the load increases, the low level of the aquifer and the heating of the single-phase motor turn off the unit through a relay.
- Sensors located in the pipeline monitor the nominal pressure of the liquid. When it decreases, the device turns on through the electronic system, filling the chamber with water.
- If the pressure is not set to the standard value, it is necessary to adjust the relay.
What is well automation?
Automatic control systems include electronics (pressure switch, idle speed, flow), pressure gauge, accumulator or modules in which these elements are combined - all of them are responsible for the optimal functioning of the water main.
In the water supply line, automation performs the following role:
- Controls the electric pump, turning it off as the line fills. In high-tech systems, instead of turning it off, it is used to adjust the rotation speed of the electric motor.
- Protects the water main from water hammer and helps create some water reserves in the event of equipment breakdown or power outage.
- Includes protective devices for the pump that interrupt the flow of electrical current to it in the event of a lack of water at the source.
Rice. 2 Example of a borehole water intake source
How to raise water to a height without a pump: video, description
Do not rush to assess the conditions for cultivating soil without electricity as extreme. It is in such situations that a considerable number of gardeners find themselves who have developed plots of land in vacant lots and other unclaimed areas. Ingenuity and useful experience, which many share on the Internet, make it possible to organize water supply without electricity.
There are quite a few such pumping methods. The most accessible ones include the following:
An Archimedes screw is a device consisting of a cylinder and a screw placed inside it with a handle for rotation.
- Application of the Archimedes screw. The device consists of a hollow cylinder and a screw placed inside it with a handle for rotation. The system must be lowered into the source at an angle. A mechanically driven screw takes in water and delivers it upward.
- Using a hydraulic ram. The method was invented by the Montgolfier mechanic. It is based on the kinetic energy of water: the flow passing through a rigid pipe is blocked, and water flows through a check valve into the hydraulic tank located above. The tank is equipped with a fitting at the bottom, onto which a hose is placed that supplies water to the consumer.
To get more information on how to raise water to a height without a pump, it is worth watching the video:
On a note! When creating a mechanical water supply device, it should be taken into account that the most effective and affordable method is a piston system.