Karcher washing equipment is popular in the responsible market. Such devices are widely used for domestic purposes. Cleaning walls, house doors, garden paths, washing cars, glass, workshops and garages - the strong water pressure supplied by the machine effectively removes dirt and dust. Regular use of the sink leads to wear and tear on the structural elements.
Often equipment owners are faced with the need to repair or replace a Karcher high pressure hose (HHP). After studying the instructions below in detail, you can easily troubleshoot problems yourself. In order to save time and effort, you can turn to professionals for help. It offers its services, which is located at the address: St. Petersburg, st. Chugunnaya, 20. Specialists will carry out the entire range of work in the shortest possible time.
Service
For uninterrupted operation of the device, regular replacement of the oil, seals and cuff on the pump (high pressure pump) is required. If there are interruptions in water pressure or improper storage/use of the device, you may need to urgently repair the Karcher yourself. What parts fail?
- Pump, motor and pressure sensor.
- Electrical part.
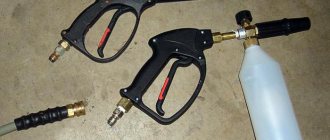
- Nozzle, hose and gun.
The choice of household mini-washers eliminates the occurrence of difficulties in maintenance, but different models have their own characteristics, which you must first find out from the seller. For example, a car wash nozzle with a plate structure will ensure high-quality operation with regular cleaning with a toothpick. Otherwise, the ingress of small particles will cause the unit to stop operating.
When purchasing a product, you should check the availability of nearby service centers and the warranty period. If such issues are missed, the device will break down and cause unnecessary problems. If you decide to repair the Karcher yourself, the right step is to study the instructions in detail.
Foam generators for car washes
A device for high-quality contactless washing is called a foam generator. With its help, you can completely envelop the car with small bubbles of a washing suspension and carry out high-quality cleaning of the surface from dust, dirt and adhered small particles.
You can make a foam generator for washing with your own hands even in the garage. You need to be patient and have all the components and elements ready.
The principle of operation of the foam generator
The device performs two main functions during the car washing process:
- formation of fine-cell foam from prepared reagents;
- uniform application of foam to the desired surface of the vehicle.
To carry out this process, a stream of water mixed with car cosmetics (shampoo or other specialized preparations) is sprayed using a stream of air passing through installed channels, and together form a coarse foam.
After this, the mixture is passed through a block with a foaming tablet. Now this mass can be applied to the surface.
Plates that regulate the flow and provide a fine spray jet distribute the working foam into all irregularities in the outer part of the body.
The difference between homemade equipment and professional equipment
The quality of work performed by a professional cleaner using a foam generator can be higher than when using a device made independently. For this there are several criteria that determine the final result.
The main parameter is the size of the foam formed. An important characteristic is the homogeneous structure and minimal diameter of the bubbles.
When using professional washes, specialized industrial shampoos are used.
Also, professional equipment allows you to pump up significantly higher fluid pressure than what can be achieved in a garage environment. Due to this, the consumption of cleaning materials is reduced.
But with all these factors, the result of self-washing turns out to be quite worthy, especially since the final price for one session speaks in favor of a homemade device.
Making your own foam generator
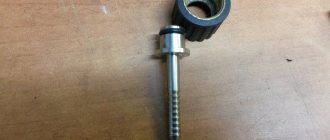
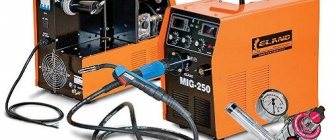
Making a foam generator will require the creators to stock up on a set of keys, an angle grinder, and a pre-purchased repair kit with spare parts for a professional installation, consisting of a nozzle, a gun, a compressor, and a flushing hose.
In addition to the listed elements, you need to take an inch pipe approximately 70 cm long. You will need to make a filter from it. To do this, fill the cavity with pieces of fishing line. It is advisable to use it of different diameters, this way foam will be formed more efficiently.
After filling, you will need to install metal filters on both sides to prevent pieces of fishing line from getting into the container with shampoo.
Next, threaded plugs are placed on both ends of the pipe. Now a T-junction is screwed to one of the plugs. A compressor is screwed to such an adapter, and a hose from a reservoir with liquid is screwed onto the second thread. The free end of the tube with the fishing line will be the exit for the foam. A hose for spraying the finished foam is attached to it through a fitting.
You need to know that the quality of the resulting foam depends on the quality of the filling in the tube with fishing line.
You can achieve the desired result by changing the packing in the tube with fishing line. It is also possible to empirically select the required length of such a pipe and the texture of the fishing line to be filled.
ktonaavto.ru
Causes of failure and recommendations for elimination
According to the manufacturer and car wash workers, the main reasons for device failure are poor water quality and lack of maintenance. To increase the operating life of the unit, it is necessary to comply with the following basic requirements:
- Install a filter device for coarse and fine water purification at the inlet to the water pressure pump.
- Check the supply of the required volume of liquid according to the technical specifications of the device. For example, if the fluid flow rate is 15 l/min, and the water supply allows you to get 13 l, after 2 months you may need to immediately repair the Karcher yourself (or at a service center).
- The water pipe diameter should be 3/4 inch per unit.
- Factory attachments and components are subject to independent replacement.
With regular preventative maintenance, it is possible to eliminate the occurrence of unforeseen circumstances that would lead to the replacement of expensive parts.
AED service
Expert recommendations:
- Check the condition and regularly change the oil in the pump plunger drive device. According to the manufacturer, the first oil change should be made after 50 hours of using the device, subsequent service - after 350-550 hours. With average throughput rates of the washing area, it is enough to carry out the treatment once every 3 months.
- Monitoring the condition of the pump for good fluid flow, external application of oil, as well as minor repairs to the Karcher car wash yourself (changing filters, tightening bolts) will extend the life of the device.
- For heated AHPs, boiler maintenance is required - cleaning the fuel filter (removing scale on the internal walls of the heat exchanger and external deposits).
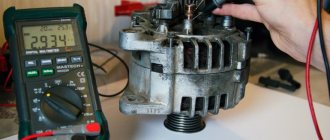
In what cases is AED repair required?
Repair is required if there is a decrease in pump performance and a decrease in operating pressure. This is caused by fluid leaking through the plunger seals. Seals wear out naturally or when exposed to abrasive elements. At high pressure, small scratches will affect fluid leakage.
The first signal of a malfunction is a small puddle formed in the area where the hose runs. To resolve the issue, you can carry out a simple but painstaking repair of the Karcher car wash with your own hands. It is enough to change the oil seals (seals). Installing a new drive, housing elements, seals, etc. will cause more difficulties.
The suction channel is formed by housing elements that place a flat filter between them. The efficiency of the device depends on its condition. The formation of defects in the fit of the surfaces of body parts leads to a decrease in the main characteristics of the device. If the suction power is low while working with the hose and nozzles, repairing a Karcher high-pressure washer with your own hands requires preparing a soft material to clean all surfaces and ribs of the body parts. Damaged elements must be replaced.
Non-standard solutions
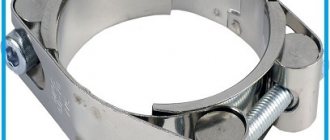
A couple of garden hose designs deserve special mention.
Oozing
This is the name of a hose with minute perforations. Under pressure, it acts as a sprayer, evenly moistening the bed along which it is laid.
Lengthening
An extendable, or expanding, or stretchable hose can be found in two versions.
The first is a polyurethane spiral. The tension causes it to fully or partially straighten, resulting in an elongation of 8-15 times depending on the diameter.
The photo shows exactly such a solution.
The second option is a flexible polyurethane inner shell, the elongation and expansion of which is limited by the nylon covering. It also protects the polyurethane from accidental damage. In this case, the elongation is noticeably less—about threefold; but the product has a minimum specific gravity (less than a kilogram per 20 meters).
Additional aspects
If the device is equipped with a Total Stop system (switching off the pumping system when there is no pressure on the gun trigger), leaks will lead to involuntary activation - the automatic device perceives the decrease in pressure as a “start” command, and the device rattles.
A decrease in performance or shutdown of the pressure pump is affected by wear of the bypass or bypass valve, rubber seal (ring) of the pressure sensor, and failure of the hose. This is accompanied by a low level of gun pressure, a decrease in the density and washing characteristics of the jet.
How to extend a water hose
Sometimes situations arise when the washing machine needs to be moved to another location, and the filler tube is not long enough for connection. You can immediately buy a sleeve of the required length, but you can also lengthen an existing one. To do this you need:
- by measuring, determine the length of the missing part;
- purchase a product of the required length (direct female-to-female connection);
- buy an adapter or connector with an external thread (“male-male”) and the required dimension (½ or ¾);
- disconnect the old hose from the connection tap;
- connect the products through special adapters (to seal the connection, you must use fume tape for water connections);
- connect the extended hose to the tap and install the machine in place.
When installing the filler hose, you should always ensure that it is not installed under tension. If the washing machine vibrates or moves, the hose may break. If such a nuisance happens in the absence of control, it may be necessary to repair both yourself and your neighbors.
On a note! If you are going to lengthen the inlet hose, you will most likely have to extend the drain hose as well. To avoid going to a plumbing store twice, it is better to prepare all measurements and a list of necessary parts for connection in advance.
Descaling
If the device does not maintain the set pressure level, the pump operates intermittently and the water supply is intermittent, repairing a Karcher high-pressure washer with your own hands will not be particularly difficult. It is enough to unscrew the bolts with a screwdriver and remove the housing, take out the motor with the pump and separate the engine from it. The pump must be directed upward, otherwise oil will leak from the piston drive.
The valves are removed from the piston (the use of sharp objects is excluded, which can damage the surface), the pump is disassembled into 2 parts. The valves are removed again.
This way the cause of the device failure is determined. This could be scale build-up or blockage. All parts in the inside of the pump are cleaned and wiped with felt. Then the structure is assembled in the reverse order.
The subtleties of making a mini-sink yourself
During the assembly process of a car wash, there are several important points that determine the safety of further operation and the absence of malfunctions.
The frame is the basis of the entire structure:
- it is planned to manufacture a system with optimal dimensions, for which suitable pipes are selected - round, curved;
- in addition to the wheels, it is advisable to install clamps at the bottom;
- handle - makes transportation easier.
Grounding – safety element:
- a three-core wire is selected;
- you will need a plug with a grounding terminal;
- The socket is grounded.
After preparation, several main steps are performed:
- Electrical equipment is installed on the frame, including a motor, pump, and other structural elements.
- A gun with a nozzle is attached, supplying water after pressing a special button. Such devices are used by professionals, but they can also be easily purchased in a store.
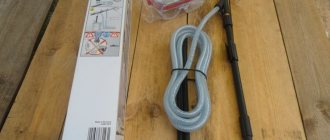
- A high-pressure hose is being installed.
After completing the assembly, connect to the water supply. A 7 m long hose is suitable for this.
How to avoid unexpected device breakdowns
When thinking about how to make a car wash with your own hands, it is advisable to ensure optimal operation, preventing the need for subsequent restoration.
Important points about using the installation:
- before starting, all connections and fastenings are checked;
- the filter element needs to be regularly cleaned to remove dirt;
- You should not often use the equipment at full power;
- Installing a battery will protect the device from power surges.
If you assemble the device yourself, subsequent restoration and replacement of rubber rings and seals will not cause any difficulties.
auto-sovets.ru
In the modern world, almost every family has a car for personal use. At the same time, not every car enthusiast can use a garage as a place to store useful things. It is quite obvious that all cars, without exception, sooner or later require external cleaning. Sometimes, light, superficial. And to do this, you don’t need to stand in line at a car wash or spend money on purchasing a washing machine. In order to save time and money, you can make a mini-wash with your own hands: always carry it in the trunk and use it as needed in any secluded place.
Materials for work: 1. Plastic canister with two necks for draining - 1 pc.; 2. Filling hose for a washing machine (length – 2 m) – 1 pc.; 3. Watering gun on a telescopic rod – 1 pc.; 4. Quick-release fitting – 1 pc.; 5. Valve for tubeless wheels (spool valve) – 1 pc.; 6. Rubber gasket (inner diameter 15 mm, outer diameter – 24 mm) – 1 pc.; 7. Coupling – 1 pc.; 8. Screwdriver, thick drill, feather drill with a diameter of 22 mm, silicone sealant or rubber glue, automobile compressor.
Stages of work:
First stage: install the air inlet.
Having collected the necessary components, remove the cap from the drain neck of the plastic canister. Important: in the future, when using a mini-wash, the canister will need to be placed on its side, with the filler hole down (for direct release of water under pressure), so we leave the lid of this hole for the junction with the hose. Use a thick drill to make a hole in the removed cover.
We apply silicone sealant along the side of the valve for tubeless wheels (colloquially - spool).
We insert the valve into the hole in the lid, press it carefully, and dry it.
After the sealant has hardened, screw the lid onto the drain hole of the canister.
Second stage: installing a water outlet.
Remove the cap from the second hole of the canister. Using a feather drill, we make a hole in it corresponding to the diameter of the coupling.
Insert the coupling into the drilled hole.
To secure the coupling more firmly, spray the joint with the lid with silicone sealant and dry it.
At one end (preferably a curved one) of the inlet hose for the washing machine, cut off the nut and its fastening.
The fastening itself will not be useful in further work, but we use a nut to secure the back side of the coupling, having previously applied silicone sealant to it.
After drying the sealant, screw the cap onto the opening of the canister.
Third stage: connect the hose to the watering gun.
The use of a washing machine inlet hose is due to its ability to withstand high water pressure. We thread the cut part of the hose into the nut of the quick-release fitting.
We fasten the section of the hose in the quick-release fitting (it is clamped with a special fastener).
We twist the main fitting and its nut.
We screw the fitting onto the watering gun on the rod.
Stage four: connect the hose to the canister.
To prevent air from escaping when water is supplied under pressure, insert a rubber gasket of the required diameter into the second nut of the inlet hose.
Screw the nut onto the quick-release fitting.
Mini-wash is ready!
Fifth stage: putting the sink into operation.
Pour water into the canister.
We connect a car compressor to the valve and pump up air (about 1 atmosphere, the main thing is not to overdo it in pumping - it can inflate or rupture the canister).
We press the start button on the watering gun and my favorite car.
This mini sink is easy to use, requires little water, takes up little space and can be used in a miniature space. In addition to the car, the car wash will help with cleaning the windows of a country house, bicycle, boat, stroller, etc.
sdelaysam-svoimirukami.ru
Repair of high pressure hose
Do-it-yourself repair of a Karcher high-pressure hose involves crimping the damaged element at the ends or along the entire length. If the hose is torn off the flange, the unusable part should be cut off evenly to an area where there is no deformation. The required flange is selected and placed on the hose. The first one needs to be inserted into the second one and pressed in a vice. Strikes are struck from above with a hammer.
If a cut occurs along the length of the sleeve, similar work is performed. The hose is cut and removed to an undamaged area. A connector of a given diameter and two clamps are inserted. They are put on the hose, the connector is inserted, and pressed tightly with clamps. If cracks form along the entire length of the hose, repairing the Karcher high-pressure hose with your own hands is impossible. A complete replacement of the product is required - it is better to entrust this to the service center technicians.
Internal pressure
The higher the pressure inside the housing, the stronger the stream of water gushing from the hose, which means the dirt comes off easier.
Install it carefully, because water can simply break a fragile car part or glass and leave dents. Manufacturers set the pressure at 150-170 bar, but 100 bar is enough to clean the car. If the contamination cannot be cleaned with a jet of water, purchase a special nozzle for the hose, a turbo cutter. It will help wash tires, wheels, and remove dirt accumulated in the cracks. You can use the mini-wash both outside and inside the car. If you are using a turbo cutter, you will need a pressure of 160 bar.
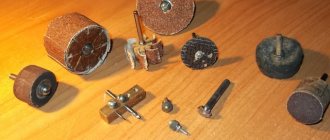
Cleaning the tablet foam nozzle
If the foam nozzle stops producing thick foam, is used for a long time or is not washed with clean water after use, the mesh in the form of a shaft becomes clogged with dried “chemicals”.
To clean the foam tablet, it is necessary to perform a number of operations:
- Disconnect the tank from the main foam lance unit.
- The arrow indicates the location of the pin holding the plastic tip of the tablet on the brass element. The pin should be knocked out. If you decide to repair the Karcher foam nozzle yourself, you can use an awl or a thin screwdriver.
- After removing the plastic tip, you will see two petals that form the spray angle of the foam. The tip with them must be unscrewed.
- In the inner part of the removed nozzle, steel threads will be visible, taking on a rounded shape (in the form of a tablet). They should be removed using an awl. Cleaning the hardened “chemicals” in the nozzle is carried out using a needle.
- The product is assembled in the reverse order.
Correctly repairing the Karcher nozzle with your own hands can extend the life of the device and reduce the cost of its maintenance.
Motor failure
Repair work
| Breaking | Possible reason | Ways to solve the problem |
| The motor does not work | Low voltage in the network | The mains voltage is checked and the plug is connected correctly |
| Damage to the extension cord | Connecting the device without an extension cord | |
| Motor protection relay enabled | The drug is turned off for 15 minutes | |
| The motor is noisy, but there is no return | Voltage reduction when using an extension cord | Extension cord unplugged |
| Low voltage in the network | There is no need to rush to repair Karcher mini-washers yourself. Initially, you need to check the compliance of the diet with the recommended indicator | |
| Engine stops | Incorrect mains voltage | The power supply in the network is determined and compared with the data on the tag |
| Motor protection relay enabled | The device needs to cool down for 15 minutes |
What else affects engine performance?
Lack of preventive inspection of the main elements of the device can cause a number of additional problems associated with engine failure.
Motor repair
| Breaking | Possible reason | Ways to solve the problem |
| Lack of pressure | The gun nozzle is clogged | Nozzle cleaning required |
| Water supply valve is closed | Check the fluid supply and, if necessary, carry out high-quality repairs of the Karcher hose yourself. | |
| Filter is clogged | The filter is cleaned and replaced | |
| Random motor start | Lack of tightness of the pump, gun | Parts are being replaced (see example above). |
If you have difficulty identifying a breakdown, it would be best to contact a professional. Many users mistakenly determine the cause of the breakdown and repair the Karcher pump with their own hands during jerky operation. The real reason may lie in weak water pressure or low voltage.
Installation
How do I connect a hose to a threaded pump fitting or another section of the same hose? Is it difficult to branch an improvised water pipeline? In general, plastic connectors are used, strongly reminiscent of fittings for connecting metal-plastic pipes.
The connection installation looks like this:
- The union nut of the connector is loosened or completely removed and pushed onto the attached end of the hose.
- The hose is then pulled onto the connector fitting.
- When the union nut is tightened, it is pressed onto the fitting, completely sealing the connection.
Along with connectors, ordinary fittings are often used - made of unplasticized polyvinyl chloride and brass. The hose is pulled over them with some force and, if necessary, crimped with an aluminum clamp or binding wire.
Since connectors perform the same functions as fittings in a water supply system, you can find products with the same functionality on sale:
- Tees and crosses;
- Adapters for pipe threads for connection with sprayers and steel water supply;
- Diameter adapters allowing splicing of hoses of different sections.
Bearing replacement
The need to replace the bearing may be caused by intermittent operation, internal noise and overheating of the motor. The reason sometimes lies in interturn short circuits or a failed bearing. In the first case, you need to separately start the engine and check its operation. If no violations are found, further repair of the Karcher sink can be easily done with your own hands in a few steps:
- The hose with the gun is unscrewed, the housing is disassembled and the engine with the cylinder head is taken out.
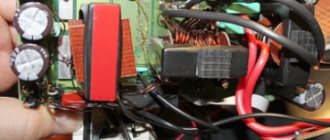
- 6 screws are unscrewed and the block with the switch is opened, the capacitor and 2 power terminals connected to the switch are disconnected.
- The unit is placed on the stand in a perpendicular position (the motor is located at the bottom), 4 bolts of 13 are unscrewed.
- After draining the oil, you can conduct a thorough inspection of the ball cage.
- Use a torx screwdriver to unscrew the middle bolt. To do this, clamp the shaft from the reverse side using a gas wrench.
- The internal bearing, which acts as a support for the swash plate pressing on the valves, is replaced.
Inlet hose with aquastop
Many manufacturers have turned even such a simple device as a water connection hose into a leak protection system. Devices with aquastop almost completely eliminate leaks as a result of damage to the internal hose.
The design of such elements consists of two shells located one inside the other. When the inner tube breaks, the outer shell retains water. In the part of the hose connected to the tap there is a mechanical valve that shuts off the water. It is powered by a special composition that expands when wet. Most models of products with hitchhiking have devices that signal when the valve is activated. A serious disadvantage of such equipment is the need for replacement after the valve in the protective block is activated. The outer wall is made quite strong and can withstand pressure up to 70 Bar (in a conventional pipeline this value does not exceed 10 Bar).
Change of oil
The entire oil change process is carried out in several stages:
- Prepare a container to hold 1 liter of oil.
- The receiving tray is being prepared.
- The drain plug is unscrewed.
- The receiving tray drains the oil into a collection tank.
- The drain plug is tightened.
- Slowly add oil to the MAX mark. Air bubbles will disappear on their own.
The type of oil and filling volume can be found in the technical specifications of the device. The waste liquid is disposed of environmentally or delivered to a collection point.
When determining the causes of malfunctions that affect the performance of the unit, special attention is paid to the acquisition of spare parts, because some of them cost the same price as the device itself.