An ax is a universal tool that is used by every master due to his own experience, skills and dexterity. At the same time, the main advantage is the ability to hold an edge and remain in working condition.
Taking into account the specifics of using an ax, which consists mainly of chopping blows, only high-quality and hard metal that has undergone competent hardening is capable of maintaining the working part of the blade in a given state. Unfortunately, many manufacturers save time and resources by shortening the production cycle and not completing all the necessary production steps in full, which deteriorates the quality of the finished tool. This problem is solvable, but only for people who have the necessary knowledge in the field of metal processing. Let's consider the technology of hardening an ax at home.
Hardening an ax at home
If the ax quickly becomes dull during use and dents appear on the tip, then the steel is soft. And this means that the ax is not hardened. And if the tip chips or cracks, that is, the steel is very hard and brittle, then this is possible if tempering has not been carried out after hardening.” A clean file with a fine notch will help us evaluate the hardness of steel, and therefore the quality of hardening.
If the hardness of the steel is high, then the file glides over it almost without catching. If the hardness of the steel is medium, then the file will take it a little. And if the hardness of the steel is low and the file takes it easily, it means that the steel is not hardened, or the heat treatment technology was violated. In the case of this axe, the file takes it easily. In this case, as well as in the case of increased fragility, the ax is subjected to a full heat treatment cycle. First, annealing, and then quenching and tempering. Correct hardening of an ax is considered to be hardening in which different parts of the ax are hardened differently. In the area of the blade, at a distance of about three centimeters from the tip, the hardness of the steel should be high. The hardness of the rest of the ax should be much less. This hardening ensures the wear resistance of the blade and the ductility of the rest. And it is a guarantee that during operation the butt will not burst or the blade will not break off.
What is a taiga ax
First, of course, we’ll talk about the forged taiga axes we made, and compare them with purchased carpenter’s axes. Then considerations on the recipes for making your own from ready-made axes, which are common on the Internet.
Purpose
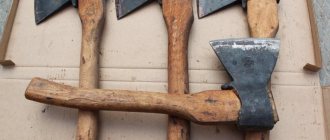
A taiga ax is an ax that is convenient to use for hunting, long hikes and work in forest areas. It is intended for collecting firewood, setting up a camp, and, quite often, for cutting up the carcasses of large animals. Therefore, optimal blade hardness, a reliable ax handle, and a convenient case are required.
Buy a taiga ax or make it yourself?
Carpenter's axes are usually on mass sale, but they are not very convenient for working in the forest. A long time ago, skilled people lightened and modified purchased axes for camping use; now a whole industry has emerged for regrinding axes and turning them into “author’s” ones. If everything is done correctly: the shape, the attachment on the ax handle, heat treatment and sharpening, you can get a good tool. But we prefer axes that are completely hand forged and designed specifically for working in the forest. The advantages of such an ax: optimal shape, light weight, more durable blade due to free forging rather than stamping. Therefore, we will first show off our axes, and only at the end of the article will we tell you how to make a taiga ax with your own hands.
GOST 18578 – 89 Construction axes
The next point that we need to know to carry out effective heat treatment is the grade of steel from which the ax is made. All construction axes that were manufactured in the Soviet Union and are now manufactured in the post-Soviet space must comply with GOST 18578 - 89 Construction axes. This GOST specifies steel grades for the manufacture of axes. Each of these steels has its own heat treatment temperature regimes. And your own quenching media.
You can find out about this in steel grade books or in thermist’s reference books, which are freely available in the library. However, I want to emphasize the fact that the main materials for making axes are U7 and U7A steels. The ax I chose for experiments has a mark.
Above, the year of manufacture is 1963. On the left is the size according to GOST A2. On the right is steel. From which the ax is made. This is tool, carbon steel U7. Heat treatment modes for U7 steel are as follows:
Before heat treatment, the cutting edge of the ax must be dulled so that its thickness becomes approximately one millimeter.
Main stages
The procedure consists of three main stages, which are performed sequentially without interruption:
- Annealing.
- Hardening.
- Vacation.
Let's look at them in order.
Annealing
The annealing process is necessary to change the structure of the metal, cleanse the structural memory of the steel and relieve stress incurred during casting or previous processing.
Figure 2 – Heat treatment modes for steel U7, U7A
The procedure consists of performing two steps:
- Heating to a temperature of 740-760°.
- Smooth cooling up to 550° at a speed of 30-50° per hour.
Considering the temperature difference, we can conclude that the cooling process will take from 4 to 7 hours.
The main difficulty is temperature control.
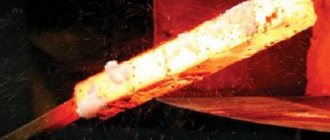
Steel heated to 768° has a red-burgundy color with a dim glow.
Without experience, it is difficult to understand whether the metal has reached the desired temperature or not. An ordinary magnet will come to the rescue. At a temperature of 768°, it ceases to be attracted to the surface of the steel, which makes it possible to determine the temperature with sufficient accuracy. After reaching the desired degree of heating, the furnace is turned off, and the ax is left in it for gradual cooling. Usually the process lasts slightly longer than the calculated value - about 10 hours.
Hardening
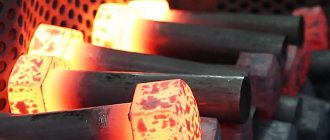
To harden, the metal must be heated again to a temperature of 800-830°. First, the surface is cleaned of scale, for which you need to use a hard wire circle. Heating is carried out until the metal acquires a bright red tint.
Important! When heating to 800°, you will have to use your own understanding of the situation, since there are no more correct ways to determine the temperature at home. It is a good idea to look at a sample of the metal that has been heated for hardening beforehand to get an idea of what it should look like.
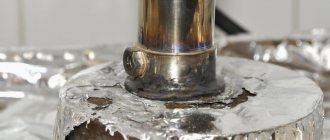
After heating, the metal must be cooled. Use water at a temperature of 30° and oil. The working part of the ax is immersed in water (3-4 cm), actively moving to prevent the formation of a vapor layer. The duration of immersion in water is 3-4 seconds, after which the entire ax is immersed in oil. At the same time, you need to make sure that it does not catch fire.
Vacation
Tempering is the final part of the entire process, designed to relieve metal stress and reduce its brittleness. Before starting the tempering, it is necessary to clean the surface of the ax again with a wire wheel, since it will be necessary to carry out visual inspection of the surface. It should acquire a blue tarnish color corresponding to the correct degree of heating.
The procedure is carried out in a conventional oven heated to 300°. The ax is placed in the oven and kept for 1 hour, after which it is removed and cooled naturally in the open air. Test processing with a file can be a criterion for the quality of hardening.
Attention! The higher the tempering temperature, the softer the metal will become.
Hardening methods
There are essentially 2 types of hardening methods. On an open fire and in the oven. But, unfortunately, in an ordinary fire it will not be possible to raise the temperature above 900 degrees. Then the oven comes to the rescue.
You can make it yourself. This is a rather difficult process, but once you make it once, it will serve you for a long time. Moreover, if you are a beginner master, you simply need it.
In the cell
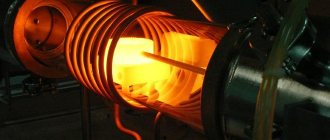
Next we will talk about how to make your own muffle furnace for proper heat treatment of workpieces, and now we will simply and briefly describe the hardening process in it; the blade steel will be used 50Х14МФ:
- We heat the oven to the desired temperature, in this case 1070 degrees, and immerse the blades in the oven.
- Having loaded the blade into the oven, we heat the oven again to 1070 degrees, and at this temperature the countdown begins. The principle is simple: 1 minute 40 seconds for every millimeter of blade thickness.
- After the required time has passed, the blade is pulled out and cooled in air for 15 minutes under light pressure.
- Then the metal is tempered in the oven at 200 degrees.
Hardening a knife in a chamber made at home.
With this process, the steel gains a hardness of 56 HRC. But keep in mind that in this case, hardening took place without immersion in liquid. Each steel has its own hardening conditions. And the result you want to achieve will depend entirely on the process itself.
On an open fire
The method, one might say, was tested by our ancestors and has been around for many years. To properly harden steel, without any precise measuring instruments, so to speak “by eye”, you need to be attentive and patient. The only way to check is with a magnet. When a metal reaches a certain incandescent point, the so-called Curie point, it stops interacting with the magnet.
And one more sign is the color of the workpiece itself, it should turn dark red. But you also need to make sure that no blue or black spots appear during the process, this indicates overheating. The workpiece should be placed in the coals when the color of the flame from them is crimson.
What you will need:
- mineral oil in a container (can be worked off);
- bucket with water;
- well prepared coals;
- long metallurgical pliers.
Hardening a knife over an open fire. After the part has acquired the desired shade and is not magnetic, you need to carefully take it with pliers and lower it into the oil for 3 seconds, and this must be done several times. Keep the workpiece in the oil a little longer each time. And at the final stage we immerse it in water.
Features of the technology
At home, if you approach the matter correctly, you can qualitatively harden any knife. This could be a hunting or folding knife, a bayonet-knife or a product in the form of a hook, a blade made of a file or a bearing, a butterfly knife, etc. It is somewhat more difficult to harden products made from stainless steel at home, but this problem can be solved, if you carefully study the process technology and select the appropriate heating equipment. Various materials are used as a cooling medium when performing hardening, both in production and at home. Thus, the most common cooling media - water and oil - provide the following cooling rates of a heated steel product:
- oil at room temperature – 150°/s;
- oil heated to a temperature of 200° – 300°/s;
- water, the temperature of which is slightly above 20°, – 450°/s;
- ice water – 600°/s.
Annealing a knife over an open fire requires close attention.
The most important problem that you may encounter when trying to harden a knife at home is overheating the metal, which leads to a significant increase in its fragility. It is also necessary to very carefully monitor the uniform heating of the knife being hardened, so as not to encounter the formation of transverse cracks on its blade.
There is a simple rule that should be followed in order not to encounter such a problem: the part of the blade that will not be sharpened is heated three times to a purple color, which corresponds to a temperature of 285 °, and the cutting part is heated only once to a yellow color, after which the degree Its heating is checked using a magnet. You can learn more about this technique by watching the corresponding video.
Colors of heat and tarnish of carbon and low-alloy steels
On stainless steels, tarnish colors appear in the same sequence, but at higher temperatures
Different cooling media also provide different depths of the hardened layer (hardenability). Thus, when cooled with water, steel is calcined at a rate of 1 mm per second, and when oil is used as a cooling medium, this rate is almost halved. To harden a double-edged knife, obtaining hard cutting edges and an elastic core, you need to do the following: the blade, heated to the required temperature, is first dipped in water for two seconds and then placed in oil.
Another technology that allows you to qualitatively harden the cutting edge of a blade with significant thickness is hardening the knife in graphite. Using this technology, the details of which can also be easily studied in the video, you can qualitatively harden knives of various models and configurations (hunting knife, bayonet knife, butterfly knife, etc.). At the same time, such hardening can be performed efficiently at home.
Annealing
So, let's start heat treatment. The first operation is called annealing. Before hardening an ax or any other tool, it is necessary to anneal it. Annealing is a kind of zeroing of the structural memory of the metal. It consists of heating the entire instrument to a temperature of 740-760 degrees and gradually cooling it to 550 degrees. At a speed of approximately 30-50 degrees per hour. Annealing is best done in a brick kiln. The most important question is how to determine the temperature of the metal. A professional can easily determine the temperature by color. Well, a regular magnet will come to the aid of a beginner.
The fact is that steel, like iron, stops being magnetic at a temperature of 768 degrees . As the magnet heats up, we check whether the steel is magnetic. When the magnet stops sticking to the steel, this means that the temperature of our ax has exceeded 768 degrees and there is no need to heat it any more. We remember the color of the glow for a temperature of 768 degrees. It's called red-burgundy. We will need this knowledge when hardening, which is carried out at a temperature of 800-830 degrees, which corresponds to the transition from dark red to red. On the screen you see a table of heat and tarnish colors for carbon steel.
I would like to draw your attention to the fact that the camera distorts the real color, making it lighter. So, the temperature required for annealing has been reached. We move the coals away from the axe, close the stove, close the main valve and leave for 10 hours. Let the ax cool down along with the stove. During the annealing process, the microstructure of the metal is improved, internal stress is relieved and hardness is reduced. After cooling, the annealed steel becomes soft and can be easily taken with a file.
Hardening with self-tempering
Another method of hardening a tool is self-tempering. First, the tool is heated in a furnace to the hardening temperature. Then, the cutting part is cooled to a temperature of 150-170 degrees. After this, the cutting part is cleaned of scale in order to see the tarnish colors. Let's see how the purple color goes. The tool is kept in air until the heat from the hot part heats the cooled part to a temperature of 250-300 degrees. We judge this by the color of the tarnish. Everything is purple. Cool. Water is used as a quenching medium. Only to cool the cutting part it is heated to 30 degrees. And for the final cooling of the ax it is heated to 50 degrees.
Hardening
The next heat treatment operation is hardening. As I already said, U7 grade steel is hardened at a temperature of 800-830 degrees. You can heat the ax over a fire, in a potbelly stove or brick oven. As soon as the metal stops being magnetic, wait a few more minutes, and then proceed to hardening. Hardening is carried out in two environments. The first medium is water heated to 30 degrees. The second is oil. We dip the ax blade 3-4 centimeters into the water. We move it intensively so that the steam cushion does not interfere with cooling. The time spent in water is about 3 seconds. Then completely dip the ax in oil. Since the oil can catch fire, keep a piece of thick cloth ready. In order to close the bucket with it in case of fire and stop the access of oxygen for combustion. We control the hardness of steel after hardening.
The blade after hardening turned out to be very hard, and therefore fragile. Therefore, by tempering it will need to be made softer and more flexible. In order to clearly see the colors of the tarnish during and after the tempering, we clean the ax with a wire wheel. This is what we have in the end.
Self-vacation
Self-tempering is a process that combines the hardening and tempering operations into a single procedure.
Its essence lies in the sharp cooling of the working part of the tool without additional cooling of the entire ax.
Figure 3 – How the color of steel changes when the ax is heated
A situation arises when the cooled part is heated to the required temperature due to thermal energy from the remaining part that has not been cooled.
The process is controlled by the color of the tarnish.
When the instrument acquires the desired color, it is finally cooled in water or oil.
Self-release is a rather complex procedure, the result of which depends on the experience and skills of the master. It saves time significantly, but it is better for an untrained person to complete the entire process so that they do not have to perform the entire hardening operation again.
The length of time the ax is kept in the oven, the time required for reheating and other nuances of the process depend on a lot of factors, including the size and shape of the ax, so it is unlikely that you will be able to get the expected result the first time. For the first time, it is recommended to involve an experienced thermist in the work and get a lot of useful information from him.
Features of the work taking into account the chosen method
Before starting work, the device is cleaned of rust and dirt. In addition, if necessary, remove the wedge from the ax handle and secure it to the stand. Before choosing a method, determine the shape and degree of sharpness of the ax.
Electric sharpener
The easiest and fastest way, but it requires skills, attention and special equipment. For sharpening you will need: an abrasive wheel with an electric drive, hand sharpeners, protractors and templates for different angles, a marker, polishing paste. An important condition is that you need to wear safety glasses and gloves.
For a straight blade, it is convenient to make a clamp that can be accurately aligned relative to the sandpaper. This will create two symmetrical chamfers. A curved ax will have to be sharpened on the fly, checking the template.
Procedure for sharpening a carpenter's ax:
- Use a marker to paint over the entire chamfer to make it easier to control the sharpening process and untreated areas;
- set the sharpening angle on the device or try it on manually;
- If installed correctly, the blackening on the chamfer will be removed evenly with the stone; if necessary, the angle must be adjusted;
- turn on the emery and remove excess metal with smooth movements until the nicks are completely eliminated;
- turn the ax over and repeat the operation, control the overall angle with a template or block;
- finally bring the blade sharpness to the desired value using fine-grained sandpaper and sand it on felt with a special paste;
- clean off any abrasive residue and apply a coating to the chamfer.
The cutting edge will heat up when processed on a sharpening machine. This should not be allowed, for which it must be periodically immersed in water or oil. Heating the metal and then tempering it reduces hardness and impairs working properties.
Manually
This method has its advantages: firstly, the blade does not overheat, so the quality of the edge is the best, and secondly, you can sharpen an ax at home with an ordinary whetstone, when there are no electrical tools at hand. For work you will need: a file, sandpaper and stone of different grain sizes, felt, sanding paste, gloves, safety glasses. You can sharpen an ax in this way:
- use a file to remove large irregularities and bring the chamfer to the desired size (movements from the ax to the blade);
- spread the sandpaper on a flat surface, use the blade to make semicircular movements alternately on each side;
- Give final sharpness with an emery block, polish the cutting edge and treat it with anticorrosive.
The difficulty of the manual method lies in the need to constantly monitor the position of the ax relative to the abrasive. Even a slight tilt to the side can ruin the sharpening. In addition, this method is very tedious.
How to understand whether hardening is needed
First, you should check whether such a procedure is required. Not all manufacturers produce high quality products. It happens that the purchased ax was either not hardened at all, or it was carried out in violation of the process:
- in the first case, the material of the tool will be too soft, and this leads to the appearance of dents and nicks, as well as to rapid dulling during use;
- a violation of technology, as a rule, consists in excluding the tempering stage after heating from the process - the metal is brittle and quickly becomes covered with cracks.
Compliance with quality requirements is checked using a flat file. You need to take it with a fine notch. If it glides freely over the surface without catching it or leaving marks, this indicates the high hardness of the alloy.
If, by all indications, the tool needs to be hardened, it is necessary to determine what kind of steel was used to make it. This is necessary for proper processing.
The best steel used for a quality ax is carbon. It is marked U7, U8, U8A.
How to harden?
When you have a forge, hardening can be done quite simply:
First the fire is lit. Small-sized wood (chips, small branches, woodworking shavings and paper) is used for ignition. Prepare the containers in which the hardening will be carried out. Mineral oil (from internal combustion engines) is the best cooling for parts. The container must allow the part to be loaded completely. Synthetic and semi-synthetic oils can be used, but keep in mind that some may boil. The cooling rate will decrease
Therefore, the use of such oil is used with caution. A water container is needed to rinse parts after hardening. You will need coal. Use brown and black coals
In practice, charcoal obtained after processing birch is often used. To pick up the workpiece and move it around inside the forge, you will need pliers. Experienced blacksmiths have several types of pliers. After obtaining a stable fire on the grates, you can add coal. It burns slowly at first. When the air supply is turned on, intense heating begins. The coals change color to white. It's time to lay down the part that they want to harden. She is put into the fire. Watch the warm-up. Need a magnet. It will show whether the required heating has occurred or not. Austenite is not magnetic. If a dark cherry-colored glow occurs, you can count on heating to similar temperatures. Take out the workpiece and try whether it is magnetized or not. If not, then the temperature has been reached. Warming up is required for at least 15...20 minutes. The thermal conductivity of heated metal is low, so incomplete heating may occur inside massive objects. In this case, bends are observed during hardening. After removing the part from the fire, it is dipped into oil in several stages. Lower and raise with rhythmic movements. This is how high cooling rates are achieved. Raising and lowering stirs the coolant during the hardening process. A fire may occur. It will go out quickly. All that remains is to rinse the part. You can check whether hardening has occurred or not with a file. If the file “does not take”, it means that hardening has occurred.
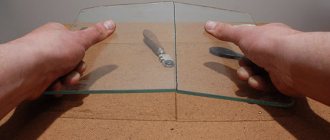
Test the quality of tempering on glass. If it is possible to leave a mark on the glass with a tempered part, then an HRC hardness of more than 55 units is obtained.
Video: how to harden metal with your own hands?
How to properly harden an ax
Blacksmith Valery Samovich: “Using an ax as an example, I want to talk about the heat treatment of steel at home, which includes three stages: annealing, hardening and tempering. The need for hardening arises if the manufacturer violates the heat treatment technology.
If the ax quickly becomes dull during use and dents appear on the tip, then the steel is soft. And this means that the ax is not hardened. And if the tip chips or cracks, that is, the steel is very hard and brittle, then this is possible if tempering has not been carried out after hardening.” A clean file with a fine notch will help us evaluate the hardness of steel, and therefore the quality of hardening.
If the hardness of the steel is high, then the file glides over it almost without catching. If the hardness of the steel is average, then the file will take it a little. And if the hardness of the steel is low and the file takes it easily, it means that the steel is not hardened, or the heat treatment technology was violated.
In the case of this axe, the file takes it easily. In this case, as well as in the case of increased fragility, the ax is subjected to a full heat treatment cycle. First, annealing, and then quenching and tempering. Correct hardening of an ax is considered to be hardening in which different parts of the ax are hardened differently.
In the area of the blade, at a distance of about three centimeters from the tip, the hardness of the steel should be high. The hardness of the rest of the ax should be much less. This hardening ensures the wear resistance of the blade and the ductility of the rest.
And it is a guarantee that during operation the butt will not burst or the blade will not break off.
GOST 18578 – 89 construction axes
The next point that we need to know to carry out effective heat treatment is the grade of steel from which the ax is made.
All construction axes that were manufactured in the Soviet Union and are now manufactured in the post-Soviet space must comply with GOST 18578 - 89 Construction axes.
This GOST specifies steel grades for the manufacture of axes. Each of these steels has its own heat treatment temperature regimes. And your own quenching media.
You can find out about this in steel grade books or in thermist’s reference books, which are freely available in the library. However, I want to emphasize the fact that the main materials for making axes are U7 and U7A steels. The ax I chose for experiments has a mark.
Above, the year of manufacture is 1963. On the left is the size according to GOST A2. On the right is steel. From which the ax is made. This is tool, carbon steel U7. Heat treatment modes for U7 steel are as follows:
Before heat treatment, the cutting edge of the ax must be dulled so that its thickness becomes approximately one millimeter.
Vacation
The last heat treatment operation is called tempering. Tempering is necessary to reduce the brittleness of hardened steel and relieve internal stresses in the metal that appeared during the hardening process. I bake in a regular oven. The ax is kept for one hour at a temperature of 300 degrees, and then cools in air. This is the handsome guy we got after our vacation.
The color of the tarnish is blue, indicating that the tempering temperature was approximately 300 degrees. You can see this color if you turn the metal surface towards the light in a certain way. We check the hardness of the metal after tempering and make sure that the blade has become a little softer. As we already know, the hardening temperature of U7 steel is 800-830 degrees. And it cannot be reduced.
At lower temperatures, hardening may not occur at all. But what should we do if, after hardening, we need to obtain ductile steel with a relatively low hardness? In this situation, we harden the steel as expected, but increase the tempering temperature. The higher the tempering temperature, the more ductile and softer the steel will be after tempering.
Data on the hardness of steels after tempering, depending on the tempering temperature, is available for each grade in steel grade books.
Hardening with self-tempering
Another method of hardening a tool is self-tempering. First, the tool is heated in a furnace to the hardening temperature. Then, the cutting part is cooled to a temperature of 150-170 degrees. After this, the cutting part is cleaned of scale in order to see the tarnish colors. Let's see how the purple color goes.
The tool is kept in air until the heat from the hot part heats the cooled part to a temperature of 250-300 degrees. We judge this by the color of the tarnish. Everything is purple. Cool. Water is used as a quenching medium. Only to cool the cutting part it is heated to 30 degrees.
And for the final cooling of the ax it is heated to 50 degrees.
How to harden metal yourself at home
Heat treatment of metals is one of the main ways to improve their mechanical and physical-chemical characteristics: hardness, strength and others.
One type of heat treatment is hardening. It has been successfully used by man in a handicraft way since ancient times. In the Middle Ages, this method of heat treatment was used to improve the strength and hardness of metal household items: axes, sickles, saws, knives, as well as military weapons in the form of spears, sabers and others.
Vacation
The last heat treatment operation is called tempering. Tempering is necessary to reduce the brittleness of hardened steel and relieve internal stresses in the metal that appeared during the hardening process. I bake in a regular oven. The ax is kept for one hour at a temperature of 300 degrees, and then cools in air. This is the handsome guy we got after our vacation. The color of the tarnish is blue, indicating that the tempering temperature was approximately 300 degrees. You can see this color if you turn the metal surface towards the light in a certain way. We check the hardness of the metal after tempering and make sure that the blade has become a little softer. As we already know, the hardening temperature of U7 steel is 800-830 degrees. And it cannot be reduced. At lower temperatures, hardening may not occur at all. But what should we do if, after hardening, we need to obtain ductile steel with a relatively low hardness? In this situation, we harden the steel as expected, but increase the tempering temperature. The higher the tempering temperature, the more ductile and softer the steel will be after tempering. Data on the hardness of steels after tempering, depending on the tempering temperature, is available for each grade in steel grade books.
Methods for heating a blade to hardening temperature
Many amateur workshops have a muffle furnace, electric or gas. The temperature in its chamber is sufficient for firing ceramics, melting glass and heating metal to the required temperatures.
In the cell
The oven has a temperature regulator, so heat treatment is not difficult. For annealing and hardening of one tool, you can make an electric muffle furnace with your own hands.
How to make a camera yourself
To heat the ax blade, you need a small chamber. Required:
- Body – any metal container with a wall thickness of 2 mm or more.
- The heat insulator is a mixture of fireclay clay and refractory brick chips.
- The heating coil is a wire made of fechral alloy.
- Thermostat.
- Network voltage stabilizer.
Before turning on the stove, you need to check that the wiring is working properly. To achieve the desired temperature, about 4 kW is required.
- A chamber is made from the refractory mixture, and grooves for the heating coil are laid in it. Allow it to dry, lay the spiral, cover it with a layer of clay, and bring out the ends of the wire to connect to the network.
- The dried heating chamber is inserted into the housing. The ends of the spiral are connected to the thermostat terminals.
Before making a muffle furnace yourself, study detailed instructions and watch videos of experienced craftsmen.
On an open fire
To reach 800 degrees, you need coals. It’s better to build something like a blacksmith’s forge from a bucket or barrel. In camping conditions, a large fire is lit. There must be a constant supply of oxygen to the coals.
A kind of bellows for blowing is made from a plastic bag. Use a boat pump and other available means. The coals should burn as brightly as possible. The ax blade is ready for hardening when it turns scarlet.
How to heat metal yourself
Instructions for using the oven:
Possibility of procedure at home
Let's look at the video of how hardening was done at home independently without additional equipment:
Making a hardening chamber
The name of this design is a muffle furnace. It is made from fireproof clay, which must be poured into any form, for example, prepared from cardboard. The layer should be 0.8-1 cm. The heating element is a nichrome spiral made of wire. Let's watch a video with detailed instructions:
GOST 18578 – 89 Construction axes
The next point that we need to know to carry out effective heat treatment is the grade of steel from which the ax is made. All construction axes that were manufactured in the Soviet Union and are now manufactured in the post-Soviet space must comply with GOST 18578 - 89 Construction axes. This GOST specifies steel grades for the manufacture of axes. Each of these steels has its own heat treatment temperature regimes. And your own quenching media.
You can find out about this in steel grade books or in thermist’s reference books, which are freely available in the library. However, I want to emphasize the fact that the main materials for making axes are U7 and U7A steels. The ax I chose for experiments has a mark.
Above, the year of manufacture is 1963. On the left is the size according to GOST A2. On the right is steel. From which the ax is made. This is tool, carbon steel U7. Heat treatment modes for U7 steel are as follows:
Before heat treatment, the cutting edge of the ax must be dulled so that its thickness becomes approximately one millimeter.
Instructions: How to harden an ax at home?
An ax is a universal tool that is used by every master due to his own experience, skills and dexterity. At the same time, the main advantage is the ability to hold an edge and remain in working condition.
Taking into account the specifics of using an ax, which consists mainly of chopping blows, only high-quality and hard metal that has undergone competent hardening is capable of maintaining the working part of the blade in a given state. Unfortunately, many manufacturers save time and resources by shortening the production cycle and not completing all the necessary production steps in full, which deteriorates the quality of the finished tool. This problem is solvable, but only for people who have the necessary knowledge in the field of metal processing. Let's consider the technology of hardening an ax at home.
- What steel are axes made from?
- How to properly harden a blade at home?
- Main stages
- Annealing
- Hardening
- Vacation
- Self-vacation
- Conclusion
Self-production of a chamber for hardening metal
A muffle furnace, which is quite possible to make yourself at home, allows you to harden various grades of steel. The main component that is required to make this heating device is refractory clay. The layer of such clay that will cover the inside of the oven should be no more than 1 cm.
Diagram of a chamber for hardening metal: 1 - nichrome wire; 2 - inner part of the chamber; 3 — outer part of the chamber; 4 - rear wall with spiral leads
In order to give the future furnace the required configuration and desired dimensions, it is best to make a mold from cardboard impregnated with paraffin, onto which fireproof clay will be applied. Clay, mixed with water to a thick, homogeneous mass, is applied to the wrong side of the cardboard form, from which it will peel off after complete drying. Metal products heated in such a device are placed into it through a special door, which is also made of refractory clay.
After drying in the open air, the chamber and door of the device are additionally dried at a temperature of 100°. After this, they are fired in a furnace, the temperature in the chamber of which is gradually raised to 900°. When they have cooled after firing, they must be carefully connected to each other using metalworking tools and emery cloth.
Clay heater with a walled nichrome spiral
Nichrome wire is wound onto the surface of the fully formed chamber, the diameter of which should be 0.75 mm. The first and last layers of such winding must be twisted together. When winding the wire around the camera, you should leave a certain distance between its turns, which also needs to be filled with fireproof clay to eliminate the possibility of a short circuit. After the layer of clay applied to provide insulation between the turns of nichrome wire has dried, another layer of clay is applied to the surface of the chamber, the thickness of which should be approximately 12 cm.
After complete drying, the finished camera is placed in a metal case, and the gaps between them are filled with asbestos chips. In order to provide access to the inner chamber, doors, lined with ceramic tiles on the inside, are hung on the metal body of the oven. All existing gaps between structural elements are sealed using refractory clay and asbestos chips.
Ready homemade camera
The ends of the nichrome winding of the camera, to which electrical power must be supplied, are brought out from the rear side of its metal frame. In order to control the processes occurring in the inside of the muffle furnace, as well as measure the temperature in it using a thermocouple, two holes must be made in its front part, the diameters of which should be 1 and 2 cm, respectively. From the front part of the frame, such holes will be closed with special steel curtains. The homemade design, the manufacture of which is described above, allows you to harden metalworking and cutting tools, working elements of stamping equipment, etc. at home.
Self-manufacturing of such a furnace (as well as other types of hardening equipment) allows you not only to get at your disposal a device that fully meets your needs, but also to save a lot of money, since serial models are quite expensive.
Source: met-all.org
What steel are axes made from?
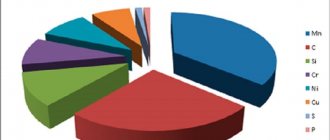
For a knowledgeable person, the question of what steel an ax is made of is far from idle. The fact is that the quality of hardening directly depends on the brand, composition and other characteristics of the metal. Some types of steel simply cannot be hardened because they do not have the necessary components and cannot acquire the necessary properties during the preparation process.
Figure 1 – Types of steel
For the manufacture of construction axes, according to GOST 18578-89, the following grades of steel are used:
- 8ХФ, 9ХФ, 9ХС, ХВГ (according to GOST 4543);
- 60G (according to GOST 14959);
- U7A, U8, U8A, U8GA, U9, U9A (according to GOST 1435).
It is necessary to take into account that a construction ax is a universal tool designed for constant and active use.
Unlike other types, this variety is used in a continuous mode, and therefore requires high-quality hardening of the blade, which prevents damage or rapid dulling of the cutting edge. It is necessary to check what metal the ax is made of when purchasing it, however, it is impossible to determine whether hardening was carried out and how well this procedure was carried out. Quality tools are sometimes marked with the grade of steel, but this information is of little use, especially for those who have never studied metallurgy.
The easiest way to determine the quality of steel is to take the tool by the handle, without touching the metal part, and sharply click on it with your finger or some hard object. If the sound is ringing and lingering, bell-type, the metal is good. A dull sound that immediately fades away indicates poor hardening or the use of unsuitable steel.
Another way to determine is to check for spark. If, when sharpening, long yellow stripes with luminous stars at the ends form on the emery, carbon steel was used, which can be properly hardened. If there are no stars, the steel is frankly weak and will not allow you to get the expected effect from hardening.
Important! The steel grade can be determined with high accuracy only in a special laboratory using a whole range of studies. At home, they only find out the metal’s ability to harden, which is usually quite enough.
Hardening technique
On the Internet you can find a large number of methods and videos of hardening metal objects, but most of them require special equipment, but there are ways that help improve the quality of steel using improvised means.
First you need to determine what steel hardening is. The main process is divided into two parts, or more precisely, heating the metal to a high temperature and subsequent cooling. The process looks simple only at first glance, but you have to take into account the structure and characteristics of the metal . If you start heating the steel without analyzing it, the material will most likely deform. Deformation occurs especially often with low-carbon steel, so if the structure of the metal is unknown, it is better not to use heat treatment.
Hardening of steel is justified only in some cases.
- The need to increase the strength of the tool . For example, it could be an ordinary kitchen utensil, a chisel or a chisel.
- Increasing the ductility of the metal also requires heat treatment to further simplify the work during hot forging.
You can also order steel hardening services from specialists, especially since the cost is reasonable. For 1 kg of metal of a large structure, blacksmiths usually charge no more than 100–150 rubles. If you harden small parts, the prices are about 6–20 rubles. This will not guarantee the quality of the instruments, which is why many try to use heat treatment at home in order to independently monitor the process. The first thing you need to remember when heating steel is some rules. Steel can be damaged if the temperature of the metal is raised above normal. In this case, the tool may acquire a black or blue tint , which in the end cannot even be sanded off with sandpaper. In order for such a defect to not occur, the metal must have a sufficient amount of carbon in its structure, and one must not overdo it with increasing temperature. Typically, steel is considered hot if a red tint appears.
For heat treatment of steel tools, a cutter, blowtorch, electric or gas stove may be suitable. In some cases, metal can be heated over a fire . In fact, there is no difference in where it is better to heat a metal product. Simply in the open air, when heated by a fire, there may not be enough heat energy to achieve the required temperature. Therefore, it is important to clarify the melting and hardening temperature of the material in advance.
It is also necessary to decide on the coolant during heat treatment. Any container with water is suitable for this, the main thing is that the tool fits completely. If steel consumables are being hardened, then a simple cut bottle can be used. In the case of heat treatment of an ax, crowbar and other similar tools, you need to choose a container with a large volume. In some cases, even a bathtub may be suitable, especially since there is no risk of its deformation.
The cooler is selected not only taking into account the size of the steel object, but also the method of heat treatment. Sometimes only a certain area needs to be hardened , in which case only jet cooling can be used. More precisely, plain water is poured onto the material in drops into the area that requires hardening. This method is especially often used when heat treating a drill bit for a drill or on nails to improve the quality of the tip. The hardening technique can be divided into several levels. The following cooling levels are distinguished:
- sharp;
- one-time;
- gradual.
For single cooling, a simple container of water is most often used. If two-stage cooling is used, then two different means are used in the process. This, in turn, increases not only the quality, but also the release of steel material. First of all, the steel is immersed in plain water, and then transferred to machine or mineral oil for further cooling . The process is quite dangerous, because you need to cool the product in water to prevent the oil from igniting.
How to properly harden a blade at home?
Hardening is a complex process, the result of which depends on the experience and knowledge of the master doing it. When hardening an ax, only the blade is subjected to the most severe treatment, and the butt and eye (hole for the ax) are left in their original state. This is important, since hardening increases not only the hardness, but also the fragility of the metal, and continuous processing can make the tool unsuitable for work - any blow can split it. Therefore, the hardening mode must be chosen so that the result is a hard strip of metal near the working edge and a softer, more viscous rest of the tool.
The essence of the process is the restructuring of the crystalline and atomic lattice of the metal, which occurs under the influence of high temperatures and a sharp change in the degree of heating. You will need a standard muffle furnace, which should be purchased or rented.
Sharpening methods
There are several types of tools, which differ in the size of the ax, the shape of the wedge, and the bend of the blade. The most popular axes: construction, carpentry, lumberjack, cleaver, butcher, hunting, tourist. In production, each product is sharpened in an optimal way; regrinding is required only when the edge becomes dull or crumbles. Self-sharpening an ax with your own hands is possible in two ways: with electrically driven devices or manually using an abrasive stone and sandpaper.
The choice of method for properly sharpening a conventional ax will largely depend on the following factors:
- hardness, density of wood;
- wood moisture;
- nature of woodworking;
- ax steel grade;
- degree of hardening of the cutting edge.
The determining conditions are the hardness of the steel and the sharpening angle of the axes. In this case, not only the angle of the wedge is important, but the width and angle of the chamfer on the working edge. It is the last factor that determines how well the ax will fit into the tree and not slide off it.
When sharpening an ax at home, the chamfer width is chosen as follows: for fine carpentry work it should be larger, and for rough tree cutting it should be slightly smaller in order to reduce the load on the blade.
On an electric machine
On a mechanical machine
Using a whetstone
This is interesting: How to make a spring at home with your own hands
Hardening an ax at home - video, photos, nuances
How to qualitatively harden an ax at home? The relevance of this issue is explained by the wide demand for this tool. In addition, using the example of such a simple household tool as an ax, one can examine in detail the nuances of several types of heat treatment - annealing, hardening and tempering.
A good forged ax can cut a nail
It is quite easy to find out that a new ax purchased from hand or at a hardware store needs to be hardened: if the blade of the tool is very soft (which can be determined by its wrinkles even when cutting knots of small thickness), then it needs high-quality hardening. If cracks appear on the working part of the ax during operation or the blade becomes chipped, it should be fully tempered.
Secrets of hardening a heat source
There are several options for devices that can bring the heating of a steel part to the desired temperature threshold. The ideal option is an industrial or home-made muffle furnace.
In the absence of such a tool, you can use another home assistant - a blowtorch.
A fairly powerful jet of flame makes it easy to heat parts of small thickness to the required temperature. Remember to move the torch along the plate being hardened to achieve even heating.
In addition, it is possible to use ordinary charcoal together with a blowtorch. To do this, dig a small hole in the soil, pour coal into it, and place the hardened blades of the knives on the edge. Heat the coal together with the plates with a lamp until the latter reaches the required heating. This method prevents the rapid cooling of the unheated part of the workpiece and its overheating.
The third option is to make a small forge. It can be either coal or gas. The main structural elements of the device are the housing and the source of forced air. The base of the coal hearth can be made of a steel sheet 10 mm thick with a piece of pipe with a diameter of about 20 cm welded at the bottom and an outlet from it for connecting a hose from the outlet of a household vacuum cleaner.
Do not forget to drill several holes in the sheet of sufficient diameter to supply air. Wood (barbecue) or coal is used as fuel.
Sources
- https://SevenTools.ru/metally/kak-pravilno-zakalit-topor.html
- https://setafi.com/instrumenty/topor/kak-zakalit-topor-v-domashnih-usloviyah/
- https://smm-star.com/kak-pravilno-zakalit-topor/
- https://VashNozh.ru/topory/zakalka-topora
- https://kovkapro.com/kovka-tehnologiya/zakalka-topora/
- https://printeka.ru/prochee/kak-zakalit-topor-v-domashnih-usloviyah.html
- https://2lzz.ru/stolyarnyj-instrument/kak-zakalit-topor
- https://teplobloknn.ru/metally/zakalka-topora.html
Hardening modes of steel 65G
To comply with the characteristics specified by the technical conditions for the operation of parts, when choosing a hardening mode, the following components are taken into account:
- method and equipment for heating products to the required temperatures;
- establishing the required hardening temperature range;
- choosing the optimal holding time at a given temperature;
- selection of the type of quenching medium;
- technology for cooling the part after hardening.
The intensity of heating determines the quality of the resulting structure. For low-alloy steels, the process is carried out quite quickly, since this minimizes the risk of decarburization of the material, and, as a consequence, the loss of the part’s strength parameters. However, too rapid heating causes other problems. In particular, for large parts with large differences in cross sections, this can cause uneven heating of the metal, with the prospect of further appearance of hardening cracks, chipping of corners and edges.
Temperature of the workpiece depending on the color when heated
To achieve the maximum degree of heating uniformity, the steel is first heated in the preliminary chambers of thermal furnaces to temperatures slightly lower than hardening temperatures - from 550 to 700 ° C, and only then the part is sent directly to the hardening furnace. Heating occurs fastest in molten salts, slower in gas furnaces, and even slower in electric furnaces. That is why surface hardening of 65G steel products in induction furnaces is performed quite rarely. The inductor, as a hardening unit, is used only for products with a small cross section. When choosing the type of heating device, the composition of the atmosphere that is created in it is also important. In particular, for thermal furnaces operating on gas, they try in every possible way to reduce the duration of the part’s stay in the furnace, since otherwise some of the carbon in the surface layer will burn out.
Based on the quenching temperature normalized for 65G steel at 800...820 °C, the maximum value of the decarbonized layer should not be more than 50...60 µm.
The temperature range of quenching temperatures can be adjusted depending on the product configuration. For example, if the part has complex shapes, small dimensions and is made of sheet metal, then the optimal temperature will be the lower limit of the above range. By controlling the hardening temperature (for example, using automatic temperature sensors), you can change the thickness of the hardened layer and the size of the zone that is less hardened than others. Such technical solutions are resorted to when different parts of a part operate under different operating conditions.
Steel 65G is not afraid of overheating, however, when hardening at the upper value of the temperature range, the impact strength of the material begins to decrease, which is accompanied by the growth of grains in the microstructure.
To reduce warping of parts that have thin ribs and bridges, they are heated in salt quenching baths. More often, a melt of sodium chloride is used, and for deoxidation, borax or ferrosilicon is added to the working volume of the bath.
When hardening products made from steel 65G, holding at a given temperature range occurs until the pearlite transformation completely occurs. This process depends on the cross-sectional size of the part and the heating method. For the most common cases, you can use the table data:
Heating and holding time depending on the quenching medium and dimensions of the workpiece
Largest overall dimension of the part, mm
| Hardening in a fiery furnace | Hardening in an electric furnace | |||
| Heating time, min | Holding time, min | Heating time, min | Holding time, min | |
| Up to 50 | 40 | 10 | 50 | 10 |
| Up to 100 | 80 | 20 | 88 | 20 |
| Up to 150 | 120 | 30 | 130 | 30 |
| Up to 200 | 160 | 40 | 175 | 40 |
Cooling of products after hardening is carried out not in water, but in oil, this avoids the possible danger of cracking.