For a person who is accustomed to dealing with everyday problems on his own, a jigsaw is a necessity. Electric jigsaws are also good for those who like to tinker, for those who live in their own home, and for summer residents. You can make a jigsaw with your own hands, since this model is significantly different for the better from hand tools. An electric tool improves the quality of sawn products, and also facilitates and speeds up the work process.
Sewing machine as a jigsaw
The heir to a grandparent's estate often gets an old sewing machine.
It has already served its purpose for sewing clothes, since more precise equipment is now being produced. If you don’t have a jigsaw on your household, you don’t have to spend money on buying one. It is made with your own hands from a sewing machine. Procedure:
Remove the thread weaving device. It is usually located at the bottom of the machine and secured with two bolts. Dismantle the cotter pin and the drive shaft, which leads to the thread weaving mechanism. Unscrew the top panel, which serves as protection for the mechanisms. The slot for the needle is expanded to match the parameters of the file
It is important that it passes freely through the hole and that there is still a backlog of 2-3 cases. The file is being modernized. For installation in a needle holder, the length of the file should not exceed the permissible length of the needle intended for installation in the machine
To do this, the upper teeth are ground off, and the lower part is sharpened like a point.
Now the jigsaw for curly cutting on plywood is ready. It will be more difficult to work with a manual drive because your legs will get tired. An additional disadvantage will be vibrations from force on the tool. The electric drive of the machine, converted into a jigsaw, partially solves the problem of vibrations.
An expensive jigsaw can be replaced with a homemade design. It will not be inferior to anything in terms of quality and functionality if you approach the assembly process responsibly
It is important to make high-quality plywood mechanisms that serve as a support table. It is desirable that the table be able to rotate
For the version with a sewing machine, this will not be possible. If desired, markings are applied to the table to make it easier to measure parts during work.
Do-it-yourself jigsaw machine - remaking hand tools + Video
A tabletop jigsaw machine will be useful to every craftsman who cuts out thin parts. However, it is not always possible and meaningful to purchase a full-fledged machine. In that case, get down to business and make it yourself!
The structure of a jigsaw machine - what lies inside?
Jigsaw machines are more of a special tool than a device that is needed by both an experienced craftsman and an amateur who runs a garage. Their purpose comes down to a special task, namely cutting out complex curved contours from sheet materials.
A special feature of such machines is the execution of cuts without violating the integrity of the external contour.
Most often, sawing occurs on wooden and derivative materials (plywood, chipboard, fiberboard), although modern machines equipped with appropriate saws can also work with other materials, for example, plastic or plasterboard.
Such equipment has found application in the music industry (making musical instruments) and, of course, in the furniture industry. Those who like to make things in their own workshop also buy such units.
The structure of a traditional jigsaw machine, designed according to all the rules, looks like this: the working surface on which the saw is mounted hides a drive (electric motor) and a crank structure underneath.
The tension mechanism can be located either below or above the machine.
To process a part, it must be placed on the workbench. Many models have the ability to rotate it at different angles to make bevel cuts. The stops and guides on the surface, as well as the rotating mechanism, can be marked, which greatly simplifies and speeds up the work.
The length of the cut depends on the length of the work table - most models are limited to 30-40 cm. Electric motor power is an important, but still far from the most fundamental factor, since the machine has a huge reserve of unclaimed power .
For example, for a home workshop or even small production, an “engine” of only 150 W is sufficient.
The crank mechanism is a much more important detail, because in this case the quality of transmission of the drive’s rotational moment into the translational and reciprocal movement, directed in the vertical plane by means of a file, depends on it.
Standard jigsaw machines are considered to be devices with an amplitude of movement of around 3-5 cm and a vibration frequency of up to 1000 per minute. Many models provide a change in speed mode for different materials.
The jigsaw file itself is usually made up to 35 cm long and is capable of sawing material up to 10 cm thick.
The width of the files can vary in a fairly wide range - from very thin two-millimeter to coarser ten-millimeter, with a thickness from 0.6 mm to 1.25 mm.
Even the thickest and widest file will easily break if you do not provide sufficient tension along the entire length of the file. Leaf and coil springs are used for this.
Quite often, such machines are equipped with an air pump, which cleans the cut from sawdust by blowing it, as well as a drilling unit.
DIY jigsaw from a sewing machine (6 photos)
Those who do figure cutting will probably find a homemade jigsaw from a sewing machine useful. In this case, it is best to use an old sewing machine with a working mechanism. Today on the Internet you can find many diagrams and drawings of similar devices on this topic, they all have practically the same design.
If a sewing machine is taken as the basis for making a jigsaw, then all that is left from it is a flywheel with a groove for transmitting torque and a vertical rod, the one used to attach the needle. Plus, the design is complemented by a small electric motor, on the shaft of which a pulley and a gear belt are installed. A little history about the jigsaw The first mention of the jigsaw dates back to 1946. It was then that the famous Swiss engineer Albert Kaufmann came up with a brilliant idea to replace the needle in a sewing machine with a small file
In that century, this invention received considerable popularity and public attention. Of course, modern jigsaws have a fundamentally different design: they are lightweight, mobile, and also have more power
As for a jigsaw from a sewing machine, this option will be useful only when cutting out shapes from plywood, and not for cutting chipboard and thick boards. How to make a jigsaw from a sewing machine with your own hands The design of a homemade jigsaw from a sewing machine is quite simple, it consists from the following parts: The base on which the sewing machine is installed; An electric motor that transmits torque via a belt drive; Crank mechanism; A movable frame with a file (you can refuse to make it); Springs. The advantage of this kind of homemade work from a sewing machine is that it minimizes rework. For example, the crank mechanism of a sewing machine is already connected to a movable mount, through which the needle is fixed. The mount itself can be easily modified to accommodate the installation of a jigsaw file or any other suitable size. Let's look at a clear example of how you can remake a Soviet sewing machine to suit the needs of figure sawing. To make this homemade product, you will need: Sewing machine; Bolt and nut; A metal plate with a spring to make a tension device (in some cases this may not be necessary); Two metal corners. The above components, if necessary, can be replaced with others, as well as the design of the jigsaw itself. To complete all the work, you will need the following tools: Drill with metal drills; Screwdriver and pliers; Bulgarian; Tap for cutting internal threads First of all, it is recommended to remove all unused parts from the sewing machine, leaving only the crank mechanism with the needle holder in its place. To install a saw tension device on a future jigsaw, you will have to dismantle the shuttle mechanism of the sewing machine
An important note: if an electric motor is already installed in the sewing machine, then you should not get rid of it, since it will be used as the main drive. To install a thin saw on a sewing machine, it will be enough to drill a small hole in the upper mount
To install a wider blade, the hole must be drilled to a suitable diameter. When making the lower fastening, you can use a regular bolt and nut. To make a hole in a nut for a bolt, you should use a tap whose diameter should match the diameter of the bolt. At this point, the modification of the sewing machine is almost complete. In order not to carry out figure cutting manually, an electric motor (45-50 W) should be installed on the side of the sewing machine pulley, on the shaft of which a pulley will also be attached. To transmit torque, you will need to connect the electric motor pulley to the sewing machine pulley using a belt.
Material taken: Here
A jigsaw made from improvised means: an old sewing machine is used as a basis
The good thing about converting a sewing machine into a jigsaw is that all the necessary mechanisms are initially available. That is, there is no need to purchase a large number of new parts.
Here's what you need to prepare:
- steel strip 20 mm;
- Sheet steel;
- small bearings – 3 pcs.;
- wire with plug;
- electric motor
The power of the motor depends on what materials you will have to work with in the future. You also need to initially choose a reliable wire and a good plug.
Stationary jigsaw from an old sewing machine
From an old sewing machine that has long since expired, the author suggests making a simple stationary jigsaw with your own hands.
It can be installed in the garage and home workshop. However, you will additionally need to make a desktop from plywood or chipboard.
Using a homemade stationary jigsaw, you can cut various shaped blanks and parts for any crafts from wood or sheets of plywood.
An electric motor is used as a drive. You will also need a quick-release chuck for jigsaw files.
Main stages of work
First of all, you need to remove all unnecessary parts from the old sewing machine. Then you will need to slightly shorten the rod with the quick-release chuck.
Then you need to drill a hole in the marked area. You will also need to drill one hole in the stem of the sewing machine itself.
At the next stage, you need to connect the sewing machine rod with the rod with the jigsaw chuck.
Next, using a hammer, the plastic pulley from the washing machine will need to be carefully placed on the shaft of the sewing machine. From chipboard (or plywood) you need to cut a base for a sewing machine.
At the last stage, all that remains is to make a desktop and attach the electric motor under it. The detailed process of making a stationary jigsaw from an old sewing machine can be seen in the video on the website.
Basic steps
The first thing to do is remove the flywheel to which the belt is attached.
After this, on the other side you will need to remove the front cover covering the needle bar. Next, the presser foot rod is removed, after which all parts under the needle plate are removed. Including shuttle travel.
If the car is old and you intend to paint it, you need to immediately remove all the old paint. Afterwards you will need to sand the surface.
Giant fish fossil confused with pterodactyl (photo)
Why Sergei Makhovikov disappeared from television screens
Johnny Depp may return to film Pirates of the Caribbean 6
It is advisable to treat the entire body in this way.
The next step is to remove the needle bar. In its place you will need to install a longer rod from the presser foot. The bottom bracket will need to be cut, otherwise it will not be possible to secure the saw blade.
As a result, there will be one hole left at the end of the rod, which will be used to secure the blade with a screw.
Since there is no hole in the presser bar to connect to the crank mechanism, it will need to be drilled. The screw will be screwed in there.
After completing the described steps, you will need to make a guide for the file. It will support the canvas in the desired position.
The guide is installed on the sole of the machine. To make it, 3 bearings will be enough. Two of them are needed to hold the file from the sides. The third blocks the movement of the canvas towards the edge.
Straight hair and a few more hairstyles that will be popular this season
Doctor Komarovsky spoke about pregnancy and vaccination against coronavirus
Kossakovsky's film is on the Oscar shortlist
The base of the guide must be bent from the strip on which the rods machined to the inner diameter of the bearings are fixed.
Under the sole of the machine there are eyelets that were previously used to attach mechanisms. The strip must be shaped so that it can be secured in these eyes.
How to make a machine from a sewing machine?
A sewing machine makes an excellent jigsaw, which is equipped with a saw blade movement regulator. It is not difficult to do if you follow these instructions:
- The thread weaving mechanism is removed from the bottom of the machine. On some models it may be located in a different location.
- To dismantle this unit, you need to remove several bolts, then remove the cotter pin and drive shaft.
- The top protective panel is unscrewed. After this, the groove along which the sewing needle moves must be expanded to suit the parameters of the file.
- The cutting element itself is also slightly modified. It is trimmed according to the length of the sewing needle.
- It is not necessary to make an adapter to install the cutting element. Instead, you can grind down the upper incisors a little and process the lower zone of the blade.
- The file is inserted into the needle holder and work begins.
All presented options for manufacturing jigsaw machines are very successful. The resulting units are distinguished by high labor productivity, and making them is not at all difficult. Depending on their skills, each master will be able to choose the best model of homemade equipment.
Video: Jigsaw from a sewing machine
In the life of a home craftsman, from time to time the need arises to make figured and simply decorative cuts, including inside the workpiece. Gasoline, circular and conventional hand saws cannot cope with this task due to their design features. To solve this problem, use a manual jigsaw, specially designed for performing such operations. This tool undoubtedly copes with its task, but when working with large volumes or dimensional materials, it definitely loses to its more professional brother - a jigsaw.
Purchasing a brand new, shiny, and functional benchtop jigsaw is absolutely effortless. Store shelves are filled with products from various manufacturers aimed at professional and amateur work. At first glance, the stationary jigsaws on sale seem to be very complex in terms of design, the assembly of which is carried out only by selected expert technicians. In fact, these are quite simple devices that you can make yourself, if you have the desire and step-by-step instructions. And if the first point depends only on you, we will definitely help with the second and provide detailed instructions on how to independently assemble a homemade jigsaw machine.
Jigsaw machine for cutting metal
We bring to your attention another homemade budget design that every home craftsman can make.
The idea of this design belongs to the author George Kosilov.
The first step is to make a work table on which the workpieces will be cut.
A sheet of metal 5-6 mm thick is perfect for making a tabletop. Cut out a circle of the required diameter.
Next, we cut off three blanks from the corrugated pipe. We cut one side of each workpiece at an angle.
We weld the profile pipes to the bottom of the round tabletop, placing them at the same distance from each other. As a result, we got a table with supporting legs.
The next step is to make a U-shaped lever, at the end of which a bearing block and a rail from the presser foot will be attached.
A square profile is used to make the lever. However, it makes sense to make a reinforced lever welded from two sections of profile.
We cut out a hole in the work table for the file, and also drill a few more mounting holes for attaching the jigsaw. You also need to drill holes in the base of the jigsaw.
We install the jigsaw under the tabletop. There we also attach the speed controller, placed in a homemade metal case.
We weld steel round timbers (“thrust bearings”) to the base of the support legs for better stability. It would be a good idea to glue some more rubber on them so that the machine does not slide on the table during operation.
The on/off button is installed in one of the legs.
Details on how to make a convenient and compact desktop machine from a jigsaw with your own hands are shown in the video. The design turned out just right - take note.
JIG SAW MACHINE Cutting metal is a pleasure
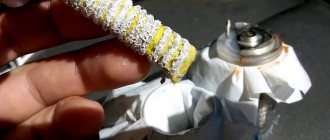
Remaking the place where the needle is attached to the file
Not everyone and not always has the need to carry out only figured cuts. Much more often, a jigsaw is used to produce controlled cuts in straight and round shapes. In such cases, a thin file will be too slow, but a standard jigsaw blade will cope with the task quite quickly. And everything would be fine, but such a saw will not fit into a standard needle holder. This means that you need to reactivate the logical hemisphere and “pump up” your homemade jigsaw from a sewing machine. By the way, this is quite simple to do.
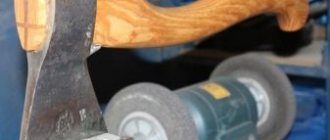
As an example, let's take a product from the following author, although this problem was also solved at the end of the previous manual. The answer lies in the stitching of the seat to tighten the needle. For this purpose, a grinder with a metal disc is used. The shank of the file itself also needs to be sharpened so that it fits into the hole in the fastener element with the bolt. Detailed examples are shown in the photo above, below, and also in the video.
Disadvantages of a manual jigsaw
A manual jigsaw is designed to form even cuts. In this case, as the rollers, rod, and pusher wear out, the saw may wobble, deviate from a straight line, and change the angle of attack. Regardless of the quality of the tool components, the following features are always present:
- When the saw becomes dull, deviation from a straight line is observed when cutting material of uneven density (for example, low-quality chipboard). The saw is capable of leaving the cutting line when it encounters a knot in the wood.
- When trying to make a curved radius cut, you can observe the following picture: the upper cutting line, which the worker follows, follows an exact trajectory, the lower one deviates, goes to the side, the radius becomes larger. The higher the wear of the tool and the lower the sharpness of the saw, the more pronounced this phenomenon is.
- Some materials cannot be worked using a pick-up or bottom feed of the saw. The carpenter is required to move the tool forward extremely evenly, which is impossible to do very accurately; as a result, the saw beats along the entry and exit path.
It is even more difficult to work with thin saws designed for curved cuts. Without practice, it is very difficult to achieve a good result, especially on thick slabs or wood materials. Let's look at how you can make a carpenter's job easier and the result better.
Device classification
Basically, the classification of jigsaws consists only of the purpose of the tool, so based on this, jigsaws are:
- household - designed to perform small and low-cost work. Machines of this type can have a power of only up to 500 W and run for half an hour, this will be quite enough.
- Professional sawing machines are necessary for work that requires a lot of labor. The power of such a stationary jigsaw is much greater, 700-1500 W, it can be used for 3 hours without a break. It is intended specifically for permanent professional activities.
- The production unit is much larger than previous types; it performs work in the production sector, so the duration increases to 20 hours.
The device can also be classified depending on the cutting material. This is what determines the type of device, as well as the saw used for cutting.
Continued modernization of the sewing machine
After all work on the stem is completed, the metal cover is screwed into place. You can go to the other side of the machine. Here a pulley from a washing machine with a diameter of 20 mm was used, which came from nowhere among the trash in the garage. However, finding such a part for someone who decides to repeat my modification will not be difficult. Many people are getting rid of old washing machines. As a last resort, there are social networks in which people will be happy to get rid of faulty equipment, subject to pickup, even for free.
A plastic pulley was installed in place of a metal wheel, which the seamstress rotated by hand while working. The pulley fits into place very tightly, after which it is screwed on with the original bolt with a very wide head.
To insert the pulley, you will have to tap it a little with a hammer.
Spacer for the car: what and how to make it from
Now it was necessary to make the machine stand higher - after all, the original rod was extended. For this I used a piece of chipboard countertop. It was cut to the shape of the base. The holes were marked using regular paint and drilled.
The spacer is ready, all that remains is to screw it into placeHaving screwed the spacer to the base of the sewing machine, I decided to add a little aesthetics, so it was painted black to match the former tailor's work tool. It turned out pretty good. While the paint was drying, we could work on the bed for our stationary electric jigsaw.
The spacer was painted black to make the resulting unit look more aesthetically pleasing
General assembly instructions
Craftsmen often assemble their jigsaws from an ordinary home drill or from a refrigerator compressor. Thus, a manual jigsaw is converted into an electric tool. Some use a washing machine motor. An interesting solution is to create a jigsaw machine using an old sewing machine.
Making from improvised materials
You can use any available household power tool as a motor: a screwdriver or electric drill, which has a spindle speed regulator, is perfect. You can use materials that are at hand: wooden blocks, unnecessary sheets of plywood.
The main thing, from the point of view of safety, convenience and productivity, is the bed. It is made from plywood sheet with a thickness of 15 mm. The wooden parts are connected with screws. For increased reliability, the joints can be coated with glue.
A lever assembly is assembled from wooden blanks. Levers must have good strength. The most suitable tree is beech or oak. You can use straight sections of legs from old chairs.
The tips of the levers are sawed longitudinally. The nail file fasteners are inserted into the cuts. The fastening is a regular metal plate with two holes. The thickness of the plate is 2-3 mm. The mount is screwed to the lever through the upper hole, and the jigsaw blade is clamped through the lower hole. Wing nuts are used for clamping.
The lever system is fixed in the frame. The back of the levers is connected to each other by a lanyard. Or, in other words, a screw tie. It is desirable that the levers are parallel to each other.
The crank assembly is cut out of plywood up to 1 cm thick. The axis of rotation is designated using bearings. The bearings themselves are seated in holes that are drilled in the racks.
Then the flywheel and lower arm are made. They are connected to each other by a connecting rod, which is also made of plywood. After which the work table and rotating mechanism are assembled. A rotating arc is cut out of thin plywood, in which a slot is cut. The table is installed on the bed. The structure is tightened with a wing nut. The drive can be an electric screwdriver.
Approximate design diagram:
Conversion from a hand jigsaw
The first step is to make a working table for the mechanism. A metal sheet or thick plywood is suitable for these purposes. Holes for the cutting tape and fasteners are drilled and sawed out in the worksheet.
The jigsaw table is then placed on a regular table. Once secured, the guide rails can be assembled. To reduce vibration, simply cut a rubber pad of the desired size and place it between the jigsaw table and the main surface.
The above design is convenient in that it can be easily disassembled and can be used again as a hand jigsaw.
Since the standard device has springs that tension the saw, a rocker arm is necessary. One edge of the rocker arm is attached to the cutting element of the machine, and the second is under tension from springs. These simple steps will easily turn an ordinary jigsaw into a machine.
When operating the device, it is important not to forget to turn off the pendulum stroke before starting cutting.
Assembly from a sewing machine
You can also quickly and easily assemble a homemade jigsaw from a sewing machine. Moreover, this device has an interesting feature - a regulator for the stroke of the nail file, since sewing machines have a speed switch.
First, at the bottom of the machine you need to find a thread weaving knot. To do this, several screws are unscrewed. The cotter pin located inside is knocked out and the drive shaft, which is connected to the thread weaving complex, is removed. After completing this procedure, the top panel is unscrewed. The groove along which the needle rode widens slightly to accommodate the saw blade. The files themselves are shortened slightly to the length of the needle. To fix the saw itself, you can make an adapter. But the easiest way is to grind off the top part of the cutting blade and sharpen the bottom. After which you can insert the nail file into place of the needle and get to work.
When working with jigsaws of any type, you should not forget about safety rules. Do not leave the device turned on for a long time without supervision.
If the master has long hair, it is better to pick it up or use a special cap. It is better to roll up the sleeves of your clothes. The room should be well ventilated. In the room where carpentry work is carried out, a first aid kit with emergency aid for cuts must be kept.
Manufacturing
Drawing of a thermoelectric jigsaw.
The simplest model is made quite quickly, but its availability is usually sufficient for household needs. A carefully made jigsaw will be no worse than one made in a factory, and in some ways it may be able to surpass it. In order to make a jigsaw, you will need:
- manual jigsaw;
- heating thread;
- screws;
- plywood;
- duralumin pipes up to 12 mm in diameter;
- drill;
- clamp.
For normal operation of a jigsaw, the following parts must be present: a comfortable handle, a switch (a push-button switch is most convenient), a power cord, and a heating filament.
Schematic diagram of starting an electric motor.
The first step is to make a frame from a duralumin pipe, but for the base you can also use textolite of at least 10 mm or thick plywood. The lighter the frame made, the easier the jigsaw will be to use. The frame must have a channel for the power cord. Experts believe that the best frame shape is one in which one of the sides is deviated by 45º.
Then an earring is made from a millimeter-thick copper sheet and attached to the frame with screws in the place where the frame is connected to the handle. The earring, screw and wing nut form a clamp in which the heating filament is fixed. The clamping cheeks are made from a 0.8 mm thick duralumin sheet, and a push-button switch is located between them.
After this, a slot-like hole is cut in the plywood through which the file can pass. It is convenient to make this gap using a drill. Markings are made and holes along it, the transitions between which are smoothed. Instead of plywood, plexiglass, plastic, or metal can be used. The drill is then used to make mounting holes in the plywood and on the base plate itself. A jigsaw on a plywood base is secured with screws so that the file can pass through the gap. The structure is attached to a table or workbench using a clamp so that the file is directed upward. If the clamp is not suitable, you can use another fastener that is more suitable for the specific case. Although the file in this case remains standard, both hands are freed up, thereby increasing the cutting capabilities, so the design is functional even in this form.
Read also: Design of a metal grinding machine
As a heating thread, you can use a nichrome spiral from any heating device, for example, from an iron. It is secured like a standard saw blade between the ends of the frame with slight tension. To heat the filament, 14 V is supplied, and a rheostat is used to control the voltage. The current is determined by the length and thickness of the nichrome thread; a rheostat helps set the optimal current strength. The current strength affects the temperature to which the thread is heated; if it is too high, the material will heat up and may catch fire, and if it is too low, cutting will be impossible.
An optimally tuned jigsaw, made by yourself, will allow you to cut out shapes with complex shapes.
Connecting the electrical components of the machine
Connecting an electric motor cannot be called complicated, however, there are some nuances here too. As you know, there are 2 switching schemes - “star” and “triangle”. Each of them has both pros and cons. For the jigsaw, I chose the “star” and now I’ll explain why. Such a circuit ensures a smoother start-up, without strong surges in the current load, unlike the “triangle” one. Of course, in this case the power drops by about 30%, but this is not critical, I am not going to cut thick metal. Those who decide to repeat my project should take this point into account.
When connecting an electric motor, situations may arise where connections cannot be avoided. You should not use self-clamping terminal blocks, such as “WAGO” for them. Such elements may not withstand inrush currents. It’s better to make a regular twist, solder it and insulate it. For this I used heat shrink tubing.
We insulate connections using heat shrink
Installing a button
The START button was installed on the right hand in the corner of the tabletop. This arrangement is most convenient when working on the machine. Everything is connected here extremely simply - 3 phases coming out of the engine are switched to 3 contacts of the start button. On its reverse side, power will be supplied from a 380 V network.
Attach and connect the start button
Design features
The design diagrams of all jigsaw machines are usually the same. Having carefully examined the drawings where this tool is depicted, you can see the following structural components:
- the bed, which is also often called the body. It is designed to accommodate all structural elements of the unit;
- drive mechanism;
- crank mechanism. It is necessary to convert the rotational energy of the motor shaft into the movements of the saw used during operation;
- double rocker arm. Equipped with fasteners for a file and a tension device;
- Desktop. In some modern models, it has a rotation mechanism that moves to a given angle.
Jigsaw machine from a washing machine engine
In a homemade design, the drive can be different - at the discretion of the master. Let's consider the option of using a standard motor from an automatic washing machine.
Let's get to work. First you need to make a jigsaw machine bed.
You can use different materials - whatever is available. In this case, the author welded a frame from a strip of metal and a profile pipe.
The design is very simple: you need to make legs from a profile pipe, and from a strip you need to make a frame and an upper frame for attaching the desktop. At the bottom, a bracket is welded from a strip of metal to which the crank mechanism will be attached.
The first version of the tabletop jigsaw used a factory mechanism from a sewing machine. In this case, we will make this unit with our own hands.
First you need to make an eccentric shaft. On a lathe we turn a shaft of the required shape from a steel round timber.
We put a bearing on one end of the shaft, after which it will be necessary to weld a piece of round steel offset from the center.
Cut a piece of round pipe that will serve as the body. We insert the shaft inside it and put the bearing on the other end.
A metal strip with a movable (hinge) element is attached to the eccentric. We weld another piece of strip to the body.
A guide for the moving element is welded to this plate.
The next step is to weld the homemade crank mechanism to the frame.
A holder for a jigsaw file must be welded to the movable element (rod), which moves up and down.
After this you will need to make a desktop. What material to use is at your discretion. Ideally, it is better to use sheet metal. But plywood or chipboard will also work.
You need to make a hole in the work table for the saw blade.
As in the previous case, it is necessary to make a bearing block. We weld it to the L-shaped post. But in this case, the stand is made not from a profile pipe, but from a strip of metal. And the stand itself is welded directly to the frame.
At the last stage, it is necessary to weld the support platform for the electric motor, and you can start painting.
A pulley is placed on the eccentric shaft. We install the engine from the washing machine and connect its shaft to the eccentric one using a belt drive (belt).
How to make a jigsaw machine with your own hands is shown in detail in the video below. The idea was shared by the author Mr Novruz.
Yeah!!! Practical Useful Homemade Inventions
For convenience, it is better to place the engine on/off button on the side of the frame, as close to the workplace as possible. In general, the design is very simple, and repeating it will not pose any problems.
DIY jigsaw from a desk
Another option, how to make a jigsaw with your own hands, is a little more complicated than the previous one, but it is also more practical and convenient. To do this, you will need an electric jigsaw, which will make the work as easy as possible. To build the machine you need: any old desk, a jigsaw (will serve as a power unit), a hand jigsaw and plywood (for making arcs and rods).
Note! Absolutely any model of electric jigsaw can be used as a power unit.
The process begins with the manufacture of a “swing”, which at one end will connect to the mechanism of the electric tool, and at the other will hold the file. The jigsaw is fastened with self-tapping screws under the table cover. A round hole is made in the lid so that the file can move freely in it and dust and shavings do not get stuck. The swing is installed above the power tool, and a saw is fixed between them.
One end is attached to the jigsaw, and the other is attached to a wheel at the end of the swing. The start pedal operation is very simple. To do this, a product is formed from a metal plate with a hook at one end and a fastener at the other. The hook is placed directly on the start button of the tool, and the other end is attached to a wooden plank that will serve as a pedal.
Homemade jigsaw from a compressor from a refrigerator
The drive of this design will be an electric motor, but not from a washing machine, as in one of the options described above, but from a refrigerator compressor.
The idea of a homemade product belongs to the author of the YouTube channel khám phá và sáng tạo.
The first step is to remove the electric motor from the compressor housing. After this, we cut out a circle from a piece of thick rubber and attach the engine to it.
Plastic ties are used to secure the electric motor. You need to drill holes in the rubber itself.
The base is a disk cut from a sheet of metal. We weld steel corners to it, and then screw on a rubber “cushion” with a motor.
We weld three legs - rings made of a round steel pipe - to the bottom of the base, and put rubber plugs on them.
Then you need to make a stand. We cut two pieces of rectangular corrugated pipe, connect them at an angle of 90 degrees, and weld them to the base.
Another metal disk is welded on top of the rack - this will be the work table. We cut a groove for the file.
At the last stage, all that remains is to paint the machine. To do this, it is convenient to use spray paint in cans.
You can watch the step-by-step process of making a stationary jigsaw with your own hands in the author's video.
Chế cưa bàn mini từ block tủ lạnh
The design turned out to be compact and quite simple to manufacture. This is the best option for a small home workshop.
This homemade machine is perfect if you are making various crafts from wood.
DIY jigsaw from a sewing machine
If you have an old sewing machine on hand in fully working order, then it can easily be used to make a homemade jigsaw, and even a small sharpener. The essence of converting a sewing machine into a jigsaw is to install a fabric holder instead of a needle.
In this case, the design of the sewing machine itself is of no small importance. So, if an old sewing machine with a foot mechanism is being converted into a jigsaw, then there is no need to install a small 40 W motor
Otherwise, you will have to install an electric motor on the sewing machine, since the quality of cutting workpieces largely depends on the required force and uniformity of saw movement.
In this case, the motor is installed on the tabletop, near the stand of the sewing machine, as close as possible to the flywheel. Since a belt will be used to transmit torque, a pulley should be installed on the electric motor shaft, after which it will need to be connected via a belt to the pulley of the sewing machine. Thus, you can convert a manual sewing machine to operate from an electric motor.
Now you will have to tinker a little with installing the adapter for installing the jigsaw file. As a rule, the socket into which the sewing machine needle is fixed is too small to install a jigsaw blade, so it will have to be drilled out a little and deepened at the same time. In general, a lot here depends on a particular device of the sewing machine.
If using the method described above to install a jigsaw saw on a sewing machine does not work, then there is another suitable option. For these purposes, you need to use a nut with a hole in the end into which the bolt can be screwed.
It is the bolt that will hold the blade of the electric jigsaw. To drill a hole in the end of the bolt, you will have to use a drill of a suitable diameter, and to cut threads, a tool such as a tap.
Modernization process
A manual jigsaw as the main device for a machine has disadvantages. The main problem is the file - it is too wide in manual models. Because of this, fine woodwork is difficult to perform with it - the curvature of the lines is limited.
The previous design is simple and does not have additional parts that make working with wood easier. The direction of modernization is the possibility of replacing the file with a thin one.
Options for improving the design:
- Build a rocker. The structure will be tensioned by springs on one side. The second side of the rocker is fixed to the file.
- Secure the file between two rollers. They serve as guides for the thin file.
- A stationary factory device is used as a drive for a system of two rocker arms. A file is pulled between the latter. The movement is transmitted from the factory device to the lower beam of the saw.
When buying or making it yourself, you have to choose a design based on personal preferences and the desire to tinker with technology. Using guide rollers is a less popular option - its reliability is poor.
Modernization by installing rocker arms is common. It is better that the factory device only serves as a drive for the jigsaw file. To do this, you need to turn off the pendulum stroke in the tool.