What are crimp sleeves?
The accessory is a small metal tube with conductive properties. With its help, you can achieve a permanent connection of wires.
This is the optimal method of fixing cores for medium and high currents. It provides high fusion strength.
Scope of application
Crimping is advisable if:
- It is necessary to connect the wires that are under high load.
- Installation of multi-core or large cross-section cables is required.
- Electrical networks are laid at height, and the conductors are connected inside the distribution box.
This installation method is suitable if visibility is limited where the network is laid.
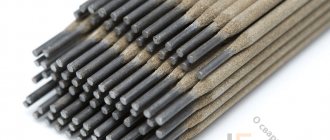
Various types of sleeves are used for pressing wires.
Types of sleeves
For pressing wires with sleeves, the following types of devices are used:
- GM. Copper element without a protective layer. It looks more like a piece of pipe.
- GML. The surface of the accessory is tinning (electrochemical sputtering). After the procedure, the product becomes resistant to corrosion and does not oxidize. Copper is used to make the tube.
- GA. An aluminum element designed to connect wires made of the same material.
- GAM. Such sleeves are made from several tubes using the friction welding method and are used for crimping copper and aluminum conductors.
- GSI. A special feature of the accessory is the absence of damage to the protective layer during the joining process. No additional manipulations are required. Such sleeves are made from copper.
Advantages and disadvantages of using sleeves
The crimping method has such advantages as high speed and strength of installation and reliability of the resulting contact.
In addition, it differs in that:
- there is no need to use an electrical network: all work is done with hand tools;
- you can connect cores made of different materials into 1 node;
- there is no need to carry out further maintenance;
- no need to have special skills;
- the procedure can be carried out in confined spaces.
The method of crimping sleeves is characterized by speed and durability of installation.
The only drawback of the process is that it results in a permanent connection.
To replace the sleeve, you will have to cut it out. If the length of the conductors is reduced, they will need to be extended.
Spring clamps for connecting wires
One of the most controversial ways to connect wires is using spring clamps. There are several types, but the two most common are wago terminal blocks and PPE caps. Externally and in terms of installation method, they are very different, but both designs are based on a spring, which creates strong contact with the wire.
There is controversy about this spring. Opponents of using wago say that the spring will weaken over time, the contact will become worse, the connection will begin to heat up more and more, which, again, leads to an even more rapid decrease in the degree of elasticity of the spring. After some time, the temperature may rise so much that the body (plastic) will melt, but what can happen next is known.
Spring clamps for electrical wiring - popular connections for wires
In defense of using spring clamps to connect wires, if they are used according to manufacturers' recommendations, problems are very, very rare. Although there are many fakes of both wago and PPE, as well as a sufficient number of photographs of them in melted form. But, at the same time, many people use them, and, under normal operating conditions, they work for years without complaints.
wago wire clamps
They appeared on our market several years ago and made a lot of noise: with their help, the connection is very quick and easy, and at the same time has high reliability. The manufacturer has specific recommendations for using this product:
- wago should only be used for single-core or stranded conductors with a cross-section from 0.5 mm2 to 4 mm2;
- to fix and connect stranded and small-diameter wires, use the CAGE CLAMP - from 0.08 mm2 to 35 mm2;
What's inside wago wire clamps
Inside these devices there is a metal plate, which ensures the proper degree of contact. The shape and its parameters of the plates were specially developed and tested. The tests were carried out on a vibration stand for many hours, then heated and cooled. After which the electrical parameters of the connection were checked. All tests were passed “excellent” and branded products always perform “five”.
In general, the range of Wago products is very wide, but for installing electrical wiring or connecting home appliances and lighting fixtures, two types of wire clamps are used: series 222 (detachable) with the ability to reconnect or change the connection, and series 773 and 273 - which are called permanent.
Detachable
Spring clamps for electrical wiring Wago 222 series have a certain number of contact pads - from two to five - and the same number of locking flags. Before starting the connection, the flags are raised up, the conductors stripped of insulation are inserted into them (all the way), after which the flag is lowered. At this point the connection is considered complete.
Wago wire connectors - connection methods
If necessary, you can reconnect the connection - lift the locking flag and remove the conductor. Convenient, fast and reliable.
Wago 222 series range
The 222 Vago series can be used to connect two or three, even five conductors made of copper or aluminum (you can connect different metals in one terminal). Wires can be single-core or multi-core, but with rigid wires. The maximum cross-section is 2.5 mm2. Soft stranded wires can be connected with a cross-section from 0.08 mm2 to 4 mm2.
One-piece
There is another type of clamps that does not provide the ability to redo the connection of wires - series 773 and 273. When using these terminals, the work is generally done in seconds: the stripped wire is inserted into the appropriate socket. The spring present there clamps it, ensuring contact with the plate. All.
wago contact terminals
These spring loaded wire clamps can be used to connect solid aluminum or copper wires with cross-sectional area from 0.75 mm2 to 2.5 mm2, stranded wires with rigid wires from 1.5 mm2 to 2.5 mm2. Soft stranded conductors cannot be connected using such connectors.
Types of mounting terminals for wago wiring
To improve contact, the wires must be cleaned of oxide film before connecting. To prevent oxidation from continuing, wago manufacturers also produce contact paste. The inside of the clamp is filled with it and it itself corrodes the oxide film, and then protects the wires from oxidation in the future. In this case, only heavily oxidized, dark conductors need preliminary stripping, and the clamp body is filled with paste.
By the way, manufacturers say that, if desired, the wire can be pulled out of the clamp. To do this, grab the wire with one hand, hold the terminal box with the other and rotate them back and forth with a small range, in opposite directions, stretching them in different directions.
Clamps for lamps (construction and installation terminals for lamps)
For quick and convenient connection of lamps or sconces, wago has special 224 series terminals. With their help, you can connect aluminum or copper wires of different sections and types (single-core or stranded with rigid wires). The rated voltage of this connection is 400 V, rated current:
- for copper conductors - 24 A
- 16 A for aluminum.
Methods for connecting wires in chandeliers and sconces using wago clamps
Cross-section of connected conductors from the mounting side:
- copper 1.0 ÷ 2.5 mm2 – single-core;
- aluminum 2.5 mm2 – single-core.
Cross-section of connected conductors on the side of the chandelier/sconce: copper 0.5 ÷ 2.5 mm2 – single-core, stranded, tinned, crimped.
When connecting aluminum wires, it is necessary to use contact paste, and copper wires must be stripped by hand to bare metal.
This product has two disadvantages. The first is that the price of original terminals is high. Secondly, there are a lot of fakes at a lower price, but their quality is much lower and they burn and melt. Therefore, despite the high cost, it is better to buy original products.
PPE caps
PPE caps (which stands for “connector insulating clips”) are very easy to use devices. This is a plastic case, inside of which there is a spring that has a conical shape. The conductors, stripped of insulation, are inserted into the cap, and the cap is turned clockwise several times. You will feel that it has stopped scrolling, which means the connection is ready.
How to make a wire connection using PPE
These conductor connectors are produced by many manufacturers; they are available in different sizes, for different diameters and the number of connected conductors. In order for the wire connection to be reliable, the size must be selected correctly, and for this you need to understand the markings.
After the letters PPE there are several numbers. Depending on the manufacturer, the number of numbers varies, but they mean the same things. For example, there is this type of marking: SIZ-1 1.5-3.5 or SIZ-2 4.5-12. In this case, the number immediately following the letters indicates the type of case. “1” is set if the body is a regular cone, on the surface of which grooves can be applied for better grip. If there is a SIZ-2, then there are small protrusions on the body that are convenient to grasp with your fingers and twist.
All other numbers reflect the total cross-section of all conductors that can be connected using this particular PPE cap.
An example of marking of PPE caps and its explanation
For example, PPE-1 2.0-4.0. This means that the body of the connecting cap is ordinary, cone-shaped. With its help, you can connect two conductors with a cross section of at least 0.5 mm2 (in total they give 1 mm, which meets the minimum requirements - see the table). This cap contains a maximum of conductors whose total cross-section should not exceed 4 mm2.
Connecting wires using PPE caps
In the second version of marking, after the abbreviation PPE there is only a number from 1 to 5. In this case, you just need to remember which of them is useful for which cross-section of wires. The data is in another table.
PPE caps and their parameters
By the way, only copper wires can be connected with PPE caps - aluminum wires, as a rule, are thicker than the maximum allowable for these connectors.
The essence of crimping
The use of standard connection methods can lead to fraying or destruction of stranded conductors. In this case, their functionality is limited. As a result, the fixation areas become very hot and burn out. Copper wiring oxidizes over time and loses its quality. Connection reliability suffers.
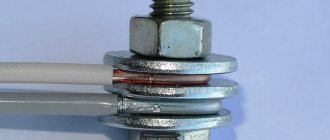
The sleeve prevents air from entering the clutch. The wire strands are placed into the tube from opposite ends, after which it is processed with press pliers. Crimping is carried out at 2–3 points. In these places, the materials being connected are deformed along with the tube. After crimping, the area is isolated.
Case materials
An important selection parameter is the material of the sleeves.
Copper
Designed for crimping copper conductors. They can only be used in a non-aggressive environment: they do not have a protective layer. Otherwise, the material will quickly oxidize.
Copper sleeves are designed for crimping cores.
Tinned
These types of sleeves are used for switching conductors used in aggressive environments. On their surface there is a protective layer of tin-bismuth composition, applied electrochemically. It prevents copper from oxidizing. Tinned tubes are not used to connect aluminum wires.
Combined
Suitable for connecting cores made of different metals. The element consists of aluminum and copper parts, which are held together by welding. A limiter is installed at their junction to control the depth of insertion of the conductors. The aluminum part has a larger diameter.
Isolated
The advantage of the products is that additional insulation of the formed connection is not required. The tubes undergo a tinning process and are then covered with a protective PVC sheath.
Insulated sleeves do not require additional protection.
Aluminum
They are used to connect conductors made of the same material. During operation, the tubes are cleaned and treated with a protective mixture.
Such sleeves can be put on cables if the voltage in them does not exceed 10 kW.
Dimensions and design features of sleeves - how to choose the right one
Connecting tubes are used for installation of single-core and multi-core cables. When choosing, take into account not only the material, but also the size of the product.
It is better to use standard data:
| Type | Section, mm² | Dimensions, mm | |||
| Cable flexibility class 2–3 | 5–6th class of wire flexibility | Length | External diameter | Inner diameter | |
| GM 2.5 | 2,5 | 2,5 | 20 | 5 | 2,6 |
| GM 4 | 4 | 4 | 30 | 5 | 3 |
| GM 6 | 6 | 6 | 30 | 6 | 4 |
| GM 10 | 10 | 10 | 30 | 8 | 5 |
| GM 16 | 16 | 16 | 30 | 9 | 6 |
| GM 25 | 35 | 25 | 40 | 11 | 8 |
| GM 35 | 35 | 35 | 50 | 12 | 9 |
| GM 50 | 70 | 50 | 50 | 14 | 11 |
| GM 70 | 95 | 70 | 53 | 16 | 13 |
| GM 95 | 120 | 95 | 67 | 19 | 15 |
| GM 120 | 150 | 120 | 67 | 22 | 17 |
| GM 150 | 185 | 150 | 67 | 25 | 19 |
| GM 185 | 240 | 185 | 75 | 27 | 21 |
| GM 240 | 300 | 240 | 75 | 32 | 24 |
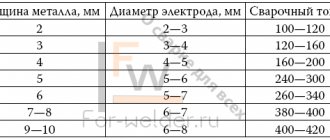
The quality of the formed electrical contact depends on the correct choice of diameter. The conductor must fit inside the tube and sit tightly.
Products can also be classified according to their design features. They can be hollow or with a partition. The first type is used if the connected conductors are made of the same metal. Combined devices are necessary for end-to-end wiring.
Color coding of tips
Color marking is used for NShVI tips. The color of the connector skirt corresponds to a specific wire cross-section:
- black – 1.5 mm2;
- blue – 2.5 mm2;
- gray – 4 mm2;
- yellow – 6 mm2;
- red – 10 mm2.
Color marking table for NShVI tips
Crimping wires using pliers cannot compare with hand twisting or soldering in terms of quality and speed of connections. For any connections you can always choose the right crimper model.
Rules for crimping wires
Crimping of wires with sleeves is carried out taking into account the following rules:
- The materials used to make the tube and conductors must match each other.
- Crimping elements cannot be shortened by sawing. In this case, the protective layer is damaged and the contact reliability is reduced.
- To carry out the crimping procedure, a special tool is required - press pliers.
Crimping of wires is done with a special tool.
The cross-section of the wires cannot be reduced so that they fit into the sleeve. It is better to take a larger diameter crimping element
Video description
The master talks about the features of using hydraulic press tongs in this video:
Tool for sequential crimping of cable products
This type of crimper allows you to prevent air from entering the inner cavity of the sleeve during crimping. This nuance is very important when connecting an aluminum cable to a copper wire. The absence of air reduces the likelihood of oxidation at the point of contact between two metals.
Computer wire crimping pliers
Twisted pair cable is used to connect a computer to the Internet. Special crimpers are used for the LAN cable. This type of tool belongs to a separate group of press jaws. Their design has a special matrix, which differs in shape. It is this that allows the installation of RJ 45 type plugs. It is also used during the installation of telephone networks.
This type of crimper does not crimp. The tool displaces contacts that cut through the insulation protection on each thin twisted pair conductor.
Professional crimping of computer wire Source stroy-okey.ru
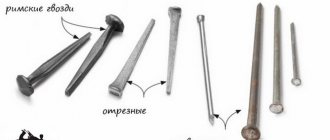
Tools required for crimping
Do not use a hammer, chisel or pliers. They damage the protective shell, which leads to a decrease in the quality of contact.
Press jaws
A hand-held mechanical tool that ensures reliable connection of wires using a metal tube. It is similar to pliers, but is equipped with raised dies. The device is intended for household and industrial use. The device has a ratcheting mechanism: the handles will not open until the crimping is completed completely.
The pliers have long handles, which makes crimping easier. The tools can be diaphragm or operating on the principle of pliers. The second type performs crimping from 2 sides. The first provides 4- or 6-way crimping. You can also use a hydraulic crimper.
Sleeves
Operation requires copper, aluminum or combined tubes of a given diameter. Their number depends on how many connections need to be made.
Tubes of a given diameter are required for operation.
Heat shrinkable tubes
Heat shrinks are plastic tubes needed to insulate the bond of electrical wires. They have thermoplasticity. During the heating process, the material acquires a liquid form, and during cooling it turns into a stretchable mass and hardens. The joint area becomes protected from mechanical damage. The insulating properties are not reduced even under the influence of external negative factors.
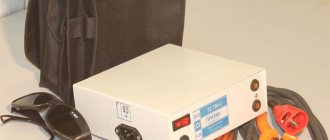
Construction hair dryer
The tool is designed for heating heat-shrinkable insulating materials. To do this, it is enough to use household models of low power.
Wago
The next type is Wago terminal blocks. They also come in different sizes, and for different numbers of connected wires - two, three, five, eight.
They can connect both monocores and stranded wires together.
Moreover, this can be implemented both in different types of Vago, and in just one.
For stranded ones, the clamp must have a latch-flag, which, when open, easily allows you to insert the wire and clamp it inside after latching.
According to the manufacturer, these terminal blocks in home wiring can easily withstand loads of up to 24A (lights, sockets).
There are some compact specimens also available for 32A-41A.
Here are the most popular types of Wago clamps, their markings, characteristics and what cross-section they are designed for:
Series 2273 Series 221-222 Series 243 Series 773 Series 224
There is also an industrial series for cable cross-sections up to 95mm2. Their terminals are really large, but the principle of operation is almost the same as that of small ones.
When you measure the load on such terminals, with a current value of more than 200A, and at the same time you see that nothing is burning or heating, many doubts about Wago products disappear.
If you have original Vago clamps, and not a Chinese counterfeit, and the line is protected by a circuit breaker with a correctly selected setting, then this type of connection can rightfully be called the simplest, most modern and convenient to install.
Violate any of the above conditions and the result will be quite natural.
Therefore, there is no need to install wago at 24A and at the same time protect such wiring with a 25A automatic. In this case, the contact will burn out if overloaded.
Always choose the right terminal blocks for your car.
As a rule, you already have automatic machines, and they primarily protect the electrical wiring, and not the load and the end consumer.
ZVI
There is also a fairly old type of connection, such as terminal blocks. ZVI – insulated screw clamp.
In appearance, this is a very simple screw connection of wires to each other. Again, it comes in different sections and different shapes.
Here are their technical characteristics (current, cross-section, dimensions, screw torque):
However, ZVI has a number of significant disadvantages, due to which it cannot be called the most successful and reliable connection.
Basically, you can only connect two wires to each other in this way. Unless, of course, you specifically choose large pads and shove several wires there. What to do is not recommended.
This screw connection works well for monocores, but not for stranded flexible wires.
For flexible wires, you will have to press them with NShVI lugs and incur additional costs.
You can find videos online where, as an experiment, transition resistances on different types of connections are measured with a microohmmeter.
Surprisingly, the lowest value is obtained for screw terminals.
But we should not forget that this experiment refers to “fresh contacts.” Try making the same measurements after a year or two of intensive use. The results will be completely different.
Instructions for crimping
Proper selection of metal tubes is required to maintain electromechanical coupling.
Preparation
Preparation for crimping involves the following actions:
- Selection of appropriate sleeves and dies for press jaws.
- Removing the insulating sheath from the wire by 2–3 cm (no more than the length of the sleeve itself).
- Cleaning bare areas with fine-grain sandpaper.
- Treatment of aluminum cores with quartz-vaseline paste. It will protect the metal from damage and oxidation.
Preparation for crimping involves selecting appropriate sleeves.
Copper wires do not need to be lubricated.
Crimping process step by step
The procedure is performed according to the following instructions:
- If the crimping is one-sided, then the conductors are placed inside the tube parallel to each other. In double-sided processing, the cores are inserted into the sleeve from opposite sides. You cannot twist them together.
- The connection is processed using press tongs using local indentation.
After completing the procedure, the clutch area is wiped with a solvent (for degreasing).
Crimping of wires with GSI sleeves
Wire insulation
Insulation requires electrical tape or heat shrink. The second one is better. The tube is placed on one of the wires before crimping. After the connection is formed, it is moved to the desired area and heated with a construction hairdryer. After cooling, the heat shrink shrinks and tightens around the joint, making it resistant to external negative influences.
Heat shrink is used to insulate the wires.
How to use crimping pliers correctly
Twisted Pair Crimping Tool: Crimping Tool
Self-mastery of crimping pliers may initially be accompanied by the creation of a poor-quality connection between the sleeve or tip and the wire. It often happens that what appears to be a reliably performed crimp hides a bad contact. This can happen for two reasons.
If the shape of the terminals is not maintained
A discrepancy between the size of the tip or sleeve and the opening between the matrix jaws can cause distortion of the compressed element. Before you start crimping, you should try on the tip to the opening in the pliers. It is also important that the bare end of the wire fits tightly into the holes of the shank or sleeve.
A bundle of wires or a single core should fit into the connecting element with light tension. If you have any doubts about the reliability of the fastening, you should practice on separate sections of the cable. After crimping by hand, you need to check the strength of the connection. If there is the slightest play, the crimp should be rejected and crimping should be resumed with a different end cap.
Excessive clamping may damage the conductors inside the sleeve. The accompanying documentation for crimping pliers usually indicates the cross-sectional dimensions of the tips directly for each opening of the pliers. The use of connectors made of soft metal alloys should be avoided. Over time, the tip may lose strength and contact will become unreliable.
Twisting stranded wires before crimping
A mistake can be made due to the habit of twisting the wires, which is done before insulating or soldering manual connections. This is absolutely impossible to do.
You can check the harmfulness of twisting in a simple way. It is worth squeezing the twisted multi-core cables with pliers to make sure that there is deformation and damage to the integrity of the wiring.
If, when removing insulation from the cable installation section, twisted conductors are found, they must be straightened. Only after this the conductors are inserted into the opening of the tip or sleeve.
Basic mistakes: how not to do crimping
During the crimping process the following mistakes can be made:
- Cutting the sleeve when the tube length is too long. This will reduce the contact strength.
- Kinked aluminum wires. This cannot be done, because the metal will break.
- Installing a liner of the wrong diameter. If it is large, then it can only be installed on copper wiring, the wires of which need to be bent.
- Reducing the cross-section of the cores. In this case, the resistance will increase and the coupling area will become very hot.
- Selecting the wrong crimping tool. It is better to use special pliers that will not damage the protective layer.
- Excessive or insufficient number of crimps.
- Use of a press matrix of a different diameter.
To avoid mistakes, you need to use standard sleeve size tables and profile tools.
Additional recommendations
For proper crimping, you must use the following tips:
- Make the junction of the conductors in the center of the connecting tube.
- Select the correct sleeve section. There will be fewer voids inside the clutch, and contact will become more reliable.
- Apply the insulation so that it extends 1 cm beyond the connecting tube on both sides.
- Use ferrules if cables with different numbers of cores are spliced.
Crimping is a procedure that allows you to obtain maximum adhesion of conductors when installing electrical networks. However, to carry it out correctly, the appropriate tools and materials are required.