Nowadays, protective structures in the form of a canopy made of profile pipes have become incredibly popular in household consumption. They can be found at almost every turn: recreation areas, sports grounds, parking lots, dachas, the private sector - all these places are most often equipped with these devices.
The breadth of operation is determined by the factor of personal production - that is, if desired and the presence of the necessary skills, equipment and materials, the highway can be made independently. But in order to correctly build the frame, it is necessary to correctly make the appropriate calculations.
Scope of application of structures
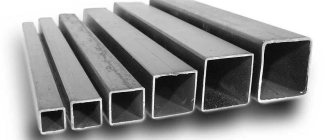
At the moment, household pipe structures based on metal profiles are the leading direction in the manufacture of frames and canopies with polycarbonate coating. Great success is due to the long service life achieved due to the additional invisible aluminum shell, which prevents the influence of oxygen on the metal.
It is worth understanding that the structure requires proper care and supervision, otherwise its service life may be reduced several times. Otherwise, the frame will last for at least 10 years.
Therefore, it is safer to buy metal for this contraction from a supplier who values its reputation
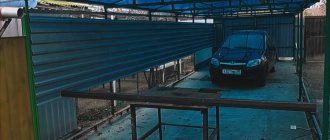
Single-pitch carport
The use of awnings made of profile pipes extends to the following areas of consumption:
- Parking lots and parking lots: the main purpose of operation is to create good and reliable protection from weather conditions; in clear weather, the construction of covered areas that prevent the negative impact of ultraviolet rays on cars.
- Suburban plots, cottages and the private residential sector: here the main emphasis is on creating structures that protect crops from external environmental influences. Another goal is to equip individual recreation areas with a roof that provides protection from both the hot sun and cold rain or snow.
- Public places: for the most part, these structures are needed here for recreation or shelter from bad weather. Often, you can gather here with a small group and relax.
Despite the fact that the purposes of using canopies made of profile pipes are completely different, the main goal in their construction is always the same - drawing up drawings. This is the main and vital stage, without which the construction of protective structures of this kind is impossible. In addition, diagramming is reinforced by additional complexities caused by application values.
Technical features of frames
In order to describe in detail the characteristics of canopies made of profile pipes, it is necessary to create a definition of the concept “canopy”. It is a small architectural form, often acts as a component of a covered area, and at the same time has important architectural or decorative significance. The main purpose of canopies is to protect a certain area from precipitation and external environmental influences.
High resistance to biological, physical and chemical influences allows metal profiles not only to differ significantly from other materials in functionality, but also to be quite advantageous in use and mass consumption. All types of frames built from this material are easy to install and section.
Design
The profile pipe frame itself has many advantages: it is strong, non-flammable, durable, but does not have a pleasant appearance. Therefore, after creating the base, you need to start decorating. There are a huge number of design options for gazebos in the country, the main thing is to show your imagination and bring your plans to life.
The metal surface does not have a natural pleasant shade, in addition, it is susceptible to corrosion, which over time will give an even more unfavorable appearance. For painting, waterproof, water-based brands are used - oil, acrylic, polyurethane, epoxy, aerosol. The main requirement is that they are resistant to sunlight, water, and temperature changes. As for color, here you need to choose shades so that they harmoniously combine with the rest of the decorative details of the gazebo.
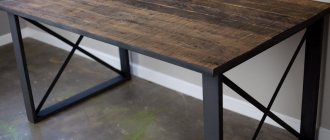
The metal frame is successfully combined with forged or welded gratings, which, when made by craftsmen, can be real works of art. They can be used to equip perimeter fences, space under the roof, and doorways. You can make other decorative and household elements from metal: benches, tables, urns and flower beds, barbecue.
Polished, varnished wood will always go well with the dark texture of metal. In addition to gazebos from profile pipes, it can be used to make internal benches with backs, table tops, flower beds, and tables. To fasten solid wooden boards to metal, you can use threaded bolts with nuts or anchors. For decoration, it is good to use wooden platbands, fences, and carved ridges under the roof.
The most popular types of wood for arranging metal gazebos are pine, beech, oak, and birch. The wood must be well dried, polished, and covered with clear varnish. Durable and lightweight wooden structures reduce the overall weight of the gazebo, it sags less on the ground, and if it is portable, it is easier to move it to another place.
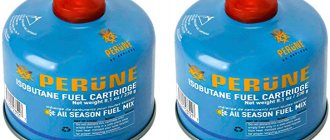
This is a multilayer profiled sheet made of polymer materials, lightweight and easy to process. It is attached to the profiles with bolts or screws and can also be easily removed. Polycarbonate is a transparent or translucent material, usually colorless, but there are various colored options. If you want to create more natural light inside the gazebo, then a roof made of this material is the most suitable option.
A single-pitched or gable roof on a gazebo made of a profile pipe can be equipped with sheets of colored corrugated sheets. This is an excellent lightweight material that is not afraid of moisture and deformation. It is possible to choose any color; with such a roof, the gazebo will always look harmonious. Colored metal roofing tiles are also very popular; they can also be used to cover a hexagonal gazebo. Metal sheets are simply attached to the roof frame, it is easy to cut a piece of the desired size and shape from them, and they will last for more than one season.
The design of the gazebo will look very impressive if you equip the frame with climbing plants. It is very simple to make a lattice or guide pole from metal rods; place flower beds from any available material at the base: stone, brick, wood. After a few seasons, you can achieve a stunning hedge of dense thickets that will provide shade inside the building.
Composition of canopies made of profile pipes
Canopies made of metal profiles consist of several parts
- Foundation: in most cases, you can get by with a small volume, since these structures are not very massive. However, it is advisable to play it safe and not skimp on safety, as this can lead to irreversible destruction of the frame without the possibility of recovery.
- Supports and suspensions: these parts of the structure act as protection against destruction and breakage. Their installation is mandatory in any case, because without any of these parts it is impossible for the canopy to function.
- Slopes and trusses: their only function is to connect supports and suspensions to each other, thereby forming a reliable system to counteract deformation.
- Roofing: an additional protective layer applied directly to the material that makes up the structure.
Despite the excellent improvement in the functionality of awnings, trusses can still be abandoned in several cases. If the construction of a protective structure takes place over a small area (children’s playground, sandbox, porch), then this additional protection system can be safely abandoned, as there will be no urgent need for it due to the absence of elongated horizontal sections.
A different situation occurs when erecting a canopy in parking areas or swimming pools. Here the horizontal sections are much longer, which is why it is simply impossible to abandon the farms. On the contrary, due to vulnerability to the slightest external loads, preference has to be given to two-pipe structures connecting racks and braces to each other. This type of truss is used to give rigidity and strength to canopies.
When creating a foundation, they often choose the columnar version, since it is the least labor-intensive process, and at the same time does not reduce the performance of the structure. During the work, the soil is not subjected to extensive digging processes, due to which it can be reused, albeit with a small chance.
Roof
The versatility of canopies made from profile pipes allows them to be easily modified. Roofing is a technical parameter that has the greatest number of possibilities for supplementing and improving the original composition.
Polycarbonate canopy
Diversity lies in the large selection of materials for roofing. In addition to the standard polycarbonate finish, you can use slate or metal corrugated sheets. Depending on the choice of roofing, the technical and physical parameters of the structure will vary, depending on the material. Since the roof is the main part, the complexity and labor intensity of the work will depend on the roof.
Farms
These parts of the canopy belong to the applied connecting sections of the structure. Their main property and function is to increase the strength of the structure by combining the supports with each other. The main quantity characterizing trusses is the angle of inclination. It is responsible for the possibility of dropping precipitation from the roof surface. The average value of this parameter is 6 degrees, but it is recommended to use 8, since with it you are not afraid of snow or rain.
The composition of the truss is easily modified: racks, purlins, and additional supports can be installed inside the structure. All details and additions must be included in the drawing.
Installation allows not only to horizontally fasten the main supports made of profile metal with cross-shaped connections, but also to assemble from hollow elements, which significantly reduces the initial weight of the frame.
Standards for selecting profile pipes for constructing trusses
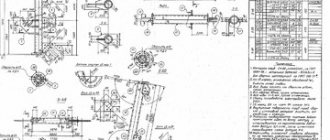
To select the necessary options for improving the strength of the canopy, it is necessary to study the decree that describes the types of structures and primers:
Resolution SNiP 2.01.07-85 on types of structures and soils
| Structures and primer | |||||
| Constructions | Primer | ||||
| Metal | Loose concrete | Insulating concrete | Industrial concrete | Natural origin | Artificially filled |
Strength characteristics
Required dimensions for awnings made of profile pipes
| Span length, m | 1.2 | 2.3 | 3.5 | 4.5 | 5.8 |
| Physical parameters of the pipe | Maximum load on the structure, kg | ||||
| 42x42x2 | 77.4 | 19.4 | 7.33 | 3.98 | 1.77 |
| 42x42x3 | 98.9 | 26.6 | 9.54 | 4.55 | 2.22 |
| 52x52x4 | 130.7 | 37.7 | 14 | 6.57 | 3.45 |
| 63x63x3 | 200.7 | 44.3 | 17.2 | 8.99 | 4.66 |
Making your own design
Making a canopy from a metal profile is a rather labor-intensive process, and therefore requires careful attention to detail and competent calculations. More on all this later.
Carrying out calculations and preparing materials
So, if you decide to make a lean-to canopy with your own hands, first of all, pay special attention to several issues:
Single-pitch canopy - drawing
- Tilt angle. This indicator must be calculated in such a way that there is no excessive steepness, otherwise there is a high probability that moisture will get under the canopy, and in large quantities.
- Drainage system. The drainage system must be clearly planned in order to avoid the emergence of a powerful water flow that can wash away the soil under the structure.
- Slope direction. When choosing a suitable location for mounting a suspended structure, you should carefully study statistical information regarding the direction of air masses.
- Additional reinforcement. This parameter must be taken into account in those regions where frequent strong gusts of wind are observed.
Advice. If we are talking about building a canopy with your own hands, it is best to give preference to a lean-to structure, since all the others are quite complex to manufacture and install, so only those who have professional skills can do it.
Using a tape measure, measure all the main parameters of the site for installing the future structure. Given the figures obtained, calculate the amount of materials that will be required to create a canopy.
Assembly and installation of the structure
First of all, you should thoroughly clean the area under the canopy from various debris, branches, leaves, etc. Then level it. Now you can proceed directly to the preparatory work. Let's start with the foundation (in this case, the supports). Make markings for the supports, keeping a distance of about 1 m between them.
Single-pitch canopy made of metal profiles
In the places where markings were left, make recesses for supports and thoroughly compact the soil at the bottom of each hole. After this, fill each hole partially with a drainage layer consisting of a mixture of sand and crushed stone. Place supports in the prepared recesses, carefully level them and fill them with concrete.
After the concrete has dried, longitudinal beams and purlins can be welded to the supports, which will be used as supports for metal profile sheets. A welding machine is best suited for this work, but if one is not available, you can replace it with self-tapping screws and a screwdriver (however, such a design can hardly be called reliable).
The last stage is laying metal profile sheets. You should start from the lowest level. Place the sheet and secure it to the beams with special screws. The next sheet should be laid in the same way, but slightly overlapping the previous one. We move in vertical rows.
Here, in principle, are all the subtleties that should be taken into account when creating a lean-to canopy from a metal profile. Good luck!
Types of frames
Canopy attached to the house
Types of canopies made of profile pipes are characterized by the type of construction systems. There are only 2 of them: support and rafter. Their selection is carried out depending on the location of the frame relative to other areas and buildings. There are 3 types of canopy:
- Attached: formed by attaching to one or more walls of an existing building to increase protection, rigidity and service life. During construction, it is necessary to create additional supports and trusses that provide connection with the support point. They are used to equip terraces, verandas, parking lots, and cafes.
- Cantilever: the uniqueness of these structures lies in the absence of supports. Their analogue is the additional fixation of the canopy, formed by attaching it to the wall. They do not have a wide range of applications, as they are only suitable for frames and small visors.
- Free-standing types: the fulcrum for them is one canopy-umbrella, or several small racks. They have the greatest application among all types: playgrounds, children's, sports grounds, public parking lots, bus stops, pavilions.
Another factor that determines the division of frames by type is rafter systems. According to their varieties, there are 4 types of canopies:
- Single-pitched: ideal for manual work, as it does not require a large number of calculations and calculations, or special equipment for manufacturing. Any materials and installation systems can be used for the construction of structures. The greatest preference, however, is given to rafter systems assembled on the basis of fastening trusses in the form of a right triangle.
- Gable: requires more calculations than single-pitch types, however, with correct calculations, it is ideal for installation. To improve the strength of the structure, it is necessary to install ridges and trusses. The final frame has the shape of a regular equilateral triangle.
- Tents: are a complex system of connecting supports and trusses, requiring ideal calculations and calculations. Otherwise, the structure has every chance of falling apart without ever being put into use. The most important process during installation of this type is the roof. It is performed by accurately cutting the required material using the necessary elements, resources and technologies for strengthening.
- Arched: incredibly expensive in terms of resources and labor intensity during personal production. Self-production is possible only if you have the necessary tools and the necessary skills in manufacturing and shaping profile pipes. The roof requires the use of flexible materials to achieve the desired shape of the structure. Basically, installation is carried out using equipment; it is very difficult to do it yourself.
It is important to know: when choosing a roof, you need to pay attention to streamlining and precipitation. It is necessary to achieve such a shape of the structure that when it rains, puddles do not form, and when it snows, the snow does not put pressure on the supports and falls to the ground.
Features of types of canopies according to rafter systems
Each type of canopy has its own unique functions related to both technical parameters and physical structure.
Sheds
The main factor that sets them apart from other types of frames is the ability to use different materials to construct the structure. They may be:
- Tree
- Metal
- Alloys and mixed materials
The triangular shape suggests inequality in the height of the supports. One side is significantly higher than the other, while the smaller part has greater defensive capabilities. When creating free-standing canopies, the upper parts of the rafter legs are attached to the wall, the lower parts - to the suspension and supports.
Scheme of single-pitch structures
Gable awnings
These designs are the most balanced option between manual work and the use of industrial equipment, allowing you to obtain high-quality results by carrying out complex calculations and calculations.
The main feature that distinguishes gable awnings is the ability to choose an installation system. It is presented in two ways:
- Full work: performed in the absence of a concreted area or a large volume of foundation. First, there is a preliminary stage, during which the land is cleared of debris. Then individual leveling of the area for the canopy and concreting of the pillars takes place.
- Reduced work: performed if there is a concreted area. In this case, there is one stage during which 4 holes are drilled in the concrete. Next, the supports are attached to the site using anchor bolts.
Due to the fact that the upper ends of the rafter legs rest on each other, it is necessary to apply vertical and horizontal alignment techniques to increase the stability of the system.
Scheme of gable awnings
Tent awnings
It is one of the most difficult types in terms of implementation. When constructing it, it is almost impossible to carry out the results manually; you have to use artificial intelligence or industrial calculators.
The main unique feature of tent frames is their remarkable appearance and practicality, which not only provides beauty to the exterior of the house, but also increases streamlining and prevents precipitation from retaining on the roof.
The ideal shape, practically invulnerable to the influence of precipitation, is achieved by connecting the rafter legs at the top of the tent.
Scheme of tent canopies
Arched canopies
These designs are ideal for residential buildings, cottages and places where personal vehicles are stored. Another advantage of the design is ideal streamlining due to the rounded shape.
The main point when constructing arched structures is the choice of material from which the canopy will be made. It is important to correctly calculate the bending radius, otherwise the structure risks collapsing or losing most of its properties.
The peculiarity of arched frames lies in the roof. It has the shape of a wave, or an arch or semi-arch. Rafter systems are assembled using arcuate supports and trusses.
Scheme of arched structures
Photo: options for ready-made structures made from corrugated pipes
Canopy with polycarbonate roof
Canopy with metal roofing
Canopy as an extension to the wall of a house
The canopy aesthetically complements the porch of the house
A canopy with a tarpaulin roof
Simple gable canopy
Another canopy option
Canopy fastenings
When constructing canopies from profile pipes, the following methods for arranging parts and parts of the structure are used:
- Welded joint: requires great manufacturing skills and expensive equipment to carry out the welding process, but the end result can be a very strong and almost unbending structure.
- Bolted connection: it is characterized by low labor intensity and demands on the skills of the performer. The end result can be a fairly strong structure, but it cannot boast of great durability. For connection you need: a drill with a metal drill, bolts, self-tapping screws. The latter must be selected based on the diameter of the pipe.
- Crab: is a method of fixing small pipes up to 25mm using clamps. When installing the structure, you can use both X-shaped and T-shaped types, capable of connecting up to 4 pipes. The connection is made by tightening the clamps using the appropriate bolts.
Important: The “Crab” connection system is only suitable for work at an angle of 90 degrees.
Video description
You can see how to weld a canopy for a house from a profile pipe under corrugated sheeting in the video:
Roof installation
When the load-bearing base of the frame is ready, the sheathing is attached across the trusses. It can be either metal or wood. The wood must be treated with an antiseptic before laying on the rafters. All metal parts of the structure are also protected from corrosion using primer and paint.
Various materials are used as roofing for carports: corrugated sheets, metal tiles, ondulin, cellular polycarbonate.
Profiled sheets are laid in the direction from the lower overhang to the ridge or the upper line of the canopy with an overlap of one wave. And they are fixed with roofing screws with a rubber gasket.
Polycarbonate is mounted in longitudinal strips along the overhang so that the condensate formed in it flows to the bottom. It is joined end-to-end using special H-shaped profiles, secured with self-tapping screws with thermal washers, and the ends are covered with a perforated U-shaped profile.
Fastening cellular polycarbonate Source ytimg.com
Preparatory work
The most necessary thing to create a canopy from profile pipes is a correctly drawn up drawing containing the exact dimensions, proportions and details. To compose it, you must follow the step-by-step instructions for implementation.
To draw up a diagram of the future frame, first of all, you need to decide on the location of construction. It plays a key role, because the choice of resources and materials for the implementation of the roof and the construction of additional supports and roof depends on the location of the structure. The best solution would be to give preference to a flat and stable surface that is not subject to ground movements, or a hill without steep slopes.
The most undesirable place to build sheds is lowland and slope. This is all due to large accumulations of water formed after rain or floods. Naturally, they negatively affect not only the comfort of stay, but also the strength of the structure, exposing them to corrosion. To get rid of this problem, it is necessary to build a sewer system, which increases financial and time costs.
Ideal place to create a canopy
Next comes the stage of developing a drawing for the structure. Schemes can be created either manually or using instruments and artificial intelligence. In order to maintain all the accuracy and study the pitfalls in detail, it is recommended to draw up a drawing at the site of the future construction.
In order to correctly draw up a diagram of a canopy made of profile pipes, it is necessary to take into account the following technical and physical parameters:
- Roof slope angle: This mathematical value takes into account the overall slope of the roof and the loads it can withstand. The calculation formula is individual for almost each type of roof:
Approximate values for each type of roof
| Rafter system | Slope angle, degrees |
| Single-pitch | 8-18 |
| Gable, designed against the influence of snow | 25-34 |
| Gable, necessary against strong gusts of wind | 17-25 |
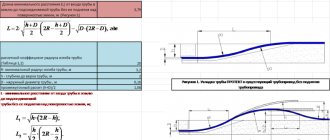
- Length of the rafter arch: this value is calculated exclusively for curved roofing systems, combining the length of the rafter arch and the width of the canopy. The calculation formula is as follows:
L=1.6*(b+h/2)
- Section: necessary for an accurate idea of the figure, its parts and details. It plays one of the main roles when drawing up the drawing, since depending on this parameter the width of the canopy is calculated and pipes for the racks are selected.
Required values of pipe cross-section and its applied parameters
| Canopy width | Pipe cross-section for rafter systems with wall thickness, sq. mm | Pipe cross-section for racks with wall thickness, sq. mm |
| Up to 4.6 | 42*19 | 41*41 |
| Up to 5.7 | 44*44 | From 53*53 to 85*85 |
| From 5.8 | From 46*46 to 62*28 | From 83*83 to 117*117 |
An important point: to create slopes, pipes of a smaller cross-section are used. This allows you to save on purchasing large models.
Now we are calculating the technical parameters for creating canopies from profile pipes. Naturally, they are individual for each house, so it is necessary to take as a basis a specific result that is most similar to what will be performed next. The average technical parameters using the example of a house with a width of 10x7 are presented below:
- Width of the canopy: if desired, it can be made to fit all the walls, but it is better to leave the overhang a little shorter. The result is a proportion of 10x7.
- Height of edges: It is best to make the high ends longer than the lower ones, as this will achieve balance in the distribution of support properties. The optimal value for the former is 2.7mm, for the latter – from 3.8 to 3.9mm.
- Step between rafters and posts: in this case, a regularity works - the more massive the roofing material, the smaller this value. The average values of this parameter vary from 110 to 190 cm.
Wide metal canopy
The only physical parameter that is worth paying attention to when drawing up a drawing is wind and snow loads on the structure during precipitation. To calculate the maximum strength value of a canopy, it is necessary to use geographical and geological maps. They can be used to determine the duration, abundance and width of precipitation.
The last point of the preparatory stage is the calculation of financial costs due to problems with installation or defective material. The final percentage of losses ranges from 4 to 10%.
Stripping and decorating
Welding professionals use a special tool when working to remove slag and obtain beautiful, even seams. An ordinary hammer can be used for this purpose.
Sloppy deposits must be removed immediately, otherwise they will freeze to death later. When the frame is ready, it should be cleaned. To do this, use a special attachment, because a regular grinding machine will not take metal.
Decor refers to the coloring of the frame. The composition should not be simple, but protective. Metal paints usually contain various red lead compounds. At the same time, the palette does not suffer at all - all the colors of the rainbow. The final layer can be a varnished coating - it will protect the metal for a long time and the appearance of the frame will become flawless.
Selection of materials and tools for work
The first thing you should pay attention to when choosing tools for creating canopies from profile pipes is the dimensions. For main parts and devices for work, the minimum size ratio is 78x78, for additional parts - 42x22.
It is advisable to buy the frame ready-made, but you can still install and make it yourself. It is imperative to coat the structure with protective paint to avoid the effects of corrosion.
The list of necessary tools for creating a canopy from profile pipes is as follows:
- Resources for installation: sand, crushed stone, cement.
- Pipes for the construction of frames
- Welding and mounting machine
- Drill, grinder, screwdriver.
- Bolts, screws, nuts.
Truss installation
As the upper horizontal piping (with a distance of no more than 5 meters between the racks), it is allowed to use square pipes of the same diameter as the racks. In some cases, additional reinforcement is made with diagonal supports.
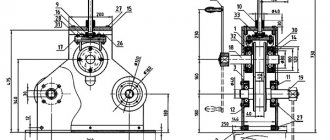
Frame diagram for canopies made of corrugated sheets. A square pipe is used as a piping, on which triangular trusses are mounted.
If the distance between the support pillars is more than 5 meters, it is necessary to use rectangular trusses for tying, which have greater rigidity and the ability to withstand significant loads.
Installation of rectangular trusses to canopy posts using welding equipment
Warning. When carrying out work at height, it is necessary to comply with safety regulations; it is prohibited to carry out work from ladders, but scaffolding or scaffolding should be used.
Construction stages
There is no specific sequence for the construction of canopies from profile pipes, since different types of roofing, finishing, and connection of supports force one to adapt to each type separately.
The first and most important stage is preparing the foundation for construction. In certain places where the supports are installed, soil is unloaded and special holes are formed in which a layer of crushed stone is laid. Afterwards, the racks are installed: on their basis, using welded bolts, supports are laid.
To give the structure additional strength, you can install reinforcement and pour cement mortar in the remaining area. The side walls are created by connecting trusses and support posts.
Once the foundation is installed, the construction process begins. It goes in the following sequence:
- Square-shaped steel parts, matching the overall parts in size, are welded to the lower edges of the racks. After the previously poured cement mortar has cooled, the support pillars are screwed to the embedded parts.
- The frame is assembled: at this stage, equidistant sections are marked on the pipe. After this, the structure is divided into equal parts, and the trusses are manufactured. First, the side sections of the supports are attached, then the front jumpers and diagonal grilles.
Welding of profile pipes
Electrodes for welding profile pipes
The main criterion for successful welding is compliance with safety regulations. It is necessary to wear a special uniform and safety glasses to avoid injury during the procedure.
To connect several metal structures, it is best to use the gas type of welding, since it can handle any amount of work, albeit at a lower speed than electric.
After completing the work, be sure to check the seams for joints and contamination. If there are any, then they need to be eliminated urgently. An ordinary grinder will help with this.
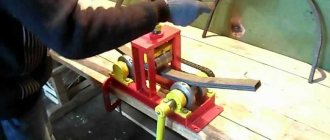
Bending profile pipes
This procedure is used when creating arched canopies. For production you need a special tool - a pipe bender. You can create it manually or buy it in a store. It allows you to easily bend a metal profile, which significantly improves it over grinders and welding.
The main thing when bending profile pipes using a pipe bender is to prevent the occurrence of breaks, cracks, and irregularities that distort the initial dimensions of the structure. Also, considerable physical effort is required to perform the bend.
Exterior finishing
After the structure has been completely cleaned after welding, it is necessary to carry out a procedure for degreasing the metal elements. To do this, you can use any solvent: acetone, ethyl alcohol, water, gasoline, kerosene. After painting, you must wait until the structure dries. Only then can you start priming.
The primer is useful because it provides additional protection against corrosion and increases service life.
Worth knowing: The color of the primer paint plays a key role in providing protection. Gray paint is best used for bright materials, white for painting pale surfaces, black for bright metals
Site preparation
When starting work, it is worth preparing the site for the structure. To do this, according to the drawn up sketch, we level and compact the earth at the site of the proposed construction. Then we dig holes around the perimeter for support pillars with a depth of 50 to 100 cm. The recesses are equipped in such a way that a rectangle is obtained, usually in two rows of 2-3 holes.
Assembling a canopy from a profile pipe for a car
A carport made from corrugated pipe is a good option for sheltering it from ultraviolet radiation and bad weather. This design costs much less than a standard garage, it is not difficult to make, the main thing is to follow the technology and everything will work out. Long service life and attractive appearance depend on the correctness and sequence of actions, namely:
- First you need to decide what type of canopy will be optimal in a particular case.
- Next, you need to understand what load it will withstand and, in accordance with this, calculate the technical parameters.
- The next steps are choosing the material for the roof and frame, preparing the installation site, and finally, installation.
It’s not difficult to build a carport; the main thing is to study the technology and stick to it.
Advice. The site for assembly and operation must be solid, otherwise the structure may “sink.”
Choosing a car shelter
The main difference between the types of canopies from one another is the shape of the rafter structure and the type of support system. You need to choose the appropriate option based on the following factors:
- size of the covered parking space;
- at what distance from the house the canopy will be located;
- how many cars are planned to be placed in the shelter.
All these parameters will help plan the type of construction.
Rafter system
The shape of the roof depends on the choice of rafter system; there are three varieties: arched, gable and single-pitch.
Arched roof
The arched system is the most difficult to manufacture; metal profile pipes must be bent on a pipe bending machine to give them the desired arched shape with the same bend. Pipes should be selected so that they bend well. The lower belt of the trusses is made curved or horizontal. The internal stiffeners that support the arch are often made with curly shapes for beauty.
Gable roof
A gable roof has the appearance of two flat surfaces that are located at an angle. The corner is at the top of the roof, the slopes diverge symmetrically downwards. The load-bearing truss has a triangular shape with equal sides; for greater stability, jibs and supports are additionally placed inside. Sometimes they opt for a version of the truss with a raised bottom chord.
Shed roof
The design of this type of roof has a flat surface with one edge raised, resulting in a slope with a slope at a certain angle. If the canopy needs to be attached to a building, then the emphasis can be either on the inclined side or on the straight side. The calculation of the rafter system in this case is simple; any suitable material will go on the roof. If the canopy has a small width, then the rafter system is made of only rafters with horizontal perpendicular crossbars. For wide cover, it is constructed from trusses in the form of a right triangle.
Support system
The type of suspended structure depends on how the support system that supports it is installed. It can be designed as an extension or stand alone. The amount of material for the frame is calculated based on the selected option for covered parking.
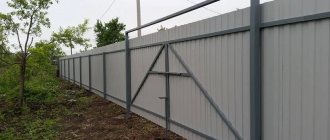
The extension is attached to a stable support (building facade, secure fence, etc.) on one side or on three or two sides. In this case, support structures are installed where there is no fastening, sometimes they are not installed at all.
If the canopy is built as an independent unit, then roof supports are mounted on all four sides.
Frame parts made of profile pipes
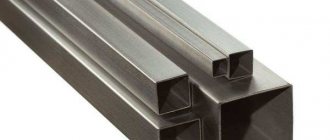
Before you begin building a carport, you should make all the necessary calculations and select the appropriate pipe section for each element. Profile pipes are produced with walls of various thicknesses, the cross-section is in the form of a square or rectangle, the size is different. The pipes are responsible for the stability and strength of the frame; they are easy to join or weld together when assembling a car shelter due to their clear and correct shape.
The cross-sectional size of a metal profile pipe depends on the purpose of each specific element and the size of the future building. The minimum width of the canopy should be 4.5 meters - this is enough for the driver to conveniently exit the car and comfortable parking without interference.
To cover such a span, it is best to use trusses. There will be a significant load on the rafters where they are located without supports. With trusses, reliability will increase - their rigidity is sufficient to distribute the load equally.
The metal frame for the canopy is assembled from the following components:
- vertical support pillars;
- lathing for attaching roofing;
- supporting system (rafters or trusses);
- side trusses or longitudinal crossbars for connecting supporting structures.
The dimensions of profile pipes suitable for use are presented in a table.
| Canopy width m | Supports (section/wall thickness) | Rafters (section/wall thickness) |
| 4/4.5 m | 40x40/2 mm | 25x40/2 mm |
| 4.5/5.5 m | 60x60/3 mm | 40x40/2 mm |
| more than 5.5 m | from 80x80/3 mm to 120x120/3 mm | 30x60/2 mm or 40x40/2 mm |
The parts that reinforce the trusses and those used to create the sheathing may have a cross-section of 20x20 mm or 20x40 mm. There is no strong load pressure on them, they simply distribute it equally over the entire structure and guarantee the rigidity and strength of the entire structure.
Support installation process
Starting installation without preliminary calculations and a project is a chance to get something completely different from what you need. In addition, errors and rework are inevitable in this case. Therefore, here are the important nuances about the process of installing support pillars:
- First, you need to make a sketch of the future canopy and write down its dimensions, think about how the supports will be installed, and the type of roof.
- If the area for sheltering a car is not concreted, then the pillars are installed in the ground and buried. When calculating the length of the supports, it is necessary to take into account how far from the surface they will go into the ground.
- If there is a hard coating, the lower part of the pillars is equipped with special mounting plates with holes by welding. They are attached to the surface with anchors.
- When the site for the construction of a canopy is pre-concreted, metal embedded parts are pre-installed into the concrete, to which the support pillars are then welded.
If mounting platforms and metal mortgages are used, then the supports are made of such a length that it coincides with the distance from the ground level to the places where the trusses are attached.
The supports can also be mounted to support posts of fences, house facades, etc.
Optimal pipe length for rafters or trusses
Before starting to manufacture rafters or trusses, you need to calculate what the length of the pipes for them should be. If the roof is pitched, then you need to know the angle of inclination. Its calculation is carried out in accordance with the climatic conditions of the construction region:
- Gable roofs in areas with snowy winters are made with a slope of 25-30 °.
- In regions where there is often strong wind, the double slope should be 15-22 °.
- The slope of a pitched roof is made within 8-15°.
The length of the rafter legs is calculated using the formula c=b/cosA. A is the angle of inclination of the pitched roof, b is the width of the suspended structure. The height of a triangular truss is found in the same way.
Attention! When designing a canopy with two slopes, ½ of the width is prescribed in the formula.
To understand how long the arch should be, you need to know its height h. The calculation is made using the formula c = (h + b/2) x 1.57.
Step size between support elements and trusses
The completion of design calculations is the determination of the step size between the supporting elements and trusses. According to the standard, it ranges from one to two meters. This parameter depends on the heaviness of the roof; the truss is fastened in the gap between every two support pillars. In order not to reinforce the canopy with side trusses, the gap between the supports should not exceed the standard distance. In the rafter structure, the step also does not need to be very large.
Making trusses is a critical stage, so they make their own drawing with scaling. It is very convenient to use programs for creating projects.
Canopy: construction order
There are two ways to make a canopy - weld the parts or assemble them with bolts.
Creating a wireframe
The area for the canopy is first leveled, then it is marked for supports. If you plan to fill the foundation with concrete, then you should drill holes in the ground with a minimum depth of 70 to 80 cm. The diameter of the holes should exceed the diameter of the pillars by 10-20 cm.
Next, sand is poured into the bottom of the holes and supports are placed vertically in them, after which they are backfilled with medium-sized crushed stone up to half the depth of the hole. After compaction, the concrete mixture is poured (crushed stone - 2 parts, sand - 2 parts, cement - 1 part).
For your information. Sand and crushed stone can be replaced with ASG (4 parts).
While the concrete hardens, in order to avoid skewing of the supports, they must be secured vertically using supports or crossbars. Concrete pouring gains strength within 5-10 days, during which time all the details for constructing the frame can be prepared. Use a stretched string to control how evenly the supports are installed.
Focusing on the project, the profile pipes are cut into pieces by the angle grinder, observing the cutting angle of the ends and the length. On a level surface, check the accuracy of the dimensions and, if necessary, adjust to the desired result. Next they are bolted or welded. Parts of the arches are bent with a pipe bender.
When the frame assembly is completed, the welds are cleaned and ground.
Next, the top trim is made for the supports, which consists of welding support beams for the ends of the load-bearing roof elements (trusses). During their installation and installation, it is necessary to control the step width and level. Additional reinforcement with slopes connected to the racks is possible.
Welding a simple lean-to structure
First, a drawing is drawn up with the dimensions of the elements. Without an engineering education, it will not be possible to calculate loads, so you should hire a specialist or use an online calculator. Knowing the characteristics of the canopy, you can search for a suitable drawing in the public domain.
To protect a car from bad weather, shed carports measuring 4x6 m are most often built. Triangular-shaped trusses are made from a 30x30x1.2 mm profile. The upper pipes are 3.9 m long, the lower pipes are 3.1 m long. Three vertical posts to connect them are cut from the same profile. The outermost one is made 0.6 m high, the rest - in descending order. To increase strength, seven braces with a cross section of 20x20 mm are installed in the resulting sections in a zigzag manner.