The final stage of finishing work often comes down to painting walls, ceilings or wallpaper. There are a great variety of materials for application, but water-based paint is considered the most accessible and convenient to use. The most optimal way to apply this mixture is with a roller or spray gun. If the first tool is very primitive and costs little, then the second can be a serious, expensive device. To create a high-quality coating with a roller, you will need a fair amount of skill and experience, which cannot be said about a spray gun, which can produce an even layer, even in the hands of a beginner. We will tell and show you in this article about the main stages of preparing the surface, paint and how to properly apply it using different types of devices.
Methods of applying water-based paint
There are at least 3 popular devices for transferring water-based emulsion to the surface: a paint brush, a roller and a spray gun.
Each tool is convenient and effective in its own way for performing certain types of work. The right brush will do an excellent job of painting oversized objects, and larger, smooth surfaces can be covered with a layer of whitewash using a roller. The spray gun costs several times more, but is perfect for both processing small objects and large-scale work. In terms of ease of execution, painting walls with a spray gun using water-based paint occupies a leading position. The spraying device allows you to get the most even layer of coating without requiring a person to spend long hours of practice. To obtain a good, uniform coating, it is enough to prepare the surface, dilute the paint and spray, following 2-3 recommendations, which will be discussed below. In addition to quality and ease of use, the spray gun has a fairly high performance that is not inferior to and even exceeds (for some models) the speed of painting with a roller. An old paint roller is in no hurry to give up the job to a new tool, and with good reason. In addition to being cheap and accessible, this simple tool is very reliable and ends its service life only when the ink roller wears out or the holder becomes deformed. To obtain a high-quality coating, you need to master the technology of using a roller, which not everyone can do quickly. Usually, a more or less decent result is obtained in 2-3 hours of practice. Professional painters create a stunningly even layer, processing areas of impressive size in an hour, even larger than the same spray gun.
The choice between a brush, roller or spray gun should be based on the size of the area to be treated, your experience with the tool, requirements for the quality of the coating and financial capabilities.
Spray selection criteria
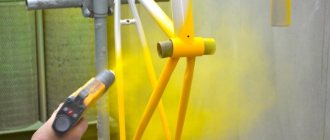
The spray gun works on this principle. Compressed air enters the device, passes through the nozzle and turns the paint into many particles that make up the dispersion torch.
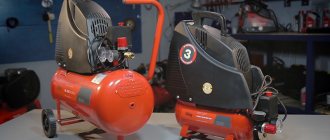
Hand-held devices are used for painting small bedrooms and kitchens. They are designed for long-term use. For large rooms, it is recommended to choose a construction tool equipped with a compressor.
The device body is made of aluminum alloy, which increases resistance to mechanical damage. Before starting work, check the tightness of the tank, lubricate the cylinder and sleeve with oil.
When choosing an electric spray gun, you should focus on products from Bosch, Elmos, Wagner, Paint Zoom, Black and Decker. When spraying water-based emulsion, the decisive factors for high-quality coating are the size of the nozzle and the optimal air pressure of the electric tool.
Manufacturers of spray guns powered by mains power adjust the nozzle diameter to ensure efficient operation of the devices. The cost of such devices depends on the operating pressure range. Branded products cost from 6 thousand rubles.
Surface preparation
The key to successful painting is a properly prepared surface on which the finishing layer of water-based emulsion will lie. Walls and ceilings ready for painting should have as smooth a surface as possible, without any growths, peeling or swelling. There is a very simple and reliable action plan for preparing for painting work.
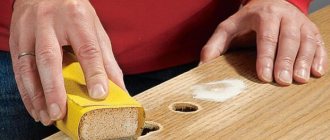
- Rough leveling of the surface is carried out using a metal spatula, by scraping off all protruding growths.
- The surface is covered with a layer of penetrating primer, and after it dries (1-3 hours) it is puttied (if the layer is up to 2 mm) or plastered (if more than 2 mm). It will take approximately 24 hours for complete drying and transition to the next stage of work.
- The dry surface is treated with a trowel mesh, removing all the smallest irregularities.
- The final stage is to repeat the priming and after drying we obtain a smooth surface suitable for painting. We will talk about the process of transferring paint to the ceiling and walls further in more detail.
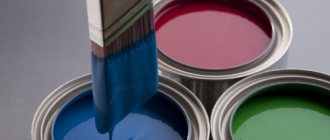
Dilution of paint
An important stage in preparing the coloring material before directly applying it to the surface. The essence of this event is to create a clean and homogeneous mixture, without lumps and foreign bodies. The optimal viscosity of paint may vary depending on the tool with which it will be applied. The amount of water added depends on the thickness of the original mixture, and since each manufacturer makes a unique product, the percentage is always different, and on average varies from 5 to 50%. Let's look at examples of diluting water-based emulsion for various application methods.
For spray gun
Convenient and productive spray guns can easily spray any mixture of suitable consistency, but if the viscosity is too high, the tool will simply not be able to handle it. Too low a viscosity, combined with a large diameter nozzle, will reduce the spray quality, producing larger droplets. A special device will help you find the optimal middle ground - a viscometer, with which you can easily select the optimal paint viscosity for a nozzle of a certain diameter. Before telling you how to dilute water-based paint for a spray gun, it should be noted that the diameters of the nozzles suitable for water-based paint range from 1.8 to 3 mm.
- The initial stage of paint preparation is to pour it into a clean container, the volume of which is at least 2 times the volume of paint.
- Check the instructions on the original packaging to see what percentage of water you should add. Water-based paint should be diluted with water at room temperature (preferably distilled).
- Add water in small portions, stirring the mixture until smooth, checking the thickness with a viscometer. If a viscometer is not available, viscosity can be determined “by eye”. The consistency should resemble thick kefir and flow smoothly from objects, leaving a millimeter layer.
- If it is necessary to add a tint mixture, a colored tint is added to it and mixed thoroughly.
- Before applying to the wall, the paint should be passed through a special filter or nylon stocking, removing the smallest particles that can seriously harm the final result.
For roller
The process of diluting water-based paint for application with a paint roller or brush is in many ways similar to the above manual for a spray gun. There are only a couple of exceptions.
- The composition can and should be 1.5 - 2 times thicker. Since the principle of roller application is radically different from spraying, a denser, thicker layer will lie more evenly.
- If you use a drill when mixing paint with water, you should choose a special attachment in the form of a cross. This way the mixture will not be saturated with air and bubbles will not form on the surface to be painted.
When diluting water-based emulsion using color, you should prepare a reserve volume. Otherwise, if there is a shortage of material, choosing exactly the same shade will be problematic.
Liked? Share on social media networks!
Home / Secrets of working with a spray gun
At first glance, painting walls with a spray gun may seem like a complicated undertaking, but in practice everything turns out to be much simpler.
The main thing is to adhere to a certain technique and sequence of actions. In this case, you will be able to paint the walls yourself using a spray gun no worse than any professional. We offer you step-by-step instructions, after reading which you can easily master a skill that is still new to you.
Before you start using the spray gun, you need to prepare the walls. If there is old coating on them, it must be removed. The plane of the wall must first be leveled, puttied and covered with a layer of primer.
It is the primer that ensures high-quality “paint adhesion” to the wall surface. It is important that the primer is dry before starting work. Otherwise, after painting, various defects may appear on the wall.
Also at the preparation stage you need to dilute a sufficient amount of paint if you are using color. This is necessary in order to avoid a situation where the supply of the substance is insufficient to cover the entire area of the walls.
In such cases, non-professionals often make a mistake: when preparing a new “portion” of paint, a smaller or larger amount of color is added and the color takes on a different shade from the previous version. Thus, when working with coloring, you initially need to prepare a sufficient volume of the product. If you are using ready-made colored paint, you can omit this preparation step.
Before starting work, you also need to assemble a scaffolding or “goat” so that you can reach the very top of the wall with paint. If the ceilings in the room are low, you can use an ordinary table for these purposes.
Considering that work on the walls is carried out with the ceiling already decorated, make sure that the paint does not get on it. To do this, along the border of the wall, using wide masking tape, you need to glue one strip along the entire perimeter of the ceiling so that it does not extend onto the wall. Note that one strip is enough for professionals, but we recommend that you use the same tape to glue newspapers to increase the protective surface on the ceiling.
Similar work must be done for the floor if it is already decorated (usually floors are decorated after the walls are decorated). If you have already installed a radiator or sockets, they also need to be hidden using masking tape and paper (sockets can be removed during work). In a word, cover up everything unnecessary that may be painted during work.
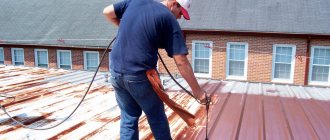
Painting walls with a spray gun using water-based paint
When the surface is prepared and the paint is diluted to the optimal consistency, you can start spraying it. Applying water-based paint with a spray gun is a fairly simple and measured process, the technology of which is presented below.
- The first spraying, when a batch of paint is poured into the tank, should be carried out on a third-party surface (newspaper, cardboard, plywood). This will help avoid chaotic emissions of material from the nozzle, which are typical at the beginning of operation. In a couple of seconds, the paint torch will level out and the tool will be suitable for processing the main surface.
- The distance from the nozzle to the wall varies between 20-40 cm, depending on the power of the spray gun and its spray system. The optimal distance is usually indicated by the manufacturer in the technical documentation. This parameter can also be calculated experimentally during test spraying on the same newspaper. To do this, just press the trigger for 1 second and evaluate the resulting stain for the uniform distribution of paint in it and the presence of smudges (there should not be any).
- It is recommended to paint the wall with a spray gun from top to bottom, from left to right. You should visually divide the room into several small areas and paint them one by one. The working tool must be perpendicular to the wall and must be moved at a uniform speed. When smudges form, they are carefully blotted with a sponge, after which the area is passed with a spray gun.
- The average volume of the spray bottle is 500 ml and the material is consumed quite quickly. If the container is not filled in a timely manner, air will begin to enter the tube, which will lead to the tool “spitting” paint and the subsequent formation of an uneven layer.
- Spraying the water-based emulsion with a spray bottle should be done in at least 3 layers. A similar approach requires not only application to putty, but also painting of wallpaper with water-based paint. Each subsequent layer should be applied only after the previous one has dried, at least after 1-2 hours.
Tools and materials for work
Painting walls with a spray gun has a great advantage over brushes - almost no additional tools are required. All you need is an electric spray gun, a prepared surface and paint. There are other types of spray guns, but for such repair work the electric one is suitable. It is convenient to hold and carry, because the absence of a cord makes it more mobile. A spray gun with a lower tank mount is more convenient; you can hold it with your second hand. The difference is especially noticeable when painting walls - the tank on top causes hand fatigue faster.
Once the spray gun is loaded with paint and the walls are ready for work (don't forget about the masking tape!), you can get to work. When it comes to choosing paint, here are a few proven tips to keep in mind:
- water-based emulsion is suitable for living rooms: it hides minor surface defects well and does not lose its luster for 5-7 years;
- Silicone paint is suitable for bathrooms and kitchens - it is resistant to high humidity and temperature changes. Minus – high price;
- silicate ones are suitable for painting walls made of brick, plaster or concrete - they have an antifungal effect;
- Latex paints are the best choice for kitchens and bathrooms, but there are two caveats: you will have to apply several layers, and not every spray gun can work with it.
Before you start painting, you need to do a few test sprays, so you need a “draft” - thick newspaper, for example. Hands must be protected with gloves while working. The room should be ventilated, heat should be excluded - the worker will become stuffy, the process will go slower and worse.
Painting the ceiling with water-based paint without streaks
One of the most common places to use water-based paint is the ceiling. This object is considered more difficult to paint, as it requires the construction of elevations (scaffolding, stepladders) and constant holding of the tool above head level. In some ways, painting a ceiling with a spray gun using water-based paint is similar to painting walls, but even with such relative identity, this matter has its own nuances.
- When starting up the spray gun for the first time, it is recommended to carry out a test spray on an unwanted surface. This will help calibrate the paint spray and determine the optimal working distance from the nozzle to the surface.
- If painting is done with an electric or pneumatic spray gun with a tank, it will not be possible to hold the tool strictly perpendicular to the surface, since the mixture simply will not be sucked into the tube. In this case, the tool is held at a slight angle, approximately 45°. If you have an airless spray gun without a tank, it is recommended to paint as expected, strictly perpendicular. There are also vacuum tanks that allow you to work with the tool in any position, but their volume is usually not large and they will have to be refilled quite often.
- You should start painting from the corner of the room, spraying even strips of paint about a meter long. The spray speed of one strip should be uniform, where 1 meter should be covered in approximately 5 seconds. For greater uniformity, one layer should be placed on top of the other by about 1/3.
- If the movement of the spray gun is delayed, drops will appear at this location. It is recommended to remove them with a sponge, and then go over the area again with a spray bottle.
- When dry, water-based paint fades, becoming slightly transparent. For this reason, painting should be carried out in at least 3 layers, waiting for each layer to dry, without ventilating the room.
For a clearer idea, we recommend watching the video, where painting the ceiling with water-based paint using a spray gun is demonstrated as clearly as possible.
What you should pay attention to when painting with water-based emulsion with a compressor.
During painting, enough paint dust or microscopic droplets fly in the air, they settle on the floor like coarse flour. This is better than drops, but the surface, like any painting, needs to be protected, for example, linoleum or laminate. Everything turns out neatly, but paint is paint.
Also, if you overexpose the spray gun, the paint begins to flow down the wall. There is nothing scary about this, you can get it wet with a cloth or spray it while passing over the area.
Also, an important point is that you will need to paint it 2 times, i.e. The paint is runny and cannot be applied in a thick layer the first time. But even when painting with a roller, a second layer is often unavoidable.
How to paint a ceiling with water-based paint using a roller
Using a paint roller to paint a ceiling can be a very convenient and quick process, even compared to a spray gun. There are such advantages as an extension cord that does not require the use of stepladders and scaffolding and rollers with a variety of textures. Disadvantages include the relatively low quality of the coating (without experience with the tool), and the need to use a brush to paint corners and pipes.
When figuring out how to paint a ceiling with water-based paint with a roller, you should start by choosing the optimal roller pile. In this case, the ideal option would be a long pile, since it absorbs more of the mixture and does not require less frequent immersion in paint. To make the work process as easy as possible, it is recommended to use a special cuvette (bath) into which a portion of water-based emulsion is poured for further impregnation of the roller with the ability to remove excess mixture. When the ceiling is prepared, the mixture is diluted, and the assembled arsenal of tools is already waiting for use, you can start painting.
- The first step is to paint with a brush the corners at the junctions of the walls and ceiling, as well as hard-to-reach places behind the pipes.
- Without waiting for it to dry, take a roller and draw a straight line from the extreme corner of the room. You should not apply strong pressure, otherwise the paint will simply be squeezed out of the roller, and an unpleasant texture will remain on the ceiling. The length of the strip to be painted is not important and depends on the comfort of your grip, the distance from the floor and the amount of paint on the roller. So, gradually, we paint over the entire ceiling.
- After waiting for the applied coating to dry, we proceed to the second layer, repeating steps 1 and 2. Here it is necessary to remember that the direction of movement of the roller on each new layer must be perpendicular to the previous one. If you painted along the room for the first time, then the second time you need to do it across.
- The final coat of paint is applied along the room, towards the window. This principle will not allow the outgoing light to reveal the smallest stains and joints of the applied layer.
To summarize, it is worth noting that modern models of spray guns can be a very serious alternative to rollers and brushes in terms of ease of use and quality of work.
You should make a choice between one instrument or another based on your personal preferences and financial capabilities. We hope that the above information has given you practical benefit or at least food for thought in making a further decision. article from the Rating section
- 0
Hand tools Power tools Air tools Painting tools
Save this page on your social media. network and return to it at any time.
ADD A COMMENT
Briefly about the main thing
Spray guns are designed for applying paint by spraying. The technology allows you to carry out work efficiently and quickly, and save on consumables due to the low paint consumption for this technique.
The classification is carried out according to the design and method of creating pressure in the devices. Thus, there are mechanical (based on a hand pump), electric (air and airless) and pneumatic types of spray guns. The quality of the result increases according to the transfer (as does the cost).
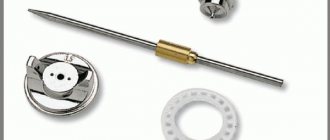
One of the criteria for choosing a spray tool is the diameter of the nozzle. It determines what paint or primer can be used with a particular nozzle. The universal size is 1.4 mm.
Knowing the structure and operating principle of the spray gun, you can assemble the device yourself. In this case, a conventional vacuum cleaner with a power of 1500 W will be relevant as a compressor.