Metal chasing is a type of decorative and applied art and a type of cold metal processing. It is the process of applying a flat or three-dimensional pattern to a metal sheet using a special tool and execution techniques.
At its core, it is a process of artistic metal processing. Both varieties are used to decorate the facades and interiors of public and private houses, paintings, weapons, kitchen utensils, everyday items, and items made of precious metals.
Metal embossing is widely used by designers and builders in their work. Nowadays, this is a popular type of artistic product, which is in demand and amazes with its diversity. Requires the highest skill from the performer.
It’s not difficult to do embossing with your own hands if you know the types of craftsmanship, the nuances of manufacturing, the materials used and develop your own style.
Required materials and tools
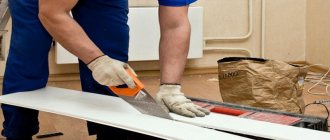
For embossing you will need foil, paper and brushes.
Along the way you will have to add some devices, step-by-step instructions will tell you about this. Embossing is a drawing that is made using a printed stencil and a pencil. Most likely, in kindergarten, children are shown how to make such beautiful drawings and how to properly use a brush. This type of creativity helps the child to concentrate on little things, develop his talent and at the same time have fun. Embossing allows a child to develop a hand for drawing, distinguish the boundaries of a drawing, and also helps the development of fine motor skills of the hands.
There are several ways to make embossing, but one of them is considered easy and can be used for small children, and the second is a little more difficult, so is intended more for older children. Each of these methods involves carrying out the work in stages, so you should not rush when performing such a drawing. You will also have to immediately stock up on paper and foil, because sometimes these materials get torn and you have to do everything again.
Forms
Metal minting technologies are used in the production of coins. This automatic process is under the control of the state and is designed to meet the country's needs for monetary units. The most complex mechanisms continuously churn out metal coins of various denominations. Each denomination has its own minting form, which is an interchangeable, universal design. Technicians change these molds as needed in a matter of minutes, and the coin-making process continues.
Required Tools
To make your first foil stamping you will need the following:
- thick foil for embossing and embossing;
- scissors;
- a sheet of thick cardboard for the backing;
- a stick with a rounded end (a sushi stick, or a blunt pencil, or the rounded end of a brush handle);
- soft substrate (thin felt, magazine, etc.).
Foil embossing method
For children's crafts, it is better to choose food foil in rolls or sheets. Such crafts will have low strength and need additional protection. For teenagers and adults who are confident handling sharp objects, you can use a soda or beer can.
You can add a glue gun with a supply of glue to the tool kit.
How to store coins after cleaning?
To ensure that coins remain free of oxidation and do not require frequent cleaning, they must be stored properly. They should be in a dry place, protected from direct sunlight. There are several storage methods that collectors usually use:
- Special albums with plastic pockets containing coins.
- Cardboard tablets with round slots for coins.
- Glass pencil cases. In such a pencil case you can not only store, but also view valuable coins without taking them out.
Frequently touching coins exposes them to bad influences, so you need to grab them by the edge. If you still had to take them outside the field, you should immediately rinse them with warm water and dry them.
By following all the rules for cleaning and storing copper coins, you can be sure that the most valuable pieces of your collection will delight you with their appearance for a long time. Do not forget that copper is not a very hard metal and must be handled with care.
https://youtube.com/watch?v=sjRRzRWatT8
Tools
To work, a master embosser needs a set of special tools and devices. Professionals with many years of experience have an entire tool base, numbering dozens and hundreds of different devices. Beginning embossers make do with several tools.
View gallery
To make a simple product, you need a set of four- or octagonal forged coins:
- kanfarnik - a coin in the shape of a thick needle with a rounded end;
- consumable - a straight, flat or radius-shaped tool in the form of a screwdriver;
- chop - a sharpened chisel-shaped chisel designed for blind or through cutting of material;
- polishers - various flat-shaped tools for polishing - leveling the base.
For full-fledged work, plumbing equipment, various clamps, clamps, vices and weights are also required. You can’t do without wooden hammers (mallets).
Text of the book “Fundamentals of Design. Artistic metal processing. Tutorial"
AT THE KUBACHINS
This spring, among the Kubachi people, I watched how delicately and cunningly the master weaves carved lace into blackened cast silver. The glass of glasses equips vision, A sensitive hand is unhurried. There is love in the eyes, and in the heart there is inspiration, winged like clouds in the sky. Coming to him, you would see for yourself that the master is true to himself to the end. He doesn’t straighten his back for hours, so that a new sign can be born in the carving. And if he inadvertently makes a mistake and makes a mark with the wrong chisel, he will become sad in deep silence and begin all the work again. And, without violating the glory of the Kubachi people, He will again shine with high skill, which excites our souls and sometimes seems like magic. So that the poem can live longer, I am learning, friends, now cheerful, now stern, I have the patience of Kubachi, the exactingness of the aul masters. Translation by Y. Kozlovsky.
In Dagestan, along with traditional engraving and silver niello, the art of copper and brass coinage is developing. As in the old days, Kubachi residents make vessels for storing dry foods and water. Almost every resident in Kubachi knows how to draw ornaments. When there is an ornamentation lesson at a local school, the teacher completely freely and confidently draws any ornamental motifs and even entire compositions on the blackboard with chalk. The complex technical skills required by Kubachi craftsmanship in the process of engraving, embossing, and drawing ornamental compositions are acquired through systematic training that began at an early age (see Fig. 4.11).
Students improve the knowledge acquired at school or at an arts and crafts school at home. Almost every student is the child of hereditary Kubachi masters. In the home of every Kubachi resident there is a small workshop where tools for work are neatly laid out. Next to the master, for example, a schoolboy son. He is holding a copper dish, jug or other item in his hands. In the center of the dish, for example, an ornamental pattern is applied with a chisel. A schoolboy or vocational school student carries out work, confidently wielding a hammer and a chaser or an engraving cutter.
In the 17th–19th centuries in Siberia, the Yakuts were engaged in the manufacture of embossed women's belts. They consisted of 15–16 plates with a semi-geometric, semi-vegetal pattern. Two or three larger plates were decorated with hunting scenes or horsemen, lions and birds. The Yakuts used brass and bronze in their work.
Buryat jewelry from those times has been preserved using the techniques of chasing, engraving, notching, filigree, niello, and enamel. As well as dishes - bowls, jugs, dishes, incense burners, toilet sets and buttons.
Embossing is not only flat-relief patterns on jewelry or household items. A technical type of coinage, difovka (see chapter above), has been used since ancient times for hammering out shields, helmets and knightly armor. Later, this method began to be used to create huge monumental sculptures.
Since the middle of the 19th century, in combination with defacing, they began to use the technology of galvanoplasty, which makes it possible to accurately reproduce the most critical areas of the figure. Together with embossing and embossing, electroplating became firmly established in the technology of monumental art.
Amazing plastic richness is hidden in a hammered metal plate made of tin, red copper or aluminum. Its relief, with minimal figurativeness, acquires the features of monumentality, that calm balance that is inherent in works of folk art polished over centuries.
Rice. 4.11. I. Saltanov. Decorative dish. Jug. Works of Kubachi OPTU students.
The revival of this ancient art in the USSR began in the 50s of the last century in Georgia, when Irakli Ochiauri made a portrait of his teacher, the famous Georgian sculptor Jacob Nikoladze, on a brass sheet. But it took almost a decade for coinage to take its rightful place among modern art genres.
It was not easy and difficult for coinage to be born again. At first, artists repeated the ornamental motifs of old forms, as if unable to resist their bewitching beauty. Chased silver bracelets, bowls and trays, belts made of chased plates, medallions with profiles that seem to have been transferred from ancient coins. But time passed, the skill grew stronger, the creative imagination of the artists expanded, and original works began to emerge from their hands, full of modern beauty and national originality. The embossing technique is well used by modern craftsmen when creating decorative panels and dishes that serve as interior decoration (see Fig. 4.12-4.17), as well as various jewelry.
Rice. 4.12. V. Degtyarev. "Khoja Nasreddin in Samarkand." Copper, embossing.
Rice. 4.13. Syrov V. Assembly-collage “Firebird”. Copper. Style: Symbolism. Direction: Panels. 1979
Rice. 4.14. K. I. Trigub. Panel "Date". Copper, 500×400. Russia. 1979
Rice. 4.15. Kazanok V. A. “Good news.” Modern design. Carved wood, copper, embossing. 1995
Rice. 4.16. V. Baybalyuk, Bratsk. Russia. "Welding an interplanetary pier." Chasing on copper with tinting successfully approached the theme of welding work in space. The astronauts pictured here work with metal. The form of depiction of everyday life in space found here an exact correspondence with one of the scenes of the future.
Rice. 4.17. Modern design. "Slave of love." Studio Caravaggio-Art. Mariupol. Ukraine. Copper, 620×420.
Rice. 4.18. E. N. Leshchuk. Technology teacher. The plate is decorative. Coinage. Copper. Ukraine.
Coinage styles.
The excellent decorative properties of embossing allow you to create new interesting and unique products, both in the established traditions of this type of creativity, and to add your own forms of presentation.
Currently, many craftsmen produce embossing mainly in historical, modern and ethnic styles (Oriental, Moroccan, Georgian, Uzbek, etc.), and can also perform artistic embossing
both in the ancient Russian style and in modern style.
In recent years, not a single major art exhibition has been complete without coinage. Interest in her is growing. Embossing is carried out not only by professional artists, but also by many, including young art lovers and technology teachers (Fig. 4.18).
The thematic range in modern coinage is unusually wide. Here, genre scenes, literary images, a typical portrait, you can find literally all genres of easel art - every piece of metal sheet that has been chased sparkles and plays.
Metal chasing is a decorative and applied work and, like any work of this kind, does not exist in isolation. It is in relationship with a specific interior, which in turn is included in the overall ensemble of the room or the entire architectural complex. If you want to embed embossed reliefs into any object, you must consider whether this inclusion contributes to the creation of an overall compositional image and obey the aesthetic and functional purpose of the object.
An indispensable part of the traditional clothing of the inhabitants of Taimyr are plates and plaques with the image of a loon; they are often used to decorate deer harnesses. Buryatia is currently famous for its work of goldsmiths; they make products from bleached silver, made using the filigree technique. Craftsmen use traditional patterns on pendants, bracelets and earrings from plant curls, dragons, lions, fish, depicting lotus buds and sparkling solar disks.
Often, a chased panel is used as an integral part of a large architectural ensemble. An example is an invoice on aluminum on a dark background: decorating the walls of the Varshavskaya metro station, embossed reliefs on copper based on the works of A. S. Pushkin at the Pushkinskaya station of the Moscow Metro and some others. In this case, the compositional and figurative structure must be subject to a number of specific features “... associated with the practical use of art.” Here are its most important features: 1) the close connection of an individual work with the ensemble, resulting in a complex overall image; 2) materiality, the materiality of the decorative form, determined by the task of organic fusion with the material environment; 3) a special figurative language that limits the choice of themes and subjects and dictates the construction of form.
Innovation in the art of coinage
.
At the Faculty of Art and Graphics of the KCHSU in Karachaevsk, much attention is paid to the development and study of folk crafts of the KCR. One of those who piece by piece collects, restores and even innovates the ancient art of coinage is Kazimir Vladimirovich Esekkuev, a teacher at the Department of Decorative and Applied Arts.
For work on artistic chasing and metal inlay on wood, he developed a new program for systematization, stylization and development of the national Karachay ornament. The idea can be borrowed from everything: from elements of national carpet weaving - (Karachay-Balkar felt carpets - kiyiz), from the ornament of tombstones. Kazimir takes traditional folk art as a basis, based on ready-made material, and then melts it down in the depths of his imagination, stylizing ancient art into chasing and notching with metal on wood. This is his know-how. In addition, he developed a number of programs for clubs in schools and for the Institute of Further Education. No one had ever dealt with these problems before.
The discipline taught by Esekkuev Kazimir is called “Decorative and Applied Arts with Workshop.” The classes study not only technology, but also materials, equipment for artistic metal processing, artistic embossing, metal inlay on wood, filigree, filigree, engraving, embossing and much more.
In 2007, Kazimir Esekkuev took part in the All-Russian Scientific and Practical Conference and Exhibition in Makhachkala, where he presented his work “Decorative Dish” (Fig. 4.19).
Casimir's innovative methods are continued by his students - all of his graduates defend their studies with excellent marks and participate in many exhibitions.
How to learn to create such things? Read carefully what we have to say in this chapter, and you will learn a lot about the creation of embossing. You will learn what basma is in the next chapter, and how this technique can simplify the work of a minter.
Rice. 4.19. K. V. Esekkuev. Teacher at KCSU. "Decorative dish" Coinage. Copper. Russia. 2007
4.2.
Types of embossed work Contour embossing
- this is the creation of a contour pattern on a metal plane using a consumable, a powder brush and textured embossing. This type of coinage does not involve punching out reliefs and therefore this technique is somewhat reminiscent of engraving. Using the embossing technique, it is easier to create a more juicy, lively design, accentuating it in places with stronger blows and the use of some other embossing, in addition to the consumables. Contour embossing can be made either with a concave, lowered line, or a convex line, raised above the background. This method of minting is often used to create various household items. They are decorated with floral and other types of ornaments, made in one line without punching out the relief.
Convex contour embossing
– this is a type of contour embossing, where the design is readable due to the convex line of the design, which is raised by the consumable from the reverse (wrong) side.
Creating a decorative design and even a relief only by lowering the background was often used both in the past and in modern times. This method of minting is, as it were, a further development of contour minting. The relief acquires a special freshness and softness due to the fact that after outlining the design with a consumable, the background is lowered with the help of various patches and matte embossing, and the design of the ornament or other image remains convex and untouched. For example, masters of the 17th century did all their work with resin from start to finish. The drawing was made clearly, in one line, and transferred to sheet metal with a thickness of no more than 0.5 mm using canfar, and on the back side of the plate. This was done so that easy relief carving could be done right away. The coinage was then removed from the resin, annealed, bleached and oiled face up. After the resin had hardened, the relief was embossed, for which the entire relief along the contour was emphasized with an almost sharp consumable, the leaves were smoothed with a smoothie, and lastly the background was embossed with a textured emboss. Then the plate was finally removed from the resin, annealed, bleached, washed, dried and straightened. The same type of coinage is also used on three-dimensional products.
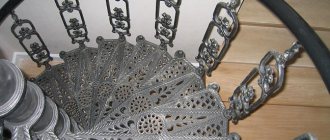
Openwork chasing
- differs from contour in that the background of the ornament or some other image is carved using special chisels. During the process of consumption, the thickness of the metal on which the cutting is made decreases. The background is perforated without removing the plate from the resin, after its final modification. It is better to start cutting from the middle and go to the edges or frontally from one edge to the other. The embossing is removed from the resin after cutting in the usual way. You need to be especially careful when annealing openwork embossings. To prevent the partitions from being damaged, especially the thinnest ones, so as not to burn them, they must be burned with a wide, calm flame of the burner. Then carefully brush through - clean out the burnt resin and bleach.
After cutting, sharp burrs are formed, which are filed down with a file and needle files of suitable profiles.
Openwork embossing requires that the design be arranged in such a way that, after cutting through the background, it does not fall apart into separate pieces. The main thing in the composition of openwork embossing is the rhythm of the voids and the pattern itself, which creates the openwork. The product is mounted, if it is previously made from individual fragments, using the hard soldering method (see Fig. 4.20).
Rice. 4.20. Openwork chasing.
Relief chasing.
The most common type of coinage, both in our time and in ancient times. Decorative dishes made of silver with gilding are distinguished by careful, very fine elaboration of all the details of the floral ornament. The drawing was translated from the reverse side by shotting. The general shape of the dish is stamped out with hollow marks on the reverse side. “Oblo” – round – is an old Russian word. Holly mints or boboshniks are mints with an oval, pain-shaped, oblong strike. This is a very large and diverse group of mints. Their working part, like consumables, has a wide variety of curves and sizes. After this, the dish was oiled and the final finishing was made on the front side with a full set of mints. This picturesque dish can be compared to a completely different one in terms of the style of drawing and execution of the embossing. There is a simpler technique for making the dish. Work on the relief begins from the front side by identifying the silhouette of each figure and simultaneously sculpting them with the help of soft consumables and shading tools. No textured coins were used here. It is not possible to make a dish in one go, that is, in one grind. The first stage is outlining the figures, partially modeling them and embossing the font. Then they remove it from the resin, wash it in kerosene, anneal it at a temperature of no more than 300–350 °C and continue working on the relief on a stove (a tightly stuffed pillow). If the modeling does not work out without tarring, then tarring is applied to the front side again to finalize the coinage.
There is another option for embossing a decorative composition. In this case, after transferring the drawing through carbon paper and tarring, it is removed and the background is lowered around the central spot. Then the plate is removed, annealed, etc., the plate is tarred on the reverse side to punch out the relief and individual elements of the convex texture. Then it is removed from the resin again, annealed, bleached, and the background is straightened on a cast iron or steel plate. This type of embossing is even more simplified, but the alternation of large and small plans makes the composition quite interesting.
Large decorative works with high relief or high relief are minted according to the design transferred directly onto the board of the workbench without grinding using a soft consumable or boboshnik (flat embossing), which is used to pass over the design pasted with soapy water on the metal. The punching is done on slightly moistened sand located in the box. In order to achieve the desired height of the relief, you have to anneal the metal several times and repeat the hammer. It is better to anneal large sheets on an open forge or fire. If the minting area is large, then the tarring is done locally, that is, only those areas of the metal that want to be minted with resin are filled with resin. Or pour a 3-4 cm layer of resin over the entire surface of the sheet, limiting the edges of the embossing to a frame knocked together from boards (without a bottom). For local tarring, you can make a ring of roofing iron that will limit the tar. Usually, with local tarring, the resin cracks and gradually bounces off in separate pieces; Such tarring is necessary at the final stage of work.
Decorative and textured embossing
- the most modern type of making products, although the Scythians in past centuries successfully used this type of coinage. The golden bowls were decorated with diamond-shaped spikes all over the surface. Textured coinage is also very characteristic of the Georgian school of metal products (4.21).
Rice. 4.21. Jug and karkara. Georgia. XIX century, silver, embossing, tinting. The height of the jug is 25 cm, the height of the jug is 28 cm.
For example, during finishing work in the construction industry, embossing large copper sheets with large dents is used rather randomly. The sheets are oxidized brown and after all this a very expressive decorative metal is obtained.
Familiarization with all types of embossing and the rich possibilities of making various decorative products with your own hands will help the novice artist take the path of creativity and create unique works of art.
Chasing by casting.
In the art of artistic metal processing, embossing and casting has long been known. Many artistic metal products made using the casting technique need improvement. The processing of the casting, which always differs from the model by a greater surface roughness, begins with preparing it for embossing. With the help of chisels, chops, riffles, files, all kinds of flashes are removed - flash, flakes, fumes. The fewer there are, the cleaner the casting. After cleaning the casting with a steel brush, it is pickled and dried. Existing flaws are repaired using plugs or welding with the same metal from which the casting is made. For embossing from casting, you need coins that are harder than for embossing from sheets. Resin is also used to secure castings during minting. Flat items are tarred on a box or board, small volumetric parts are minted on a kettle. Small jewelry - decorations, keychains are fixed with rosin. Large products are minted, secured in a vice. In this case, gaskets made of lead, aluminum or wood are placed under the jaws of the vice so as not to damage the surface of the casting. Hollow and thin-walled products must be especially carefully clamped in a vice. Very large and heavy castings are processed either on a workbench or on the floor.
For coining product marks, rough coins are taken that resemble the surface of a casting. Castings are processed not only with embossing tools: consumables, polishers, smooth, textured and boboshniki, but sometimes also with the help of a drill with a hose with a set of various steel and abrasive cutters that remove a thin layer. Smooth the surface of the product using needle files, personal files, scrapers, grinding materials and smoothers.
Embossing with a slot.
Unlike other embossed jewelry, it does not have a background; this feature also requires other conditions when using it. Cut-out embossing is done in those places where it acquires a special lightness and delicacy, for example, when it is visible in the light or when the background is bright fabric, other metal or a wooden board. When composing a motif composition on paper, you should remember one necessary condition for an embossed composition with a slot: the ornament in certain places must necessarily come into contact with each other and the inside of the frame bordering the decoration. The background is cut through after the embossed relief is completed. For cutting, chisels and various small-sized chisels are used; for cutting, metal scissors are used; for cutting out curved shapes, a jigsaw is used (see section of the chapter below).
The embossed embossed parts of one composition are knocked out separately and attached to a metal base (background) by soldering or riveting. When riveting metal plates, a rivet or a rod with a head is inserted into the drilled hole and pressed with a heavy hammer so that the rivet does not pop out. The protruding end of the rivet is flattened with a plumber's hammer and its head is shaped by crimping; This way the rivet will tighten the plates being connected.
The image on metal goes well in a baguette frame (see Fig. 4.17) or with a wooden backing, which serves as a background for a chased panel. The surface of a wooden substrate (board) can be treated by smoking (firing over a fire, with a blowtorch flame or in hot sand) or by firing with acids, for example, wetting the surface with strong sulfuric acid using a grass brush, after which the board takes on a pleasant brown appearance.
Minting of the first Russian coins
Rus' owes the appearance of its own money to His Serene Highness Prince Vladimir, who introduced it into regular circulation in the 10th century. The minting technique had some characteristic differences and consisted of several step-by-step actions.
- Metal round timber (silver or gold) was prepared.
- Stamps were placed on both sides of the press, after which the workpiece was placed on the lower one.
- The press was driven and compressed the workpiece, simultaneously imprinting an image on both sides.
The technology, as is clear from its description, was imperfect; the coins turned out to be different not only in appearance, but also in weight. At the same time, the weight error of the spool was only 0.4 g and, on the scale of the total mass, was not at all critical. It was from this coin that the concept of a spool as a measure of weight, which is 4.266 g, originated.
With the change in the political situation in the country, which led to the fragmentation of the state, silver coins began to be minted en masse and circulated locally. Metal disks were cut out of silver wire “by eye,” which inevitably led to a fairly significant scattering of the specimens. They differed not only in weight, but in shape and in the printed image. The coins of that period (rubles from the word chop) were not smooth, but uneven and rough. For this quality and for their light weight, they were nicknamed “scales” among the masses.
Drawings for embossing
The initial stage in the process of creating a product is applying a design to the workpiece. Metal artistic processing is associated with the presence of raw materials such as metal plates made of tin or copper sheets, brass and aluminum. On each of them it is necessary to apply a design according to which the embossing will be done. The subject of the images is selected in advance, and then special sketches are prepared based on them. Then the designs are transferred to the surface of the metal workpiece using direct copying. After this, the surface is covered with a thin layer of varnish, which protects the contours from abrasion.
Materials and tools for embossing
Different types of metals are also used for minting. The main property that determines the possibility of using a material for the production of coinage is plasticity, that is, the metal must be deformed under the influence of external forces and not be destroyed in any way.
Embossing tools
Most often, craftsmen use sheet material with a thickness of 0.4 to 1 mm. For work on creating volumetric relief, materials with a greater thickness are used, for example, copper, with a thickness of about 2 mm.
Red copper has been known since ancient times. It has plasticity and the necessary viscosity, but the main thing is that this material is able to restore its plastic properties after heat treatment. Copper is easy to mint and can be formed into a variety of shapes. It is possible to perform a high drift on its surface without any particular difficulties. It is well ground and polished, but products made of copper quickly lose their shine.
Copper for minting
Copper and alloys based on it are highly resistant to corrosion. They can be stored in air for a long time without any difficulties. These and some other characteristics made it possible to use copper as a base material for volumetric and flat coinage.
Aluminum is fairly easy to hammer, but working with it requires a fair amount of caution. The metal has a low melting point and this is what needs to be monitored during the heat treatment process
Product made of cupronickel
Cupronickel has the necessary degree of plasticity, can be polished well, and under the influence of certain reagents it can change color.
By the way, among metals made on the basis of aluminum, duralumin stands apart. But working with it is associated with a number of technical difficulties, so when processing it it is difficult to maintain the integrity of the sheet, meanwhile it is used to imitate silver.
In addition to non-ferrous metals, steels, in particular low-carbon ones, are also used for minting. Before work, such steels are annealed and the surface is etched. It is difficult to process with embossing tools, but it is difficult to replace in finishing. Steels of this class, as well as this roofing metal, are used to obtain large relief images that do not require careful detailing.
Steel for coining
Steels containing in their composition are a beautiful metal, but difficult to mint. It is used for monuments, monuments, etc.
When choosing a metal for minting, it is necessary to take into account that it should not be subject to delamination, there should be no defects on the surface, for example, stains, cracks, etc.
Before starting work, the metal, regardless of the brand, is subjected to heat treatment - annealing. To perform this operation, either traditional blowtorches or muffle furnaces are used. Copper is annealed at a temperature of 650 to 700 degrees, brass 620 - 650, steel 600 - 650. Various media are used for cooling, for example, cold water is used for cooling.
The main working body with which minting is carried out is the minting. They are made using forging. They are made in the form of rods of different sections and having a length of 12 to 17 cm.
When working, the coin is held in the left hand, while the elbow is suspended. This guarantees freedom of hand movement. The coin is held in such a way that it always leans back, so that the striker is slightly raised. As the striker strikes with the embossing hammer, which the craftsman holds in his other hand, the tool moves forward.
Materials used
Embossed jewelry is traditionally made from silver and gold. Most craftsmen work with cheaper metals:
- Copper with a thickness of 0.3 to 1.5 mm. It is plastic, easy to process, depending on the brand with a light or dark shade of red. Copper and its alloys are more often used than other metals for decorating rooms.
- Red copper, sheets of which can be rolled to a thickness of 0.05 mm. Due to its softness, relief embossing can be easily performed even on voluminous products of complex shape. High resistance to corrosion allows the installation of decorative elements made of hammered copper on the facades of houses.
- Various brands of brass with golden yellow color in different shades. High (up to 50%) zinc content increases hardness and reduces flexibility. However, despite its lower ductility than copper, brass is easily minted.
- Tompak is a type of brass with a low (up to 10%) zinc content. Due to the large proportion of copper, the metal turns out to be red in color with a yellow tint. The alloy with the addition of aluminum up to 5% acquires a color indistinguishable from the color of gold. Tombac is used to make badges, medals for anniversaries, cheap jewelry, and decorative elements for interiors.
- Aluminum and its alloys. The metal is easily minted, but due to its low melting point, care must be taken during heat treatment to ensure that the design does not become deformed. Duralumin imitates silver well, but it is difficult to work with, since due to its low flexibility, the metal may crack when knocking out the relief.
- Tin plate on which beginners practice their embossing skills. However, masters also do not neglect this accessible material.
- Ferrous low-carbon metals. The blanks are pre-annealed and etched to obtain a decoper, on which images with large relief or designs with small details are minted.
- Roofing iron for embossing contour images with shallow relief without background and small details.
- Stainless steel with a thickness of 0.5 to 0.8 mm. The metal looks beautiful, but due to its high strength and dense structure it is difficult to knock out. High resistance to corrosion allows us to make embossed memorial plaques and plaques for monuments and monuments from stainless steel.
- Cupronickel and nickel silver are nickel alloys with a high copper content (81 and 65%, respectively), so they are ductile and easy to polish. Chemical treatment makes the surface golden, silver, or imitates antique bronze.
DIY minting process
One begins to learn the art of embossing with simple images that are easy to find freely available on the Internet. After mastering the skills of working with different types of coins, they move on to complex compositions. For the first three-dimensional images, it is better to choose copper.
It is important to immediately learn how to mint correctly. It is held, slightly tilted back, with the fingers of the left hand, without using the little finger
In order not to limit the freedom of movement, the hand is kept suspended, without resting the elbow on the tabletop. The tool is moved forward after making an imprint of the required depth. When doing copper embossing with your own hands, it is recommended to apply a thin layer of plasticine to the surface of the workpiece so that the embossing glides better.
To improve ductility, the metal sheet is annealed. Minting begins with the application of external contour lines on the front surface. From the inside, the outline is pulled out after filling the internal lines. Then the main relief is filled and leveled. The work is completed with decorative processing.
Since finishing is performed with toxic substances, when working at home, it is necessary to follow safety rules for handling and storing aggressive liquids. The treatment is carried out inside a fume hood or ensures effective ventilation of the room. Containers with reagents are closed with well-ground stoppers.
Currently, coinage is very popular. Therefore, after mastering this type of artistic metal processing, you can organize a profitable business. Thematic drawings can be easily found on the Internet and original compositions can be created based on them.
Process Basics
The image is created by striking a hammer with a tool applied to the surface of the metal. The configuration of the impression depends on the shape of the working part of the instrument. Then it is sequentially rearranged and the operation is repeated until the entire pattern is knocked out. Complex images are minted using several tools with working parts of different shapes.
Depending on preferences, metal minting is performed in different styles:
- historical;
- Old Russian;
- eastern;
- Georgian;
- Moroccan;
- Uzbek;
- modern.
The quality of the images depends on the degree of training of the minter.
Regardless of the style, each master has his own “handwriting” of performing the work. Despite the apparent complexity, it is not difficult to master metal embossing with your own hands.
Complex images are minted using different tools
DIY embossing
What is coinage? This is one of the types of decorative and applied art - relief, exclusive paintings made on metal using a certain technique.
Artistic embossing will be a very good decoration for your interior, especially if it is done by yourself. With great desire, patience and perseverance, the work itself will give you great pleasure, and the product will show off on the wall for many years.
Embossing with your own hands, if you decide to make a painting as a gift, then it will also have considerable value, just like handmade work. But first, you should start with a simple, uncomplicated painting in order to master the execution technique and get better at it.
Which metal to use
A little about the metal on which the painting will be made. The fact is that the same picture on different metals will turn out differently, this happens because different iron stretches differently.
For a painting, a brass, aluminum or copper sheet is best suited, but it should be noted that copper stretches better, which makes the paintings more voluminous, which is best suited for artistic embossing.
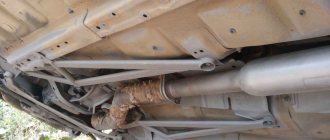
Galvanized iron stretches less well, and accordingly the pattern will be less voluminous, so it is better to design facades in this way - cornices, drainpipes and roof fragments.
Performing artistic embossing
Do-it-yourself embossing - doing artistic embossing at home is not difficult, but it will require materials, tools, as well as desire, patience and perseverance.
To work you will need:
- Aluminum sheet 1 mm thick.
- Rubber sheet and plywood - size 500 x 500, thickness 1 cm.
- There are two embossings - contour and volumetric, which you can make yourself.
- Hammer.
- Plasticine.
- Copy paper.
- Sketch.
Work process
Embossing with your own hands, before you start working, you should prepare the metal so that it becomes soft and pliable, heat the sheet until red, but do not overdo it, otherwise it may simply melt. After heating, the metal sinks and becomes more elastic, which contributes to better stretching of the relief.
When the metal is ready, place it on the rubber, transfer a clear design using carbon paper, if gently enhance the outline with a pencil or felt-tip pen. Then roll with plasticine, this is necessary to create a greasy surface, which helps the tool glide better.
Now determine which contours you will draw from the front side and which from the back. Start embossing from the front side of the picture, and then turn the sheet over and, guided by the drawn lines, begin to draw out the purl outline; if the orientation is not enough, then draw additional lines of the purl fragments.
Embossing with your own hands, when you draw all the contour lines on both sides, you can start drawing out the main volume. Here you can already find your bearings, visually determining where and how much you need to extend and add volume and how much the plasticity of the metal will allow.
When the work is finished and you are satisfied with the general appearance of the picture, place the picture face down on a sheet of plywood and press it down along the entire plane. Look at the result, if necessary, complete what you consider necessary and repeat the procedure. If you are happy with everything, then you can start tinting.
Painting tinting
There are several ways to tint aluminum.
- Take a piece of birch bark, set it on fire and smoke the surface of the painting. Then rub with kerosene and varnish.
- Apply a thin layer of drying oil to the front side of the painting and start heating the sheet from the back side, holding it over the fire. Here, watch how much you should darken the tone, hold it for a short time - a light darkening, if you need it darker, then hold it over the fire longer accordingly. Once the desired tones have been achieved, coat the surface with varnish.
Video Embossing with your own hands
15th century coinage
During this period, large-sized thaler coins appeared, which were already difficult and simply impossible to mint using a stamp pair and a hammer. The minting technique required urgent improvement, in particular in terms of increasing the impact force, which could leave a clear imprint on a large area of workpiece. It is possible to increase the penetrating force with the help of a falver. The principle of increasing the power of the device was based on the high height from which the penetrating projectile fell. The higher it was raised, the more powerful it was minted. The technology can be schematically described as follows:
- The lower stamp was fixedly fixed on the carriage of the machine.
- The upper half of the stamp pair was installed on the end of the log.
- The log was raised to the required height with the help of several people or using horsepower.
- After it was released, it fell vertically and minted a coin disc.
The height of the striking rod, and therefore the impact force, were not always equal, which is why it was not always possible to mint a coin the first time. If the result of the impact was not satisfactory, the process was repeated until a clear relief profile appeared on the metal workpiece.
But even before the introduction of falwerks into the production process, a colossal step forward was made in the coin business. The mintmasters (persons primarily responsible for the production process of the mint) came up with the idea of making a reusable sample of a coin stamp, which made it possible to stamp completely identical coins. For this work, engravers were invited to carve the desired image on the ends of a metal rod. The production of identical money began, although the speed of its circulation was very low.
Hand-chased from the modern period
Despite the widespread automation of the coin stamping process, their manual production still exists today. These are, as a rule, special collection and government orders, which require the highest quality of execution. These include the following varieties.
Gold coins in “proof” quality
The field of such samples is mirrored, and the image itself remains matte. They are not knocked out of a metal strip, but cast, after which a edge is applied and a double hammering blow is made. The field is polished after the relief design is ready.
"Brilliant Uncirculated"
The surface does not have a mirror reflection, the pattern is not matte. No defects, even the most insignificant ones, are unacceptable.
Improved UNC
Minting is done mechanically using conventional die pairs, but then the coin is removed by hand to prevent damage and immediately placed in a capsule, envelope or seal.
First minted coins
No machines were used to make the very first metal money; each coin disk passed through the hands of a master who put his skills, knowledge and soul into making money. Among ancient coins it is impossible to find two identical copies; each of them was one-piece. This continued for several centuries until man came up with a reducing machine. Rollers, balancers or hammer shells began to be used to produce coins. The diversity of approaches to the minting process has left numismatists with a wealth of material for research and collection of collection specimens.
Let's start simple
In any store you can always purchase ready-made creativity kits. But it’s much more interesting to do everything from start to finish yourself, and also come up with a drawing. All you need is effort and patience.
The following materials will be needed:
a sheet of foil or an aluminum can; backing sheet for foil
Important: the thicker the sheet of foil, the softer the backing should be. Felt and rubber are suitable as a backing; To apply the drawing you will need a tool
It can be a sushi stick, a brush (its hard tip), a non-writing pen, etc.; a stencil, a drawing template, or you can come up with one yourself; scissors; ruler.
Let's start making coinage. We take the jar. We cut off both bottoms. Now cut the jar from one edge and straighten it to form a sheet. Now use a ruler to straighten the edges and cut them off. The option of using a sheet of foil is not excluded.
Now place the material face down on the backing. The drawing will then appear in a mirror image. Now we put the stencil on the sheet and use a tool to press the picture. You can push either a solid line or a broken line. Now you can make a frame in a similar way.
Article on the topic: Knitting a shirt front for a man: a pattern for beginners with photos and videos
Historical reference
More than a millennium has passed since the appearance of the first Russian metal coins, and throughout this time the metal of the main money supply was silver. Gold and copper occupied a significant place and importance in it, and yet silver in all centuries was unrivaled until the advent of Soviet power
The word “money” itself has Turkic roots, and in the pre-Mongol period in Rus' the equivalent word “silver” was in circulation, which clearly shows the importance of this metal in popular monetary circulation
The first copper in this capacity appeared in troubled times of feudal fragmentation against the background of the poverty of the treasury of individual subjects. And already under Ivan the Terrible, golden money discs saw the light of day. However, both of them had very limited circulation. And only under Peter the Great both copper and gold found their strong place in monetary circulation in Rus' and in international payments. But each metal deserves special attention.
Do-it-yourself copper chasing
Metal chasing is one of the oldest types of decorating metal products. This is a method of applying certain patterns by knocking them out on a metal surface. At the same time, a certain relief appears on the surface of the metal, which creates a complete picture of the pattern.
Now you have the opportunity to make various bracelets, medallions, and keychains using this technique. Today we will create a keychain book with the inscription “Family”.
Materials and tools that we will need to work using the embossing technique for making a keychain booklet
- Embossing hammer “ELVAS” MSH-01
- Metal scissors “ELVAS” MKH-01
- Set of stamps for metal embossing “ELVAS” NMH-02
- Metal block “ELVAS” MBH-02
- Vise-punch “ELVAS” TMH-01
- Marking punch “ELVAS” PHM-01
- Metal sheet for embossing, copper color “ELVAS” MLH
- Set of figured stamps for embossing “ELVAS” NFH-01
- Wire for weaving “GAMMA”AW-1 d 1 mm No. 01 silver
- Ruler with rubber base
- Ruler with geometric shapes
- Small tube DC-050/10 No. 02 for copper
- Tweezers “GAMMA” TW-201
- Marking compass
- Rubber mallet
- Scriber
- Curved round nose pliers “Micron” HTP-14
- Pliers “Micron” HTP-15
- Side cutters “Micron” HTP-11
- Needle file
- Metal wool
1. On a metal sheet of copper “ELVAS” ART. MLH we will mark the pages of the future keychain book. To make square pages, the easiest way is to use a ready-made stencil; in this case, you will need a ruler with geometric shapes.
2. For marking we will use a scriber. In our case, square pages will save space on the sheet if we match the sides of the squares.
3. To cut out the marked pages, you need to use metal scissors ELVAS MKH-01.
To avoid leaving fingerprints on the copper sheet, we will wear knitted cotton gloves.
4. It is more convenient to cut first along the common line to the end, then separate the combined sides.
5. As a result, the cut out pages will be slightly deformed.
6. Straighten the pages using a wooden or rubber mallet; a rubber mallet may also work. It is better if the size of the striker is larger than the size of the page - this way you can almost completely avoid marks from the striker on the surface.
7. Scissors leave a sharp edge, which, like the corners, must be processed with a file. In addition, we will slightly round the corners with the same file.
8. Marking the space for the holes for the connecting rings should be done using a measuring compass and a ruler with a rubber base.
9. Then we will make more distinct marks with the “ELVAS” PHM-01 marking punch. To do this, align the tip of the punch with the marked point at an angle of 90°.
10. Next, before striking, place the punch strictly vertically and, using an “ELVAS” MSH-01 embossing hammer, strike the flat part of the punch.
11. Mark the location for the second hole in the same way.
12. As a result of working with a punch and a hammer, we get clear marks for the holes.
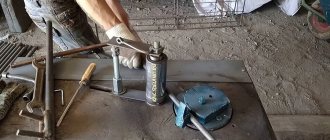
13. We punch the marked places with a vise-punch “ELVAS” TMH-01. We use the side of the vice for the hole diameter of 1.5 mm.
14. Using a punching vice, you can make neat holes in the workpiece without any effort.
15. However, the metal around the holes may be slightly warped. This deformation can be removed using a rubber mallet (see point 6)
16. Next, we will design our pages. First, let’s stamp out the desired text on the cover. To do this, we will need a set of stamps for metal stamping “ELVAS” NMH-02 (English alphabet) and a hammer for stamping “ELVAS” MSH-01
17
It is important to determine in advance how much space the text will take up on the page and what distance will need to be maintained between letters
Let's mint the first letter. The blow must be strong. If you are not sure that the print will be clear, re-strike.
Attention: under no circumstances remove the emboss from the metal between blows, otherwise you can ruin the whole work
How to clean copper-nickel coins?
Let's consider the main available methods for cleaning copper-nickel coins of the USSR and their features. It is highly recommended that you start testing them on the least valuable specimens, which you won’t be too sorry for if they fail.
Electrolysis
The essence of the technique is to place the metal in a weak (isotonic) salt solution, into which a small electric current is applied. However, this is still far from a harmless and unsafe method for humans, since you have to deal with liquid and electricity at the same time. Hand and eye protection must be provided. For cleaning, a 12-volt power supply is used, which requires preliminary preparation. You need to cut off the plugs and divide the wires into 2 parts, stripping their ends of the insulating material. After this, you need to twist the copper wires and solder them to the metal clamps, which should not touch!
Now you need to make an electrolyte. The solution is made at the rate of 1 tbsp. l. table salt per 0.5 liters of water. It needs to be poured into a plastic container.
After turning on the power supply, both clamps are immersed in water with all necessary precautions. The one that begins to hiss in the electrolyte is positive (the “+” sign), you need to attach a coin to it
The negative end of the power supply must be connected to another metal object, such as a regular spoon. In this position, the entire switched-on structure can be left for a long time, up to 4 hours. The approximate time is calculated depending on the condition of the coin and how dirty it is. After this, the current is turned off, the coin disc is removed from the liquid and washed in a warm soapy solution, and then wiped dry with a soft, clean cloth.
"Tilon-B"
This is an effective product that can dissolve patina, but it is very important to do it right. For 1 part of Trilon-B you need to take 10 parts of water.
You don’t need to make a lot of solution, just enough volume to immerse a coin in it. After immersion, you need to stand nearby and monitor the cleansing process. The duration of the procedure depends on its condition. After this, the coin should be washed with soapy water, easily and without pressure, cleaning it with a soft brush. Rinse and wipe dry.
Cigarette ash
The method is more likely to be a folk, non-standard one, but sometimes it turns out to be very effective. You will need ashes from smoked cigarettes and plain water. The contaminated coin is first moistened with water, after which ash is applied to it. She remains there for about 20 minutes. After this, you need to gently and carefully rub the ashes into the metal, and then rinse with warm water and wipe dry.
Ayran
The well-known fermented milk drink can also help in cleaning coins made of copper-nickel alloy. But this process will not be quick and gradual. The coin is placed in the ayran for 3-5 days, after which it is removed, rubbed with fingers and placed in a new composition. Each time the result obtained is evaluated to understand how many cycles need to be applied to achieve the desired effect. This is one of the methods, the advantage of which is that there is no reddening of the copper surface.
Cleaning with soda
Let us immediately make a reservation that for coins that, due to storage conditions (for example, buried in the ground) have a frankly bad appearance, this method is unlikely to be effective. You will need: baking soda (carbonate), foil, enamel bowl and boiling water.
Soda is poured onto the foil in an even layer of approximately 2-3 mm, and a coin (or several) is placed on it. The same layer of soda is poured on top. Now you need to fill everything with a small amount of boiling (not boiling water a minute ago, but boiling) water. The container is closed with a lid and left for 0.5 days. Depending on the neglect of the coin and the result obtained, you can repeat the cleaning several times. After that, everything is as usual - we take it out, wash it with soap (it’s a good idea to use toothpaste instead of soap), dry it or wipe it dry.
You should be prepared for the fact that in places where the surface is damaged it will not be shiny silver, but darker and more matte.
Types of coinage
Depending on the shape of the object and the complexity of the design, embossing can be:
- Openwork, similar in appearance to metal lace. The work begins with cutting out the background, then the final cutting is carried out along the prepared lines. Since the thickness of the openwork partitions is small, during annealing it is necessary to ensure that they do not melt. Openwork embossing is often applied to three-dimensional objects as a finishing touch.
- Contour, which is minted on sheet metal without a pre-applied relief. Visually, such embossing is similar to engraving, but differs from it in convex or concave shapes. This method is used for the manufacture of decorative elements of interiors and for applying ornaments to flat surfaces.
- On bulky objects. The most difficult type of embossing to perform, since the design is embossed on a curved surface. However, experienced craftsmen cope with the work without much difficulty.
- Embossed. It is also classified as a complex species. The work begins by punching out the contours of the design, then the image is made in relief. At the final stage, the image details are aligned and polished.
Essence of the process
The essence of the embossing technique is the impact of the hammer on the embossing tool. An imprint corresponding to its type remains on the metal.
By performing multiple blows, a relief is obtained that matches the sketch. The shape of the design is conveyed with great expressiveness and accuracy, depending on the tools used by the embosser during the work process. At the same time, the quality of work depends on his qualifications and skill.
Each master has his own style of work. Metal stamping on non-ferrous and ferrous metals differs in type and technology.
Coinage of the Peter I era
The great tsar adored everything advanced and intensively introduced mechanized production, including in the coin business. The order of minting also changed, becoming cyclical. The required batch of metal was issued from the treasury to the mintmaster, who ultimately had to hand over a batch of coins that exactly matched it in weight. The lot usually amounted to 120 poods of silver.
The minting process itself included bringing the issued precious metal to a certain concentration and an acceptable amount of copper impurity. After this, the silver was melted and poured into molds. The sheets removed from the molds were rolled and rolled to achieve the desired thickness. Human or horse-powered edgers were still used to cut blanks from the resulting sheets. After weighing, the weight of each workpiece was brought to the norm by adjustment or re-melting; the discs corresponding to the weight norm were allowed to proceed to further stages of minting - they were edged and then sent for embossing.
It is noteworthy that from that time on, coinage began to be called not only their pressing using impact force, but also any other method of obtaining the desired shape and image of a metal disk.
Various types of products
Embossing is widely used in the production of products for various purposes, from sheets of metal of different grades. It is widely used in the decoration of buildings inside and outside. This operation is used in the production of metal utensils, decorative manels, and jewelry.
Forging products
When creating products, craftsmen use special techniques, for example, chasing grapes. There are many secrets in this business that are often passed down from generation to generation.
Paintings and interior elements are produced in embossing workshops. In addition, some craftsmen carry out work on the production of paintings that consist of several layers, including those that consist of several metals. This combination gives the composition multicolor.
Embossing on three-dimensional products
In embossing workshops, fragments are also produced that can be installed in furniture made from solid wood and various types of panels.
A special type of coinage is frames for icons; in addition to drawings, precious stones are fixed on their surface.
For as long as coinage has existed, separate styles have developed (Caucasian, Eastern, etc.). Modern masters use all previously developed styles and at the same time develop their own.