How is ultrasonic testing carried out?
The method is more often used to control the strength of welds. An ultrasonic weld flaw detector operates on the following principle. Certain deformations, called acoustic or elastic waves, propagate into the thickness of the metal. They come in several types:
- infrasound;
- sound;
- ultrasonic;
- hypersonic.
During the propagation of ultrasound, the medium through which it diverges performs measured oscillations relative to the equilibrium point. Longitudinal and transverse vibrations can act in solid bodies. Both types of waves allow you to control the strength of welds as accurately as possible. The speed of delivery and propagation of ultrasound directly depends on the strength and internal environment of the material under study. The intensity of the sound waves can be controlled.
As the sound wave travels, its intensity subsides. The density of the material can be judged from the rate at which this occurs. The device shows the ultrasonic attenuation coefficient, forming it based on their scattering and absorption indicators. The accuracy of the readings is high, which allows you to get a clear picture of the quality of welds, metal, and other solid materials.
How does an ultrasonic weld flaw detector work?
Science knows only a few ways to work with ultrasonic devices to control the density of welds and other metal compounds. Their differences are only in the method of assessing the information received. Any type of data assessment complies with the current GOST.
Kerosene
This method can be described as the simplest and cheapest, but this does not reduce its effectiveness. It is carried out using this technology.
- Clean the joint of two metal blanks from dirt and rust on both sides of the seam.
- On one side, a chalk solution is applied to the seam (400 g per 1 liter of water). You must wait for the applied layer to dry.
- Kerosene is applied to the reverse side. It is necessary to moisten generously in several approaches for 15 minutes.
- Now you need to observe the side where the chalk solution was applied. If dark patterns (spots, lines) appear, it means there is a defect in the weld. These drawings will only expand over time. Here it is important to accurately determine where the kerosene comes out, so after the first application of it to the seam, you need to immediately carry out observation. By the way, dots and small spots will indicate the presence of fistulas, lines - the presence of cracks. This method is very effective for connecting connections, for example, pipe to pipe. It is less effective when welding overlapping metals.
Ultrasound source
Despite the different methods of collecting analytical data, ultrasonic metal flaw detectors use a similar method of operation. The main part of the device is a plate made of quartz or titanium barium. The plate is located in a special probe (search head). The probe is slowly moved along the surface under study, recording the wave extinction coefficient. The wave is supplied due to the action of an electric current, as a result of which ultrasound beams are generated. Based on the data obtained, we can talk about the density of the connection, the presence of defects, cavities, cracks, and other unnecessary deformations.
Ultrasonic testing equipment: operating principle
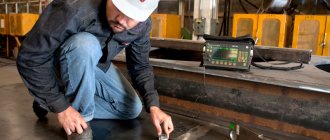
Devices used for ultrasonic testing of pipes and metal structures operate on a similar principle. The main working element is a piezoelectric sensor plate made of barium titanite or quartz. The piezoelectric sensor is located in the probe - it is placed along the connections and smoothly moved in a reciprocating motion. While the probe is moving, a high-frequency current flows to the plate, which is why it emits ultrasonic vibrations perpendicular to its length.
The reflected waves are received by the same plate with a receiving probe. It converts the oscillations into alternating current, which immediately rejects the wave on the oscilloscope monitor. As a result, an intermediate peak appears. During ultrasound diagnostics, the sensor sends short alternating pulses of elastic vibrations with different durations, which are separated by pauses. Due to this, the presence and depth of the defect is determined.
Diagnostic stages
Before starting the study, it is necessary to clean the metal from corrosion, paint, and other foreign matter. There is no need to clean the entire surface. It is enough to maintain a gap of up to 70 centimeters. In this form, the material is already ready for diagnostics, but it would be better to additionally ensure ultrasound permeability. For these purposes, grease, oil, glycerin, and other liquids containing fatty inclusions are used.
Before starting work, an ultrasonic weld flaw detector must be configured to achieve specific goals. There are several options here:
How to achieve the most accurate research results?
To obtain more accurate data, it is necessary to move the flaw detector probe in a zigzag manner along the surface of the material being examined. In this case, it is advisable to rotate the probe at least 10-15% around the axis of the metal. If the device emits any uncharacteristic vibrations, it is necessary to turn the probe as far as possible in the indicated place so that it becomes possible to accurately determine the dislocation of a poor-quality connecting seam. The search continues until the location of the matter where the ultrasound peak is highest is determined.
It should be taken into account that the ultrasound diagnostic device may produce errors due to wave reflection from the seams. For this purpose, additional research methods are used. If several diagnostic methods lead to the same answer, you can record the defect by recording the coordinates of the flaw. Equipment manufacturers, based on the requirements and rules of GOST, recommend diagnosing the same object at least twice with different devices.
The data obtained during operation of the ultrasonic flaw detector is recorded in a special journal or table. This allows you not only to quickly eliminate a flaw in the connection, but also to speed up re-diagnosis, because potential problem areas are already known.
Training and certification of specialists
Ultrasonic flaw detection specialists are trained and certified in special certified organizations. There are 3 levels of qualification for flaw detectors.
Level I is assigned to beginners whose work will be carried out under the supervision of a specialist with level II or III. A first-level specialist cannot independently choose a control method, evaluate the results, or select technology and mode.
Level II flaw detectorists can independently carry out and supervise the work. Make a decision on the choice of control method, methods, technologies, and also evaluate the control results. They can develop technological maps and approve them.
Level III flaw detectors can supervise the work of level I and II flaw detectors, conduct training and certification.
Defects that are accurately detected by ultrasound diagnostics
Inspection of welding seams, carried out using ultrasonic devices, gives a clear picture of the situation. Correctly performed work with the device almost 100% guarantees the accuracy of answering questions. But, nevertheless, the scope of use of the equipment has some limitations.
Problems that can actually be detected by an ultrasound sensor:
Diagnostics is most accurate if applied to the following types of metal:
Sutures that can be examined using ultrasound can be:
Vector-50 (NPC "Kropus")
at a price of 280,000 rubles.
Vector-50 is a model of an eddy current flaw detector from a constantly updated line from the Kropus Research and Production Center. This is the largest Russian manufacturer of NDT equipment, so its products could not fail to be included in our review.
Model features
The device is universal, because Supports any eddy current and impedance converters. This makes it possible to assess the condition of metal, carbon fiber and composite products, to identify surface and subsurface cracks and discontinuities in them. The device can be used as a thickness gauge and to determine the electrical conductivity of non-ferrous metals.
In addition to its compact dimensions (200x225x80 mm) and low weight (1.5 kg), the equipment has a color display with a resolution of 640x480 pixels and connects to a computer via USB. The device memory can store 100 settings and 500 control protocols.
Among the features is the display of the signal on the display in two planes: complex and amplitude-time. Various signal visualization modes are available. There is also the possibility of separate amplification along the abscissa and ordinate axis. The device can be used with rotary transducers for hole inspection.
The flaw detector is powered from a 220V network or battery.
In the second case, the maximum battery life is 10 hours. Technical characteristics* Vector-50
| Parameter | Meaning |
| Operating mode | standard, synchronous, frequency scanning |
| Gain adjustment, dB | 0-70 in steps, 0.1, 1, 2, 6 or 10 |
| Frequency change, Hz | 1-20×106 in increments of 1, 10, 100 or 1000 |
| Low-pass/high-pass filter, Hz | 5-1000/2,5-500 |
| Types of suitable converters | rotary, absolute, differential |
| Operating temperature, °C | -30…+55 |
| Dimensions, mm | 200×225×80 |
| Weight, kg | 1,5 |
*See the full list on the official website.
See how this flaw detector works in tandem with a rotary sensor to detect surface cracks in bolted process holes:
Field of application of ultrasonic flaw detector
Such devices are in greatest demand in the manufacturing sector. The diagnostic service can also be ordered privately to control welding seams during the construction of buildings, reconstruction of residential and industrial premises. Seam inspection is indispensable when you need to determine the degree of wear of water and gas pipes. Owners of the oil, chemical and engineering industries are actively purchasing equipment. Portable ultrasonic flaw detectors are used by geologists in the field, as well as laboratory assistants to examine small objects.
Ultrasonic flaw detector: price, delivery
The site presents the best models of devices. The range of prices and functionality will pleasantly surprise the company's clients. You can clarify the exact cost of a flaw detector by using the electronic communication form, indicating the exact model of the device. All models of diagnostic equipment are described in detail. Here visitors will learn information about the manufacturer, functionality, dimensions, and area of application of a particular flaw detector. Additional questions should be clarified with the consultant.
The price of any ultrasonic flaw detector also depends on the manufacturer. The entire range of the site is covered by a manufacturer's warranty. Targeted delivery to the regions is carried out. Free consultations are available to clients. Promotions and sales, information about which is regularly updated on the portal, will help you save.
VD-70 (NPK "Luch")
at a price of 220,000 rubles.
VD-70 is a simple and relatively affordable model of an eddy current flaw detector that allows you to determine the location of surface cracks and estimate their depth. Suitable for examining metal products only.
Model features
This is a very lightweight device (0.5 kg), housed in a durable aluminum case with IP63 protection degree. The display has a resolution of 320x240 pixels and occupies half the area of the front part of the case.
The device has a memory for 1000 studies and 300 program settings. The manufacturer offers several delivery versions: general, locomotive, wagon, for depot TR-2 and TR-3.
VD-70 operates from a built-in battery, the capacity of which lasts for 8 hours.
Technical characteristics* VD-70
| Parameter | Meaning |
| Depth of detected defect, mm | from 0.3** |
| Working gap, mm | up to 0.7** |
| Frequency, kHz | 10-250 |
| Radius of curvature of products, mm | from 12** |
| Operating temperature, °C | -10…+50 |
| Dimensions, mm | 170×85×35 |
| Weight, kg | 0,5 |
*See the full list on the official website.
** depends on the type of converter.
The video below shows the equipment of the previous version of the device. It has not changed, but the flaw detector itself has become more compact and ergonomic:

