Home / Devices
Back
Reading time: 2 min
0
3986
No one will be surprised to hear that a welding machine is used for welding - this is the simplest and most logical description of its functions. A professional welder will tell you what the welding machine is for and explain how to use it.
But not everyone can imagine that an inverter often has very useful additional functions.
This article talks about welding inverters with a start-charging function. Explains how to properly use them to charge and start a wide variety of devices.
- general information
- Features of application
- Application
- Conclusion
general information
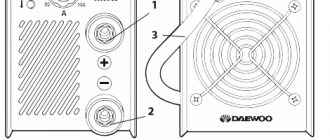
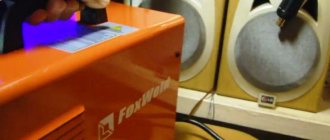
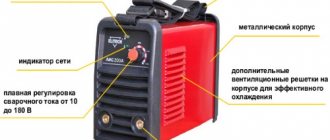
Some welding inverters can perform a starting-charging function. And this does not depend on the level of their use - be it domestic or professional. The SVIZ 200AP caliber is just such a multifunctional device.
Of course, it is very convenient when the same device can be used for welding, to charge the battery, and to start a car. So many functions performed by one compact device! Caliber SVIZ 200AP and other devices of this type are launching and charging units.
Any batteries can be connected to them for starting and charging. You are lucky if you have such an inverter - you have the opportunity to resolve many difficult everyday situations on your own, without calling specialists.
For example, starting a car engine in severe frosts, charging the battery at home. And, when questions arise: “is it possible to use a welding inverter as a charger?” - we will answer: “Yes! Certainly! If it is equipped with such a function as the Caliber SVIZ 200AP we presented!”
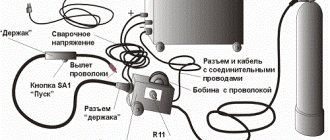
How to weld using a battery
It should be within 200 - 280 mA. If necessary, it is adjusted by selecting turns. The transformer should be run for a while to check how hot it is. If heating does not occur, wind the secondary winding. Before this, the core is also carefully insulated.
For the secondary winding, you need a wire with a cross-section of 10 mm2, the number of turns is from approximately 15 to 20, it is selected experimentally so that the output voltage is approximately 16 Volts. Power diodes must be installed on radiators to cool them. All parts are mounted on a PCB plate. A fan for cooling, as well as measuring instruments, are installed in the finished case.
We tried to answer your question about how to make a starting charger for a car with your own hands. The simplest circuit of such a device is considered, however, when using it, certain rules must be followed so as not to prematurely damage the battery or radio-electronic products installed in the car.
Application
Before using the welding inverter for charging or starting, make sure it is equipped with these functions. A regular welding machine is not suitable for this - it is simply not designed for this.
The welding inverter operates in a mode that produces 50 volts of voltage, from which the battery will simply burn out. If the unit has a start-charging function, then it is possible to switch it to the reduced voltage mode required by the battery - 12 or 24 Volts.
In addition, you can also adjust the Amperes - the recommended ratio is 1 to 20, that is, when set to 3 Amps, we charge the battery with a capacity of 60 Amps. It must be remembered that the inverter must be configured before use. The unit can perform the charger function only after switching to the correct mode.
Homemade inverter from power supply
Specifications
The device that you can assemble according to the instructions given in the article belongs to the category of resonant ones. The maximum welding current is 120 Amps, the minimum is 5 Amps. Voltage – 90V. When welding with electrodes with a diameter of 2 mm, the machine works without the need for a break, and when working with 3 mm rods, 2 minutes of rest are required with a 10-minute welding cycle. But keep in mind that these numbers may vary depending on the temperature and humidity of the environment.
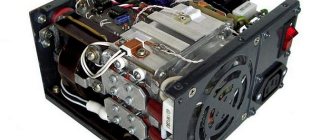
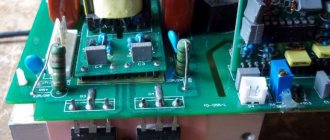
The weight of the device does not exceed 2 kilograms, so you can carry it without difficulty. There is a smooth adjustment of the current strength and a falling characteristic. Consists of 4 boards (main board, capacitor board, power board and control unit). From our experience, we can say that this device is excellent for simple country house and garage work.
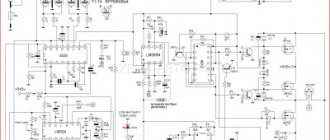
Homemade inverter circuit
Required Parts
First, a little theory. Let’s say right away that making a welding machine from a computer power supply is not the best idea. An inverter and a power supply are two radically different devices. The power supply unit, of course, can be rebuilt to work as an inverter, but this is very difficult and the finished device will not be very efficient.
Therefore, we recommend using only the case itself from the power supply. Some parts can be found on the radio market, and the rest can be taken from an old PC.
Let's move on to the details themselves. We need a power transformer that can be assembled from three E42 type cores. We recommend installing them vertically. E42 cores can be obtained from an old monitor.
We also need a throttle. It can be assembled from two cores, which can also be found in an old computer monitor. The remaining cores are ferrite, type 2000 NM. Power transistors and diodes can be taken from the same monitor. You may have to buy a couple of transistors along the way, but they are very inexpensive. Also buy two electrolytes and a diode bridge.
Additionally, you will need a control power transformer, a PWM controller such as SG3524 and a relay from an unnecessary uninterruptible power supply, which is found in every computer.
Assembly Features
It is necessary to thread ferrite tubes onto the output wires to smooth out the shape of the sinusoidal rectified voltage. Such straws can be found in Samsung brand cash registers. There they are used as filters. In this case, the waves are smoothed out without problems if the inductance does not exceed 5 mkH.
The power part of such an inverter is rarely overloaded, and the arc length does not exceed 4 mm due to the low open circuit voltage (without voltage boost). You can add a voltage booster to the winding so that the arc is ignited without problems and burns steadily.
Current transformers must be connected only to the secondary winding, since in the primary the current is maximum and it flows only at the moment of resonance. are switched on in the secondary since the maximum current is in the primary winding.
Additionally, using a field-effect transistor type IRF510, you can make a manual start of the device and provide an anti-sticking function. The input of the “Shutdown” microcircuit must be broken using a transistor (in the event of a short circuit), a temperature sensor or a power switch.
The operating principle and detailed setup of this homemade inverter are described in great detail in the book “Inverter Made Simple,” which is easy to find on the Internet. Check it out for yourself.
Battery welding
Starting current indicator up to 600 A.
- Starting chargers. Combines the functions of the other two types. These are portable devices with a control panel and charge level regulator. They can gradually reduce the supplied current as capacity is restored; when the battery is fully charged, they can automatically turn off.
Battery chargers can be pulse and transformer . The first ones are small in size and consist of an inverter and a protective element that prevents short circuits. The latter are equipped with a voltage rectifier and transformer. This makes them more bulky. In terms of ease of use and technical parameters, pulse charging is better suited for modern cars of domestic and foreign production.
Characteristic
Main parameters of recharging equipment:
How to make a welding machine from a car battery
I started welding with 2 mm electrodes, and at first I even burned a few holes in the metal because the current was too high. Then I welded with 2.5 mm electrodes, but the current was still too high and I had to cook very carefully so as not to burn through the thin 3 mm metal. I even cut such metal freely with electrodes. Then I didn’t have any other electrodes, but I think 4 mm electrodes would have gone freely under such a current. Overall it cooks great
except that the current is too high, which there is nothing to limit. But you get used to it, and it’s quite normal to brew something even serious.
But it’s better not to deeply discharge the batteries, otherwise they will deteriorate quickly, but the high current will do them no good. I will say that from three 90Ah batteries you can easily burn 15-20 electrodes each and the batteries do not discharge much, and such a number of electrodes is already decent.
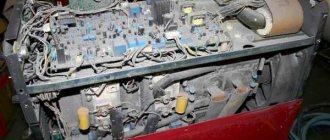
Below are some photos of batteries and welding
This is what the batteries themselves look like when they are connected in series; my welding wires are 35 kW.
These are actually 2 mm electrodes
Electrodes 2.5 mm
In this photo you can see the penetration from the back side, I didn’t specifically photograph the welding process itself, so I didn’t capture the welding quality specifically, but overall it cooks well.
And here is the result of the welding, the frame for the wind generator is welded.
If anyone is interested in the wind generator itself and welding, I wrote an article about making a wind generator and there is a video there where you can see what I did and how I welded it. That's all, if there is anything new I will write in the following articles.
E-VETEROK.RU wind and solar energy - 2013 Email: [email protected] Google+
Pure Sinus Perm:
Nice channel, just beautiful.
Pure Sinus Perm:
Well done, make more videos like this about three-phase power supply. Make a video about chickens and how many eggs they lay.
isak nyton:
Well, what did you film, you didn’t even show the trans
Anatoly Anatolyevich:
Well done