Even minor accidents can result in quite large financial costs. When contacting workshops, a high price may be charged. You can eliminate body deformation, remove cracks and damage, restore paintwork and polish car headlights with your own hands. To do this, you need to have the necessary tools, resources and a little time in reserve.
Types of body repair
At home, restoration is carried out using several methods :
- Difficult.
- Local (small).
- Painting and polishing.
Do-it-yourself body repair requires careful preliminary preparation. It is recommended to study the sequence of actions and watch the video “How to do body repairs yourself.”
Complex repair
Complex auto body repairs done by yourself involve straightening various dents. If necessary, damaged elements are replaced, for example, wings, geometry is restored and semi-automatic welding is carried out.
Minor repairs
minor car body repairs are used to correct small dents, chips and scratches . Otherwise, they may lead to the appearance of pockets of corrosion (rust). Minor car repairs with your own hands are carried out only after the end of the warranty period .
Bodywork includes:
- Geometry restoration is carried out after dismantling all removable elements.
- Removing dents and signs of corrosion, patching holes and removing all defects. If there are hopeless elements, they are replaced.
Polishing and painting
Body repair and painting are stages that require special attention. You should not clean a surface that is larger than the damaged areas. The final stage of do-it-yourself body repair and painting is applying the paint using a compressor.
To polish on your own, after the paint has dried, it is recommended to use a sander.
Do-it-yourself tin work
If you have straight arms, bending tin and making pipes out of it is quite simple!
Making a pipe from tin with your own hands is an excellent alternative to buying an expensive drain or ventilation casing. In practice, the savings turn out to be colossal, and if you consider that having mastered the technology, you can literally “stamp” pipes of any (okay, almost any) diameter - then it’s definitely worth reading my tips and at least trying to implement them in practice!
Below I will talk about what we need to form the pipe, and also describe the algorithm by which I have been successfully bending tin products for five years.
Tough as it is
So, let's start our review of the technology with an analysis of the material. We will bend a pipe from tin:
- The basis of the tin sheet is steel that has been processed in a rolling mill. As a rule, sheets with a thickness of 0.1 to 0.7 mm are found on sale - the thicker, the higher the price.
Rolled products from which sheet metal is cut
- To protect against corrosion, the steel base of the tin blank is coated with a material that prevents oxidation of the metal. Most often, compounds of chromium, tin and zinc are used for this.
- At the final stage, the product is cut in accordance with standard sizes. Most often, construction stores sell tin blanks with a width of 512 mm to 2 m, but if necessary, you can find or order wider parts.
Blanks for work
This metal has obvious advantages:
- The small thickness ensures a reduction in the weight of tin products.
- Surface treatment quite effectively protects the steel base from corrosion upon contact with environmental factors.
- Thin metal is cut well, and very powerful tools are not required for processing - hand scissors are quite sufficient.
- Rolling and heat treatment of blanks during the production of sheet metal provide them with high ductility. Thanks to this, sheets and strips bend perfectly along a minimum radius without the risk of cracking.
The downside of the flexibility of sheet metal is low bending strength, therefore, when manufacturing open parts, stiffeners must be added to their design. However, this does not concern our situation: the pipe itself holds its shape perfectly.
Tinsmith's tools
As I already noted, tin is a soft and plastic material that is processed quite simply. But this simplicity also has a drawback: a metal tool not only leaves marks on the surface of the sheet metal, but can also damage the protective layer upon impact, causing the development of corrosion.
That is why the following tools are used to work with tin and thin galvanized steel:
- metal scissors. I use the most common, spring-loaded ones with not very long handles - with relatively little effort they cut 0.7 mm steel perfectly;
It is very important that the blades of the scissors are sharp, otherwise the edges of the workpieces will turn out uneven, and we will have to spend time and effort removing the “fringe”.
Shears for galvanized steel
- hammer with a rubber/rubber-coated striker. Why rubber is needed is already clear - to prevent metal from hitting metal;
- mallet - in principle, performs the function of a hammer with a rubber attachment. Both tools are interchangeable, which does not prevent me from having both a mallet and a hammer at my disposal;
- pliers (several pieces, different sizes). They are used for bending metal, since it is impossible to grasp the short edges of a sheet or strip with your fingers, despite all its plasticity;
Photo of a standard mallet
- calibrating blanks - steel pipes (I have two, with a diameter of 50 and 100 mm) and angles. Used as templates for bending round and rectangular parts, respectively;
- measuring instruments - ruler, tape measure, level and compass;
- Marker - A sharpened steel rod that is used to mark tin sheets. You can buy or sharpen a two-hundred nail.
You can use a center punch for marking
- a workbench is the most necessary thing. The workbench functions as a place for marking the cutting stand, a work table - in general, it is on it that we will perform all the work.
Of course, this set will only be enough for us to make several pipes - up to two or three dozen. If the work is large-scale, then you cannot do without at least a sheet bender - a device that allows you to bend large metal blanks evenly.
Step 1. Preparation
Instructions for making a pipe from tin begin with a description of the preparation of the workpiece:
Laying the material on the workbench
- On a workbench or other flat surface we roll out sheet metal, leveling it using mechanical action if necessary.
- We measure the length and width of the pipe by marking the material with chalk, marker or marker. When marking, we take into account that the width of the workpiece should be equal to the circumference of the pipe + 1.5...1.6 cm for forming a seam.
- We control the perpendicularity of the drawn lines using a square.
Cut to size
- We take scissors and make first a side and then a longitudinal cut. You need to cut strictly along the lines, trying not to make large indents. If the cut line “walks”, problems may arise at the stage of seam formation.
- Once again we level our workpiece. If necessary, tap the edges to remove waves and process them, removing burrs.
Stages of body diagnostics
Car repair requires a preliminary assessment, carried out in several stages:
- Determine body VIN code .
- Compare with the sample provided by the manufacturer.
- Step by step check the body parameters in areas that are problematic.
From Wikipedia: VIN (Vehicle identification number) - and vehicle identification numberconsisting of 17 characters, it encodes information about the manufacturer and characteristics of the vehicle, and the year of manufacture.
If a DIY car repair requires scanning the thickness of the paintwork, then brass, aluminum and ferromagnetic materials are used for this.
Geometry Alignment
The main tool used to restore a car body is a slipway. This tool is designed with high strength ratings, sufficient for heavy-duty work. The main action during leveling is tightening. It involves the use of a fastening system that acts on the points of the structure, under pressure on which the body part acquires its original shape. This task involves a high level of complexity, which is not easy to cope with without experience.
The jig provides the measurements needed to accurately carry out repair work. Geometry alignment is carried out in stages:
- Secure the vehicle to the slipway platform.
- After calculating the points on the machines, equipment is attached to them.
- Start the pile installation.
After starting, the slipway and equipment automatically pull out the damage in the desired shape. The equipment involves the use of a computer program that calculates the required level of effort and the measurement indicator of the rack.
The advantage of a pile installation is that it does not disturb the quality of the metal in fault areas when eliminating them.
Types of body damage
In order to make body repairs, you need to determine the type of damage :
- Deformation of individual areas.
- The appearance of cracks and destruction.
- Distortion of the shape of openings (windows, doors).
- Damage to anti-corrosion and paint coatings.
It is impossible to prevent the occurrence of operational damage. In order not to spend a lot of money on eliminating them, you can carry out body repairs yourself at home.
What is body repair
Body repair is a set of technological actions aimed at restoring the body. The basis of this process involves eliminating damage of any nature.
There are two types of body repair:
- full - used when eliminating large damage. Most often it is used when restoring a passenger car after an accident;
- local - used to detect scratches, chips and other minor damage.
Methods for restoring car tins
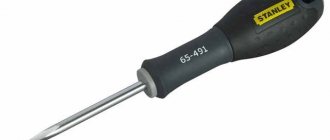
- If the metal is severely damaged , then to repair the body on your own you need:
- Use an anvil and a small mallet .
- Place the anvil on the outside of the dent.
- Make light blows with a mallet from the inside.
From Wikipedia: Mallet - carpenter's hammer made of hardwood or rubber
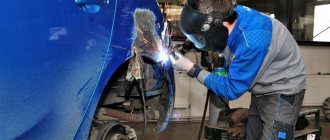
Geometry straightening
In case of severe deformations, auto body repair requires complete removal of the paintwork . In this case, to completely restore the body, you cannot do without a welding machine and an industrial hair dryer. Welding is carried out using graphite electrodes. First, the dent is straightened from the rim to the central part. To do this, the metal is heated and only after that they resort to a targeted effect. Thanks to this, the tin becomes pliable and plastic.
Correcting dents without painting
Restoring a car body with minor deformations can be carried out without repainting . In this case, the change in shape is carried out mechanically. The process takes a lot of time and involves exposure from the reverse side.
Soldering metal onto a dent
When independently repairing a body without pulling, the method of soldering special solder using a soldering iron, acid and flux (a chemically active substance) is used. This option allows you to eliminate defects and get an ideal result.
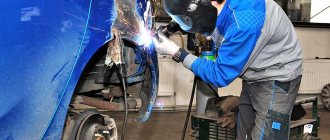
Spot welding method
Repairing a car in case of body damage involves correcting the entire defect from the outside. Using a welding electrode, metal is picked up in the deformed area. Extraction is carried out with a reverse hammer. The graphite electrode breaks off and the welding site is ground.
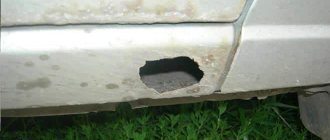
Welding a patch to the body
You can even eliminate through holes yourself . In this case, you need to completely cut out the damaged piece, and then weld the patch. If the areas of corrosion are not large, then the damaged areas are cleaned to solid metal.
Tin work DIY tin products
The joining of the edges of thin sheet metal is most often done in a lock - by clamping one edge to the other, but occasionally other methods are used, which may be needed more often in the work of a young master. These are the methods.
Connection methods
The edges of the sheets can simply be soldered. It is clear that this will be the most fragile method, especially if the metal sheets are thin. This will be a butt connection (1). Such a connection can be used where strength is not required, but an inconspicuous connection is required.
In thicker sheets, the butt joint is made with teeth (2). This is actually done not by tinsmiths, but by coppersmiths - craftsmen who make copper utensils, tanks, pipes, caps, etc. A butt joint can be made more durable by soldering a plate (3) on the inside.
This will be a butt with an overlay. A more durable connection is an overlap (4). One edge is overlapped with the other, the seam is soldered or fastened with rivets. But this connection already has a protruding edge, which is not always convenient.
You can bend the edges at one edge and at the other, hook them and compress them with blows of a mallet. This will already be a simple lock (5).
The most common connection method is a double lock (6). It's done like this.
One piece's edge is bent at a right angle, the second's edge is also bent, but in the other direction, and pressed against the piece, and then this edge is bent at a right angle in the opposite direction.
Both bent edges are connected to each other, bent towards the first edge, and the seam is pierced with a mallet. On the reverse side it will be smoother, which must be taken into account when connecting in this way.
How to make gutters and roofing elements from sheet metal with your own hands
The sequential progress of work is schematically depicted in the following figure:
Double lock (diagram)
All kinds of tin products are most often connected with a double lock.
Occasionally, tinsmiths use connections using rivets. However, this method is more often used when it is necessary to rivet a handle, eyelet, strip, etc. Occasionally, rivets are used to strengthen the seams into an overlay and a simple lock. They are usually riveted with small rivets, preferably with wide flat heads, using a cold method.
For rough work, tinsmiths prefer rivets rolled from a piece of tin. To make them, you need to have a piece of iron with holes of different diameters, or a riveter. A diamond-shaped piece of tin is rolled up into a pound using a hammer or pliers, inserted into a riveter, into a hole of a suitable diameter, and the head is riveted.
These rivets are soft, but, of course, do not have the neat appearance of solid rivets.
Tin rivet
Almost all work with thin metal is based on the plasticity of the metal, its ability to bend and flatten. But the master must skillfully use his tool, otherwise these same properties will be detrimental to the work. How and why will be seen later.
The main and very first job of the master is the ability to bend the fold, in other words, to bend the edge of the sheet. The work is simple, but also very responsible, since further processes depend on it.
It is necessary to bend the fold for a variety of needs: for seam connections, for edges, for inserting bottoms, and others. It is necessary to ensure that the metal only bends, but does not flatten in any way. If the metal is flattened in the bend, it will expand.
The edge of the fold will come out curved and the surface of the sheet will warp.
In rough work, where the fold is bent wide, this has almost no significance. But where greater precision and grace are required, it will be very noticeable. Let us explain with an example what we can achieve.
Suppose we want to make a tube out of tin and connect it with a double lock.
They bent the folds with an iron hammer, began to roll up the tube and connect the seam, but it turns out that the seam is very difficult to connect; the folds turned out to be bent due to riveting the metal with a hammer.
Riveted seam
Therefore, folds should always be bent with a wooden mallet on the sharp iron edge of a crowbar, iron strip or corner of a scraper.
The work happens in this order. First of all, draw a fold line with a thicknesser. The thicker the metal and the rougher the work, the wider the fold can be taken (10-20 mm, on thin sheet metal the fold is 3-5 mm). Place the sheet on the edge of the scraper (or devices replacing it) along the fold line, and with quick and precise blows with a mallet, beat off this line, first at the ends, and then along the entire length of the fold.
Rebate
Then they bend the edge of the fold at a right angle, place it with the outer side on the anvil and straighten it with the inner side with blows of the mallet.
Let's assume that you need to bend the fold of a tin cylinder.
Making a fold on a cylinder
It is clear that the diameter of the outer edge of the folded fold will be larger than the diameter of its inner circumference. Consequently, the metal must be riveted along the entire fold, stronger at the outer edge and weaker towards the cylinder.
The fold must be bent with an iron hammer. The cylinder is taken in the left hand, the width of the bend is marked from the inside with a thicknesser and applied to the edge of the support or crowbar at an obtuse angle, after which it is struck on the future fold with the toe of a hammer, beating the fold line and riveting the edge. Light blows of the hammer are directed so as to rivet the outer edge more strongly.
Having gone around the full circle, reduce the angle of inclination of the cylinder, placing it steeper towards the anvil, and continue working in the same order. It is repeated again and again, decreasing the angle of inclination to a straight line. With such gradual knocking out, the fold will be bent at a right angle, and it will not burst anywhere. The bent fold is placed on the slab and straightened with blows of a mallet.
To such a cylinder with a rebate, you can already attach the bottom with a double lock, only at the circle for the bottom you need to bend the rebate or solder the bottom with solder.
Rebate fold on mug
Just as the fold on a cylinder is bent, this is also done when the edge of a tin product needs to be strengthened and made thicker by rolling wire into it. The work is carried out in the same order, but with a mallet and without beating off the sharp edge of the fold. The bend should come out smooth, you need to make a flap on the metal, calculating the width of this flap based on the thickness of the wire that will fit there.
https://www.youtube.com/watch?v=90S6cMb7H50u0026list=PLL_d19CnB7lWHraCvrOIJby9noeJ9dqeT
Rolling up the edge
The width should be approximately three times the diameter of the wire, adding a little for the thickness of the metal. When the fold is bent at a right angle, it is bent back with a mallet, turning the cylinder on a round anvil. Then they place it on the stove, insert the wire and secure it with a few blows of the mallet on the lapel.
Using a mallet on a round anvil and a plate, the lapel is finally pressed and smoothed. Turning the product over with the edge up, straighten the rolled edge on top. If the lapel turns out to be not wide enough, it is now very easy to fix it by piercing it from above with a mallet and pulling the blow outward.
On products with straight edges, rolling the wire into the edge is, of course, even easier.
Among the techniques for processing thin metal, based on riveting and pulling out metal, a young master should definitely become familiar with hammering.
By hammering out a flat piece of metal, it is given a variety of convex shapes.
In this way, you can knock out the bottoms and covers of boilers, hoods and a variety of streamlined parts for model airplanes, skins for model ships, etc. Above we already had a similar job - this knocking out a bucket.
Tapping is a job that requires patience. You can't hit it once or twice with a hammer and get a good draw. It is necessary to slowly tap with a hammer, constantly moving the product, gradually increasing the depth of drawing and finally straightening and smoothing the surface of the product with light blows.
There are basically two ways to pull. The first method is when the metal is flattened on a convex anvil, starting from the middle to the edges. The middle will be thinnest, but the product will be convex. The work is carried out with an iron hammer. According to the second method, they are beaten out with a mallet or a hammer with a round end on a mandrel (matrix) having the appropriate shape.
Punching out on a mandrel
As an example, let’s take the beating out of the same bucket. On a wooden stick or thick board, you need to make several round notches of varying depths. They are cut with a semicircular chisel and then smoothed with blows of a round hammer.
A round piece of metal is placed over the first recess and hammered out with a hammer or round mallet until a properly rounded surface without wrinkles is obtained. The same technique is repeated in subsequent, deeper matrices. In conclusion, we will obtain a bucket according to the profile of the matrix.
With a different profile and a different cutting we could get a different shape.
Sometimes the young master will have to knock out longitudinal grooves on thin metal plates. The cross section of such a plate will be shaped, and the plate will acquire rigidity.
Plate with longitudinal recess
As in any other business, marking and cutting the material, starting work, is a very important operation on which further success depends. It is clear from this that this work requires special care and accuracy. The simplest job is to cut and make a simple open rectangular box with straight or radiating sides, with or without a toe.
Making a rectangular box
A rectangle of appropriate dimensions is cut out from a sheet of tin (a). When cutting, you need to take into account the bottom area and the height of the walls. Using a thicknesser, draw a line of folds. One corner is cut off if you need to make a sock in the box.
Turning the sheet over onto the board, use the toe of a hammer to cut off the bisectors of the corners at the corners approximately to the border of the future folds of the walls (b).
Turning the sheet over again, bend the sides (c) onto the edge of the anvil (piece of iron), but not completely. They are trimmed at the rectangular end of the anvil and bent with a mallet close to the wall (d).
The cut corner for the toe remains unbent; it is slightly flattened, making a groove out of it. The box is ready (d).
The work, as you can see, is not at all difficult, but it must be done carefully.
Cutting out and making cylindrical shapes will not present any particular difficulties.
For the cylinder, you need to cut out a rectangle with a height equal to the future pipe, and a length of 3.14 times the diameter of this pipe, with an increase for rolling the seam.
https://www.youtube.com/watch?v=BYckHlEbbTcu0026list=PLL_d19CnB7lWHraCvrOIJby9noeJ9dqeT
Cutting diagram for the seam of a cylinder or rectangular box
When making conical products (bucket, funnel and others), all working techniques will remain the same, only when cutting you will have to remember the geometry. All conical objects must be correctly depicted in the scan, and this is the most important thing.
Let's take the simplest cutting method. Let's try to make a conical bucket. First of all, you need to draw its middle section along the axis. It will appear in the form of a trapezoid; continue the sides of the trapezoid until they intersect.
The intersection point is the center from which two arcs are drawn - from the long base of the trapezoid and from the short one. You will get a ring, part of which will be used to make the surface of the conical bucket. The width of this ring is the height of the bucket.
You just need to remember to add more to roll up the top edge and fold the bottom.
Cutting a truncated cone
The length of the part of this ring we need is determined by the diameter of the bucket. Approximately three diameters with an increase for a double lock - this is what you need to take from the ring. Setting aside 3.14 times the diameter of the outer hole or bottom of the bucket along the upper or lower arc, draw a line along the radius.
The increases for the double lock are made parallel to these radial lines. This will result in cutting out the surface of the bucket. They also accurately draw any conical shape, be it a whole or a truncated cone: the height of the figure is plotted along the radius, and the length of the scan along the circumference.
P.V. Leontyev
Sequence of body work
When carrying out body repairs, as shown in the video, you must follow the sequence of actions:
- Geometry restoration.
- Carrying out welding and straightening work.
After completing the body repair of the car, paint and polishing is carried out:
- Cleaning and dismantling of external parts (bumpers, headlights and lighting equipment).
- Processing defective areas to bare metal with a chisel and sandpaper.
- Applying putty to an uneven surface.
- Next comes the sanding and priming stage .
Requirements
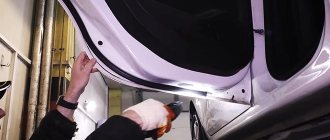
To carry out bodywork yourself, you need premises and equipment. The requirements for these conditions are determined by the characteristics of the repair. For one-time work, it is necessary to equip the room (usually a garage) with lighting. It is necessary to install both stationary and portable lighting fixtures, carefully positioning them to ensure good visibility of the car from all sides. As for equipment and materials, their choice is determined by the type of body repair.
The requirements are highest if work is planned to be carried out regularly. Then the garage needs not only to be illuminated, but also insulated to ensure the possibility of repairs during the cold period. In addition, you should purchase a device for restoring body geometry. It should be borne in mind that the cost of a branded tool is high, but you can purchase or create a homemade analogue.
You will also need many tools to perform various repair operations, and straightening hammers and a welding machine are required.
You can purchase them either in sets or individually. In any case, it is better to choose the most universal equipment possible. This will reduce the total number of tools by using each of them to perform different jobs.
To carry out particularly complex repair work at a high level, equipment such as laser tools for monitoring body geometry and an ultrasonic flaw detection apparatus is required. However, if you plan to do minor body repairs yourself, it is not advisable to purchase such expensive equipment. Even with complex but one-time repairs, the costs will most likely be unjustified.
Parts and supplies should be purchased as needed. It makes no sense to store all the spare body parts in the garage. In addition, purchasing them should not be a problem for most car models, with the exception of particularly rare ones, since there are many such products on the car market, both branded and non-original. Features of workplace organization can be studied in the video.
Required tools and materials
Before you do car repairs yourself, you should get everything you need:
- Hammer, keys and measuring devices.
- Homemade slipway with a purchased hydraulic unit.
- Sander and sandpaper (#60 or #100).
- White spirit, primer and polish.
From Wikipedia: a slipway is a floor-mounted system for straightening a deformed car body, acting with the help of multi-ton pressing and tensile forces.
Restoring the body can be done without any problems if you have basic welding and straightening skills. The actions performed do not depend on the car brand. Carrying out body repairs and painting in-house can save you time and money.
How to make a tin pipe: a process of 8 technical steps
Tinplate is a material that belongs to rolled products. This is a type of sheet steel. After rolling, the sheet is treated with anti-corrosion substances.
In order to make such a pipe you will need only 2-3 tools
For heating equipment, you can make tin pipes for the chimney yourself . This material is elastic, so it is processed manually. In addition, steel is characterized by rigidity and strength, so tin products of special strength are made from it.
Features of working with tin: how to bend a sheet of iron and cut it
To create products from tin with your own hands, it is worth familiarizing yourself with some of the nuances of working with this material. Recommendations will help facilitate installation and create a structure in the shortest possible time.
- An element of the appropriate configuration will allow you to give the sheet of tin the required shape. Bending involves tapping using a hammer.
- To ensure an even fold, tapping is done close to each other.
- A special leather loop will help make cutting out a steel workpiece easier. This element is mounted on scissors and put on the fingers.
- After cutting, the edge is processed with a planer, which prepares the hacksaw material.
- Products made of tin sometimes need to be cut. This is done to give the product a shaped shape. This procedure is performed with a can opener.
In order for the material to be cut well with a knife, it is cut with a hacksaw, and then a knife or scissors is used.
Tin work is simple and can be done independently. The ability to make such a design will be useful in everyday life. A tin pipe is made simply; the main thing is to know certain nuances of the process.
Direct and secondary damage
Direct and indirect (secondary) damage can be divided. Direct damage is the area of the body panel that was in direct contact with the object that caused the damage. This place may have a violation of the integrity of the paintwork or a metal rupture.
Indirect damage has bent and distorted metal located in the area adjacent to the direct damage. Sometimes secondary deformation can be located several tens of centimeters from the area of direct damage. It is difficult to fully define and analyze.
When repairing damage, the repair method is determined by the possibility of accessing the damage from the back of the body panel. If there is access from both sides of the damage, then the straightening method is used with a hammer and support. If there is access only from one side, then other repair techniques are used, such as pulling with a spotter, using an adhesive system or a vacuum suction cup.
When repairing damage, you should try to choose the easiest path. Even if you have special equipment, this does not mean that it needs to be used everywhere and always. If possible, use simple tools, and if necessary, use more complex ones. Sometimes a dent can be squeezed out from the back side by hand, without any tool. It must be remembered that now automakers use fairly thin metal in the production of body panels, so it does not require much effort to restore the deformation.
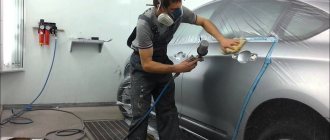
Painting and polishing
For painting in accordance with car repair technology, you need to use only substances intended for coating the surface of the car. In some cases, several stages of painting are required. After body repair and painting, the surface is thoroughly washed.
The painted car is polished. Sanding is performed using soft abrasives only after the paint has completely dried.