Required materials and tools
Before you start learning the assembly process yourself, it is first important to prepare the necessary tools:
- Screwdriver. You will need it to tighten various parts: bolts, confirmations, screws. With their help, prepared parts of the fittings are necessarily attached. There is an alternative method of assembly - using ordinary screwdrivers, but in this case the whole process can take a long time, and not every person has such an opportunity.
- It is advisable to immediately purchase drills of various diameters. In many construction stores they are sold as a set (from 4.5 to 10mm). This will also save time on searching for all the necessary materials, especially since such a tool may be useful in the future;
- A drill for confirmation is purchased separately. In this case, you can drill a 5 mm hole in a very short time. For steps without special costs, the hole expands to 7mm;
- In order to tighten the confirmat efficiently and tightly, it is recommended to purchase a hexagon. As an alternative, some home craftsmen use a screwdriver equipped with special bits, but with this design it is impossible to get into hard-to-reach places;
- Anyone who wants to assemble cabinet furniture should have a Forsnel drill, since it is used to tighten hinges and other fittings;
- Marking supplies: ruler, pencil or bright felt-tip pen, metal square, tape measure, stationery knife;
- Circular saw;
- Electric jigsaw;
- A hammer, preferably with a nail puller (will be needed if you need to dismantle individual elements);
- Construction hair dryer.
If the furniture does not have any special features, when assembling it is recommended to use universal diagrams that are designed for a drilling angle of 90 degrees. Unfortunately, such a device cannot be called a budget option, so such a purchase is only advisable when the assembly becomes a professional craft.
Other electric tools for cabinet furniture production
It is assumed that cutting chipboard to size is not done by hand. To design bevels, radii on some parts, to design cuts in the place for installation, as well as inserting a sink or hob, you will need a regular jigsaw with a wood saw or chipboard installed.
The edges of the chipboard after the jigsaw are processed with a grinding machine with fine-grained sandpaper and covered with PVC edges or melamine tape. In the first case, you will need a router, a hair dryer and special glue. In the second - a regular iron with a metal “sole” (aluminum can leave untidy whitish stains on the surface of the melamine tape) and a short knife with a wide blade for trimming excess (jamb knife).
You will not need another electric tool for the production of cabinet furniture.
Hand tools for making furniture with your own hands
Roulette
There is no need to explain why you need a tape measure and why you can’t make furniture with your own hands without it. Just note that the best option is to buy a tape measure 5 meters long, which has a lock to secure the tape to the desired size, saving you from having to unwind the tape measure again to the desired size.
Awl
An easy-to-use awl is this:
- thick
- with a rubber handle that is positioned horizontally
If you don’t find such an awl in stores, it doesn’t matter. You can do it yourself. To do this, buy a screwdriver (it is also advisable that it has a horizontal and rubber handle) and grind off its end.
Knife
Using a knife, you will cut off the remaining glued edges from the ends of the part. You can use any knife, but, as practitioners say, the most convenient one is a shoe knife. In any case, the knife should not be dull or too sharp. In the first case, you will tear the edge rather than cut it; in the second, you will cut the laminate along with the edge, thereby ruining the appearance of the product.
Square
You will need a square in case you need to make markings for holes. It should be metal 25-30 cm long.
Iron hammer
The main requirement for a hammer is that the lighter and smaller it is, the better. With a small hammer you can get into hard-to-reach places, but with a light one your hand will not get tired.
Rubber hammer
With its help, it is convenient to stuff a plastic profile or edging and carefully connect the parts on pins or dowels. It will definitely come in handy for those who intend to make not one, but several furniture products.
Clamps
Designed to fix parts. An excellent assistant in the manufacture of unevenly shaped parts. The best option is to have three clamps whose length does not exceed 10 cm.
Screwdriver
A screwdriver will help you unscrew fasteners that require tenderness and accuracy that are not inherent in drills and screwdrivers, as well as unscrew fasteners that the latter cannot reach. The best option is to have a screwdriver with a hollow handle, a set of bits, a reverse function and a ratchet. In general, the more screwdrivers of different sizes, the better. For example, a screwdriver 12-15 cm long is useful for unscrewing fasteners in narrow places. And large and medium ones will help you assemble furniture faster and more conveniently.
Pliers
They will come in handy in cases where you need to remove a dowel from a chipboard or unscrew the fastening on which the slot has worn out. There are no special requirements. The main thing is that it is convenient to operate them.
DIY tool for pre-assembling furniture and wardrobes
Before assembly, it is necessary to mark the parts and drill the joints for confirmation in the ends and front parts of the chipboard. This process will make further assembly much easier.
Also, preliminary marking will be required for attaching various lifting and sliding mechanisms, furniture hinges, shelf holders, rod holders and other fittings.
For the marking process, at the initial stage you will need all the measuring tools described above.
To add parts (drill holes) at home, you will need a simple hand tool:
- Drill. Drilling holes in furniture parts does not require a high power drill; 350W is sufficient. The main thing is that it is light and comfortable - after all, for large volumes of making furniture with your own hands, you will have to hold this tool in your hand for quite a long time. The drill will require a set of drills - confirmat, wood and metal drills 3, 4, 5, 7, 8, 10mm. And also Forstner drills 15 and 20mm for installing minifixes and eccentrics, 26 and 35mm for inserting furniture hinges, core drills 60.65 and 80mm for inserting lamps, plugs for wires (if required by the purpose and design of the furniture).
- Clamps and vices. Needed when assembling large-format parts and gluing (for example, when assembling furniture dowels). Also used for direct drilling in place, without preliminary additives, to evenly clamp parts in the desired position. It is better to use quick-release clamps. Homemade variations of clamps and vices are also useful for this purpose.
- Mallet. Used to install hidden fasteners (furniture dowels) and adjust conventional ones. Indispensable when inserting dense removable shelves into designated niches, since it allows you to precisely and without damage “fit” the parts to the right place.
- Hammer . Needed for attaching back walls and bottoms of fiberboard drawers to small nails. But many assemblers have gotten used to screwing fiberboard onto thin self-tapping screws. Or attach to staples using a construction stapler.
How to assemble furniture: instructions
The instructions for assembling furniture describe in what order and how to connect the elements to each other. You need to study it first, and then keep it on hand to refer to it as needed.
Next to you you need to lay out all the furniture elements, freed from film or bags, sorted by purpose, for example:
- main elements (for a cabinet this is the back wall and doors);
- secondary elements (shelves and drawers);
- accessories.
Assembling kitchen furniture may seem complicated, but it is not - just imagine it in the form of many cabinet elements. The work is carried out according to the principle “from large to small”, that is, first the basic elements are fastened together, then additional ones are added to them.
It is important to carefully monitor the correct selection of right and left elements, top and bottom. Even if the furniture does not have a clear pattern, mistakes will lead to the inability to open the door or the unsightly appearance of the finished furniture
If there is an internal divider in a section of a closet or chest of drawers, it must be installed before installing the top panel. During the process, you should constantly double-check the correct installation - measure the corners and diagonals of the resulting box. It should be smooth on all sides.
Lastly, the back wall is mounted, which is often made of plywood - it is screwed with screws around the perimeter
It is important to pay attention to the fact that the front side of the plywood or other material “looks” from the cabinet - the back side of the furniture will be facing the wall, so its appearance is not so important, but from the front side the back wall will be visible. The assembly of the beds ends with the installation of the side panels and backrest
Additional tool
A hammer drill is useful in the production or assembly of furniture.
This is a highly specialized tool with high impact power.
The main purpose is to drill holes for mounting and installation of built-in furniture.
Over time, a circular saw will be in demand in the carpentry workshop for cutting wooden panels, countertops and furniture panels.
The miter saw is designed for cutting at an angle.
In addition to wooden elements, this tool is used for cutting aluminum profiles.
High speeds ensure an even cut, without chipping or cracking.
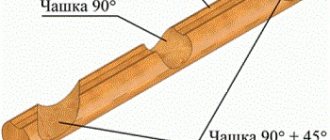
Using a miter box allows you to replace an electric saw with a regular hacksaw.
The miter box is designed for smooth cutting at different angles.
Consumable materials in furniture making
Furniture products have long ceased to play a secondary role in the interior. They are distinguished by a variety of configurations, functionality, and comfort. Modern interior items require a special approach to manufacturing. Often non-standard components are used in the production process:
- glass;
- stone;
- plastic;
- mirror;
- metal.
Their choice depends on the functional characteristics of the furniture and its operating conditions. The range of items used is wide. It allows you to realize any design idea. The design is made reliable not only by furniture tools, but also by basic materials that can withstand significant loads.
Chipboard (chipboard)
A combined name for several types of material. It is made by hot pressing wood shavings or sawdust impregnated with a non-mineral binder. Cabinet furniture is made from chipboard. The stove has many positive qualities:
Chipboard structure
- does not warp;
- does not dry out;
- does not swell in low humidity conditions.
Wood-based products differ from each other in their safety class
Experts advise paying attention to this when making furniture.
Laminated chipboard
Made using the technology of covering surfaces with special films. Depending on the sheet filler, the slabs acquire different textures. Laminated chipboard products are resistant to external factors:
- temperature changes;
- high humidity;
- mechanical impact.
Structure of laminated chipboard
Fiberboard (Fibreboard)
It is obtained by hot pressing of fibrous web. This is a thin, fragile material with good thermal insulation. Structural elements of furniture are made from it - the bottoms of drawers, the back walls of cabinets.
Fine fraction (MDF)
It is a type of fiberboard. It is distinguished by increased environmental performance, the possibility of fine processing, resistance to parasitic microorganisms, and durability. Allows you to apply different images to the surface and do embossing. The plate is suitable for partitions, door furniture panels.
Plywood
It is formed from an odd number of sheets of peeled veneer of different types of wood, using synthetic glue. Wood-laminated board comes in different thicknesses and formats. It is safe and easy to handle. It has a specific marking consisting of a two-letter code. The letters indicate the quality of the material. There are three categories of slabs:
- not amenable to grinding;
- processed on one side;
- processed on both sides.
Plywood furniture is beautiful, original, strong, durable, and resistant to external influences.
Decorative plastic
Widely used for cladding kitchen facades. It is used to glue wood boards under pressure. The material is used in two versions: cold-pressure roll plastic and high-pressure sheet facing plastic. The color range is very diverse. Plastic facades look aesthetically pleasing. Recently, an acrylic base has been used. Decorative plastic copes well with adverse conditions, including moisture, ultraviolet radiation, high temperatures, scratches, and impacts. Furniture made from this material is reliable and durable.
Tree
Wooden furniture is a luxury item. It has many positive qualities, including:
Wooden furniture
- environmental friendliness;
- high density;
- strength;
- wear resistance;
- durability.
The products are made from wooden panels of solid wood or constructed from thin plates. Wood species can be soft, hard, or especially hard. Each group has its own advantages and disadvantages. Softwoods are easier to machine, but are not as durable as hardwoods. What kind of wood is best to make furniture from is up to the craftsman to decide.
Other tools
- Self-tapping screws and confirmations.
Self-tapping screws and confirmations for furniture assembly
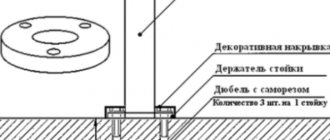
Rafix - eccentric couplers, which are used for fastening horizontal and vertical furniture parts.
Minifix is used for joining furniture pieces made of chipboard, MDF, plywood, solid wood
A drill for furniture hinges is used when assembling furniture in those places where it is necessary to install furniture hinges
This drill differs from other drills in that it drills an additional hole for mounting the confirmat head
Furniture tools are very different. They differ in size, functions, and purpose. This can come as a shock to a novice needleworker. It is difficult to know the features of each device, and even more so to decide on the fly where it should be used. But the right advice and practice will help you achieve your desired heights.
When creating such a specific creation as furniture, you need to get acquainted with another interesting group: consumables. These are any materials. They are unique in that they lose their properties during use. They are indispensable when twisting cabinet furniture.
Accessories
No furniture can do without high-quality and functional fittings - front and fasteners. The first type includes parts that serve only for decoration. This is an important part of the interior, which is always in sight. Facial accessories include:
- door handles;
- hooks for clothes;
- decorative locks and much more.
Depending on the design of the room, you can choose front fittings made of plastic, wood, metal or glass. There must be a special coating that reduces friction and protects against mechanical stress. Fittings of the second type perform the function of fasteners, connecting parts and increasing the reliability of furniture. It should be compact, durable and made of quality materials. This type includes:
- loops;
- shelf holders;
- bolts;
- mechanisms for drawing drawers;
- seals.
Door handles
Coat hooks
LocksHinges
Shelf holders
Bolts
Drawer pull out mechanisms
Seals
Types of consumables
- Jigsaw files. Thanks to removable files, it is possible to saw through chipboard.
Various jigsaw files
Quality bits for driving screws
You will need a Forstner drill bit to cut holes for overhead or internal hinges and holes for a minifix tie.
Screw and twist drills for wood for drilling through holes and holes in the ends of parts
Selecting a model for production
Conductors of industrial production can be highly specialized and universal. Templates of the first type are used to perform certain operations on typical parts. Universal devices are suitable for working with different materials and objects of various configurations.
Based on design features and functionality, conductors are divided into the following types:
- overhead - when used, they are applied to the surface in the desired area, fixed with clamps or held by hand. Used for drilling holes in flat parts;
- rotary - the working part moves in both vertical and horizontal planes. Used when working with elements of complex geometric shapes and to create holes, the axis of which must be located at an angle;
- tipping - used to create holes in perpendicular planes.
The conductor device can be specially created for a certain type of fastener: dowels, confirmations, screws, corners. There are devices to simplify the process of installing fittings.
According to the type of fixation, furniture jigs can be sliding or fixed. The former can be moved freely over the surface if necessary, while the latter are rigidly fixed in the right place. The presence of an adjustment mechanism will help to combine the device with different types of workpieces.
For large furniture manufacturers, the availability of a variety of additional accessories plays a decisive role, since they significantly reduce time costs. In this case, the cost of the tools does not matter much. A completely different approach to purchasing the necessary equipment from those who have a small furniture production facility or from independent craftsmen who produce certain types of furniture. In this case, making furniture templates with your own hands turns out to be much cheaper and more practical. The choice of the necessary options and the complexity of the device are determined not only by production needs, but also by the skill and experience of furniture manufacturers.
Overhead
Turning
Universal
Tools for furniture assembly
- Electric screwdriver. Indispensable for screwing in screws and attaching fittings.
A screwdriver will help you speed up the assembly process
Drill for drilling holes in chipboard, it is desirable that the drill has a reverse
Drills for wood and metal of different diameters
A jigsaw is needed for sawing off parts
You may need a rubber hammer if you need to knock something and put it in its place.
Hex key for confirmation for assembling cabinet furniture
Construction hair dryer for gluing edges
Furniture clamps for fixing, gluing, joining parts
A stapler will be very useful for stuffing the back wall of fiberboard
Remember to be vigilant and cautious when using these tools. Don't act hastily. It is best to invite an assistant.
Fixing tools have an important role in twisting furniture, and also as important “helpers”. These and other gear perform the function of installing fragile parts (mirrors and handles). They help attach and adjust doors.
Assembly features for different types of furniture
There is no single recipe for designing and manufacturing cabinet furniture. There are significant differences between how to assemble a wardrobe and a chest of drawers. A novice master will be faced with seemingly insoluble questions at every step.
Different furniture is assembled in different ways.
But with experience comes confidence in one’s abilities and understanding of the nuances.
Dresser
In this type of work, the assembly sequence is important:
- First of all, the frame is assembled;
- the side parts of the drawers are fastened to the front and back walls;
- attach the bottom;
- install the guides, having previously made measurements and marks with a pencil;
- then move on to additional elements, if any are present in the dresser model, for example, mirrors or decorative ornaments.
Standard assembly of a chest of drawers is a fairly simple matter.
Bed
The bed consists of a basic frame, base and headboard. Depending on the product model, the assembly may have features specified in the instructions.
Only by understanding all the intricacies of the process can you draw a conclusion about whether or not it is worth making such a bed yourself.
But the basic rules are common to all beds:
- first of all, install a base of three frames and a base;
- attach the legs to the frames and check the structure for stability;
- Next, the corners and shelves are fastened;
- connect the backrest to the frames;
- lay the timber for the mattress pad;
- tighten in the places indicated in the instructions with self-tapping screws;
- adjust the hardness of the bed by tightening the screws;
- if necessary, coat the finished product with varnish.
Closet
The cabinet is considered the easiest model to assemble.
You need to assemble the finished cabinet parts following the instructions.
Here the assembly technology is common to all:
- connect the shelves to the side walls;
- attach the back wall;
- make sure that right angles are maintained between cabinet elements;
- install and adjust facades;
- hang shelves;
- hang the doors.
Closet
The sliding wardrobe is a little more difficult to assemble compared to the classic one. Here you need to install a sliding door system and ensure the careful execution of each fastener and component.
A variety of materials can be used to make a sliding wardrobe - from natural wood to plasterboard.Otherwise, the entire structure may tilt and the doors will be blocked:
- assemble the base, if there is one;
- assemble the side walls;
- attach the back wall;
- check corners and diagonals;
- attach shelves, rods and drawers;
- install the upper guide rail;
- insert and adjust the door;
- install the bottom guide;
- stick on the sealing brushes.
It is easier to make a sliding wardrobe if it is a built-in option.
Kitchen set
The kitchen set begins to be assembled from the lower blocks.
Choose high-quality fittings for assembling your kitchen.
This is the basic rule that applies to all models:
- fasten the side parts with Euroscrews;
- insert strips to install the tabletop;
- attach the back wall;
- install and adjust facades;
- collect the top blocks.
TOP Rating
Below is a rating of the best models of screwdrivers based on the results of 2015
| Model | average price | Popularity |
| Bosch PSR 1200 | 2,200 rub. | 5 out of 10 |
| Bosch PSR 14.4 | RUB 2,730 | 3 out of 10 |
| Makita 6261DWPE | RUB 3,130 | 7 out of 10 |
| DeWALT DW907K2 | RUB 3,509 | 4 out of 10 |
| Hitachi DS12DVF3 (18 W) | RUB 3,660 | 10 of 10 |
| Makita 6281 DWPE | RUB 4,290 | 8 out of 10 |
| Bosch GSR 12-2V | RUB 4,375 | 7 out of 10 |
| Hitachi DS14DVF3 | RUB 4,464 | 4 out of 10 |
| Makita 6271DWAE | RUB 4,490 | 5 out of 10 |
| DeWalt DCD 940 B2 | RUB 8,680 | 1 out of 10 |
Manufacturing
To successfully make cabinet furniture with your own hands, you must carefully follow all the steps:
- preparation of parts;
- processing of sections;
- marking of fittings;
- installation.
Having completed the calculations and begun assembling the product, in no case should you work without a drawing or act at your own discretion. If a new idea arises, you should create another diagram that will take into account all the amendments.
Preparing parts
When working from scratch, you first need to cut out the furniture parts - thick paper or cardboard will do. Next, you will need a high-performance machine with a high cutting frequency. Having placed the workpieces on it, you need to cut the material, saving space if possible. This will help reduce wood costs.
Ready-made options can be found in furniture departments and on the market. In this case, no machines will be required. If the raw materials are not processed, then the parts must first be covered with self-adhesive film or special plastic.
Cut partsCut
Processing slices
Before you start assembling the parts, you need to glue the sections. For this you will need edge tape. Before work, you need to make sure that the humidity in the room is low - it is advisable to dry and warm the workshop well. You will also need equipment; a regular iron and a construction knife will do. Sometimes the edge is initially equipped with a sticky layer, then there is no need to further treat the surface.
During gluing, the iron should be kept at a short distance from the cut to prevent possible displacements and to secure all parts well. If you overexpose it, the edge may overheat and burst. When it is fixed, use a knife to trim the edge and smooth out all the irregularities.
Tape over the cuts. Trim the edge. Clean up any uneven areas.
Marking of fittings
Correct technology involves placing the finished parts of future furniture on a flat surface for marking. Following the plan, you need to mark all the places where the fittings will be attached. It is advisable to double-check the dimensions, since an error of 1 cm can distort the entire structure. Next, you need to make holes in the marked places and screw in the fittings.
Mark and drill holes Screw in fittings
What tools are needed to make furniture and built-in wardrobes at home?
The bulk of cabinet furniture is made from laminated chipboard. It can be equipped with elements made of MDF, wood, glass and other finishing materials. You should immediately think about what tools you need to make furniture with your own hands at home. Some stages of work require the presence of rather specific devices, and their absence will create unnecessary difficulties.
- Measuring tool for furniture making
- Tool for cutting and edging furniture parts
- DIY tool for pre-assembling furniture and wardrobes
- What tools are needed to assemble furniture with your own hands and then install it locally?