An apartment, and especially a private house, needs regular maintenance and repair work. A home handyman has to be a generalist, capable of performing many different tasks. Therefore, masters want to master as many technologies as possible.
One of the most in-demand skills is the ability to perform welding work. Practice shows that electric welding is best suited for beginners - the technology is simple and accessible to anyone who wants to learn how to use it. Before you start mastering the method, you should familiarize yourself with the theoretical aspects of the issue, don’t you agree?
All the necessary information is described in detail in our article. We described the principle of operation of electric welding and indicated which device is best to choose for working at home. In addition, the article provides a step-by-step technology for welding parts, methods for making seams, and also lists possible defects in joints.
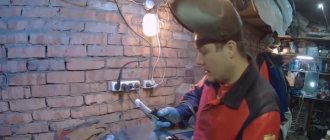
Electric welder at work
Yandex.RTB RA-1479455-2
Types of electric welding
An electric arc can be formed by both direct and alternating current. Welding transformers use alternating current, and inverters use direct current.
Working with a transformer is more complicated: the current is alternating, so the welding arc “jumps”, the device itself is heavy and bulky. The noise that both the arc and the transformer itself makes during operation is also quite annoying. There is one more problem: the transformer greatly “stresses” the network. Moreover, significant voltage surges are observed. The neighbors are not very happy about this fact, and your household appliances may suffer.
Inverters mainly operate from a 220 V network. At the same time, they are small in size and weight (about 3-8 kilograms), operate quietly, and have almost no effect on voltage. The neighbors won't even know you started using the welding machine unless they see you. In addition, since the arc is caused by direct current, it does not jump and is easier to stir and control. So if you decide to learn how to weld metal, start with a welding inverter. Read about choosing an inverter welding machine here.
Yandex.RTB RA-1479455-7
Welding technology
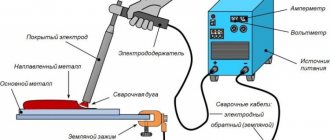
For an electric arc to occur, two conductive elements with opposite charges are required. One is a metal part, and the second is an electrode.
The electrodes used for manual arc welding consist of a metal core coated with a special protective compound. There are also graphite and carbon non-metallic welding electrodes, but they are used for special work and are unlikely to be useful to a novice welder.
When an electrode and metal of opposite polarity touch, an electric arc occurs. After its appearance, in the place where it is directed, the metal of the part begins to melt. At the same time, the metal of the electrode rod melts, being transferred with the electric arc to the melting zone: the weld pool.
How a weld pool is formed. Without understanding this process, you will not understand how to weld metal correctly
Yandex.RTB RA-1479455-3
During the process, the protective coating also burns, partially melting, partially evaporating and releasing a certain amount of hot gases. Gases surround the weld pool, protecting the metal from interaction with oxygen. Their composition depends on the type of protective coating. The molten slag also coats the metal, also helping to maintain its temperature. To weld properly, you must ensure that the slag covers the weld pool.
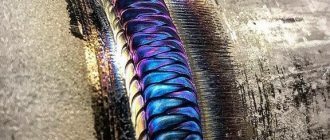
The weld is formed by moving the bath. And it moves when the electrode moves. This is the whole secret of welding: you need to move the electrode at a certain speed. It is also important, depending on the required type of connection, to correctly select its angle of inclination and current parameters.
As the metal cools, a slag crust forms on it - the result of the combustion of protective gases. It also protects the metal from contact with oxygen in the air. After cooling, it is beaten with a hammer. In this case, hot fragments fly away, so eye protection is required (wear special glasses).
Yandex.RTB RA-1479455-8
How to learn?
How to learn to cook with electric welding yourself? For training, you will need to properly prepare your workplace. It should be spacious, well lit and equipped with exhaust ventilation. Personal protective equipment for the welder will also be required:
- clothing and footwear made of non-flammable materials;
- split leather gaiters;
- a welder's mask with an adaptive light filter that protects the eyes from arc welding flashes;
- respirator for respiratory protection;
- Safety glasses or a clear face shield for stripping workpieces and seams.
Tools you will need are a wire brush, a hammer, and an angle grinder.
How to connect the electrode?
It is better to start mastering welding technology with electrodes with a diameter of 3 mm. The rod is inserted into the holder with the end cleared of coating and securely fixed with a screw or spring. The cable from the holder is connected to the inverter terminal. The second cable, which has a clamp at the end, is connected to the second terminal. Ferrous metals are welded using the so-called straight polarity - the positive wire is connected to the workpiece with a clamp, and the negative wire is connected to the electrode.
Two types of connection polarity.
Reverse polarity is used for welding stainless steel and other materials.
Beginning: lighting the arc
The arc is ignited using one of two main methods:
- striking with an electrode along the future seam;
- tapping the workpiece.
For beginners, the first method is recommended. If the electrode has already been welded, tapping helps knock off a thin layer of slag from the tip of the rod.
Electrode tilt
The angle of inclination of the rod to the vertical depends on the type of seam
The “backward angle” position is most often used. The working zone follows the tip of the rod, in this case the greatest heating of the metal is obtained. If you tilt the rod in the opposite direction, the heating decreases. This position is used at the end of the seam and when manually welding thin-sheet structures to avoid the appearance of burns and craters.
Movements
The welder must maintain the gap between the electrode tip and the workpiece within 2-3 mm. If it is necessary to ensure a seam width greater than the thickness of the electrode, complex trajectories for its guidance are used.
A novice master needs to master soft and even straight-line driving at a constant speed. After you begin to get even rollers, you can move on to more complex trajectories.
The main task at the training stage is to learn to “feel” and control the state of the weld pool, without overheating or cooling it excessively.
Trajectories of electrode guidance. It is better to learn on workpieces with a thickness of 4-5 mm. After mastering the welding of beads on the plate, you can begin welding two parts.
Let's sum it up
Having learned to work with welding equipment, it will be possible to solve many everyday problems that often arise when working in the country or in the garage. Beginners should pay special attention to the polarity of welding parts of different thicknesses with an inverter.
By understanding how to properly configure the equipment and choose an electrode, you will be able to obtain high-quality seams on any product. Be sure to pay attention to the forward and reverse polarity of connecting the welding inverter.
When welding thick parts, direct polarity is used when welding with an inverter, and for thin parts, reverse polarity is used.
Sources
- https://moiinstrumentu.ru/kak-varit-svarkoj.html
- https://WikiMetall.ru/spravochnik/kak-nauchitsja-varit-jelektrosvarkoj.html
- https://mrmetall.ru/kak-pravilno-varit-jelektrodami-nachinajushhim-jelektrosvarkoj/
- https://sovet-ingenera.com/santeh/svarka/elektrosvarka-dlya-nachinayushhix.html
- https://kak-sdelano.ru/instrumentyi/cvarka-invertorom-dlya-nachinayushhix
- https://instrumentiks.ru/sovety/svarka-invertorom
- https://tokar.guru/hochu-vse-znat/svarka-elektrodami-kak-pravilno-varit-nachinayuschim.html
- https://svaring.com/welding/teorija/azy-svarki-elektrodami
- https://www.svarbi.ru/articles/kak-varit-svarkoy-elektrodami-dlya-nachinayushchikh/
- https://tutsvarka.ru/vidy/svarka-invertorom-dlya-nachinayushhih
How to learn to cook with electric welding lesson 1
To master this method of joining metal well, you need to understand the physical process of welding. Understanding the formation of a seam will help you to cook not “blindly”, but with awareness of what is happening, which will certainly be reflected in the result.
For welding work, various devices are used that convert the current to the required value, capable of melting steel. The simplest are transformers operating from 220 and 380V. Due to the windings of the coils, they lower the voltage (V) and increase the current (A). Most often these are large devices in industrial enterprises or a small homemade device in the garage.
More “advanced” versions are converters that produce constant voltage. Thanks to this, the creation of the weld seam is more delicate and quieter. At home, small versions of these devices are used, called inverters. They operate from a household network and convert alternating current into direct current. Learning to cook with an inverter is easier than starting with a large industrial transformer. The essence of the process is as follows:
- The device produces the required voltage.
- Two cables come from the inverter (+ and -), the first is attached to the product, and the second is equipped with a holder for the electrode. Some people refer to the negative cable as zero. Depending on which wire clings to ground, the polarity of the current is determined.
- At the moment the end of the electrode touches the product, an electric arc is excited.
- Particles of the molten electrode rod and the edges of the metal being welded form a connecting seam.
- The coating on the electrodes, melting, creates a gas cloud that protects the weld pool from environmental influences and ensures a pore-free connection.
- When the metal hardens, a layer of slag forms on its surface, which is removed by light tapping.
An inverter for beginners can be any budget model that supports working with electrodes with a diameter of 3 and 4 mm.
Tools and equipment
The manual arc welding technique is relatively simple and is performed using specialized equipment and electrodes. You will also need auxiliary tools and protective equipment.
Equipment types
There are three types of machines that can be used to perform arc welding yourself:
- transformers . The operating principle of such devices is based on alternating current. It should be noted that they are quite heavy, can cause sudden changes in voltage in the general electrical network and are very noisy. It is quite difficult to make an even seam on a transformer; only experienced welders can do this. But if novice craftsmen are trained in arc welding using a transformer, then working with other equipment will be much easier;
- rectifiers _ The operation of the devices is ensured by semiconductor diodes. Units of this type convert alternating current into direct current. These are universal devices. Almost all electrodes are suitable for them and welding can be carried out on different metals. Compared to a transformer, the welding process is much simpler and the arc stability is maintained;
- inverters . They work almost silently. Convenient to use due to its compactness and automatic settings system. During operation, the device produces high-power direct current by converting alternating current.
Among all devices, inverters are considered the best. They create a stable arc even during power surges and are multifunctional.
Tools and equipment
Before welding with electric arc welding, you must first prepare personal protective equipment and tools:
- welding machine and electrodes for it . Those who are just learning welding skills should prepare more electrodes;
- utility tools . The arc welding technique involves removing the slag generated during welding, and for this you will need a hammer and a metal brush;
- protective clothing . You cannot start welding without a special mask, gloves and protective clothing made of dense materials. Such means should not be neglected, since human safety depends on them.
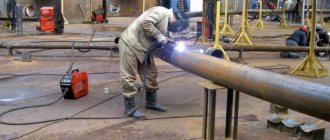
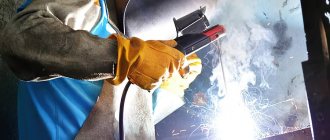
If you are working with the machine for the first time and want to learn how to properly weld using manual arc welding, it is recommended to first prepare training metal elements.
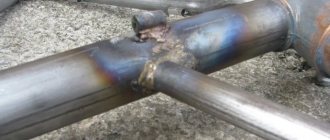
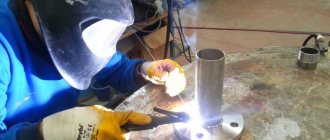
Features of welding a pipeline with an inverter
The electric arc welding method is suitable for creating a vertical seam, provided that it is located at the end of the pipe. If a horizontal seam is created, the latter should be on its circumference. If you have to make ceiling and bottom seams, then they should be at the top and bottom. Among all those mentioned, it is the last one that creates fewer problems in implementation.
If you have to deal with steel pipes, then the butt welding method is most often used, which involves welding each edge along the height of the walls. To minimize sagging inside the pipe, the electrode should be positioned at an angle of no more than 45 degrees relative to the horizontal. Such a seam should reach a height of 2–3 mm and a width of 6–8 mm. If the products are overlapped, then the seam will have a height of 3 mm and a width of 6–8 mm.
Preparation
Before you begin electric welding of metal products, you need to complete the following preparatory measures:
- It is necessary to remove the top layer from the welded aliment.
- If there are any irregularities at the ends of the pipe, they need to be cut off or straightened.
- Next we begin to process the edges. Here it is necessary to smooth out at least 10 millimeters of the surface adjacent to the edges of the pipe outside and inside until a metallic sheen appears.
Main stages
If the walls are 6–12 mm wide
Particular attention should be paid to creating the first seam, since a lot depends on it. It must be performed in such a way that it melts every edge and dull areas
It is very important to examine it very carefully, as there may be cracks on it. If they are found, they must be melted down or cut down, after which the area is welded again
When creating the remaining layers, you need to slowly turn the pipe. It must be remembered that the beginning and end of each layer should be located with an offset relative to the previous layer at a distance of 15–30 mm.
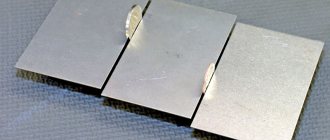
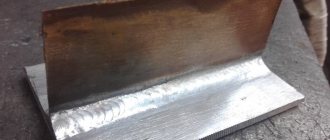
Three main types of connections
GOST 5264-80 describes all types of standard connections used in production. If joints are used that are not described in the list, then in the accompanying documentation (drawing) the designer makes a footnote indicating the parameters of the seam.
Connection types:
- Butt welding – used for welding sheets and flat parts. There are: with flanged edges, with or without cutting, on a removable or permanent lining.
- Angular - for connecting elements in which the edge of one of them abuts the plane of the second at an angle other than 0 degrees.
- Overlapping - used when installing parts, with the side of one superimposed on the plane of the other.
Types of welded joints
The main purpose of creating a permanent joint is to ensure sufficient strength for the operation of the metal structure.
Electrode selection
This tool, intended for welding, is a metal rod with a special coating called coating. When welding, the core begins to melt. The coating, when burned, releases gas, which will serve as protection for the seam from the adverse effects of oxygen in the air, which contributes to the creation of oxides.
When choosing an electrode, you should pay attention to the core material, which should be similar to the components of the products being welded. There are electrodes designed for welding the following materials:
- carbon steel;
- alloy steel;
- high alloy steel;
- stainless steel;
- heat-resistant steel;
- aluminum;
- cast iron.
This does not exhaust the complete list of materials. In everyday life, the most common use is not thick structural steel.
The following types of electrode coating exist:
- Basic.
- Rutile.
- Sour.
- Cellulose.
Each of them solves its own problem. Basic and cellulose coatings are used for DC welding. Can be used when working on critical structures. The advantages of rutile coating are ease of ignition and slight splashing of hot metal.
When using electrodes with an acid coating, easy separation of slag occurs. But it is not recommended to use this type in a confined space, as it can harm the health of the welder. The most widely used electrodes are those with basic and rutile coatings. They are suitable for beginner welders.
When choosing a diameter, take into account the thickness of the parts being welded. It is preferable to weld thin metals using semiautomatic machines or inverters. There are also tips for adjusting the current. They comply with the recommendations on how to properly weld using electrode welding. There is a dependence on the diameter of the selected electrode.
The welding current is selected according to the calculation: 20-30 A for each millimeter of electrode diameter. Within this spread, the spatial position of the seam, the thickness of the metals being welded, and the number of layers are also taken into account.
Sufficient information about various electrodes when choosing among them suitable for a specific type of welding can be obtained from the markings of these tools. It won't be difficult to figure it out.
The principle of selecting welding current
When choosing welding parameters, you should be guided by:
- per metal thickness;
- per electrode diameter;
- on the positions of the future seam - horizontal, vertical, ceiling.
Electrode manufacturers place a table with recommended parameters on the packaging, but when welding different alloys, the values may be different. To select the current more accurately, it is better to try different modes on scraps of metal, focusing on those indicated in the table.
When welding in a vertical position, the current is reduced by 10-15%, and for creating ceiling seams - by 20-30%.
Pipeline welding
Using electric arc welding, you can make a horizontal seam that runs around the circumference of the pipe and a vertical seam that runs from the side, as well as top and bottom seams. The most convenient option is the bottom seam.
Steel pipes must be butt welded, welding all the edges along the height of the walls. During operation, the electrode must be installed at an angle of 45 degrees - this is done in order to reduce sagging inside the products. The seam width should be 2-3 mm, height - 6-8 mm. If welding is overlapped, then the required width is 6-8 mm, and the height is 3 mm.
Immediately before starting work, you need to carry out preparatory procedures:
- The part needs to be cleaned.
- If the edges of the pipe are deformed, then straighten them or cut them off with an angle grinder, or simply with a grinder.
- The edges where the seam will go must be cleaned to a shine.
After preparation, you can start working. It is necessary to weld all joints continuously, completely welding. Pipe joints with a width of up to 6 mm are welded in 2 layers, with a width of 6-12 mm in 3 layers and with a wall width of more than 19 mm in 4 layers. The main feature is the constant cleaning of pipes from slag, i.e. after each completed layer it is necessary to clean it of slag and only then weld a new one. Particular care must be taken when working on the first seam, it is necessary to fuse all blunts and edges. The first layer is carefully checked for the presence of cracks; if they are present, then they must be melted or cut out and welded again.
All subsequent layers are welded while slowly turning the pipe. The last layer is welded with an even transition to the base metal.
Mistakes of novice welders
To learn how to cook with electric welding correctly, you need to consider the main mistakes that beginners make:
- Moving the electrode too quickly, resulting in an uneven seam.
- The seam moves too slowly, resulting in holes and burns in the metal.
- The seam is too uneven and flat. The main mistake here is the angle of the electrode.
- Lack of welding of metal. This happens because the 5 mm gap between the metal and the electrode was not maintained, i.e. the gap was too small.
- Otherwise, when the gap is too large, the metal is not welded.
All of the above mistakes are just the most serious ones. There are many more nuances that can only be understood with experience.
When welding thin-walled metal or profiles, a careful approach to work is required. Thin parts can be welded by applying a cleaned electrode and welding directly on top of it.
Welding on non-ferrous metals is strikingly different, as it requires different electrodes. A special protective environment is also required. Now you can buy universal machines that cook almost any metal.
There are also semi-automatic devices for working with thin-walled metals. Its essence lies in fusing a special wire.
What errors might there be?
Incorrectly selected current - if its value is low, the arc will constantly go out and the seam will be interrupted. A high current value leads to penetration, burning through the body of welded metal structures.
The slag output is controlled by the angle of inclination of the electrode and depends on its type. If the bath moves quickly, slag inclusions remain in the seam.
High-alloy steels must be heated before processing, otherwise the edge material will not have time to melt or a transition zone will form.
Welding of non-ferrous metals must be carried out with special electrodes in a shielding gas environment. The polarity of the current must be straight in order for the metal coated with oxides to melt.
Welding Basics
To learn how to weld correctly, you need to understand the physical foundations of the welding process. Any welding machine creates in a small working area at the junction of two parts being welded a temperature above the melting point of the metal being welded, the so-called weld pool. In it, the part of the metal of both parts that has turned into liquid is mixed with each other and with the metal of the molten electrode. After the temperature decreases, the metal from the weld pool crystallizes, connecting the welded parts into one whole. By slowly moving the weld pool following the arc along the joint, the welder obtains a seam. High temperatures in amateur welding machines are achieved in two ways:
- electric arc;
- gas burner.
Electric welding is safer, since there is no risk of gas explosion, and is easier to learn for those who are just learning how to weld properly.
An electric arc is created by passing a high current through the air gap between the parts being welded and the electrode.
Safety precautions
Electric welding is popular. The device is small in size and is capable of hermetically connecting parts in any spatial position; welding is fast and controllable. When working, be aware of the health risks:
- Eye injury. The welding arc emits light energy, which can burn the cornea of the eye and be imprinted on the retina. A feeling of sand under the eyelids, difficulty blinking, swelling - these symptoms go away for quite a long time. A mask with special glass will help protect your eyes; before lighting the arc, warn others by shouting: “Eyes!”
- Electric shock. Electric arc is the passage of electric current through the gap between the electrode and the metal. The greater the current, the brighter the arc. But if this current passes through a person's body, he will die. To avoid electric shock, you need to: Monitor the integrity of the cable braid and the insulation of the holder.
- Use high-quality insulated holders; do not grab the bare parts of the holders with your bare hands.
- When working continuously, wear safety shoes with rubberized soles.
Other types of welding
The most important element of any metal structure is the weld. In this regard, the technique of welding vertical seams, as well as other connection options, will be extremely useful for beginners.
There are a large number of methods used to form reliable joints in the case of different locations of parts relative to each other. Special techniques for moving electrodes have also been developed, for example, herringbone, boat, etc.
The simplest types of welding include working in a horizontal position. However, there are more complex types of seams.
Butt
The easiest way to carry out this type of connection is not on a vertical plane, but on a horizontal one.
Drawing of welding seams.
The welding process can be performed in several ways:
- in space;
- on a removable copper lining;
- with a preliminary seam.
In the first case, the most difficult thing is to boil the root throughout the entire product. The use of a copper lining can simplify the task. Due to its high thermal conductivity, it will prevent melting of the surface under the parts as a result of contact with molten material. It can be easily removed after finishing work.
Welded multilayer
This technology involves several passes. Before each pass, the previous layer is cleaned and cooled. In this regard, this connection method differs significantly from others.
The layers are welded using electrodes of different diameters. We weld the bottom one with rods 3-4 millimeters in diameter, and the subsequent ones - 5-6 millimeters. The topmost layer is convex, in addition, it performs heat treatment of the lower layers.
https://www.youtube.com/watch?v=yEz_cweZtyQ
Ring
Used in joining pipes and various parts of shut-off valves. It is a mixed type of arc welding.
First, a vertical seam is made on the side of the pipe using electric welding, then a horizontal seam is formed around the circumference. In the same way, welding of plates located on the ceiling is carried out.
Features of the preparation technique for circumferential welding are as follows:
- the product is thoroughly cleaned;
- deformed areas are trimmed and leveled;
- the edges are cleaned to a shine.
Processing of joints during the welding process is carried out continuously, and turns are welded in several passes. Each subsequent connection is applied only after the previous one has been cleared of slag.
If cracks are found, they are removed and the resulting fragment is welded again.
Ceiling
Characteristics of different types of welded joints.
Every inexperienced welder will be confused when faced with the need to weld a ceiling seam using electric welding. This type of connection can easily be called the most complex welding seam. It should be noted that ceiling welding causes a lot of problems associated with the inconvenient position of the master when working.
Drops of hot metal tend to break off and fall down, which further complicates the work process. The molten metal itself is held in the bath due to the action of surface tension.
Welding a ceiling seam involves positioning the electrode normal to the surface of the product. In this case, the rod performs circular movements. This way it is possible to expand the connection.
The arc should be short to avoid undercuts. It is necessary to weld the ceiling seam according to the following method - the metal should harden at the highest speed. A similar effect can be achieved by using electrodes with a coating that has a high melting point.
In addition to circular movements, you should also make vertical movements. Moving the electrode away from the bath will extinguish the arc. As a result, the metal will begin to cool and the bath will shrink.
Thus, in addition to the standard defects formed during welding, welding of ceiling seams is characterized by another unpleasant feature, which is impossible to get rid of. When making such a connection, you must understand in advance that it will be weakened and less reliable than any other.
In connection with the above, such joints are almost completely absent in industrial production.
Welding process
Electrode welding technology consists of several stages. The electrode is connected to the welding machine to produce alternating current. If you intend to use direct current, you will need a rectifier. When an electrode touches or strikes metal, an electric arc appears. Its ultra-high temperature ensures the melting of the metal and the end of the rod with coating.
One of the circumstances of how to properly weld with an electrode is its proper connection. When connecting the anode to the product, manual welding with straight polarity will occur. If you connect the negative pole, the polarity will be reversed. Whether to connect the electrode in a direct or reverse manner depends on the thickness of the product. For thin metals, reverse inclusion is used, and for thicknesses greater than 0.3 cm, direct inclusion is used.
The electrode welding technique requires choosing the correct current on the welding machine. The device has two cables - one with a clamp, and the second with an electrode holder. Holding the electrode securely in the holder, light the arc by touching or striking.
In the touch method, the electrode is held perpendicular to the surface to be welded. Having touched it, it is taken a short distance. The striking is carried out in a smooth motion, and then the electrode is also moved to the side. If the arc does not ignite, you should try to increase the current.
Before welding with an electrode, you should choose the correct diameter, which is directly dependent on the thickness of the metal parts. Let us assume that it is necessary to weld products whose transverse dimension is 3 mm. The table shows that to decide how to properly cook with a 3 mm electrode, choose electrodes with a diameter of 2 to 3 mm.
The technique of how to properly cook with an electrode suggests that as it gradually burns, it is constantly brought closer to the metal surface. If sticking occurs, you should tear off the conductor by rocking it in different directions.
Where can you become a welder?
There are many options available to those interested in welding today. The main thing is to understand that this cannot be learned by mastering only theory. Practice is definitely needed.
To get it, beginners should enroll in appropriate courses that last several months, or join an experienced welder friend who will be ready to share the basics and show how to properly weld a particular metal.
And for schoolchildren who are thinking about a future profession, it’s even easier - after the ninth grade, you can go to a college or school, where manual and automatic arc welding is taught for three whole years, and then they are issued a corresponding diploma.
After the eleventh grade, training to become a welder lasts one year, and for some beginners this may be the most optimal option.
Ultimately, no one is stopping you from becoming a self-taught artisan. On the Internet you can easily find text instructions, tutorials and textbooks, as well as lessons on arc and other types of welding in video format. And if you have, say, a garage and welding equipment, you can practice on your own.