Removing part of the surface layer of a metal product using a chemical reaction is called etching. This technology has been known to man for several millennia; along with embossing and blackening, it was used to finish metal parts of weapons and household utensils, jewelry and ritual objects. Nowadays, metal etching is used in arts and crafts, for electroplating, and for creating images and inscriptions on metal products.
Before etching, a protective coating that is resistant to the etching substance (mordant) is applied to those areas of the metal surface that should not be etched.
Next, the part is exposed to an acidic environment or immersed in a container with an electrolytic liquid. The longer a part is processed, the larger the layer of metal that is corroded by the aggressive environment. Metal etching can be carried out in several stages, this is the so-called multilayer etching.
Etching images on metal is carried out both in industrial and at home conditions.
Based on the materials used to corrode the metal layer, there are such methods of etching metals as:
- Chemical (liquid). Acidic solutions are used. Does not require complex equipment or expensive materials. During operation, fumes that are harmful to health are generated.
- Electrochemical. An electrolyte solution is used and an electric current is passed through it. It is characterized by a higher speed of the process, more accurate execution of the details of the design, and economical consumption of working fluid. Does not form harmful fumes
- Ion plasma (dry). The surface layer is evaporated by a beam of ionized plasma. Used in the production of microelectronic components.
The ion plasma method requires high-precision and expensive equipment and is used only in industrial production conditions. The liquid method, electrochemical metal etching and even electrochemical engraving are available at home.
Using galvanic etching, you can independently make a printed circuit board that is almost as good as an industrial one.
The galvanic method of etching compares favorably with the liquid etching method because there is no need to use acids that produce harmful fumes. Depending on the workpiece material, different electrolytic solutions are used:
- Steel and iron - ammonia and iron sulfate
- Copper and its alloys (bronze, brass) - copper sulfate
- Zinc – zinc sulfate.
Galvanic method of etching a pattern on metal
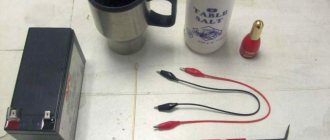
To carry out the process at home you will need:
- Galvanic bath made of non-conductive material.
- 5 volt DC power supply.
- Metal cathode (same metal as the workpiece.)
- Wire hangers for the workpiece and cathode. The workpiece should not touch the walls or bottom of the bath.
- Two conductive rods longer than the bathtub.
One rod is connected to the negative terminal of the power supply and the cathode is hung on it.
The other rod is connected to the positive terminal and a product that will serve as an anode is hung on it.
When voltage is applied, the process of electrolytic transfer of metal from the product to the cathode begins. It will occur from surface areas not covered with protective varnish.
Artistic metal etching is carried out using both galvanic and liquid methods.
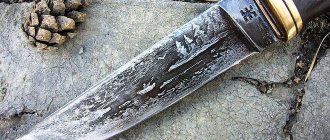
Artistic multilayer metal etching
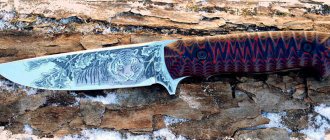
With its help, masters of folk crafts and simply home craftsmen obtain highly artistic images on edged weapons and firearms, all kinds of forged and cast utensils. For craftsmen making designer hunting and household knives, etching has become an almost mandatory finishing element. Especially popular are hunting scenes, Arabic, runic or abstract geometric patterns. Many craftsmen combine metal etching with bluing, giving the design a bluish, black or yellowish tint.
To transfer images, both the method of coating the part with varnish and glossy paper are used. Another method is also used - gluing the part with tape. Using a hot needle, scratch the lines of the design, after which, using tweezers, carefully remove the tape from the areas to be etched. Remains of the adhesive mass must be washed off with a solvent.
Before etching, the part should be thoroughly degreased.
Before starting etching, the surface should be prepared. This will ensure:
- High process speed
- removing metal in an even layer.
During surface treatment, all mechanical and chemical contaminants are removed from it. Use a warm soapy solution; any detergent will do. After the surface has dried, it must be wiped with a rag soaked in solvent or degreaser. This will remove any remaining liquid and oil films.
The process of degreasing a metal surface
It is good to combine chemical treatment with mechanical treatment:
- mirror polishing
- sanding with sandpaper. Used when polishing is unavailable. You should make sure that the skin always moves in one direction and that the marks from it are strictly parallel.
Mechanical processing will significantly improve the appearance of the product after etching.
There are several methods used for this operation. All of them are united by a common principle: protecting part of the surface from the corrosive effect of the mordant, and what distinguishes them is the substance used to apply the design.
Nail polish
Popular and affordable method. Has some disadvantages:
- The high viscosity of the varnish makes it impossible to draw small details and fine lines.
- Requires a steady hand and drawing skill.
- It is very difficult to correct incorrectly applied parts.
Using nail polish
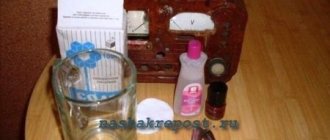
Instructions for liquid etching of a knife
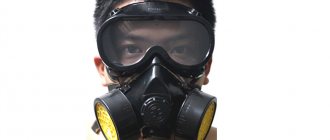
The chemical method is simpler and does not require batteries. A strong aggressive environment is required. It has already been stated that the method is dangerous due to its gaseous emissions. Opening a window or getting a good hood is a must. Safety equipment:
- latex gloves;
- respirator;
- protective glasses;
- smock.
Avoid contact with mucous membranes of the body. Washing with water will not do. A chemical burn is a terrible thing. We've sorted out the equipment, now it's a matter of materials:
- insulating tape;
- nail polish, marker;
- grinding machine;
- distilled water in a container;
- Plastic container;
- solvent, acetone;
- ferric chloride supply;
- cotton swabs and disks, toothpick;
- sandpaper of various grains.
The knife must be prepared in advance. On a solid product, protect the handle with electrical tape; on a collapsible product, disassemble it and work with the blade separately.
Creating a protective layer
The pattern that needs to be transferred to the product must be outlined with a protective layer. Considering that in the coated area, the reaction will not take place, and the metal will remain light. Initially, make a sketch with a marker and then cover it with nail polish. This is the best option. The varnish can then be adjusted to ensure evenness of the lines and the pattern itself.
Patterns for etching on a knife.
Don’t be shy about fantasizing; the uniqueness of the work performed also depends on the personal qualities of the master. Use varnishes of various shades; they are clearly visible on the surface of the product. Drawings and sketches for etching on knives are freely available on thematic Internet resources, or use the pattern from the picture above.
Preparation of the solution
We make sure to use personal protective equipment. When working with acid, you need to have a solution of soda on hand; it will come in handy if an aggressive substance gets on your skin. The rule of all chemists is to pour acid into water, never in the reverse order:
- The ratio of ferric chloride and water should be 50/50. This is the best option, but to speed up the reaction, other proportions can be used.
- The plastic container should not be filled entirely; be careful when placing the product there. After pouring a little distilled water, pour in the same amount of ferric chloride.
- Label the container with the words "Acid" and be careful with it. A metal container is not suitable; there is a possibility of it reacting with the solution.
Please note that the diluted liquid will serve more than once; you can actually process a dozen blades in it. Once dilution of the solution is complete, proceed to the next step.
Etching process
To obtain a high-quality result, it is recommended to make movements in the liquid when immersing the blade. The process will look like gently rinsing the product in a solution. Touching the blade is strictly prohibited. Leaving it in it for a long time is also not recommended.
The process of etching a knife.
Etching professionals argue that repeated, short-term immersion of the product in an aggressive environment is necessary. It looks like this:
- you should immerse the blade for 20 seconds;
- take it out into the air for the same time as the immersion;
- quick rinsing under water from a tap;
- hold in air for 20 seconds;
- and then again immerse in the solution for the same period of time.
This achieves constant control of the etching; the circular process must be performed several times. The total time of holding the blade in acid should not exceed 10 minutes. It should not be forgotten that all time intervals depend on the steel and the composition of the solution.
At the end of the process, it is necessary to rinse the product well with running water and remove the protective layer with acetone or solvent. Walk the blade with sandpaper starting from coarse grain 400 grit. and ending with 2000 or 2500. A felt wheel on a sanding machine will help bring it to a shine.
Previous Sharpening knivesSharpener for knives Victorinox Next Knives DIY knife lanyard
Primer or bitumen varnish
Primer GF 021, XB 062 or bitumen varnish is used. First, the entire product to be etched is coated with the substance. Next, use a thin pen or marker to transfer the contours of the drawing. A needle should be made from thin wire or a rod of soft alloys, sharpening the end of the wire.
Etching using a primer
Those areas of the image that must be etched are scratched down to the metal. Care should be taken to ensure that the primer does not chip.
Decorative copper etching
To achieve our goals, we will need: a copper blank, a drawing printed on a laser printer, ferric chloride (you can get this ingredient at any amateur radio store), plastic containers, nail polish remover, an iron, protective equipment and a hammer with nails.
Manufacturing process:
The iron needs to be raised every 10-20 seconds
- The workpiece is cleaned using nail polish remover;
- We cut out the design and apply it with the front side to the workpiece;
- Cover the workpiece with the attached drawing on top with an iron and leave it in this position for 5 minutes. It is worth noting that the iron must be raised every 10-20 seconds so that the paper under it does not burn;
- A solution of water and ferric chloride is diluted in a container in a ratio of 10:1, respectively;
- Holes for the chain are punched in the cooled workpiece using a hammer and nail;
- The copper product is placed in the solution for 4-5 hours;
- We treat copper products with nail polish remover and enjoy the new decoration.
Glossy paper
In addition to glossy paper (you can buy it at art supply stores, or you can simply cut a sheet out of a magazine), you will need a laser printer, an imaging application, and an iron. The image of the drawing should be mirrored and printed in full size. The image is applied to the surface and ironed several times. After the workpiece has cooled, the paper is washed off with warm water, and the toner remains on the surface of the part. The back and side surfaces that are not subject to etching must be protected with varnish or plasticine.
Read also: Operating instructions for a blowtorch
Glossy etching paper
The main advantage of the method is that the smallest details of the image can be accurately transferred.
The main disadvantage is that you can only work in this way with flat or cylindrical workpieces. The method is very popular in the manufacture of printed circuit boards.
Getting a color drawing
To give the resulting pattern, drawing or inscription an additional decorative effect, we suggest using a simple method accessible to everyone. To do this, apply a small amount of any nitro enamel to the treated area, achieving complete filling of the recess. This paint and varnish material dries quickly enough, so you can return to further work after an hour. After making sure the enamel is completely dry, remove any excess material that has fallen onto the surface of the etched piece using fine sandpaper. The use of a solvent in this case can ruin the entire work, since it smears the paint over the surface without completely removing it, and can give the pattern an unattractive dullness.
Mechanical polishing of the finished product on a felt wheel with GOI paste will give the painted etched pattern the final expressiveness.
Dear readers, comment on the article, ask questions, subscribe to new publications - we are interested in your opinion
Comments
Quite interesting, and not difficult at all. You can do all this yourself, all materials are available. There’s just one thing I didn’t understand: can you only etch metal in this way, or silver too? I have a bunch of scrap silver, I want to try to make a bracelet, and if silver is also etched in the same way, that would be great.
To etch silver, you can’t use simple salt; you will need a nitric acid salt: NaNO3, KNO3
what is the proportion for etching with copper sulfate?
In order for the process to go faster, you need to get a saturated solution - this means you need to add copper sulfate, stirring and observing the presence of residue at the bottom. Add the reagent until it is completely dissolved. As soon as the moment comes that you cannot stir the precipitate, it means the solution is “saturated”.
Here's a question: NaNO3 is sodium nitrate, if so, how to use it? I want to etch it on a silver spoon.
Yes, that’s absolutely right, you can also take ammonium nitrate.
Take a spoon and cover the entire surface with a protective compound, except for the areas to be etched. You also leave room for contact with the positive pole of the source. The spoon is immersed in the solution along with a metal strip connected to the negative contact of the source.
I just tried it, changing the technology a little. So, instead of varnish, I used laser-iron technology (this is how radio amateurs make printed circuit boards). I did not place the workpiece in the solution, but dipped a cotton swab into the solution, connected to a charger for car batteries. The result is a beautiful drawing in 5 minutes. The etching thickness is about 0.2-0.3 mm. The only negative is that the solution still seeped under the toner and left small holes. Subsequent processing with a rubber-cord wheel and polishing made it possible to somewhat level out this annoying nuisance, but not completely. I believe that if I had not rubbed the surface with cotton wool, but still placed the workpiece in the solution, everything would have turned out great. But the workpiece is large, so this was not possible. It is better to apply the stencil using photoresist films or varnish.
For large items, such as decorative swords, daggers, spears, etc., PVC sewer pipes with a cap at one end can be used as a container. It is best to fix the resulting container in a vertical position, although, if necessary, the pipe can be cut lengthwise and a plug can be added to the other end. For etching such products, it is best to use a welding inverter, setting it to 20-40 amperes. At higher current levels, the solution boils away too quickly. The pattern is applied according to the principle of the method with nail polish, only acrylic paint is used instead.
Steel pickling
In addition to the artistic etching of metal, which allows one to obtain exquisite images on steel surfaces, steel etching is also used to remove scale and oxide films. In this case, you should especially carefully observe the requirements of the technological process in everything related to the concentration of etchant solutions and the time of exposure of the part in the mordant or in the electrolyte bath. Over-etching during such an operation is extremely undesirable.
When etching steel, both liquid and electrochemical methods are used. The mordant is prepared on the basis of strong acids, such as hydrochloric or sulfuric. Particular attention should be paid to thoroughly degreasing the surface. A missed oil or grease stain can render the workpiece unusable. To protect parts of the workpiece that are not subject to etching, I use varnishes based on rosin, turpentine, and tar.
These components are highly flammable, so you should be especially careful and careful when working with varnish. After etching is completed, the unetched areas of the workpiece are cleaned of the protective varnish with a solvent.
Nitric acid is very popular among home picklers. It is used as the only base for mordant, or in a mixture with tartar or salt. A metal etching solution based on a mixture of nitric and hydrochloric acid is very chemically reactive and should be handled with extreme care.
For processing hard and special grades of steel, mixtures of nitric and acetic acid are used. The processing is carried out in two stages. First, a special preliminary mordant is prepared - glyphogen, which is a mixture of water, nitric acid and ethyl alcohol. The part is kept in it for several minutes. Next, the workpiece is washed with a solution of wine alcohol in distilled water and thoroughly dried. After this, the main etching is carried out.
For pickling cast iron, solutions of medium concentrations of sulfuric acid are used.
Based on their atomic weight and the physical and chemical properties of the substance determined by it, for each metal and alloy they select its own mordant that best affects it.
Pickling copper alloys
Both pure copper and copper alloys are etched using sulfuric, hydrochloric, phosphoric, and nitric acid. To increase the reaction rate, chromium or nitrogen compounds are added to solutions. At the first stage of etching, scale and oxide film are removed from the workpiece, then proceed to the actual etching of the metal. Be careful when etching copper at home.
Aluminum and alloys based on it stand out among other metals in that they are etched using alkaline rather than acidic solutions. For molybdenum, alkaline solutions based on sodium hydroxide and hydrogen peroxide are also used.
Titanium stands even more apart - at the first stage of preliminary etching, alkali is used, and at the main stage, acid is used. For titanium I use the strongest acids - hydrofluoric and concentrated sulfuric and nitric. Titanium blanks are etched to remove the surface layer of oxides immediately before electroplating.
To etch metals such as nickel or tungsten, an aqueous solution of hydrogen peroxide and formic acid is used.
A blank for a printed circuit board is a sheet of textolite, coated on one or both sides with a layer of copper foil. The purpose of etching printed circuit boards is to create conductive traces from copper foil in exact accordance with the drawing. The tracks are covered with a protective varnish, the rest of the foil is removed by etching.
At home he uses several methods:
- Ferric chloride. The reagent can be purchased at a chemical store or made independently. Iron filings should be dissolved in hydrochloric acid. Before use, the solution should be kept until the iron is completely dissolved and mixed thoroughly.
- Nitric acid.
- An aqueous solution of sulfuric acid mixed with tableted hydrogen peroxide.
- Copper sulfate with the addition of hot water and sodium chloride. This option is the safest, but also the longest. Throughout the entire process, the pickling temperature should be maintained at least 40 o C, otherwise the pickling will take many hours.
- Electrolytic method. You should take a dielectric container (cuvettes are good for developing photographs), fill it with a solution of table salt, place a board and a piece of copper foil there, which will serve as a cathode.
After etching with the liquid method is completed, the board should be thoroughly washed with a soda solution to extinguish any remaining acid.
How to etch metal at home
Etching is carried out using special solutions of sulfur or hydrochloric acid. To conduct chemical experiments, you will need a metal container, a protective suit consisting of rubber gloves, goggles and sleeves, tongs and dry wipes. At home, experiments are best carried out outdoors or in rooms with good ventilation.
Etching with blackening on copper sheet
With the right approach to etching, you will achieve a characteristic shine and surface uniformity from copper for a long period of time. Be careful not to get the chemical solution on your hands or eyes. You can neutralize the effect of acids with water - the affected area is washed generously.
If the product gets into your eyes, you should immediately contact your local doctor and undergo a vision test.
Ferric chloride etching
This process is probably known to every teenager who has repeatedly experimented with a found copper twig in the yard.
Ferric chloride solution before and after etching
Advantages:
- Relatively stable speed of chemical processes;
- To carry out the experiment, one element is needed - ferric chloride;
- Proportions are done by eye. That is, the reaction rate does not depend on the amount of ferric chloride;
- Ambient temperature may not be taken into account.
Flaws:
- The rate of interaction between metals gradually decreases and etching turns into flour;
- Not everyone can get the key element. Ferric chloride is often very expensive on the black market;
- The key element stains everything it touches. This way you can irreversibly damage your clothes and interior items.
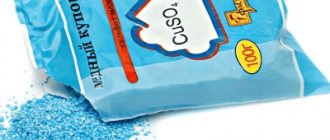
Copper sulfate and salt
Advantages:
Copper sulfate: preparation of solution, “before” and “after” view
- It is not difficult to obtain copper sulfate, since it is actively used in agriculture to control plant pests;
- Bluish stains can be easily removed from clothing and home furnishings with vinegar.
Flaws:
- Copper sulfate can change not only the properties of copper, but also harm human health;
- The cost of a key element is rapidly rising for inexplicable reasons. In just a few years, its value has literally tripled;
- The reaction rate is highly dependent on the temperature of the liquid. It is worth noting that copper sulfate is very sensitive to minor temperature fluctuations and even heating by 3-5 degrees can increase the etching rate several times.
Persulfate etching
Advantages:
Ammonium persulfate
- To maintain a full chemical reaction, one key element is enough - persulfate;
- The element is absolutely harmless to clothing and interior items, does not leave marks or stains;
- High rate of chemical reaction.
Flaws:
- If it comes into contact with clothing in large quantities, it can burn through the fabric and make holes in it;
- To maintain the process, the key element must be constantly added and heated;
- After weed, a lot of ballast remains - sulfate.
Hydrogen peroxide and hydrochloric acid
Advantages:
Copper beads in a solution of hydrogen peroxide and hydrochloric acid
- It is distinguished by the highest speed of the chemical process of all those discussed above;
- Upon contact with skin or fabric, it does not leave noticeable marks;
- Does not require heating and can be performed at room temperature;
- Availability: Hydrogen peroxide is freely available in pharmacies, and battery electrolyte is suitable instead of hydrochloric acid.
Flaws:
- A strong concentration of hydrochloric acid in a solution can harm not only things, but also human health. Etching copper in this way requires great care and additional protective equipment - gloves, goggles and sleeves. Experiments at home are best carried out in old clothes;
Hydrogen peroxide and citric acid
Advantages:
Etching kit with hydrogen peroxide and citric acid
- Sufficiently high speed of chemical processes;
- When it comes into contact with interior items and fabrics, it does not leave stains on their surface;
- Does not require additional heating, flows easily at room temperature;
- Availability of materials: hydrogen peroxide can be bought at any pharmacy, and citric acid can be obtained at every supermarket or local store;
- The etching solution is completely safe for humans and their clothing. It is worth noting that in case of contact, it is advisable to rinse the eyes and skin with plenty of water;
- Low price of key elements. Conducting a chemical experiment requires at most 15-30 rubles.
Flaws:
- If the concentration of citric acid in the container is exceeded, precipitation may form - etching and copper residues. The resulting precipitates impede the reaction and can leave dark spots on the metal.
Preparation of solutions
Etching copper at home for jewelry purposes
Ammonium persulfate solution before and after copper etching
After carefully weighing all the pros and cons of each method, you can choose the optimal one for conducting experiments at home.
So, etching copper with ferric chloride requires an empty container into which the key ingredient is placed in an even layer. The entire process is done with gloves. Copper is carefully placed on the iron. The container is closed with a plastic bag or lid and left anywhere, preferably away from the table or food.
When etching copper parts using vitriol and salt, you will need: salt, copper sulfate, any container and water. Salt and vitriol are mixed in a 1:1 consistency and dissolved in a cup of water. Copper is placed in an open vessel, since air also takes part in the chemical reaction.
Etching metal at home with persulfate is quite simple.
Kit for preparing a solution of hydrogen peroxide with hydrochloric acid
Take a shallow vessel, pour the powder into it and fill it with a small amount of water. Wait for it to completely dissolve and place the copper product, covering it with a lid.
To clean the surface of a copper product at home using hydrogen peroxide and hydrochloric acid, you will need a small vessel. 100 g is poured into it. peroxide and add 2 tablets of acid. After the acid has completely dissolved, copper is added to the container.
Hydrogen peroxide + citric acid is the easiest way to clean metal and give its surface a smooth shape.
To carry out the experiments, you will need a small vessel in the form of a metal saucepan or tray. 200 ml of hydrogen peroxide is poured into the container and 5 g of citric acid is poured.
The contents of the tray are stirred using a metal object or a wooden stick, after which the copper product is added.
The chemical reaction in such a solution proceeds very quickly, so do not move away from the tray and get ready to remove the copper immediately after it begins to brighten.
Etching process for other materials
In addition to metals, other materials are also subjected to etching. The most common etching of glass is for decorative purposes. Etching is carried out in hydrofluoric acid vapor, the only one capable of dissolving glass. At the preparation stages, preliminary acid polishing of the surface of the product is carried out, then the outline of the future image is transferred to it. Protective coatings for glass are made from a mixture of wax, rosin and paraffins. After applying the protective coating, the workpiece is dipped into an etching tank.
The use of hydrofluoric acid creates a beautiful matte structure on the surface. To obtain a smooth, transparent surface, concentrated sulfuric acid is added to the etching mixture. To obtain a relief, deep pattern, the operation is repeated.
In metal etching, extremely chemically active substances are used - strong acids, alkalis and their solutions. If handled incorrectly, they can cause serious injury and damage to property.
Using rubber gloves
Therefore, when working with them, you need to take special precautions and strictly follow the safety rules when carrying out work:
- Work is carried out only in the presence of good ventilation, preferably a fume hood.
- It is mandatory to use personal protective equipment: rubber gloves and an apron, thick work clothing, a respirator, and a protective face shield.
- Do not place jars containing acids and alkalis on high shelves and cabinets.
- When diluting acids, ACID is POURED into WATER, and never water into acid.
- When working with acid, have a soda solution on hand, and when working with alkali, have a weak vinegar solution to wash areas of the skin where drops of the solution accidentally fall.
- When working using the galvanic method, before starting work, carefully inspect all electrical equipment used for the absence of mechanical damage and integrity of the insulation.
- Have a working fire extinguisher on hand.
Read also: How to make a homemade forge
If the etching solution comes into contact with the skin, immediately wash the affected area with an appropriate neutralizing solution. If acid or alkali splashes onto clothing, it should be removed immediately.
Rinse the affected area with water
If the etching solution gets on the mucous membranes, you should immediately seek medical help. Delay in such cases can cost health or even life.
If you find an error, please select a piece of text and press Ctrl+Enter.
Removing oxides, rust and scale from the surface of metals in solutions of acids, salts or alkalis is called etching.
Methods and subtleties of artistic metal etching
Artistic metal etching refers to the application of a relief pattern or three-dimensional image to a steel product. This approach is most often used when working with high-hardness steels that are difficult to process with engraving tools.
This way you can decorate any weapon, forged, cast objects. Craftsmen who manufacture designer hunting and household knives rarely do their work without etching the metal. The most popular in this area are hunting scenes, Arabic script, runes, and geometric patterns. Often, etching is supplemented with bluing, due to which the image acquires a bluish, yellowish or black tint.
Artistic processing by etching a design on metal can be performed in the following professional ways: a composition that reacts with the mordant is applied to the surface of the sketch, or the image is left free, closing all the gaps. Next, acid is used, and in the first case the pattern will have little relief, while in the second the relief will be greatly deepened.
It is customary to divide artistic etching methods into galvanic and chemical. The first is considered less harmful and more effective. It is important that it does not involve the release of toxic gases from the electrolyte solution, which is inevitable during chemical processing.
During chemical etching, an acid-resistant varnish is applied to the surface of the product, in accordance with the planned image. Next, the object is immersed in an etching bath for the required period of time, where the reagent corrodes the unprotected metal, creating an in-depth pattern.
Etching methods
- Chemical
- Electrochemical
Chemical etching is performed by immersing products in a solution of sulfuric or hydrochloric acids. When a product is immersed in acid solutions, not only the oxides present on the metal surface, but also metallic iron interact with them.
With the rapid dissolution of oxides, etching of the base metal should be as small as possible. The relative speed of the processes of dissolution of metals and their oxides depends on the composition of the oxides, the concentration of acids, the temperature of the process, etc. An increase in the concentration of sulfuric and hydrochloric acids accelerates the dissolution of both oxides and pure iron.
To remove the FeO film from iron, it is most advisable to use 10% HCl. The optimal pickling temperature for sulfuric acid should be considered 60°, for hydrochloric acid 40°.
- The FeSO4 salt formed in the bath as a result of etching reduces the etching rate;
- An increase in the FeCl2 salt content in the solution increases the etching rate.
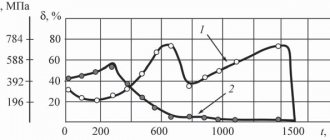
During chemical etching of steel, as a result of the interaction of iron with acids, intense release of hydrogen occurs, which diffuses into the surface layer of the metal, making it brittle and causing the formation of so-called “etching bubbles” on the surface.
To eliminate this phenomenon, special additives (retarders KS, MN) are added to the etching bath, which create a protective film during etching that protects the metal from the harmful effects of hydrogen.
Small items are loaded into the bath in baskets or trays. If before soldering you need to clean not the entire product, but only the soldered seam, then it is best to use a 10-15% solution of hydrochloric acid (apply to the seam with a brush) followed by rinsing with water.
For etching products made of copper and copper alloys, solutions of hydrochloric, sulfuric or nitric acids are often used, but more reliable results are obtained by etching in an 8% solution of sulfuric acid with the addition of 10% chromium. It is recommended to etch products made of aluminum and its alloys in an alkali solution, but sometimes hydrochloric acid is also used for this purpose.
Pickling of products made of nickel and its alloys is carried out in a 20% solution of sulfuric acid with the addition of chromic anhydride at a temperature of 60-80°. Products made from cupronickel are etched in a 10% solution of sulfuric acid with the addition of 1.5% chromium. After etching, a mandatory rinse in hot water with a small amount of cream of tartar is necessary.
Electrolytic etching is performed by immersing a product as an anode (anodic etching) or cathode (cathode etching) in an electrolytic bath.
In case of anodic etching:
- the electrolyte is usually a solution of acids or alkali metal salts
- cleaning occurs by rapid electrolytic dissolution
- Strict adherence to the regime is required to avoid excessive dissolution of the metal.
- The cathode is insoluble materials in the electrolyte, mainly lead and sometimes iron.
The anodic current density is selected depending on the condition of the product surface and the required process speed:
- in practice, the current density ranges from 5–200 A/dm2
- the process is usually carried out at room temperature
- The duration of the process is selected experimentally and ranges from 30 seconds. up to 30 min.
For cathodic etching:
- Lead or its alloy with 6-10% antimony is usually used as an anode.
- electrolytes are solutions of acids or their mixtures with alkali metal salts
Cleaning the metal surface from oxides using this method occurs through the action of atomic hydrogen formed at the cathode, which reduces the metal oxides, and gaseous hydrogen mechanically removes them from the metal surface.
In order to avoid corrosion, which can begin from the presence of acids and salts on the product, it is advisable to neutralize the remaining etching solutions after etching.
For this purpose, the products are immersed in a 2.5-5.0% soda ash solution for 1/2-1 minute. at room temperature and after washing in cold and hot water, dry thoroughly.
After such treatment, storing the soldered parts in a dry room will not cause corrosion of their surface. To prevent the prepared product from oxidizing again, it is recommended to solder it as soon as possible.
Pickling is the process of cleaning and processing a metal workpiece. Chemical, acidic, alkaline, electrochemical - there are many ways to perform this technological operation. Where is metal etching used, why is it used in industry, what are the processing methods using this technology, all these issues are discussed in detail in the article below.
Deep etching of metal at home
Agree, metal products (knives, blades, amulets...) look much more beautiful if they are decorated with patterns and ornaments. But how to apply a pattern to a metal surface? Engraving? This method is also possible, but there are several more.
One of them is called artistic electrochemical etching of metal . In this article you will learn how to decorate a knife blade.
Below is the entire process from drawing a sketch to the process of etching metal at home.
Development and drawing
Sketch
A subject drawing, a floral ornament, a logo or just a phrase - this is just a small list of design ideas that will be beautifully imprinted on the blade. Choose what pattern you want to see on the blade and start creating a sketch. You can draw it yourself or ask a professional.
Then you need to transfer the design to the blade. To do this, we place the blade in the scanner, transfer the image to the CorelDraw program, where we outline the contours of the blade. Next, apply a suitable ornament. The result should be duplicated in a mirror image and sent for printing.
Blade varnishing and pattern transfer
The blade must be varnished in advance. You can use matte varnish for plastic replica models. The varnish needs to be diluted with a nitro thinner to dry faster, and applied with an airbrush (you can also use a brush). The varnish is used because it retains its plasticity throughout the day and does not crumble under the scrubber.
We cut out the sketch to make it easier to fit to the blade, “black out” the reverse side with a pencil, and attach it to the blade with masking tape. Afterwards we draw the ornament with a thin pen. The result is a drawing on the varnish.
Scratching a drawing
We scratch the pattern on the surface of the varnish using scrubbers with different sharpenings. It is important that the metal of the scrubber is not harder than the metal of the blade, otherwise there will be scratches.
Features of the drawing
In our example, a “field” is etched (this is the most difficult option, since it is more difficult to scratch the design), although a more accessible option is also possible, when only the contours of the design are etched.
Metal etching
You can use a variable transformer, for example, from a toy railroad. It will be an adapter for a mini-drill, which is indispensable for delicate work. The maximum voltage is 12V, which is more than enough. Heat shrink casing serves as insulation. Flannel: Copper/brass plate - approximately 1007 mm.
We begin electrochemical etching of metal by placing the fabric on a plate and soaking it all in a saline solution (do not skimp on salt). Then we start etching - with quick touches, you shouldn’t hold it for long, because... the varnish may overheat.
Result
The described method of etching metal at home is good because it is easier to control the process, unlike etching in a “entire” vessel.
You just need to go over the drawing several times (we recommend that you practice on rough blanks first so as not to spoil the blade). When the drawing is finished, turn off the unit and wipe the blade with solvent.
Actually, this is the method of artistic metal etching.
What is metal etching used for?
A series of technologies for controlling the removal of the surface layer of a metal part using specially selected chemical reagents is called metal etching. It allows you to remove scale, rust and oxides from products under the influence of acids, salts and alkalis in solutions.
In this way, additional preparation of metal products is carried out for joining or coating, which improves the adhesion of the parts or the applied layer to the base.
The most commonly used method is chemical etching of metal, carried out by immersing the workpiece in a bath of dissolved chemical reagents.
Methods of chemical etching of metal
There are also types of it that provide for additional activation of toxic substances using physical factors.
This is metal etching electrochemical (or galvanic) under the influence of an electric field or ion-plasma through the ionization of reagent particles.
If the word “etching” is used without indicating its type, then we are talking about chemical etching in an aqueous electrolyte. It is also called “liquid”, in contrast to “dry” ion-plasma.
When etching metal with an acid, usually sulfuric or hydrochloric, the workpiece is immersed in its solution. In this case, both the oxides existing on the surface of the part and the base metal enter into an acid reaction. As the acid content increases, the dissolution operations are accelerated simultaneously for the oxides and the base metal.
In addition to the acid concentration, the speed of the metal etching process is also influenced by its temperature regime, as well as the chemical composition of the oxides. The most optimal combination of these factors allows etching to be carried out so that, with the fastest possible dissolution of the oxides, it affects the base metal as little as possible.
In addition, in artistic etching, when it is necessary to keep part of the surface of the product intact, it is covered with a special protective layer.
To clean iron from surface oxides, the optimal solution is 10% hydrochloric acid at a temperature of 40 °C (for using sulfuric acid - 60 °C). As this temperature increases, the speed of the process also increases. The salts obtained during metal etching can also affect the speed of the process. Some of them, for example FeCl2, increase it, while others, such as FeSO4, decrease it.
The etching of metal with ferric chloride is complicated by the production of hydrogen during reactions of iron and acids. It interacts with the top layer of metal, forming “etching bubbles” in it and making the product more fragile.
In order to prevent this effect, special additives are added to the bath with the etching solution to slow down the reactions. By creating a special shell, they protect the metal from the negative effects of hydrogen.
Tanks made of concrete or wood, coated inside with acid-resistant materials, serve as the main equipment for pickling metal. For the convenience of immersing small workpieces in baths with etching solution, special trays with baskets are used.
When it is necessary to clean not the entire surface, but only part of it, for example, a soldered seam, then a brush is used to apply etching solutions to its surface. The part is then carefully washed with water. Etching pastes are necessary for cleaning rusty metal parts.
The area affected by rust is covered in two stages with different layers of pastes, followed by rinsing.
In this case, they need to be washed after the etching procedure with warm water, dissolving a little cream of tartar in it. In the form of etching of iron or steel products, ammonia solutions or iron sulfate are used; bronze and brass parts require etching of the metal with copper sulfate, and zinc products - with zinc sulfate, as well as a solution of zinc chloride oxide.
Features of the electrolytic etching process
Electrolytic or galvanic etching of metal is used to speed up the cleaning of parts by immersion in a bath of solution, which usually takes a lot of time. This process is much faster if metal parts are placed in an electrolytic bath in the form of cathodes or anodes. Hence the division of electrolytic etching into cathodic and anodic.
For the anodic method of metal etching, alkaline solutions of metal salts and acids are used as an electrolyte. The cathode is usually lead or, less commonly, iron as materials that do not dissolve in the electrolyte.
Given the speed of the process of metal etching by electrolysis, when cleaning products using this method, it is necessary to strictly follow a certain regime so as not to expose the metal to the risk of excessive electrolytic dissolution.
The characteristics of the anode current are selected based on the state of the surface layer of the product, as well as the required speed of the process. Etching is carried out at room temperature. The duration of the operation is determined empirically.
The cathodic method of metal etching involves the use of lead or its alloy with antimony as an anode. When mixed with acid solutions, alkali metal salts act as an electrolyte. This technology is based on the action of hydrogen produced at the cathode.
It promotes the reduction of metals from oxides located on the part, and hydrogen in the form of gas separates them from the surface of the metal. This etching option is not suitable for workpieces made of hardened steel due to the possible hydrogenation of the surface layer of the metal part.
It can be reduced when using this metal etching technology by introducing tin and lead salts into the electrolyte bath.
Galvanic etching is more economical than chemical etching. This applies not only to the time spent, but also to the amount of chemicals used. In addition, the chemical composition of the poisons for such etching does not include caustic acids, so during it no gases are released that have a negative effect on health.
Upon completion of etching, possible residues of solutions after cleaning on the products are neutralized. If this is not done, particles of salts or acids can contribute to the onset of metal corrosion.
In order to remove these residues, the products are briefly placed in a solution with soda ash. After this, the parts are washed with cold and then hot water and dried.
What is etching
This is a technology for removing the top layer from the surface of a metal part. The technology is used to clean workpieces from scale, rust, oxides and remove the top layer of metal. Using this method, the top layer is removed to search for internal defects and study the macrostructure of the material.
Using etching, they clean the part and increase surface adhesion. This is done for the subsequent connection of the metal surface with another workpiece, before applying paint, enamel, galvanic coating and other protective coatings.
The method allows you not only to quickly clean the part, but also to create the desired pattern on the metal surface. Using this method, the finest channels and complex images are cut out on a metal surface. You can clean large parts or rolled products. The processing depth is adjustable with an accuracy of several microns, which makes it possible to produce complex parts with small grooves and other complex elements.
We prepare the product for the etching procedure
Preparing a steel or iron product for the etching procedure at home includes a number of necessary steps. First, the surface must be thoroughly cleaned of any contaminants; this is the only way to guarantee that etching will proceed quickly and the depth of the removed layers will be the same.
Popular detergents and ordinary water are quite suitable for cleaning metal. After the metal is washed, it must be allowed to dry. Next, the surface must be wiped using fiber, which is previously moistened in a solvent. Thus, you can not only remove residual moisture, but also degrease the surface.
It should also be noted that the quality of the treated surface can be improved by polishing it. This can be done on a special machine. If this is not possible, then the metal must be treated with sandpaper. Thus, you can create a very interesting optical effect with your own hands.
Now you need to apply the future design to the metal surface. Nowadays, many techniques are used for this. The main thing to remember is that areas that should not be etched must be treated with protective agents.
Today, nail polish is often used as such protection. But this method has certain disadvantages, namely:
- The varnish has a thick structure, which makes it difficult to apply when it comes to complex ornaments or designs.
- A master needs to be able to draw well.
- If a mistake occurs when applying the varnish, it will not be easy to correct.
A layer of varnish or primer is applied to the surface of the product. When this composition dries, you need to apply the image using a thin tool or pen. Next you should find a thin needle, an awl or a special tool with which the image is scratched onto the metal. This must be done extremely carefully so as not to damage the polished surface outside the contours of the design.
When the sketch is ready, all that remains is to close the parts that should not be treated with protection and begin the procedure itself. It must be remembered that the protection can only be applied to a dry surface, since otherwise the acid or saline solution may get on the metal and damage the surface. It will be very difficult to correct such an error in the future.
Application of etching in industry
- For cleaning parts made of carbon, low-alloy and high-alloy steel, titanium and aluminum from oxide film.
- To improve adhesion before applying galvanic and other types of protective coatings.
- To prepare steel surfaces for hot-dip galvanizing.
- To conduct macroanalysis to detect the formation of intergranular corrosion in stainless steels.
- This technology is used to process small metal parts, such as watch gears.
- Copper processing is used to make semiconductor chips and printed circuit boards in electronics. This method applies a conductive pattern to the microcircuit.
- For quick cleaning of hot rolled metal products, heat-treated parts, from oxides.
- In the aircraft industry, this technology is used to reduce the thickness of aluminum sheets to reduce the weight of the aircraft.
- In the manufacture of metal inscriptions and drawings. Etching produces relief images drawn by removing a layer of metal according to a specific stencil.
Read also: How to measure chainsaw chain pitch
Description of metal etching technology
This technology involves removing part of the surface layer of a product through a chemical reaction.
When talking about what metal etching is, you need to understand: with the help of solutions of acids, salts and alkalis, products are cleaned of scale, traces of corrosion, and oxides. This approach is also necessary for additional preparation of metal parts for joining and coating, since it provides better adhesion of elements, or the base and the protective layer. It is worth mentioning that the most common is chemical etching of metal, in which the workpiece is immersed in a bath of chemical reagents.
Before starting etching, areas of the surface that should remain unchanged are protected with a special compound. After which the workpiece is exposed to an acidic environment or is dipped into an electrolyte. The thicker the layer of metal that needs to be removed, the longer the processing takes. Sometimes they resort to multilayer etching, in which work is carried out in several stages.
Types of etching
The main types of metal processing used in industry:
- electrolytic - there are cathode and anodic;
- chemical;
- plasma.
Electrolytic etching
Electrolytic or galvanic metal processing is used to quickly clean parts, apply engravings and produce grooves. Metal parts are immersed in an acid or salt electrolyte. The part becomes a cathode - a negative electrode or an anode - a positive electrode. Therefore, two types of electrolytic etching are classified - cathodic and anodic.
- Cathodic etching. The method is used to remove scale from the surface of carbon steel products after hot rolling or oil quenching. In cathodic etching, the material for the anode is lead, and the electrolyte is a solution of hydrochloric, sulfuric acid or an alkali metal salt. During the electrolysis process, hydrogen gas is actively released at the cathode, which interacts with iron and removes scale. During the cathode method, the metal surface is actively saturated with hydrogen, which increases the fragility of the workpiece. Therefore, the cathode method is not used for thin-walled products.
- Anodic electrochemical cleaning. This is the most common method in mechanical engineering. The process involves mechanically tearing off the oxide film on the anode with oxygen and mixing metal molecules with the electrolyte. An electrolyte is a solution of acids or salts of the metal being processed. Lead, copper and other metals are used as the cathode. During anodic treatment, the surface of the product becomes clean, with slight roughness, and the metal dissolves in the electrolyte. With this method, there is a risk of reducing the thickness of the workpiece and over-etching.
Chemical etching
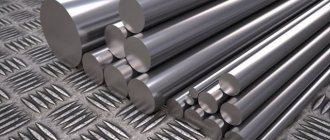
The chemical treatment method is used to clean the surface of a part from oxide film, scale and rust for workpieces made of the following materials:
- ferrous metals;
- stainless and heat-resistant steels;
- titanium and its alloys;
- aluminum
For etching, sulfuric, hydrochloric or nitric acid is used. The workpiece is immersed in an acid or alkaline solution, molten salt and kept for the required time interval. The required cleaning time can range from 1 to 120 minutes.
The cleaning process occurs due to the release of hydrogen when the acid interacts with the metal. Acid molecules penetrate through pores and cracks under the oxide film. There they interact with the metal surface and hydrogen is released. The released gas tears off the oxide film and cleans the part.
Simultaneously with the oxides, the metal being treated dissolves in the acid. To prevent this process, corrosion inhibitors are used.
Plasma etching
With the ion-plasma method, cleaning and removal of the surface layer occurs by bombarding the part with ions of inert gases that do not react chemically with the molecules of the material being processed. Allows you to make high-precision notches and grooves with an accuracy of up to 10 nm. The technology is used in microelectronics.
The plasma-chemical method involves excitation of plasma in a chemically active medium, which causes the formation of ions and radicals. Active particles falling on a metal surface cause a chemical reaction. In this case, light compounds are formed, which are removed from the surrounding air by vacuum pumps.
The method is based on chemical reactions that occur when using reactive gases, such as oxygen, which are highly reactive. These gases actively interact in the gas discharge plasma. Unlike plasma treatment in inert gases, with this cleaning method, the active gas reacts only with certain molecules.
The disadvantage of this method is the lateral expansion of the grooves.
The essence of the technique
Cold etching of metal, like any other action, requires a preparatory process. First of all, such preparation at home requires removing contamination from surfaces, especially oil. Next, you need to protect those areas of the metal that should not be etched. To do this, a special coating is applied to the pattern, which is able to withstand the chemicals used in etching.
At the next stage, the product or element is immersed in a container where electrolysis is located, creating an acidic environment. Remember that the longer the metal is in an acidic environment, the more of the surface will be corroded by the aggressive composition. In some cases, multilayer etching technology is used, when the procedure is applied several times.
Today, etchers use different methods of metal etching; let’s look at them in detail.
- Electrochemical etching method. Certain types of metals (such as stainless steel) that are highly resistant to acid. Therefore, electrochemical etching is used to process such metals at home.
To carry out etching using the electrochemical method you will need: a plastic bath filled with electrolyte, terminals, wires, as well as a source of electricity transmitting direct current. It should also be remembered that the reaction process occurs extremely rapidly, and therefore we use a container with a large volume. The etching itself usually takes from a few minutes to half an hour. At the same time, the master needs to periodically check the product so that the composition does not corrode the metal more than is required. The connection diagram for metal etching is as follows: a copper plate is immersed in the electrolysis solution, through which current is supplied. As practice shows, the method is effective.
- Chemical etching technique. The process takes place in a container where the active composition has previously been poured. Such compositions include citric acid, saline solution, and acetic acid. If a solution for etching metal is prepared from salt, then its chemical efficiency will be lower than that of acid solutions.
Instructions for chemical etching in saline or citric acid involve immersing a metal surface coated with a protective solution in a container. In this case, the duration of the procedure depends on what composition the master uses.
Etchants
Pickling of carbon steels is carried out in an 8-20% solution of sulfuric or 10-20% hydrochloric acid. With the obligatory addition of corrosion inhibitors (KS, ChM, UNIKOL) to eliminate the fragility of the material and reduce the possibility of over-etching.
Products made of stainless or heat-resistant steel are processed using a solution consisting of: 12% hydrochloric, 12% sulfuric, 1% nitric acid. If required, processing is done in several stages. The first is that scale is loosened in 20% hydrochloric acid. The second stage is immersion in a 20-40% nitric acid solution to completely remove surface contaminants.
The thick layer of scale that forms on stainless steel is removed during its production by 75-85% molten caustic soda with 20-25% sodium nitrate. After which, complete removal of oxides is carried out in 15-20% nitric acid.
Processing of aluminum and alloys based on it involves removing the refractory oxide film from the surface of the workpiece. For this purpose, alkaline or acidic solutions are used. Usually 10-20% alkali is used, at a temperature of 50-80 ºС, the etching procedure takes less than 2 minutes. The addition of sodium chloride and sodium fluoride to the alkali makes this process more uniform.
The purification of titanium and its alloys, carried out after heat treatment, is carried out in several stages. At the first stage, scale is loosened in concentrated caustic soda. Then the scale is removed in a solution of sulfuric, nitric or hydrofluoric acid. To remove the remaining pickling sludge, use hydrochloric or nitric acid with the addition of a small amount of hydrofluoric acid.
When processing copper and its alloys, etchants from hydrogen peroxide, chromic acid and the following salts are used:
- copper chloride;
- ferric chloride;
- ammonium persulfate.
This information material describes in detail the pickling process used in metallurgical plants. The method allows you to quickly clean the metal surface from oxides, scale, rust and other contaminants. Thanks to etching, it is possible to apply various designs to metal, create complex microcircuits and make microscopic channels of the desired shape.
DIY instructions for electrochemical etching of metal
Electrochemical etching of metal is often used by home craftsmen, because this method allows you to transfer any design. To do this you need to go through the following steps:
Prepare the surface of the product
- remove foreign inclusions, traces of corrosion, scale, dirt from the metal;
- wipe it with a rag and degrease it with solvent.
Next they move on to polishing. Sometimes it is not possible to achieve mirror smoothness - then the surface is sanded with sandpaper strictly in one direction.
To create an inscription or drawing on a metal plate, you need to prepare:
- container made of glass or plastic;
- table salt;
- metal plate;
- 5–12 V power supply;
- connecting wires.
1. Cut a rectangular fragment from the metal plate, on which the inscription will soon appear. In any hardware store you can easily find a plate 1-2 mm thick. For example, a cheap steel eyelet will do.
2. Sand the workpiece - use coarse sandpaper for this, and then move on to fine sandpaper. The result should be a shiny surface with many small scratches. Do not forget about sanding the edges and edges of the plate. Next, the metal is degreased with alcohol, a solvent, or washed with hot water and soap, after which it is forbidden to touch the surfaces with greasy hands.
3. Print the design on a laser printer and transfer it to the workpiece using laser-iron technology. Remember that the sketch is printed as a mirror image. If you don't have a laser printer, nail polish or a permanent marker will work for drawing. As a result, the painted area will remain unchanged, but the exposed metal will be etched away.
4. Take a non-metallic container, pour water, add salt. When etching metal in a saline solution, the concentration of the latter affects the speed of work: the more salt, the faster you will achieve the desired result. However, you need to understand that excessive speed is dangerous for the protective layer of varnish or toner, which is why the drawing will turn out to be of poor quality. Therefore, it is recommended to prepare a mixture of a glass of water and a tablespoon of salt.
An anode, the role of which is played by the workpiece itself, and a cathode are fixed in the container. Any piece of metal is used as the latter, but the larger its area, the faster the etching will be completed.
The plus from the power source must be connected to the workpiece, and the minus to the solution. To achieve uniform etching of the metal, it is better to install several negative contacts on all sides of the piece of plate being processed.
A computer power supply, namely its 12 V line, is suitable as a current source. Remember that the etching speed depends on the voltage. Or you can use a mobile charger - its output is 5 V, which is quite enough for the planned procedure. A voltage above 12 V can cause the process to proceed too quickly, causing the protective layer of varnish to fall off and the metal etching solution to reach an unacceptable temperature.
So, when the wires are connected, you can turn on the power supply. Bubbles that immediately come from the cathode are a sign that the process has started. If the bubbles are coming from the workpiece, there was a mistake in choosing the polarity.
Within a few minutes of processing, foam of an unpleasant yellow-green hue will appear on the surface of the solution. And 30–40 minutes after the start of etching, you need to turn off the power and remove the plate from the solution. Do not be afraid of a dark coating on the surface of the metal; it is normal.
5. Remove plaque, wipe off the toner or varnish that acted as a stencil for etching on the metal, and re-sand the metal if necessary. Plaque can be easily washed off with a stream of water; to remove nail polish or toner, you will need acetone or nail polish remover. After these procedures, it is clearly noticeable that the letters are in relief, and the etched surface has become matte.
Pickling of non-ferrous metals
Copper and alloys based on it are etched using sulfuric, hydrochloric, phosphoric or nitric acids. The process is accelerated by solutions of chromates or nitrates. The first stage is the removal of scale, then the brass is directly etched. Aluminum (and its alloys) are etched in a caustic alkali solution. For casting alloys, nitric and hydrofluoric acids are used. Spot welded workpieces are treated with phosphoric acid. Titanium alloys are also etched in two stages. First - in caustic alkali, then in a solution of sulfuric, hydrofluoric, nitric acids. Titanium etching is used to remove the oxide film before electroplating. Molybdenum is treated with a solution based on sodium hydroxide and hydrogen peroxide. In addition, metals (such as nickel, tungsten) are etched using water, hydrogen peroxide and formic acid.