Do-it-yourself vibrating screed for laying concrete (drawings)
The reliability of a concrete coating depends not only on high-quality building materials and the correct proportions of the mixture. Maximum strength and durability of the screed is given by thorough compaction. Air cavities and voids in the frozen mass will reduce the quality and shorten the period of use.
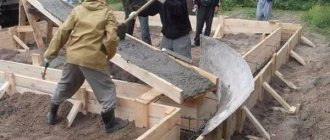
When pouring a small platform or formwork for an outbuilding, air is released by piercing the cement mass with a pin (for example, a piece of rebar). But when installing a floor in a room, laying a road surface, concreting a parking lot or other similar areas, using the manual method is problematic and the high quality of the foundation is not guaranteed. A special bar with a small amplitude of intense vibrations helps to compact the surface on your own faster and easier.
Structures of any power and complexity are effective if concrete is laid and leveled in a layer of up to 20 cm. Screed of greater thickness is compacted layer by layer.
Types of mechanisms
Vibrating slats are divided into 4 subtypes according to their design:
One type of such tool is with guide elements, which is convenient for deeper processing of the poured surface.
- Floating. Used for final layer processing.
- Sectional. Used when filling large areas.
- Telescopic. Universal, made with sliding slats.
- With guide elements. Relevant when vibrating to a depth of up to 30 cm.
Typical design and operating principle
The main components of the device in question are the following:
- Working frame - it is in direct contact with the concrete surface.
- Vibrator - attached to the frame and creates intense vibration movements, which perform the function of tamping and compaction.
- Motor - sometimes the vibrator is pre-mounted with it.
- Handles with which the vibrating screed is controlled.
- All handles are covered with vibration-absorbing material, otherwise working with the device will be very uncomfortable.
If a person has all the specified components, then creating a vibrating screed for processing concrete with your own hands will not be a big problem.
The device works simply - the engine drives a vibrator, which transmits its movement to the working frame. The frame itself is in contact with the surface being processed and transmits the generated vibrations to it.
The vibrator itself functions thanks to the presence in its structure of a special part - an eccentric, which creates powerful frequency vibrations that are transmitted to the frame. The higher the vibration frequency and the slower the surface is processed, the denser and better quality it will be.
Homemade vibrating screed for concrete
Types of vibrating slats for laying concrete mixture
When constructing concrete surfaces for platforms, roads, floor screeds, and slab foundations, special attention is paid to the strength, evenness and smoothness of the surface. The leveling method using hand tools is labor-intensive and time-consuming. Vibrating screeds for laying concrete, mortar and mixtures will help improve the quality and speed up work.
Vibration compacts the freshly laid material, removing air bubbles. After the concrete hardens, there are no cavities in it, into which moisture could get in over time and destroy the surface of the monolith. Vibrating screed treatment improves the quality of the surface layer, increases: strength, water resistance, frost resistance and wear resistance.
Methods for making vibrating screeds
A homemade vibrating screed is a tool with a simple structure. It consists of the following main structural elements:
- drive;
- slats (frames);
- control knobs.
At home, vibrating tools are made in two ways:
- in the form of a mop;
- in the form of a rigid frame.
The equipment is driven by a gasoline or electric motor. For home use, it is better to use an electric motor as the basis of the mechanism, because it can be used indoors without any problems, for example, when screeding a floor.
The motor can be removed from an old power tool or from an unused household appliance.
An electric motor with a power of 1.5 kW is enough to compact a layer of concrete mortar 200 mm thick, as well as level it. If you use a motor with a large value of this parameter, this will, in most cases, lead to unnecessary energy consumption. Only when you really plan to carry out a large volume of construction operations in domestic conditions associated with compacting concrete, can you take a motor of greater power. This will be a justified step in terms of productivity, efficiency and safety of work.
If you have to work mainly outdoors or in well-ventilated areas, then it is quite possible to replace the electric motor with an internal combustion engine, for example, from a chainsaw or brush cutter. You just need to use it to start, in conjunction with the clutch.
To make the frame, a steel channel or a flat board is suitable. For home use, it is enough to equip homemade vibration equipment with a rack up to 3 m long. When choosing this parameter, in the general case, you need to be guided by the size of the object that needs to be built.
Design and principle of operation of a vibrating screed
A tool such as a vibrating screed is considered narrow-profile, as it is used for certain work - leveling concrete pours . The design consists of a rigid frame and a vibrator, which causes the working element to move asynchronously after starting the engine.
For convenient control, the device is equipped with handles that look like the handlebars of a bicycle or motorcycle. The vibration motor is powered by electricity or gasoline.
Reference! The frame (usually) is made of a thick sheet of aluminum or high quality alloy steel.
Operating principle of the device:
• by pressing the start button the unit is started;
• the engine transmits rotational movements to the frame system that reach the frame (rules);
• under the influence of the moving frame, the concrete solution also becomes mobile, as a result of which air bubbles come out of it, and high-quality compaction of the concrete is achieved.
The parameters of the vibrating screed working element vary (from 0.3 to 10 m), which largely depends on the type of installation being performed.
When comparing the gasoline and electric units, it was concluded that the first option is more powerful. Therefore, it is used in large-scale construction. Gasoline units have a peculiarity - they emit harmful impurities into the atmosphere during operation, which are formed as a result of fuel combustion. This gives grounds to limit the use of the installation, allowing work only on open construction sites. The electric model is used for both external and internal installation.
Reference! The main functions of a vibrating screed are to compact the concrete solution and expel air bubbles from it. A good idea is to use a device for leveling the concrete surface (screed, floors, etc.).
Construction stores offer a wide range of vibrating laths, but their prices are quite high. The simple design of the unit allows it to be installed at home using available materials.
Preparatory stage of work
A floating vibratory screed is not technically complicated, but to assemble it with your own hands you will need minimal knowledge in the field of construction.
As noted above, it is much easier to buy this device at the nearest specialized store, but if you want to save money and assemble it yourself, you should carefully prepare for the work.
To assemble it yourself, you must have basic skills in working with welding and electricity.
It is extremely important that when assembling a floating vibrating screed with your own hands, follow the safety rules.
Diagram of the vibrating screed: 1 - working plate; 2- vibrator; 3- shaft; 4-shock absorbers; 5- frame; 6- engine; 7- belt drive; 8.9- pulleys; 10-drive shaft.
This is because most of the work will be done using a three-phase starter.
Experts consider the optimal size of the working part of a vibrating screed to be three meters, and it is better to take the engine power no more than one and a half kW.
As practice shows, a floating vibratory screed with such parameters will allow you to work with a solution whose thickness is up to twenty centimeters.
To make this universal device with your own hands, you need to have a channel and fittings on hand, as well as angles made of steel or aluminum.
In addition, you need to stock up on bolts with different diameters, insulating rubber, and high-quality three-phase cable.
You will definitely need an electric motor of appropriate power, suitable starters for it, as well as the vibration installation itself.
The tools you should find are a welding machine, a drill with a screwdriver, and a set of wrenches.
All materials must be of high quality and reliable, since during its operation the floating vibratory screed will be subject to fairly high loads.
In addition, when assembling this device, it is necessary to comply with safety regulations as much as possible and ensure reliable protection of all electrical components of the equipment.
It is advisable at the preliminary stage of work to draw up a detailed drawing of the assembled device and carry out all work in strict accordance with it.
Do-it-yourself vibrating screed for concrete screed.
3.5 curved handles are formed from a piece of reinforcement. They are attached to the profile by welding. There is an option to strengthen the reliability of the connection with screws; the handles are insulated with rubber.
The motor is located in the center of the frame. This ensures uniform transmission of vibration throughout the frame. The engine is attached using two corners to the frame. Screws are used differently for welding, the sequence varies. The first option implies that the corners are attached to the motor, after which this structure is installed on the profile. In the 2nd case, the corners are fixed to the frame, and then the engine is installed there. The methods are really equivalent. The master will do it because he is comfortable.
The fundamental point is to firmly fix the cable (on the frame, in other words, on the handles). The starter is installed on the motor, or it is also called on the handle. The gasoline vibration screed is assembled in the same way. It must be emphasized that what remains for our client to do is welding work, if desired, replaced with bolted connections.
1. The working part of the vibrating screed for home use in its ideal version is 3.5.5-3 m.
2.4. A motor power of 1.5 kW is enough to compact a 20-centimeter layer of concrete.
3. Instead of an iron profile, simple (3/4) differently shaped pipes are completely suitable.
4. The presence of a frequency converter in the rack design allows for normal load selection.
5. Welding the engine to the frame is not recommended, because this will complicate possible repairs.
6. When testing the assembled equipment, you do not need to pour a lot of solution. In the initial step, experiment in small areas. This will make it much easier to adapt to technology.
7. A layer of concrete is poured 3-4 cm higher from the guide mark.
8. Engine noise is harmful to the hearing organs, which is why earplugs are used. You should also wear gloves.
Source
Vibrating screed rental
Professional vibrating screeds cost from 20,000 rubles (electric) and from 40,000 rubles (gasoline). Not everyone can afford this.
Also, many developers do not see the point in spending that kind of money, and when screeding the floor and foundation, they cannot do without this tool.
Therefore, the best option would be to rent a vibrating screed for concrete. Almost all large stores offer rental services for tools and equipment.
You can rent a vibratory screed for a certain number of hours or several days, leaving a certain deposit, which is provided for by the store’s policy.
Homemade concrete smoother or ideal screed when building a house
First, you should list the necessary components for the vibration rack. The list includes:
1. channel (for creating the frame frame);
4. electronic engine;
8. starter for the electric motor, regulating the speed;
To make a vibrating screed, you will need the following tools and equipment:
- apparatus with a protective mask and gloves;
- drill, metal drills;
- screwdriver
There is an option to rent a welder or invite a specialist. This will cost more, but there will be a 100% guarantee of high-quality work of the seams and fastenings. How correctly the welding work is performed determines the durability and performance characteristics of the equipment being created.
Those who still dare to make a vibrating screed on their own without outside help need certain abilities, specifically speaking:
- production experience with a welding machine;
- knowledge from the field of electrical engineering;
- General accuracy, ability to follow instructions and read diagrams.
From time to time, for an amateur craftsman, the main obstacle becomes his own “creativity”. Instead of following the advice correctly, a person wants to make “unique equipment”, but in the end he gets a completely wrong result. In order for the vibrating screed for screeding a concrete floor to come out as it will fit, it is important to follow what remains to be done by our client in the instructions.
The process of assembling the electronic rail is carried out on a flat surface (table, workbench) in the indicated sequence:
DIY vibration screed
For small jobs, you can use a homemade vibrating screed.
Manufacturing
The simplest option is to assemble a vibrating screed from a board, timber and drill.
First, the surface of the board must be sanded, all irregularities must be removed. It is this material that will serve as the basis.- Next, a drill is attached to the board, about 25 cm wide and about 30 mm thick, with self-tapping screws. The drill should lie lengthwise on one of the sides.
- Also, a meter-long beam is attached to the board using self-tapping screws.
Usage
It is easy to use.
You insert a curved drill into the chuck of an electric drill and connect it to the mains, thereby creating vibration movements of your board.
Flaws
There are no shortcomings in a homemade vibrating screed. They are as follows:
- No matter how you sand the board, it will not have the same smooth surface as an aluminum screed.
- The power of the drill is not sufficient to work with a larger board, and accordingly, the work will be performed in small sections.
- Disposable vibration screed, because After the first use, the board will become unusable.
- It is impossible to regulate the speed.
Vibrating screed option with aluminum profile
It will be more difficult to make a vibrating screed with a metal lath with your own hands. In addition to the monetary costs, you also need to have technical knowledge.
Instead of a board, in this version an aluminum profile will be used. This design will last you longer. The function of the handle will be performed by a pipe, and, of course, a vibration motor.
We do not recommend using welding in this option. For safety reasons, cover the handle of such equipment with insulating material.
Adviсe
- Your homemade design will be reliable if you secure all its components properly . The bolts must be tightly screwed. The wire should not dangle.
- After you have made a vibrating screed with your own hands, test it . To begin with, a small surface will suit you. Test your homemade tool first, otherwise you may ruin the entire screed. Do the work without rushing.
Vibrating screed
Anyone who wants to make a vibrating screed with their own hands must clearly understand how it functions and what is needed to make it. First of all, you should take into account that in most cases such a tool cannot work autonomously - it needs a network of ≈220 V or ≈380 V. Have you thought about batteries? Yes, it’s a worthwhile thought, but even the most powerful of them (only light models are taken into account) can provide the engine with power for no more than 4-6 hours of continuous operation, and their power is too low. Also on the construction tools market are vibration racks with a carburetor engine. This, of course, solves the problem of remote construction, but not completely.
Source td-set.ru
The essence of the purpose of this type of construction equipment is to remove voids created by water and air from the concrete mixture, and this is possible thanks to the compaction of the adhesive agent and fillers - cement, sand and crushed stone. The process occurs under the influence of mid-frequency vibration of a metal bar, set by the engine and transmitted to the treated coating. All units of this type consist of three main parts: a long rack for smoothing, which creates motor vibration, and a double or single control handle. The technical parameters of each node may vary depending on the need. For example, the length of the bar varies from one to five meters, the engine can have different power, and the handle can be extended with special inserts to work at a distance.
In addition, there are a number of other benefits, and most importantly, the speed of concreting various sites, which increases 5-7 times, depending on the coverage of the treated surface (length of the rule). In addition, you can fill a large area with concrete at one time, for example, dump a full mixer (automobile concrete mixer) onto the site and make a screed, walking through the liquid concrete in boots. This cannot be done with manual tightening, since this process is performed while squatting or kneeling. The vibrating screed allows you to work with a layer of mortar up to 20 cm thick, which is in no way possible for manual screeding, since the finisher is physically unable to compact such a layer efficiently.
Despite the fact that such a unit is automated by a carburetor or electric motor, it remains manual in any case, since it is moved by the operator using muscle power, and it is common for a person to get tired. Based on this, manufacturers produce slats from lightweight aluminum, but not from steel, which is much stronger but heavier. This principle also applies to control handles and engine mounts. Light weight is extremely important in road construction, where a vibrating screed is needed constantly and the operator has to work almost without interruption.
Electric drive or carburetor
Of course, an electric vibratory screed is better in two respects: firstly, electricity is much cheaper than gasoline, and, secondly, the first option does not provide absolutely any emissions from fuel combustion. On the other hand, the need to connect to a stationary power source by default implies the presence of a power cord, which is a limiter for the ability to move away from the outlet. Of course, you can use an extension cord, but this can only solve the problem within a personal plot, but not on the street.
Source raketa.net.ua
Gasoline-powered construction equipment is not suitable for work in enclosed spaces, since gas pollution at this level is life-threatening. Therefore, if we talk about vibrating screeds, then there is no way to do without an electric motor, and we will briefly consider one of them, this is the PB-02 floating type. But, to be honest, I don’t quite understand why it is considered floating, because this construction tool has nothing to do with reservoirs, and its handle is rigidly held in place by the engine. Perhaps this adjective is used because the instrument easily changes direction, like a swimmer on water.
Manufacturers claim that this unit is used without guides, but I consider this to be a common marketing ploy, since the rack does not have such parts, which means that we are talking about beacons on a screed. Only the lighthouse screed is aligned only along them and nothing else. Otherwise, the parameters are quite decent, for example, the aluminum profile varies by 1500, 2000, and 2500 mm, the power is 190 W, which is enough to process a layer up to 100 mm thick. Such a unit weighs 16.18 and 20 kg, depending on the length of the rail. As you can see, this tool can be used to work in private homes, in multi-story construction, and even to fill entrances for trucks, taking into account the fact that the vibration depth reaches 100 mm.
Source tool-price.com
The top photo shows a Baumax BMX 5FH vibration screed running on gasoline. Before talking about its technical characteristics, it is worth mentioning the main advantage of such a tool - it is mobile and easy to transport. That is, with such a unit you can go to any place where there is no stationary power source or there are constant power outages in the network. In addition, while working, the power cord will not drag behind you, which gets in the way. The two main disadvantages of a gasoline vibrating screed are the high cost of fuel and the inability to work indoors.
The length of the working profile of such a tool varies from one to five meters, which allows the vibrating screed to be used both in road construction and for creating park (garden) paths. The depth of compaction of the concrete mixture reaches 150 mm, which means that the tool is cost-effective for any civil objects. The unit is equipped with a Honda GX-35 carburetor engine (the brand speaks for itself), with a power of 1.6 horsepower, which is equivalent to 1.2 kW. If you do not take into account the fact that you will have to work with headphones, then real builders will enjoy this process.
How to make your own vibrating screed for concrete compaction
Concrete coating is one of the most popular and widely used in construction. It is characterized by high wear resistance, strength, and long-term operation. Screed, blind area, floor, columns, as well as many other options for using concrete require a competent approach to pouring technologies. In order for the quality of the coating to be high, you need to have on hand not only good building materials, but also special tools. Therefore, a master who follows the instructions must have a vibrating screed. It will help compact, compact and level the mortar mass.
Purpose and varieties
A vibrating screed is equipment used for several operations when pouring concrete:
The vibrating screed removes remaining air bubbles and water from the concrete. This prevents the formation of cavities inside the hardened concrete, which can subsequently cause structural failure. Modern tool models allow you to obtain a perfectly smooth finishing surface.
Vibrating screeds for concrete compaction are used both on an industrial scale (bridges, overpasses, hydraulic structures) and in individual construction (foundation, floor, blind area). A professional tool is expensive, but for home use it is quite possible to make a simple mechanism with good performance characteristics.
Such models are installed on concrete and smoothly pull themselves, while compacting and compacting a layer up to 18 cm deep. Grip length – from 1.5 to 5 m. Used for freshly laid surfaces. They are operated by one specialist, for whom operation of the device does not present any problems.
2. Working according to guides.
More productive and efficient, they compact the layer up to 30 cm. The power of the tool allows you to do without deep vibrators. They have a lot of weight, which is precisely what determines the use of guides, thanks to which the rail does not sink into the concrete.
Engineering is progressing, so new models are appearing that combine the characteristics of basic and innovative capabilities. Reversible vibrating screeds can move not only forward, but also backward. And sectional (sliding) ones allow you to capture a width of up to 25 meters.
Any vibrating screed consists of two main parts - a profile and a power unit. The shapes of the structures are very diverse. An aluminum, magnesium or steel profile is used. It is possible to use a gasoline or electric engine.
Types of vibrating slats
As for the steel , more durable frame, it most often organizes the movement of concrete. An important point is that the dimensional characteristics, which also include the length of this very rail, start from 60 centimeters and it is possible that its maximum length will be 11 meters. As stated earlier, the material presented comes in several variations:
- electrical,
- as well as gasoline ones.
Vibrating screed ScreeDemon
As for electric ones , they have very high power. True, due to the fact that quite harmful substances and elements are released into the atmosphere, it can only be used in the open air. But the second variation is simply irreplaceable in the field of construction work, moreover, in the interior area of the premises.
Moreover, they are used to carry out the smoothing process of various areas. By the way, you can buy a device of this variation in absolutely any construction store.
There are some negative aspects here. The cost characteristics are by no means cheap. Also, there is no guarantee that it will serve you for a very long time. That is why, based on all this, one very significant conclusion can be drawn. It will be quite cheaper and more practical to build a vibrating screed with your own hands.
So, what is the very essence of making a vibrating screed in order to make concrete yourself and at the same time, without resorting to the help of specialists? This material is used not only to carry out the process of compacting the solution, but also to expel the bubbles themselves from the very thickness, which in turn have a very bad effect on such qualities of the material as wear resistance and, of course, durability.
Installation of the main element of the vibration rack
Well, now it’s time to work with the rule. It is necessary to drill 4 holes in it so that it can be connected to the side ribs of the platform with bolts. And again, fasteners from the “couldn’t get simpler” series. If necessary, the rule can be removed and used manually, or replaced with a longer or shorter one.
PHOTO: YouTube.com The rule has been established, which means you can assemble and check the vibrating screed for functionality
Peculiarities
The work of the vibrating screed is based on removing air bubbles and excess moisture from the solution, which minimizes the formation of voids and, after drying, makes the mixture more dense and homogeneous. The mixture, which has not yet had time to dry, under the influence of vibration, moves the concrete and grains of crushed stone in it, thereby displacing voids and air. The result is a monolithic surface, devoid of seams and cracks.
The surface of floors, bridges, road surfaces or concrete platforms treated with such a device will be durable and strong.
Vibrating screeds are actively used in both private housing construction and industrial-scale construction sites. They are also used if it is necessary to level any surfaces during concreting done in layers.
The invention of this unit can be considered one of the achievements of modern technologies that influence the improvement of construction processes.
The vibrating screed for concrete is used mainly for freshly laid mortars that have not yet had time to dry, as well as for the purpose of correcting cement layers.
Design and principle of operation of the mechanism
The vibration screed consists of the following parts:
- an engine with a vibrator, powered by electricity or gasoline;
- handles treated with vibration isolator;
- a working frame with a vibrator, which is made of metal hollow pipes and a metal profile tightly attached to them.
The operating principle of the device is based on the fact that torque is transmitted from the engine to the vibrator. As a result, the eccentrics of the vibrator, which has a displaced center of gravity, create certain vibrations that are transmitted to the concrete layer through the profile.
The optimal operating mode of the vibrating screed is selected using a special sensor. The higher the oscillation frequency and the lower the speed, the mixture will be denser, but the work productivity will noticeably decrease.
The vibrations of the vibrating screed help to achieve 7-day strength of the concrete layer within 24 hours of work. In addition, the impact of this mechanism significantly increases the resistance of concrete to frost and temperature changes, by almost 30%.
Gartsovka for paving slabs ratio of sand and cement
Gartsovka for paving slabs
Modern street improvement involves the widespread use of paving slabs. To install it, a prancing agent is used - a special two-component mixture consisting of a filler and a binding mass. Thus, it is a lime-sand or cement-sand mass mixed in various consistencies.
Dry laying mixture for tiles stands out among other compositions due to the proportions of the components and the technology of use. The method of its application differs significantly from the finished liquid solution.
You can make a pliers for installation yourself, but purchasing a ready-made composition will significantly save time.
Laying mass composition
The use of a plier allows you to achieve a reliable connection of paving products with the base. After laying the tiles, the dry mixture takes on the role of a load-bearing layer and takes on the main load.
A building mass of cement and sand is used in the construction of small pedestrian paths that require a low mechanical load. For roads with traffic or intense pedestrian traffic, granite screenings or fine crushed stone are added to the cement-sand layer.
The proportions of cement and sand vary depending on the type of work - from 1:4 to 1:8. In some cases, due to insufficient cement, grass may grow between the tiles, whose roots will gradually destroy the pavement. If there is an excess of cement, the coating can crack severely and, again, collapse.
The optimal ratio is considered to be 1 to 5.
How to cook prance
The simplest type of mortar is a lime-cement mixture. Before cooking, it is necessary to sift the sand, which will clear it of pieces of clay, stones and shells.
Several buckets of sand are poured onto a flat area. Lime and cement are added, and then everything is thoroughly mixed. For 8 buckets of sand there is one bucket of the remaining components.
The mixture is used dry. In rare cases, it is diluted with water when a concrete base has already been prepared for masonry. In this case, the laying layer can be made thin, and the ratio P:I:C will be 5:1:1.
A cement-sand mixture without adding lime is also used. The mass is prepared in a ratio of one to four, five or six, depending on the required strength of the masonry. The main thing in such cases is not to overdo it with cement, so that cracks do not form.
If you decide to prepare such a solution yourself, we recommend using a concrete mixer.
Gartsovka for paving slabs
Gartsovka is the general name for a group of two-component mixtures that are widely used in the repair, construction and household sectors. It consists of a filler and a binder. Traditionally, this is a lime-sand mixture in various proportions; it can also be made with cement, gypsum, expanded clay, calcium and other components.
Gartsovka for paving slabs differs from other types of dry mixes in composition, method of application and consumption. Its features are related to its purpose. Paving slabs can be subject to significant pedestrian and traffic loads, moisture and other factors. Its foundation must be strong enough.
You can prepare the prance yourself, but experts recommend buying ready-made ones. Only a professional can correctly calculate the composition, proportions, and consumption of the dry mixture. Moreover, the quality depends on the raw materials and the uniformity of the ingredients. The manufacturer takes all this into account when preparing the mixture.
Composition of the mixture for laying tiles
The use of a hook ensures good adhesion of the paving elements to the base. It acts as a load-bearing layer and takes on the bulk of the load. Therefore, the correctness of its preparation and installation is extremely important.
The paving slab compound, which includes sand and cement, is suitable for paths and paths with light loads. For areas with intense pedestrian and transport traffic, fine crushed stone is added to the load-bearing layer instead of sand.
The proportions of the binder and filler will also differ depending on the intensity and operating conditions.
The ratio of cement and sand can vary from 1:4 to 1:8. If you take a composition without cement or with insufficient cement content, vegetation may appear between the tiles, the root system of which will lead to the destruction of the surface. If there is too much cement component, the coating may crack.
Advantages and disadvantages
Not only beading can be used as a supporting layer when laying tiles. They also simply use sand, cement screed, and adhesives. The sand base is easy to restore and repair, but does not secure the tiles well; sand can be quickly washed out. Cement and adhesive compositions can withstand the loads of heavy equipment, structures and a large flow of pedestrians, but the tile coating cannot be restored if damaged. Gartsovka is a universal option - a fairly strong, durable and repairable base that you can make with your own hands.
Technology for laying a layer of grout under tiles
- The mixture is poured dry onto the prepared base. In rare cases, it is allowed to be diluted with water, at the discretion of the master.
- The prancing layer is 4-7 cm. The tiles laid on top of it should rise 0.5-1 cm above the curb.
- The mixture is compacted and leveled over the entire area with a board with cutouts or a rule. It is advisable to compact the layer using tampers or vibrating plates. The quality of the compaction directly affects the durability and reliability of the foundation.
- Before laying the tiles, the surface of the supporting layer is slightly moistened to increase viscosity and bondability.
- After laying, the seams between the paving elements are filled with dry grout to the top.
- The laid tiles are watered with water for several days.
The consumption of the sealant also depends on its composition and layer thickness. On average it is 1.4-1.8 kg/sq.m. with a layer thickness of 1 mm. Only a specialist can calculate the consumption at the planning stage, since the indicator will be different for each component of the mixture. The indicators of each ingredient are taken into account, as well as the total area and thickness of the base.
Electric motor installation
Metal corners will securely fix the engine. It is better to place it in the center of the profile. This will help distribute the vibrations along the entire length of the rack. The engine is secured in two main ways. The first involves installing a special mount directly on the electric motor, then the resulting structure is attached to the profile itself. In the second case, it is necessary to secure the corners to a metal beam and only then install the engine on the structure. To fix the electric motor on the profile, use self-tapping screws or welding. Both methods are equally effective, but a welding machine, unlike a screwdriver, is not accessible to everyone.
What to use as a vibrating screed motor
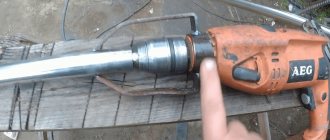
When starting to make such a tool, you should understand that it must be universal. The point is that pouring the screed is a one-time job, which means that the engine from the vibrating screed (if the latter is not needed) should be used for other purposes. Therefore, the best option here would be to use a conventional vibration grinder as a motor.
There is another advantage to using a grinder: you don’t need to trick a regular motor shaft by turning it into a vibrating one. All that remains is to think about how to attach the electrical equipment to the platform so as not to damage the grinder.
What is a vibrating screed?
Scheme of a vibrating screed for making it yourself
So, what exactly is called a vibrating screed? The vibrating screed itself is made of a special frame, which in turn can be made of materials such as steel or less durable aluminum.
Apart from all this, a rather important area is that the vibration installation itself sets this rack in motion. This is really quite a convenient invention.
All its work is based on the engine . Moreover, it can be either electric or gasoline, in principle. The essence and principle of operation is as follows, namely, that the motor area itself transmits the moment of the rotational category to the installation of the vibration direction. And it also organizes all the movement of the frame made of steel or aluminum.
Method of working with a vibrating screed
Before pouring concrete, it is necessary to set the horizontal guides.- The vibrating screed is lined up along the guides.
- The concrete mixture begins to be poured, which should slightly cover the vibrating screed.
- Next comes the compaction process by vibration of the tool.
- The rail is pulled along the aligned guides.
- During operation, the vibrating screed makes unpleasant noises, and due to vibration, calluses can form, so use personal protective equipment.
All of the above methods will help to avoid difficulties when laying concrete pavement.
How to make a Vibrating Screed? Types and instructions - Review +
Concrete is the most commonly used building material. Due to its performance properties, concrete is used in almost all stages of house construction: the foundation, blind area, floor surface, walls and partitions.
To achieve strength and durability, concrete must be made from a quality mixture and the right tools.
If the concrete solution is properly compacted, the finished surface will be free of cracks. The most important tool when working with concrete is a vibrating screed.
Telescopic
Such devices have sliding slats, which allows you to level a large area at the same time.
Before starting work, the slats are fixed to the required distance, which simplifies the work.
Sectional
They have a large grip, which is ideal for industrial construction. They have a collapsible design, which makes them convenient for transportation from site to site. Equipped with a powerful engine.
Aluminum
This type of vibrating screed is designed for processing freshly laid concrete. Designed for private construction. Thanks to its lightness, it is easy to manage.
Based on the type of engine, there are gasoline and electric vibrating screeds.
As noted above, a gasoline vibrating screed is more powerful and, accordingly, more expensive. Electric vibrating screeds have less power, but they are recommended for use in enclosed spaces.
Gasoline engines emit harmful substances during operation, which is noticeably noticeable in confined spaces.
Examples of good vibrating screeds
The Spanish vibrating screed ENAR is perfect for professional use .
The features of this tool are:
- ease of use;
- compacts concrete to a depth of 15 centimeters;
- does not sink into the concrete surface;
- profile length reaches 4 meters;
- Ideal for working on freshly laid concrete.
The price range for a vibrating screed with a Honda gasoline engine with a power of 0.7 hp starts from 44,000 to 51,000 rubles. Weight depends on the chosen model and varies from 15 to 25 kg.
When buying a vibrating screed, remember that it must fully meet your requirements and be suitable for your construction site.
DIY vibration screed
For small jobs, you can use a homemade vibrating screed.
Manufacturing
The simplest option is to assemble a vibrating screed from a board, timber and drill.
- First, the surface of the board must be sanded, all irregularities must be removed. It is this material that will serve as the basis.
- Next, a drill is attached to the board, about 25 cm wide and about 30 mm thick, with self-tapping screws. The drill should lie lengthwise on one of the sides.
- Also, a meter-long beam is attached to the board using self-tapping screws.
The vibration screed is ready.
Usage
It is easy to use.
You insert a curved drill into the chuck of an electric drill and connect it to the mains, thereby creating vibration movements of your board.
Don't forget about safety rules! Wet concrete can be a good conductor of electrical current. Wear gloves and boots.
Flaws
There are no shortcomings in a homemade vibrating screed. They are as follows:
- No matter how you sand the board, it will not have the same smooth surface as an aluminum screed.
- The power of the drill is not sufficient to work with a larger board, and accordingly, the work will be performed in small sections.
- Disposable vibration screed, because After the first use, the board will become unusable.
- It is impossible to regulate the speed.
Vibrating screed option with aluminum profile
It will be more difficult to make a vibrating screed with a metal lath with your own hands. In addition to the monetary costs, you also need to have technical knowledge.
Instead of a board, in this version an aluminum profile will be used. This design will last you longer. The function of the handle will be performed by a pipe, and, of course, a vibration motor.
We do not recommend using welding in this option. For safety reasons, cover the handle of such equipment with insulating material.
Adviсe
- Your homemade design will be reliable if you secure all its components properly . The bolts must be tightly screwed. The wire should not dangle.
- After you have made a vibrating screed with your own hands, test it .
To begin with, a small surface will suit you. Test your homemade tool first, otherwise you may ruin the entire screed. Do the work without rushing.
Vibrating screed rental
Professional vibrating screeds cost from 20,000 rubles (electric) and from 40,000 rubles (gasoline). Not everyone can afford this.
Also, many developers do not see the point in spending that kind of money, and when screeding the floor and foundation, they cannot do without this tool.
Therefore, the best option would be to rent a vibrating screed for concrete. Almost all large stores offer rental services for tools and equipment.
You can rent a vibratory screed for a certain number of hours or several days, leaving a certain deposit, which is provided for by the store’s policy.
Method of working with a vibrating screed
- Before pouring concrete, it is necessary to set the horizontal guides.
- The vibrating screed is lined up along the guides.
- The concrete mixture begins to be poured, which should slightly cover the vibrating screed.
- Next comes the compaction process by vibration of the tool.
- The rail is pulled along the aligned guides.
- During operation, the vibrating screed makes unpleasant noises, and due to vibration, calluses can form, so use personal protective equipment.
All of the above methods will help to avoid difficulties when laying concrete pavement.
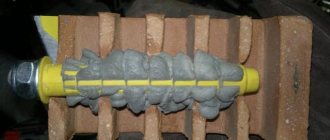
Platform for installing vibration motor
To make a platform for the engine you will need two wide brackets. You can find them at a metal warehouse, or perhaps someone has similar ones lying around in their garage or shed. As a last resort, you can purchase a small piece of cable duct and unravel it using a grinder. The width of the staple should be 5–7 cm, this will be enough.
To make the platform, you will need to weld these brackets to the handle of the paint roller. In words, everything can be difficult to understand, so we suggest you pay attention to the photo example posted below.
PHOTO: YouTube.com This is how you need to weld the staples to the handle of the roller
That's all the welding work that was mentioned at the beginning of the article.
Do-it-yourself vibration screed: materials, manufacturing instructions, nuances of use
Pouring a concrete screed in a house is a rather labor-intensive process. Not only do you need to prepare the solution, it needs to be carefully leveled over the beacons. Most often, the usual rule is used for these purposes.
And today we’ll talk about how you can use it and some other parts and tools to make a vibrating screed, with which it will be much easier to level the concrete. And the author of the Sharp Hammer channel knows how to do this.
What may be required to make a vibrating screed
Despite the apparent complexity of such a tool and its considerable cost in stores, you can assemble a vibrating screed at home almost on your knees. The only thing that cannot be done inside the home (at least not worth it) is welding work. But in fairness it is worth noting that there will be a minimum of them.
Platform for installing vibration motor
To make a platform for the engine you will need two wide brackets. You can find them at a metal warehouse, or perhaps someone has similar ones lying around in their garage or shed. As a last resort, you can purchase a small piece of cable duct and unravel it using a grinder. The width of the staple should be 5–7 cm, this will be enough.
https://www.youtube.com/watch?v=8LsIh7mbsU4
To make the platform, you will need to weld these brackets to the handle of the paint roller. In words, everything can be difficult to understand, so we suggest you pay attention to the photo example posted below.
PHOTO: .comThis is how you need to weld the staples to the handle of the roller
That's all the welding work that was mentioned at the beginning of the article.
What to use as a vibrating screed motor
When starting to make such a tool, you should understand that it must be universal. The point is that pouring the screed is a one-time job, which means that the engine from the vibrating screed (if the latter is not needed) should be used for other purposes. Therefore, the best option here would be to use a conventional vibration grinder as a motor.
There is another advantage to using a grinder: you don’t need to trick a regular motor shaft by turning it into a vibrating one. All that remains is to think about how to attach the electrical equipment to the platform so as not to damage the grinder.
PHOTO: .comThe vibrating grinder is perfect for today's homemade project.
What is the most convenient way to connect a grinder?
Here you can simply attach a socket to the long handle, into which the grinder plug will be plugged. However, there is a better idea. It is quite feasible if you find an old drill with a burnt-out motor in the closet. The engine is removed from it, but everything else will be used.
To begin with, wires are removed from the drill that will be used to power the grinder. Next, they are passed through a small piece of pipe with a diameter of 50 mm and a round socket from the extension cord is attached to them. If you put everything together, you get some kind of pistol with a rather long and thick barrel.
PHOTO: .com This drill is quite suitable for a vibrating screed
Now, when you connect the drill to the network, power will be supplied to the socket, but only if you press the key. Moreover, the harder the operator presses, the more tension will be applied to the grinder. All that remains is to secure the resulting structure to the handle, which can be done using regular tape.
PHOTO: .com This socket will be on the back side of the sewer pipe
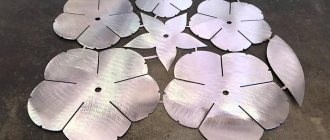
Mount for grinder
The sander can be secured to the platform using two pieces of DIN rail. They must be screwed in such a way that the power tool can be tightened using bolts on both sides. Elementary clamps that are very easy to disassemble if necessary, and then use the vibrating grinder for its intended purpose.
PHOTO: .com Attaching a sander to a platform can be ridiculously simple
Installation of the main element of the vibration rack
Well, now it’s time to work with the rule. It is necessary to drill 4 holes in it so that it can be connected to the side ribs of the platform with bolts. And again, fasteners from the “couldn’t get simpler” series. If necessary, the rule can be removed and used manually, or replaced with a longer or shorter one.
PHOTO: .com The rule has been established, which means you can assemble and check the vibrating screed for functionality
Final assembly of the tool
All that remains is to do a mere trifle - stick the handle into the place intended for it on the handle of the roller and connect the plug of the vibration grinder to the socket in the pipe. After this, you can begin practical tests.
PHOTO: .comFinal touches: the handle is inserted into the handle from the roller - you can connect the vibrating screed
Real world testing
After completing the work on making the vibrating screed, you can begin pouring the floor. To do this, mix a solution (the more, the better), which is laid out between the beacons. Do not be afraid that the solution will not be produced. When working with a vibrating screed, the time required for leveling concrete will be reduced by approximately 10 times.
When the solution is laid out in a mountain between the beacons, the vibrating screed turns on and simply drags along the guides with slight pressure. Here the master himself will notice how much easier it is to work with such a tool than with the usual rule.
PHOTO: .com The vibrating screed showed itself perfectly, which means the work was not done in vain
Final word
This tool is extremely convenient to use. At the same time, it compares favorably with the one that can be purchased in a store. After all, it is much cheaper.
At the same time, a homemade vibrating screed can be disassembled and parts from it can be used as an independent tool.
This approach will help relieve the home craftsman’s pantry, relieving him of the need to store disposable items that would be a shame to throw away.
We really hope that everything we tell you today will be useful to you. Despite the fact that the author tried to present everything in the simplest possible language, it is possible that something remains not completely clear. If so, ask your questions in the discussions below.
The HouseChief editors will be happy to clarify any unclear points. There you can comment on what you read and express your personal opinion on the advisability of assembling such a tool yourself. If you found the article interesting, don't forget to rate it.
Every opinion is extremely important to us. Take care of yourself, your loved ones and be healthy!
Loading…
Mount for grinder
The sander can be secured to the platform using two pieces of DIN rail. They must be screwed in such a way that the power tool can be tightened using bolts on both sides. Elementary clamps that are very easy to disassemble if necessary, and then use the vibrating grinder for its intended purpose.
PHOTO: YouTube.com Attaching a sander to a platform can be ridiculously simple
Method of performing vibroslating at home
To make a vibrating screed for laying concrete yourself, you need to acquire the necessary parts.
To fasten spare parts together, you should use a welding machine or other available options for creating fasteners.
Handles can be easily made from pieces of reinforcement or small diameter pipes. The build process looks like this:
- Two corners are connected to a channel of the required size (it will act as a frame).
- The handles of the device need to be attached to the channel. Their length should be sufficient for comfortable work.
- The engine is also mounted on a channel, usually in the middle.
It would be nice to use aluminum to create the frame; it is not subject to corrosion and is lightweight. Creating a vibrating screed for laying concrete is not an easy task, but it is quite within the capabilities of the average person.
Making a unit for treating concrete surfaces is not that difficult. Using a store-bought device will definitely be more pleasant, but a homemade version, if executed correctly, can easily cope with the tasks assigned to it.
The power of the selected motor must be sufficient to create high frequency oscillations. To get an even and compacted coating, you need to move the lath slowly, pay attention to problem areas on the concrete surface, and periodically clean the working frame from material that will stick to it.
How to assemble a homemade vibrating screed
Source cylinder.com.ua
If you need to quickly make a homemade vibrating screed for a small amount of work, then you can simply install an electric drill on a flat board or construction rule of the required length (along or across), and secure it with clamps made of perforated tape hangers. As screws for aluminum, you will need small self-tapping screws, which are used to assemble frames for plasterboard structures. The handle can be made from a metal strip, fixing it to the drill handle with electrical tape or large clamps for the fiftieth pipe. To create vibration, clamp a Ø 10 mm drill in the chuck at an angle. That's it, you can use it.
Source youtube.com
You can make a pretty good vibrating screed with your own hands from an old grinder, a board and several fasteners (reinforced steel corners). It is very important to find a narrow sanded board 50x100 mm without flaws, although lumber with such parameters usually has the correct geometry. It needs to be opened with some kind of anti-rot product and then painted for additional protection from moisture. You can choose the length yourself - it depends on your needs in this case. It is better to take a small grinder, for example, for a 125 mm disc - this will be enough, although if necessary, you can mount a tool of greater power.
Please note that you need to buy reinforced corners, since regular fasteners will bend during vibration - you will need 4 pieces in total - 2 for the handle and 2 for attaching the angle grinder. The handle can be made from a round pipe Ø 20 mm or a profile 20x20 mm - it doesn’t matter.
Source youtube.com
In order for a hand-made vibrating screed to come to life, you need to attach an angle grinder to it. On the gear cover on opposite sides there are threaded holes for the handle to turn it over under the working hand or change the direction of rotation of the disk. So, these same holes can be used for fixation, as shown in the top photo. But to create vibration, install a thick washer, but its diameter must be larger than the diameter of the shaft for attaching the disk. You simply fix this washer, shifting the center to one side, and press it with a nut (this is also shown in the photo).
Source olx.ua
Perhaps you need to make a vibrating screed with your own hands for long-term use, and most often it is needed by those people who are engaged in construction and repairs privately, but at a professional level. For this purpose, you can purchase a three-phase or single-phase motor, where you will have to take into account its power and dimensions. For example, this could be an AIR56A2 foot-mounted asynchronous electric motor with a power of 180 W and dimensions of 216x120 mm without a connection box.
Source sevparitet.ru
In the top photo you see one of the options for such a unit, where an aluminum corner is used, and the electric motor is mounted on a vertical shelf, and the fastener stop is on a horizontal one. But this is not a rule, just an option. Such a tool is assembled from half-beams, channels, and sometimes from two metal pipes connected by jumpers.