Despite its name, the standard hydraulic lift table used in various businesses has much more in common with a forklift or elevator than with a conventional table. Nevertheless, similar designs (similar or similar in principle of operation) are widely used in everyday life, although not as a device for lifting heavy loads.
An example is transformable tables, a large assortment of which can be found in any large furniture store; If you have golden hands, experience (albeit small) in carpentry and a lot of free time, you can try to make such a lifting table with your own hands.
Properly made, such a table has a number of advantages, such as:
- Multifunctionality. A transforming table is characterized by adjustable parameters of length, width and height - the lifting mechanism itself plays an important role in this setting.
- Compact dimensions. When assembled, the structure takes up very little space, and when disassembled it turns into a spacious dining table, with enough space for everyone.
- Hidden functionality. Depending on the assembly features, the table may include hidden cabinets and shelves that can be used to store dishes and other things you need.
- Uniqueness. When making a table, you can use any size, any wood and any design delights, which will make the design original and unlike any analogues.
- Ease of use. Any lifting mechanism offered on the market is easy to install and operate. Its assembly and disassembly does not require the use of serious physical effort.
- Reliability. If properly assembled according to the correct drawings, the table will serve you for many years without the need for frequent repairs and diagnostic work.
Lifting mechanism
There are three types of table lifting mechanisms used in enterprises and at home:
- Transformation of the tabletop. At the same time, its dimensions change - length, width, height, and in some cases, configuration. Perfect for the situation already described, when you need to make a large table out of a small one.
- Raising/lowering table top. In such models, the shape and dimensions remain unchanged; Only the height of the table changes, which allows, for example, to quickly turn a small coffee table into a dining table and vice versa.
- Widespread transformation. Suitable for complex structures that only professionals can make. Here, all parts of the table are movable - both the table top and the legs, which allows you to significantly expand its functionality.
More on the topic: Design of lifting tables
DIY CNC machine assembly
Rating: 3/5
Many people believe that assembling a CNC machine with their own hands is quite problematic. But that's not true. Having the necessary knowledge, the device can be assembled at home, although not quickly, like in a factory.
What you will need for assembly:
- CNC machine drawings;
- fasteners and parts;
- drilling and lathe;
- set of tools.
There are two ways to make a home CNC machine: buy a set of parts necessary for its operation, or find the components of the device yourself and assemble them. In today's article we will look at the second option.
First you need to choose a suitable scheme according to which the equipment will operate. Its choice depends on the desired characteristics of the machine, in particular size and design.
It is necessary to buy lead screws and other parts; or they can be made on a lathe and drilling machine. The material used is plywood or aluminum.
It is also advisable to make a working surface from plywood. The optimal thickness is 18 – 20 mm.
Features of working with the bed
The frame provides the device with the necessary rigidity. The motor, Z axis, rail guides, work table (surface), and also the spindle are mounted on it.
It is best to install the frame without welds, as they do not tolerate vibrations well. Fastening is best done using T-shaped nuts. You also need 2 bearings: spindle and sliding.
As the basis of a CNC machine, you can use a regular used drilling machine. Its head needs to be replaced only with a milling one. In order for this tool to move in all three planes, a special mechanism is created using the carriages of a conventional (MFP) printer. When the above assembly is ready, the correct software control must be connected to the equipment.
A CNC machine assembled according to this principle for a home workshop will be able to work with plastic, wood and thin metal sheets without any problems. Since the carriages are not rigid enough, it will not work with stone or thick sheets of metal. A powerful CNC machine requires high-quality electronics and a high-power motor.
Features of CNC machine assembly
Details
Let's look at the features of assembling a CNC machine for wood for a home workshop.
The first two stepper motors are mounted on the housing. They are mounted behind the vertical axis. They provide vertical and horizontal movement of the milling head.
In order to install Z-axis stepper motors, you need to use the back, front, and top plates. Make a backing for the milling spindle.
Use the rubber wrap of a thick electric cable to secure the electric motor shaft. Fasteners can be durable screws with nylon bushings.
Materials
No less important than the drawings and mechanisms is the material from which the lifting table parts are made. Its strength and reliability, resistance to damage and climatic influences, weight and dimensions of the structure depend on this. So, the most popular types of materials in manufacturing are:
- Chipboard. Combines low price, functionality and pleasant appearance. The material is easy to process, the lightest working surface for a circular saw.
- Fiberboard. Choose slabs with at least a middle plane! Then the material will be as easy to process as chipboard, which will make it possible to produce parts of any shape and size. Environmentally friendly.
- Natural wood. Significantly more durable, although expensive, material. Suitable only for the appropriate interior.
- Glass. It looks original and stylish, takes up little space, and has ample opportunities for decoration. However, it is very important to choose durable glass, otherwise the final structure will be too fragile; Tempered glass is not inferior in strength to hard wood.
- Metal. The most durable and heaviest material, harder than others to process. Not recommended for home installation; although some small models are relevant for such modern stylistic trends as loft and high-tech.
Spindle device
Structurally, this important component of the technical device looks like this:
- a cutter is fixed to a metal shaft through an interference fit, a mandrel or a collet;
- to ensure that the cutting tool is firmly fixed, the end of the spindle is shaped like a cone;
- the device itself is located on a carriage to ensure movement along three coordinate axes;
- rotations are transmitted to the cutter, which ensures milling of the hole according to the specified parameters.
Important technical characteristics are power indicators and the number of revolutions of the cutting tool.
The operation of a CNC milling machine depends on power, namely:
- For processing chipboard, MDF or plywood, a power of 800 W is sufficient.
- If you need to process wood or non-ferrous metals with a milling cutter, then 1500 W is enough power.
- Processing hard metal, stone or concrete requires a power rating of at least 3000 W.
It is easy to determine the operating mode of a single- or dual-spindle tool by the number of revolutions created. Engraving, cutting or milling modes are popular.
The choice of spindle must also take into account the reserve of rotation speed and power.
Components
Having decided on the type of mechanism and working material, let’s make a short list of parts that you can’t do without during assembly:
| № | Helpful information |
| 1 | Durable base board |
| 2 | Plywood for table top rim |
| 3 | Elements for creating legs - wooden blocks, metal pipes, corners |
| 4 | Parts for load-bearing walls |
| 5 | Power tools - drills, jigsaws, saws |
| 6 | Brushes for painting and varnishing |
| 7 | Brass hinges |
| 8 | Fasteners |
| 9 | Lots of sandpaper |
| 10 | Paint, varnish and stain |
Remember that this is only a standard set, and for each individual situation, especially depending on the required functionality (or technical specifications) of the table, it can change and expand.
Now let’s move on to the most important element, without which all the others will be completely useless:
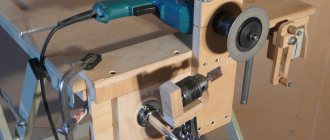
Options for homemade guides
The guide mechanism for CNC is often based on the use of a chrome-plated metal pipe.
The guide mechanism can be made from a chrome-plated metal pipe
It has a low cost and is easy to process by changing its shape. In addition, there are a number of disadvantages:
- The protective top layer wears off very quickly, then the metal wears out faster.
- When the load on the pipe is high, it does not provide the necessary strength.
This solution is cheap for a specialist, but such a machine will only last for a few tens of hours. This is due to the disadvantages of galvanized or chrome-plated pipes, which themselves are made of soft metal, subject to rapid wear under load. A router used in conjunction with such guides will significantly reduce their service life.
In addition to these methods, milling cutters with low power should be used as moving parts of the device. They give the manufactured parts precise, thorough processing; they are most often used on woodworking machines. They have a low price and short production time.
Blueprints
The basis of any design work is a competent, carefully thought out and calculated drawing. You can get such a drawing in three ways:
- The first way (the easiest) is to find it on the Internet. However, just as the simplest path rarely leads to the desired result, so here, at the end of the work, you can get something that is not what you wanted at first - such drawings are rarely reliable and accurate.
- The second way (the most reliable) is to seek help from a specialist. At the moment, there are many construction companies, as well as individual craftsmen who are ready to provide you with any advice and services at your expense. Before contacting them, make a complete list of wishes, in particular regarding dimensions, material and design.
- The third way (at your own peril and risk) is to make the drawing yourself. Suitable only if you yourself are the master mentioned above. You can always find all possible help on the Internet, on forums and websites of construction stores.
After which comes the turn of the work itself - it is necessary to cut and saw the workpieces, treat them with stain and varnish, paint and dry them, then connect them according to the prepared drawing and install the lifting mechanism.
Frankly speaking, it is difficult to provide any universal instructions for making a lifting table - there are too many varieties, modifications and configurations, ranging from the simplest to complex multi-sectional structures with a large number of moving elements.
More on the topic: Characteristics of the ts 2001b retail lifting table
However, the transforming table is a reliable design that allows you to ergonomically use the workspace, providing comfort, ease of use and wide functionality.
Making homemade car lifts
Standard car lift
First of all, when making a standard car lift, according to the drawing, I made a base from a profile pipe with a cross-section of 60 by 80 millimeters, but you can use pipes of a larger cross-section.
The base is made in the shape of a rectangle, the width of which should be slightly larger than the width of the vehicle that will be lifted.
Next, frames are made from channel or profile pipes, the width of which is equal to the width of the base of the lift, but the height is arbitrary and depends on your planned height to which the car will be lifted.
Then I installed two of these U-shaped rectangular frames on the base.
I secured one end of one frame with a hinge to the base
The second end of the same frame is also attached using a hinge with the upper end of another frame, whose lower edge is installed in special grooves in the base
This way the frame will move along the base.
To move in the gutters, a nut is installed at the end of the fixed frame so that the threaded rod can be easily unscrewed or screwed in during rotation.
The far end of the rod was secured using hinges with the lower edge of the movable frame.
The threaded rod is made from high-quality metal rod with a diameter of 2 inches.
The thread on the rod and on the fixed nut must be trapezoidal or persistent, because these types of threads are designed to withstand heavy loads.
Thus, the rod is fixed in a fixed frame and, when rotated, moves the movable frame on rollers, along which the frame moves in special grooves of the base - as a result, the vehicle rises or lowers.
As a result, you will get a homemade car lift
Source ad-cd.net
Don't be confused, this lift is not a screw type, as it does not have a vertical load on the screw along the axis.
DIY car tipper
In some cases, a previously manufactured lift can be replaced with a tipper that is easier to manufacture and operate.
First of all, observing all the dimensions of the drawing and, most importantly, safety precautions, a shoe is made that will serve as a support for the future tipper jack.
Next, you need to make two 1.5 meter long stands from the metal corners.
Their assembly is carried out in the form of squares, and they are fastened by welding with a welding machine.
When making racks, take into account the distance through which the beam will be fixed.
Afterwards, holes are drilled in one of the racks to secure the support pipe, as well as for the tipper locking mechanism.
The next step is to make a platform for the beam.
It is made from a sheet of steel, the edges of which are bent in such a way as to form a box, to which the sides must then be welded.
Next, start creating a structure to support the vehicle when it rolls over.
It is made from beams, a beam from a square profile pipe and an angle, the length of which is equal to or greater than the length of the car.
If you do everything correctly, you will have a high-quality homemade car tipper.
Source ad-cd.net
Machine engine lift
If you need to lift not the entire car, but only its engine, you can consider the following type of homemade lifts.
To make it you will need:
- Bolts, hooks for fastening, star-shaped dowels and other small items;
- The steel cable is about half a centimeter thick.
- Iron chains, links with a diameter of 2 centimeters or more (such a large diameter for the chain to withstand the load).
- Metal corners (size 8x8x1 centimeters).
- Steel plate with a thickness of 1 centimeter.
- Worm-type gearbox (for home-made products, you can take a similar gearbox from disassembly or remove it from an unnecessary or inoperative mechanism, but its load capacity should start from 350 kg, and the transmission force indicator should start from 60 kg).
The assembly of the structure must be carried out strictly according to the instructions in compliance with safety precautions.
First you need to attach metal corners to the walls that are located opposite the hood of the car whose engine needs to be raised.
Next, you need to install a steel plate on top of the corners; they should be connected using prepared bolts.
Afterwards, a worm gearbox is installed, which should be fixed with a key on the drive shaft, while a key of smaller diameter should be installed on the output shaft of the gearbox.
Next, you need to make holes in the steel plate, the diameter of which should fit your chain, and then mount the entire chain mechanism.
Finally, you should work on the locking mechanism, holes for which, after a certain distance, are made in the lift frame.
As a result, you should have the following homemade car engine lift
Source ytimg.com
The lift is operated as follows:
- First, the bolts, nuts and other fastenings of the vehicle engine are removed.
- Next, the loops of the steel cable are brought to the engine and the structure is coupled to it.
- With a little effort, the chains are moved, which rotate the drive shaft, causing the engine to rise to the required height, after which it is fixed.
I recommend the following video, in which the author independently makes a scissor-type car lift:
Ramp for pallet wrapper
What is a pallet wrapper? This is equipment that almost no enterprise involved in the storage and transportation of various goods can do without; it is used to wrap products in a special protective stretch film, while the cargo itself is placed on a wooden pallet or pallet.
You've probably seen the products of such packers in stores, although hardly anyone paid any serious attention to it - just think, boxes or bottles in film on a wooden box!
Meanwhile, proper winding helps protect the cargo from climatic and shock influences, and rigid fastening on the pallet will not allow the goods to spill onto the ground and get lost during transportation.
But let's be consistent. So, first of all, there are two types of pallet wrappers:
Types of guides
The accuracy of the machine is the task of the guide rods. They are divided into two types:
- slip;
- rolling - involve the use of bearings.
The first type is used on machines of low power and not requiring high productivity. These include woodworking, turning, drilling and benchtop machines.
Homemade guides for a CNC machine are made using a linear method; they can be roller or ball. Regardless of the type, they must have the following characteristics:
- saving the specified parameters;
- smooth movement;
- efficiency;
- low friction.
In most cases, cylindrical rods are used as parts for sliding bushings; they must be ground. Some craftsmen advise making the mechanism without bushings, but due to this manipulation the accuracy of the products will be reduced, and the rods will have a shorter service life.
Automatic pallet packers
The most widely used models on the packaging market, the main advantage of which is productivity and quality of work. The device is fully automated and does not require direct operator control - he just needs to place the load on the working platform, check for the presence of film and film and press a button on the remote control.
After this, the device turns on; at the same time, a movable mechanical “arm” begins to rotate, at the base of which rolls of film are fixed, carrying out a smooth and widespread winding of the load. At the same time, it is possible to adjust both the speed of movement of the “hand” and the level of film tension, which allows you to significantly reduce its costs (two to three times!). After which the load is removed from the platform, a new one is installed and the process is repeated.
Automatic pallet packers operate both autonomously and as part of a conveyor belt - this is especially beneficial when working in large industries with a large turnover of goods.
More on the topic: What is a PMG lift?
The only disadvantages of this type of device are the inability to work with cargo of non-standard, too small and large dimensions, as well as the high price (however, this will not be a problem for wealthy enterprises - besides, the initial costs will undoubtedly quickly pay off).
We recommend to buy
How I assembled a CNC router, and at what points you should not repeat after me
Hi all.
The strange idea of owning my own machine for cutting sheet material came to my mind quite a long time ago - when I found myself at a production facility in the city of Vladimir. At that time, and even now, I spend most of my time in the office, and for me specifically this is objectively more efficient from a financial point of view. At the same time, once I saw the magic that turns material into useful things, I could no longer get rid of such a thought.
While studying the designs of milling machines, I realized that they are quite diverse in terms of the number of axes, the movement of material and the router along them, and other subtleties. Somewhere, several synchronized milling cutters operate in one machine, somewhere a complex system of levers is used, which allows you to calculate the position using a complex formula. I consider this to be the apotheosis of design genius:
But let’s return to my idea - it was to cut sheet material and mill some soft shapes, for example, polystyrene, in 3D.
The frame design was chosen based on the rigidity of the triangular shape (as usual, it was changed on the fly):
The advantage of this design is that the machine takes up less space, and it is much easier to install a new sheet on it. Bonus - the chips fall down (but they still need to be removed, so this is not very important).
But what is the problem with this design? The fact is that the Z axis, which is quite heavy in any case, moves upward under its own weight, and, therefore, requires a more powerful motor and driver. The first thought was to install a counterweight on the cable through the block, but on the forums they don’t respond very well to cable solutions due to inertia. But having the area, you can always put the machine on a long leg and reduce this effect.
If you have free space, it would probably be ideal to place the triangles one after the other; you would get a table with a very rigid frame.
Rigid frame of the machine with a horizontal table.
Mechanics. A ball screw (ball screw) is installed on the Z axis.
Ball screw
The ball screw provides maximum tool positioning accuracy, but slow movement. Having servo motors that spin up to serious speeds, this is not a problem, but stepper motors still have a limit for reasonable use. But there is another problem with the screw. Being free, it is deformed at large lengths, plus it has inertia, and the phenomenon of resonance occurs. Therefore, I decided to do the remaining 2 axes X, Y on a rack, which I currently consider to be a mistake. The fact is that there is little information on the Internet, and only recently ready-made moving nuts with gearboxes for ball screws have become widely available in the Russian Federation - this, in theory, solves the problem of screw inertia (but not resonance).
As for the gear rack transmission, everything is fine with it, except for one thing - backlash. They arise due to the precision of execution and inaccuracy of installation. The rail I bought was cheap and thin, so it experiences deformation. I don't recommend doing this.
Fraser. I decided to start with something simpler, air-cooled (and have left it that way to this day). This is, of course, kress. Cheap and tasteful. I saw on the Internet schemes for converting it to digital control of spindle speed, and even pneumatic automatic change (!) of the Kress tool - that is, if something happens, you can cleverly hack it, and it will be like adults on $100K machines.
What about mechanics? The X axis - suddenly this is the one along which Z moves (although, as for me, it is more logical for it to be along Y), the motor with a planetary gearbox moves. Stupidly, I managed to twist the heads of two bolts, and therefore there are 2 out of 4, but nothing. The gear is fixed on a cone + a one-piece thread lock.
The Y axis is more complicated. There is also a gearbox, but a worm gear, Italian, then axle shafts through cardans from the Volga, and at the ends there are also belt gearboxes. It is very important to lock these gearboxes on the rack so that there is no play. For some reason, I thought furniture lifts would do (they don't). When milling, the counterforce is such that the elevator presses so much that the gear jumps. I had to build a pressing eccentric on top of this.
In general, the Z axis is the most powerful thing in the machine, everything else is practically a snot. Initially, however, I generally wanted to take a powerful metal beam of quality X, fix it on concrete columns, and drive a movable table under it - but due to dust, I had to abandon this decision, the machine became more traditional and moved to a separate room. This beam lies in the yard under the snow (pieces have already been cut off from it with a grinder for household purposes). If you decide to start building industrial devices at home, it is unlikely that you will avoid alterations.
This is how it should have been in the first version
In general, the aspiration system is of particular importance. If you don’t do it, be prepared that when working with wood, the finest dust will cover EVERYTHING in the room, including your eyes, hair and skin, and if you work with plywood, it will also contain chemicals, which is completely unpleasant.
It seemed to me the simplest to buy a cyclone on Aliexpress, screw it to a water barrel, and attach a vacuum cleaner hose to the foam outlet of the cyclone. Despite the apparent flimsiness of the design, if the input from the router gets clogged, the power of the vacuum cleaner is enough to collapse the barrel into a ram’s horn in a few seconds, and I straightened it for half an hour, and was covered in this dust - so I advise you to monitor all this through a surveillance camera while drinking beer in another room.
For dessert, I decided to leave electronics. I had an annoying idea - to stuff everything into the system unit from the computer (and run a clean air duct from another room there), and I successfully implemented it, but with a caveat - the drivers for the suction fan were placed end-to-end on 3 axes. As you can see, the installation on the ties is clear, the block can be rotated 90% without worrying.
Where CDs and hard drives should have been in the original, the drivers are located, I installed a suction fan on them, and being aware of dust, I ran a ventilation duct and a corrugation from the next room to it (now it wouldn’t hurt to also have a slot or valve to the street, since excess pressure, obviously, stupidly squeezes through the door cracks (you can feel it).In the front and bottom parts there are driver power supplies (it’s easy to understand that one of them powers 2 drivers, and theoretically you can stuff all 5 drivers into the system unit by purchasing a powerful power supply , since maximum power is unlikely to be taken from all 5 at the same time, and during holding, the power consumption of the motor is not very large).
In the lower rear zone, above the motherboard, there is a control board, which in theory should have 5*4=20 inputs from drivers only, but some of them go to one input, so everything is ok. The remaining pins are needed for all sorts of things - for limit switches, power supply for the spindle, its speed (if they were digital).
I powered the monitor and vacuum cleaner directly from the 220V input to the system unit, so as not to create 10 switches (Wago terminals on the bottom left).
In fact, the machine is more than suitable for cutting material - yes, there may be a small gap somewhere on the rail, but when the thickness of the material is a couple of mm, and there is a thin cutter with the same working edge height of a couple of mm, this does not play a special role. There are issues with long cutters for 3D milling (they are also significantly more expensive than cutting ones), I am thinking about strengthening the X axis and transferring all axes to ball screws, but this is a matter for the future.
What would I like to say in conclusion? If you are oppressed by some idea, and let’s say your wife is against it, follow the dictates of your heart. If it says you need to finish the project, do so (if it says obey your wife unquestioningly, perhaps this is also a reasonable path).
Good luck to all!
PS Write in PM, on YouTube, etc., if you are very interested in this or that question.
Lifting coffee table: models and selection rules / Photo
Home / Furniture / Tables / Coffee table with a lifting top: models and selection rules
Content
Creating an interior that meets all design requirements requires a serious approach. You especially need to try when the amount of free space is limited. The solution is items that can perform multiple functions. A coffee table with a lifting top falls into this category.
Advantages and features of coffee tables with a lifting top
The main feature of the product is the presence of a mechanism responsible for changing the height of the tabletop. Many models have several fixation points, which allows you to choose the optimal position as you wish.
A lifting coffee table provides the user with a number of advantages.
- Compact dimensions make it possible to leave more space in the living room for free movement.
- One design takes on the functions of a dining table, a work table and a coffee table.
- These models are distinguished by an unusual design.
- Transformation occurs easily and quickly.
- It is possible to lift a separate part of the surface.
- The products can be called affordable, taking into account their high functionality.