Forged rose: It’s unusual, but nice to write a review about an item that will not bring you any practical use. There are many websites dedicated to welding and forging; these are popular “male” topics in RuNet. The craftsmen tell and show from the heart - some about forged chairs, others about welding seams.
But everyone has and makes their own forged roses; no one is alien to the desire for beauty and artistic creativity. Forged flowers can be made to suit every taste, but the preparation and technology for making them are the same. We read, we understand.
Preparation of materials and equipment
What materials will you need:
- Sheet metal is usually used for the petals and leaves The thickness and type of metal is a matter of taste and choice of the craftsman, but most often a sheet with an average thickness of 0.5 mm is taken. It can be cold-rolled black metal, or it can take metal from the hood or fenders of a car - it is quite thin there - up to 0.8 mm.
- For stems you need to find a suitable wire with a diameter of 5 mm or more; for options with spikes, a knitting wire with a diameter of 6 mm is more suitable - this work is more difficult. You can use rods with a diameter of 8 to 12 mm.
Forging process - drawing.
Hot forged metal roses.
Shaping the stem.
Making a flower.
The tools you will need are the simplest:
- Welding machine: better semi-automatic or inverter with 2 mm electrodes at a current of no more than 70 A.
- Grinder or grinder, metal scissors, pliers.
- Gas-burner.
- Drill with drill bits for metal from 0.5 to 1.0 cm.
- Unrefined or motor oil for finishing rose bluing.
- Metal paints, if the rose needs to be painted.
Forging a rose from metal
To forge a rose from a single piece of iron, you will need a cylindrical blank with a diameter slightly smaller than the size of the future flower. After heating, one side of the blank from which the petals will be made is left unchanged, and the other is pulled into a square. Depending on the desired number of layers, the cylinder is divided into 3 - 4 parts. Circular notches are made along them of such a depth that in the center there remains metal in size equal to the square part. The resulting layers are deposited on the forming plate to a thickness of 2 mm.
Rose forging process
Then the production of petals begins. The undercuts on the layers are made in such a way that when folded into a bud they overlap. The resulting petals are riveted onto the pointed protrusion of the anvil, reducing the thickness towards the edges, and placed in a bud. The remaining layers are processed in the same way, but each subsequent one is made a little larger than the previous one. To make the forged rose more like a living flower, the petals of the bottom layer are made straighter. The collected bud is heated and the petals are given the desired shape using pliers.
After heating, a stem is forged from the square part of the rod. If desired, thickenings are made on the rod, from which spikes are formed. The leaves are cut out from sheet steel 2 mm thick. Cuttings are pulled from them and welded to the stem. To make the iron sheet look natural, veins are made on the surface.
The more improvisation when creating a rose from metal, the more original the flower turns out. It is recommended to experiment with the shape of the petals and their texture. However, it should be taken into account that the outer layer should not have more than 5 petals. Otherwise it will no longer be a rose.
Cutting without sewing, technical stages of work
The process of creating a rose:
Making a solid forged rose.
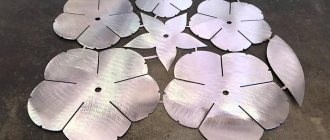
- From sheet metal we cut out four or five, if we want a larger rose, square templates with a side length of 10 cm. In each square we draw a schematic flower with four petals, try to draw them symmetrical, but precision to the millimeter is not needed here. On the last square we draw a sepal that looks like a compass rose; exact symmetry is not necessary here either.
- If you want to make a tea rose - wide open, with numerous petals, it is better not to be lazy and prepare the templates in the following order:
- The sepal is a five-pointed star with a diameter of 7–8 cm.
- The first outer blank consists of five petals with a diameter of 11 - 12 cm.
- The second and third blanks each have four petals with a diameter of 10–11 cm.
- The fourth blank is made of three petals with a diameter of 10 cm.
- The fifth is made of four narrow petals with a diameter of 9 cm.
- We cut out the blanks with metal scissors or, if available, with an angle grinder. We do not cut to the center of the figure.
- We draw on the metal a couple or three blanks for green leaves on the stem. The size must be different. We cut out the leaves with scissors or a grinder.
- Let's take the stem. If it is a rod, shorten it to 40 - 50 cm.
- We drill holes in the blanks to attach them to the stem. The diameters of the holes and the stem blank must match. The rod or wire should fit tightly into the petals.
- Welding stage: weld the workpieces to the stem. The optimal thickness of the electrode is 3 mm, the current strength is from 70 to 100 A. The holes in the petals do not have to be made round, the main thing is that the stem touches them with at least half of its circumference. In this case, the seam and the structure itself will be strong. You need to melt more rods than petals - it’s easy to burn through thin metal.
You need to plant the workpiece on the stem, starting with the sepals. The petals should be placed crosswise, two centimeters below the upper tip of the stem. Each layer must be secured by welding - similar to a puff pastry.
Table with roses.
Roses in a jug.
Metal structure with roses.
Bouquet of roses.
Forged rose.
Metal rose.
- Now comes the most exciting and artistic part of the work: forming the rose petals! We bend the leaves of the sepals of the lower workpiece down. Turn on the gas burner and begin to gradually heat the flat petals. At this stage, moderate heating is sufficient - there is no need to heat it red-hot. We use pliers to wrap the two petals as if we were wrapping them into each other. We wrap the remaining two petals around the first two. We work like this with each layer. At the same time, bend the tips of each petal outward - in the opposite direction. At this stage, it is important to have a “free” hand: the petals should be crooked, their bends in the opposite direction should be unequal, the serifs and marks should be asymmetrical. This is the only way the flower will turn out alive and real: there are no strict geometric shapes in nature.
- Let's start with the leaves on the stem. We make small notches on each edge of the leaves. The leaves should not be flat; it is enough to bend them with your hands. We weld it to the stem carefully at the weld points.
- In principle, the rose is ready. But only in principle!
https://www.youtube.com/watch?v=MbQ8wjkkzPw
Cutting blanks with petals
You can start working by making blanks for the petals or a rod for the stem of the flower. To make the product look natural, it is worth giving the knitting wire several characteristic kinks. Very important! — in the upper part of the future stem you need to leave a straight section of 20 centimeters, onto which the petal blanks will be planted.
Blanks of metal petals for forged roses
Next, we make blanks for cups with flower petals using simple or methods. To do this, we take metal squares with a side of 80 - 90 - 100 - 110 cm (depending on the number of layers in the bud). We transfer the templates onto them and immediately make a central hole - this way it will turn out exactly in the middle, without displacement. The diameter of the hole should be selected so that the workpiece fits tightly onto the rod. Now you need to cut out the blanks using metal scissors or a grinder, without trying to make them perfectly even along the marking line. A real flower's petals are never perfect.
Artistic floriculture: design stage
The fact that it is necessary to clean up welding marks and take measures to protect against corrosion is clear - it is not subject to discussion. But further design processing raises many questions. The fact is that blacksmiths and welding masters are happy to make metal roses and post videos with master classes and their photographs on the RuNet. Everyone has their own technical discoveries and style of execution - roses with buds, fully opened, with and without thorns - excellent tips and step-by-step guides, choose any.
But the finishing coat is simply a problem: our craftsmen only have enough imagination for bluing - treating the product with motor oil and then heating it until a varnish film forms. Varnishing or spraying is used less often. For some reason, our craftsmen talk about painting a forged rose with colored paints in a whisper and with fear - after all, artistic stereotypes are still strong.
Meanwhile, modern design fashion for eclecticism in all applied directions gives freedom and enormous possibilities in the color and texture design of metal flowers. But in any case, the forged rose will remain special and unique - the main flower of a huge army of blacksmith and welding masters. Join us and make your own rose.
Assembling metal flowers and bending petals
You can proceed further in two ways. The first one is for those who have their own forge or a serious workshop with blanks and templates. When making several roses from metal, this can be very useful - blanks heated in a forge or gas welding are placed on pre-prepared cups of different sizes, and the petals are punched with a hammer until they fit.
The second method is piecemeal - the workpiece, placed on a wire and welded, is heated, and the master begins to wrap the petals with pliers or round nose pliers. Very important! — it is recommended to first string all the templates onto the stem, and then twist them, starting from the top. And so that they seem to wrap themselves in each other.
If you took care of the metal leaves using a separate template, then they are put on the stem in advance. The cross-shaped lower element under the flower is wrapped with the petals down, almost to the stem itself.
Each cut piece should be welded before bending. It is better to heat the metal with autogenous heat; it gives a directed flow and a well-defined glow zone. This way you can achieve very interesting volumetric solutions, even create an entire metal bouquet.
Should I paint an iron rose? It is enough to immerse it in oil while it is hot to get the effect of black varnish. For a metal flower, shape and volume are much more important than natural colors, which will peel off later anyway.
From the moment of human development, when he began to actively use his hands in work, the results of his work became more and more complex, more perfect and more beautiful. At first, the purpose of making this or that thing was purely practical; later we began to make objects of art just like that, for aesthetic pleasure, without any hidden use for them.
Forged metal products have always been valued and admired. This is also due to the fact that looking at a high-quality forged item, we involuntarily imagine what a huge amount of work was done. After all, metal is metal and it is not as malleable as, say, wood.
We make a rose with our own hands
A forged rose will be an excellent gift or a good training for your skills. How to make it, what techniques and methods exist - more on that later.
Blacksmithing technology allows you to create a huge list of items. Both tools and household items. But there is another direction - artistic forging, when entire works of art are created. At the same time, various patterns, decorations and even flowers are made from metal.
A forged rose will be an excellent gift or a good training for your skills. How to make it, what techniques and methods exist - more on this later in our material.
Forging
In essence, the basic technology is similar to that described in the previous section with the addition of basic Kuznetsk operations.
You will need rolled stock in the form of a 6 mm rod and 2-2.5 mm sheet steel for blanks for the petals of the future flower.
The rod is heated at one end and the edge is thickened. This can be done by holding it in a vice and using blows from the end to form a thickening.
To conveniently secure the petals around the thickening circle of the rod, you can make a groove with a chisel on the heated metal.
Blanks in the form of petals and crosses are cut from sheet steel in the same way as in the above method.
Each of the petals is pre-forged and thinned at the edges, dispersing the metal. At the same time, you can still create the veins inherent in a natural rose.
Before assembly, you can make thorns on the stem. To do this, you need to make thickenings on the rod using the planting technique, which are then, after securing the stem in a vice, formed into spikes.
Start assembling the flower from the prepared elements.
