DIY blacksmith pliers
- BonnFactory February 28, 2017
- Artistic forging: do-it-yourself forged productstools
Today we will tell you how to make blacksmith pliers with your own hands.
Hello. Not a single blacksmith can do without tongs, as well as without an anvil, a forge with a burner, and other improvised tools that he makes himself with his own hands.
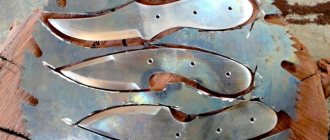
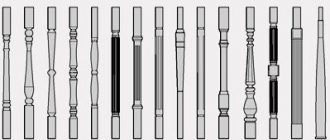
There are different types of pliers, but in this article I will tell you about the most convenient ones. This is, of course, a subjective opinion about convenience, but why do I think so: the pliers are quite large and will be convenient for clamping large and small forgings; they have round lips for easy gripping of reinforcement, as well as sufficient width to grab flat parts. This type of pliers is just right for a garage.
Special special We don’t need any tools, but we still need a little preparation!
Hardening a knife at home
It is very good if there is a furnace for hardening steel. You can even purchase it in a specialized store, but the pleasure is not cheap. So how to harden a knife at home without a special muffle furnace? There is a way out, and to be honest, there is more than one.
But first, you need to conduct small experiments and remember in detail all your actions. If the result is positive, then the same manipulations can be performed with a real part.
This tricky technique will help you get better at working on small workpieces and acquiring the skills to heat and cool a blade. We must not forget that different alloys require different temperatures and cooling methods, otherwise cracks and brittleness of the workpiece cannot be avoided.
Heating source
Basically, several sources of heating the workpiece can be distinguished. It is better to exclude the muffle furnace, since according to all expert estimates, it is the best in this matter. But we will try to evaluate other fairly common heating devices.
The forge copes quite well with heating workpieces. A blowtorch or propane torch may be suitable for this purpose; by trial and error, you can achieve the desired result. By the way, for these two options, you can build a small oven from refractory bricks, and the process will be simpler and the result will be positive.
Well, the last, one might say, completely unacceptable source of heating is a gas stove. If you want to spoil something, use this option.
Temperature
As has been said many times, every steel requires a certain temperature. In production, special thermometers are used for control, but in everyday life you can use a magnet (also mentioned above).
Dark spots should not be allowed; this is overheating, which will subsequently ruin the entire workpiece. If the master has enough experience, then he can determine by eye by the color of the hot metal whether the workpiece is heated enough or not. There is also such a hardening method: the part of the blade that is sharpened three times is heated to a temperature of 285 degrees, and the cutting part is heated only once, and to the maximum 950-1000 degrees.
The heating modes for each brand of steel are different:
- low-carbon steel requires heating in the range of 757-950 °C;
- steel with a high carbon content is sufficient at 680-850 °C;
- but alloying grades require from 850 to 1150 °C.
There is a whole table of colors, colors of incandescence. For example: brown-red 580-650 °C, dark red 780-830 °C or orange 950-1000 °C. So be careful and do not overheat the workpiece.
Cooling and holiday
For proper hardening, you need to maintain the correct temperature during cooling. It is preferable to cool stainless alloys in mineral oil with additives. And low-alloy steels, in aqueous solutions with salt and other additions.
There are many cooling options:
- blades with double-sided blades are dipped first into oil and then into an aqueous solution;
- Red-hot workpieces are dipped into the oil three times, each immersion taking a little longer than the previous one. And only then they lower it into the water;
- To give elasticity to the middle of the blade, this part is heated, then dipped in boiling water for 2 hours, and then in ice water.
With all these manipulations, it is worth considering that metal cools twice as fast in oil. A workpiece that has undergone hardening is subjected to a special process called tempering to restore the crystal lattice of the metal structure. There is nothing complicated in this procedure: the blade needs to be warmed up for a couple of hours. For alloy steel 270-320 degrees, for plain steel 150-200 degrees.
Materials required for making blacksmith tongs:
- round fittings with a diameter of 12 mm. approximately 50 cm long, 2 pcs;
- bolt for tie M8.
I’ll immediately explain why such materials are used. There is no point in taking reinforcement of a smaller diameter; it will be too soft and impractical. You can take a larger diameter, it will be even better, but in this case you will need to put more effort into forging and heating the workpiece as a whole. So 12 is quite suitable for work in the garage. The length is also for convenience - longer - it will be difficult to hold the forging with pliers; In short, you can get burned while working. And it’s better to take a little more, you can always cut it off! The M8 bolt was chosen according to the same principle: less means it is unreliable, more means the pliers will have thin walls at the drilling site.
In general, all the work is demonstrated on video, so I will only briefly describe the process in words and frames from the video below.
Working on the lips of ticks.
Since we make universal large pliers, we cut the reinforcement by 100 millimeters. If it is difficult for you to estimate the size by eye, then you can use a ruler. I made a convenient version of it for forging in the video about the anvil.
Having turned the workpiece 90 degrees, we begin to flatten the connecting point of the two halves of the pliers. To do this, we rest the reinforcement against the edge of the anvil and forge it from the edge of the previously flattened lips.
In order not to have too much trouble bending the pliers on the anvil (my stump is not very stable), I simply carried out this operation in a vice. It turned out to be quite convenient and fast.
Now our pliers have acquired a finished look and someone may stop there, but I decided to improve the pressing lips of the pliers by welding a couple of pieces of wire to the already forged pliers.
All that remains is to drill a hole and fasten the pliers with a bolt. Since it is unlikely that this connection will need to be unscrewed, I scalded the nut. It turned out to be such a half-rivet.
And now you can see everything described clearly in the video.
Author of the article “DIY blacksmith pliers” Bonn Factory
Source
Experience of forging a knife from a valve (I got the intake valve)
Attention!!!
This homemade product is posted for informational purposes only. The creation and use as a bladed weapon is prohibited; according to Article 223.4 of the Criminal Code of the Russian Federation, it is punishable by imprisonment for up to two years!
List of materials:
— valve from the engine (inlet caught); - a piece of dry maple branch; - a piece of threaded rod and a nut; - Super glue; - oil or other wood impregnation. List of tools:
- hammer; — mini-horn (my homemade one); - an improvised anvil made from a sledgehammer and hemp; — belt grinder; — grinder (angle grinder); - drill. Homemade manufacturing process:
Step one. Forging
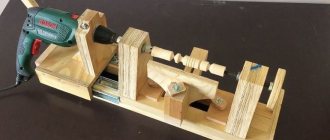
At first I welded pieces of steel wire to the rod as a handle, but over time they fell off. Then he worked, holding the workpiece with pliers.
Everything is forged easily with a light hammer. When the steel is heated to the forging temperature, it does not ring, so by hearing I determined at what point I should forge.
I forged the rod into the plate quite quickly and easily.
Step two. Grinding
I also drew the slopes by hand, they need to be made as flat as possible, the steel will withstand, and the knife will cut well even without a razor-sharpened blade.
Step three.
Hardening Step three.
Handle and final touches The knife looks good, in an ancient style, it also cuts quite normally, at the level of a household knife, I like it.
I also have another valve, this one is already an exhaust valve, but the stem there is much narrower, I don’t know if it’s worth messing with it?
This completes the project, I hope you liked the homemade product and found useful thoughts for yourself. Good luck and creative inspiration if you decide to do this again. Don't forget to share your ideas and crafts with us!
Attention!!!
This homemade product is posted for informational purposes only. The creation and use as a bladed weapon is prohibited; according to Article 223.4 of the Criminal Code of the Russian Federation, it is punishable by imprisonment for up to two years!
Become the author of the site, publish your own articles, descriptions of homemade products and pay for the text. Read more here.
How to make blacksmith's tongs
Pliers are an extension of the craftsman's hand; they should provide reliable grip and hold of the workpiece, be a little springy, and the jaws should adhere to the part.
Blacksmith pliers are classified as auxiliary tools. Their purpose is to manipulate heated workpieces during operation. Any master should have several types of such devices that are convenient to work with.
How to make such a tool yourself and what you need to know about blacksmith pliers is further in our article.
Pliers
How to make holes for furniture hinges
Pliers are a type of pliers that have a flat working surface. Often it is equipped with small notches. They are designed to grip and hold relatively small parts. For ease of working with parts, two such tools are sometimes used at once. They can have various shapes of working surfaces, which is why they got their name: long-nose pliers, duck-billed pliers, narrow-nose pliers. Often, pliers are equipped with cutting edges designed for cutting wire.
Combination pliers are also called pliers. Such tools include pliers equipped with a cutting edge for cutting nails and wire, and serrated grooves designed to hold tubes, nuts and other cylindrical parts.
Dimensions and materials of forging tongs
This device, which can be used to hold a workpiece during blacksmith work, is quite simple to implement.
Ticks consist of two separate elements - castor beans, which are movably fastened together. A rivet or bolt with a nut is used as an axis between them. The main thing is that such a connection should not create obstacles in work.
Each castor bean consists of three parts: a sponge, a middle part with a hole for the connection and a handle of the required length. Depending on the shape and purpose of the jaws, pliers are longitudinal, transverse and special.
Pliers are, in fact, an extension of the craftsman’s hand, so they must provide reliable grip and hold of the workpiece, be a little springy, and the jaws fit tightly to the part.
Often, part of the holder is heated to ensure a secure grip. Therefore, the sponges must be made of a fairly heat-resistant material.
In general, the length of blacksmith pliers can vary from 300 to 1500 millimeters, depending on the purpose of the work.
Both homemade and purchased versions of the tool should have these properties and parameters.
The material for the manufacture of forging tongs can be steel grades 15, 20, 25. They have the necessary qualities for the manufacture of such a tool. Also, some experts recommend using reinforcing steel grades. The material has excellent properties: resistance to deformation, ductility and good heat-resistant properties. In addition, reinforcement is a common rolled metal product and has a variety of cross-sections. This is convenient for making pliers of various sizes, from the smallest to a fairly large two-handed tool.
The main thing is that the reinforcement is not susceptible to hardening. After all, constant heating and cooling during operation will lead to the forging tongs becoming fragile and breaking very quickly.
Do-it-yourself blacksmith pliers are made as follows.
Historical perspective
Initially, as a tool, pliers were intended to remove hot metal blanks and crucibles of molten metal from forges. They were also used by blacksmiths to hold various workpieces during forging.
Archaeologists prove that the prototype of pliers - tongs, which had a rod-axis - was invented back in the Neolithic era. Back then this instrument was made from burnt wood.
The first depiction of hand pliers tools dates back to the 6th-5th centuries BC. In the Bronze Age, blacksmiths used primitive pliers as clamps. They are currently found in the burials of blacksmiths as burial goods, indicating that the deceased had a special and fairly high social status.
Since ancient times, pliers have been two castor beans connected by a rivet that acts as an axis. This tool has been evidence of specialized blacksmithing skills since ancient times. Together with the anvil and hammer, pliers were an attribute of numerous ancient Greek and Roman blacksmith gods and lords of thunder (Thor, Vulcan, Hephaestus, etc.).
Much later, pliers began to be used in construction work, in plumbing activities, widely used in electrical work, etc. Depending on the specialization and principle of the device, various pliers are called side cutters, pliers, wire cutters, pliers, etc.
Manufacturing of forging holders
The algorithm for producing a forging device is as follows.
- To make pliers, take a piece of 25 mm reinforcement and heat it to forging temperature.
- At a distance of approximately 350 millimeters from the edge, the circular section is pulled onto a square with sides of 20 mm.
- Having retreated part of the square by 50 mm, press it into the depth of the workpiece 8-10 millimeters.
- The next step is to cut the remaining 300 mm square into a strip, which, in turn, is formed into the handle of the future tool. Their length is about 500 mm.
- Now the finished piece for the pliers is cut off from the rest of the piece of reinforcement.
- After heating, the end of the remaining square is pressed into sponges of the desired shape.
- The second half of the forging tongs is made in the same way.
- To connect them, you need to fold them together, stitch them, or better yet, drill a hole for the fastening rivet.
The halves are connected into a single instrument. To obtain the sponges of the desired shape, they are heated and forged into a mandrel.
How to make such a blacksmith tool will become clear after watching the video presented.
For the manufacture of smaller or, conversely, larger forging tongs, they take reinforcement or a workpiece of the appropriate diameter.
Burning stamp
| Wood burning stamp with a raised image | |
| Area up to 10 cm2 | 1800 rub. |
| Area from 10 to 25 cm2 | 180 rub./cm2 |
| Area from 25 to 50 cm2 | 150 rub./cm2 |
| Area from 50 to 80 cm2 | 130 rub./cm2 |
| Soldering iron 200 - 300 W (with adapter) | 2500 rub. |
| Soldering iron 500 W (with adapter) | 3500 rub. |
| Handle 150mm (brass + textolite) | 500 rub. |
| 350 rub. |
- Engraving depth over 1.5 mm + 50% for each additional. mm
- Coat of arms + 50%
- Complex image with high labor intensity from + 25% to +100% to the cost of the product
To order, contact us by phone +7 (499) 3940020, mail or use the online chat in the left corner of the screen.
- ———————————————————————————————————-
The process of burning a design on wood is known to us as an ancient art form that is found in the culture of various peoples.
For quite a long time, the process of burning was perceived only as folk art, and even now many people are interested in wood burning as a hobby.
But already at the end of the last century, wood burning firmly entered the professional environment, where this fascinating process began to be used for commercial purposes.
In a professional environment, wood, leather, plastic and other materials that can withstand high temperatures are processed using burning clichés.
The essence of his work is simple - an exclusive text or design is engraved of a wood cliche a stamp is obtained on the wood .
Using a burning cliché
At all times, they sought to protect their product from counterfeiting and, caring about preserving the authorship, tried to gracefully sign their work. Nothing has changed now. Artists, workshops and various enterprises use cliches for burning on wood - they leave a brand mark on objects and products, which serves to distinguish original products from fakes.
Alternative Tool Options
To convert it into a blacksmith's tool, you can take nail pullers or old pliers.
In the first option, they need to be remade, since the grip of this tool is too curved for comfortable clamping of nail heads.
To do this, you need to disassemble them into two separate parts and, by heating the ends of the clamp, disperse it into a flat shape. You can also simply weld jaws made from a strip of metal to the clamp.
For normal and comfortable operation, you will need to lengthen the handles. This can be done by welding pieces of pipes or fittings onto the existing handles.
Assembling a homemade knife
Having completed all the above operations and bringing the knife steel to the required hardness, we proceed to assembly. We adjust the shape of the pads to the shank of the knife and cut out two additional leather inserts.
Then we lubricate the parts with glue, install brass inserts on the glue and leave to dry for several hours.
It is better to make the extreme insert not from a rod, but from a tube of the required diameter. This will help attach the finished product to a leather strap during use, which will prevent its loss while hiking, fishing or hunting.
After the glue has dried, carefully sand the handle and blade with sandpaper. To protect the blade from corrosion, it is enough to polish it well after final sharpening and finishing.
Primary processing
The primary processing stage is carried out in order to give the workpiece a primary shape that will approximately resemble the final product. The preparatory stage is characterized by the following features:
- The workpiece is forged.
- The structure of the material is compacted.
The above information determines that a knife from a valve can only be made if you have the skills of a blacksmith. In addition, appropriate equipment is required, which is used to heat the material and deform it.
Mounting according to view
There are several options for attaching the handle to the knife blade. The most popular are the mounted and overhead handles. Each of them is designed for specific knives.
Horseback
Mounted fastening technology provides for a narrow knife shank. The handle will be made in one piece. This mechanism provides resistance to damage. The design will be lightweight compared to riveted technology. This predetermines when used in long and voluminous work. If the manufacturer has chosen the mounting technology, epoxy resin and wood sawdust will be needed for excellent adhesion. The work is carried out according to the following scheme:
- Selected types of wood are treated with an antiseptic;
- A blank with suitable proportions is made from the block. The cutting angle is taken into account in order to achieve a beautiful cut;
- Marking is carried out and a hole of suitable diameter is drilled;
- You should dilute the epoxy, combine it with sawdust, and pour it into the hole;
- At the same time, you should insert the blade, which was previously wrapped with tape to protect it from dirt;
- Place the semi-finished product in a vice or press and wait until it dries completely (a day or two).
You can make such a handle with grooves for your fingers. To do this, make a recess under the index finger. You can practice performing the correct form on plasticine, only after that you can move on to wood. After this, you should use a cutter, rasp and sandpaper to sand the workpiece. Soak the product in heated drying oil and dry it in the sun. After this, treat the handle again with a zero polish. Complete the production with a coating of rosin, turpentine and wax, melted in a water bath, which should be used to polish the handle.
Invoice
Such a handle provides for the presence of a wide shank, which is necessary to determine the contour of the created handle. It is assembled from two wooden blocks, united by metal rivets. This method of fastening does not affect the dimensions of the product in any way, thanks to this it is possible to balance a wide or elongated blade. The overhead fastening option is popular among the manufacture of kitchen knives. Main stages of work:
- The prepared wood is treated with an antiseptic and placed in a vice, where it is evenly divided into two symmetrical parts;
- The surface of the shank is carefully cleaned and polished to avoid gaps;
- Future fastenings are marked to connect the two parts;
- It is necessary to prepare a rod of copper or brass and drill holes in the markings in accordance with the diameter of the rod;
- Make rivets; their length should be greater than the thickness of the finished handle.
Before doing the work, you can practice rough assembly of parts. After assembly is completed, the handle should be processed using a cutter and sandpaper. The halves must be attached symmetrically. You also need to saturate the wooden halves on the side adjacent to the shank with epoxy glue or resin, and add toner to give the desired shade to the product. Next, you need to wrap the knife blade with tape and connect the workpiece, cut off the pieces of rod and protruding rivets. Place the finished knife in a vice again, after wrapping the handle in oiled rubber. Allow the finished product to dry (a day or two).
Soak the handle in heated drying oil and dry in the sun. After this, treat it with zero. Polish the product with a mixture of rosin, turpentine, and wax, melted in a water bath. Instead of this product, you can use ship varnish.
Cliche for embossing. Soldering iron stamp. Creating a vector drawing
Making clichés for embossing on leather, wood or paper
MAGNESIUM
Or a brass cliche for hot
And cold stamping
Per day
from 3,000 RUBLES
The CheGoods workshop will produce cliches for hot and cold stamping on leather, paper and wood for subsequent application to any branded accessories, personalized gifts, boxes, packaging and other souvenir and presentation products.
A variety of cliches for different types of application - embossing, blind printing and foil stamping. All cliches, both brass and magnesium, are produced by the Chegoods workshop using modern high-precision equipment.
Do-it-yourself hot stamping on leather, wood or paper or solving the problem of applying a logo at home using a replaceable stamp with a soldering iron
We produce replacement hot stamping stamps from brass or magnesium and come complete with a soldering iron so you can apply your logo at home or in a small production facility as part of your hobby or small business. The stamp is removable, and in its place, to the soldering iron, you can screw another one.
A brass or magnesium stamp with a soldering iron can be used to apply a logo or personal signature on leather, wood, some types of plastic, or thick paper manually without the use of expensive equipment.
PRICE
REPLACEABLE BRASS
OR MAGNESIUM
STAMPS WITH SOLDERING IRON
from 4,000 RUBLES
The price is for an 80 watt soldering iron.
When purchasing a 150 watt soldering iron
the price for a cliche + soldering iron will be from 5000 rubles
What is the difference between magnesium cliches
And the brass cliche?
Both magnesium and brass cliches are perfect for a soldering iron, and you can choose the material based on their properties.
The main advantages of magnesium cliches are fast heating and an attractive price. However, when used under pressure, it is better to use brass cliches due to the greater strength of the material.
Basically, if you only use a soldering iron for embossing, you can get by with magnesium. If you have the prospect of using embossing machines, then it makes sense to take a brass cliche.
Free registration of personal signature and initials for subsequent embossing
As a gift, we can create a personalized stamp for free, choosing the font to add a personal signature. Usually, for a gift to a colleague, management or dear client, initials or various combinations of last name, first name and patronymic are added to the organization’s logo. The result is a memorable gift that compares favorably with the “mass market”. You can write any inscription in the style of your choice - modern, vintage, old Russian, calligraphic, abstract, creative, military and others of your choice.
Personal signature
In the selected
Your style
As a gift
A selection of vector images from an extensive gallery according to your wishes
Sometimes you want to give your loved ones a gift that reflects their hobbies, professional activities, character or your associations with this person. It can also be something personal that you want to put on your own items or leather accessories from the CheGoods workshop. In any case, due to the specific format of the equipment that makes cliches for hot and cold stamping, you need to have a professional design program for working with vectors and image storage to select the desired picture.
We will save you from this problem and you will receive a vector image that you can later use for applying to any surface. These vector images are used not only in the production of cliches for hot and cold stamping. They are needed for applying designs to non-standard surfaces, high-quality printing (booklets, stickers, banners, etc.), laser engraving, cutting from various materials (wood, plastic, metal, etc.), embossing, making badges, and this is just the beginning list
The CheGoods workshop will select you a vector image from an extensive database, apply a personal signature according to your font preferences and send it to the specified e-mail file saved in the two most popular formats - Corel Draw and Adobe Illustrator
Creating a vector image for a cliche
And other needs
1,000 RUBLES
Collection of vector images for making cliches
did not you find what you were looking for?
Contact us and we will try to offer the image you like
Our complete collection includes more than 1,000 vector images of various subjects
Frame
This is what the snail-shaped blower looks like in the diagram. To make it, at the bottom of the bucket, in the center, we make a hole, which should be slightly larger than the diameter of the motor shaft. Then you need to make fastenings, as in the photo or any other fastenings that will securely fix the engine so that it does not rotate and does not touch the impeller.
After this, you need to cut the bucket so that it is wider than the impeller. Next, we cut off the lid, the same diameter as the bucket, and in it we make a circle in the center, which will be slightly smaller than the diameter inside the impeller.
Fan drive for forge
- electrically;
- by manual force;
- a combination of methods.
When using an electric drive, rotation is carried out using an electric motor that converts electrical energy into mechanical rotational energy.
The manual method involves simply rotating the handle of a glider-type gearbox.
This option is usually a backup and is used when there is a power outage and the installed electric motor cannot be used.
The figure shows the drives: a) - manually, b) - using an electric motor.
1—belt on pulley;
2 and 3 - transmission gears;
4 — rotation handle;
Operating rules
Despite the high popularity of the material, epoxy resin handles cannot be called very durable. The operation of knives must comply with certain rules.
It is traditionally believed that products made from epoxy are purely decorative, so such knives are given as souvenirs, but they have found their practical application. A knife with a resin handle can be successfully used in the kitchen, but such a weapon should not be thrown. High impact loads may cause chips or cracks.
It is advisable to put the knife in a closet after use. On the one hand, this is required by safety precautions, on the other hand, extra protection from direct exposure to sunlight will not hurt. If the handle becomes dirty, you can clean it with a soap solution or other non-chemically active cleaning agent. It is better to refrain from using acids.
As for safety, modern epoxy resin in hardened and liquid form is absolutely harmless to humans, although it is still worth using personal protective equipment when pouring.
Industrial fans design
A fan for a forge of this type often has a casing that is made in the shape of a snail. Its internal structure and principle of operation are shown in the figure, where a) is the appearance, b) is the structure and arrangement of internal parts.
The principle of operation of the “snail” is as follows:
- Inside the casing (3) of the fan housing, a rotation wheel (1) equipped with blades (2) is located on the axis.
- The shape of the blades and the direction of rotation of the wheel create the movement of air flow into the pipe (4) in the direction of the combustion zone.
- The direction of air flow is provided from the hole located in the central part of the volute body to its final turn, which has a narrowing. Due to this, the air pressure increases.
An example of an industrial product is a fan of the common brand VT1-2, produced under the Blacksmith brand.
It is designed for blowing both stationary and portable forges with a completely open top. The diameter for connecting the pipe of such a device is 50.8 mm, power is supplied from a 220 V network, power consumption is 150 W, the impeller rotates at a speed of 3000/3600 rpm.
The maximum pressure (pressure) of the air stream in the supply hole is 490 Pa. The fan has dimensions of 225x180x225 mm and weight of 2.65 kg.
The fan housing is made by casting and is highly durable. The device operates almost silently and is easily connected to the forge.
Primary processing
The primary processing stage is carried out in order to give the workpiece a primary shape that will approximately resemble the final product. The preparatory stage is characterized by the following features:
- The workpiece is forged.
- The structure of the material is compacted.
The above information determines that a knife from a valve can only be made if you have the skills of a blacksmith. In addition, appropriate equipment is required, which is used to heat the material and deform it.
Advantages of blades made of valve steel X40
Knife valve steel has many advantages over other alloys. Among them, the following points can be noted:
- Turning is not too difficult; you can use a regular sharpening stone for this.
- Even when using the product to cut difficult-to-cut material, nicks and other defects do not form on the surface of the cutting edge.
- The device lasts quite a long time. This is due to the fact that the surface is characterized by increased resistance to high humidity.
- Easy to care for. In order for the product to serve for a long period, there is no need to carry out any maintenance work.
Valve fishing knife
A minor drawback is that such steel has a fairly high rate of fracture brittleness. However, it is quite difficult to break the blade; it requires a lot of force.
Blower installation
We move on to the final stage - installation of the blower. We attach the first part with the pipe to the engine. Here you should pay attention to the fastening so that they are reliable. Next, install the impeller in this part and close it all with a lid. The latter is also secured with epoxy resin. For a more presentable look, you can paint the structure in a single color. As a result, the snail design should look like this:
Now the fan for the forge is ready and all that remains is to attach it to the forge itself and check the effectiveness of the product.
This type of blower for the ash pit is most preferable, since the air flow can be directed in the desired direction.