Perhaps one of the most useful and ancient tools is a knife. It is difficult to find an area of activity where one could do without it. Knives are needed by both hunters to fight animals and librarians to cut paper. There are a huge number of these weapons, which differ in size, shape, sharpening and other characteristics. Handmade knives have always been valued. You can easily make them yourself.
Advantages of handmade knives
Homemade knives, subject to all technological recommendations, are not inferior to factory models in terms of quality and have a number of their own advantages, such as:
- the ability to independently determine the type of product;
- individual choice of knife shape;
- non-standard design of the handle, relying only on the individual preferences of the master and the general design of the knives;
- the ability to use materials available at hand;
- satisfying the creative impulse of the master.
The key point in making unusual handmade knives is determining the category of purpose and design of the masterpiece being created. The classification of knives is very arbitrary, but the following main types of products can be distinguished:
- products for household needs;
- combat (including hunting and fishing knives);
- sports knives;
- decorative knives;
- survival knives.
The design of the knives involves the division into knives with a retractable blade and a fixed blade.
Crafting tools
Having decided on the type and design of the product and having prepared its sketches, immediately before work the craftsman needs to prepare the following tools and equipment for making knives:
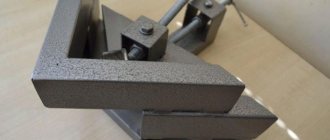
- Vise with soft lips (for clamping and holding the knife in a given position).
- Grinding equipment (grinder or stationary machine).
- Drilling equipment (machine or hand drill) with drills of various diameters.
- Tools for sawing and processing metal (file, metal scissors, jigsaw, hacksaw).
- Hammer.
- Rasp.
- Equipment for heat treatment of the knife blade (electric oven, gas burner and fire brick, etc.).
- Personal protective equipment (respirator, goggles or mask).
Handmade knife drawing
Drawing of a hunting knife
Machete drawing
To protect the knife from scratches and to prevent damage to things by the blade during transportation, you can make a homemade knife sheath. For this you will need:
- a piece of thick cotton fabric;
- a piece of hard natural well-dressed leather;
- durable sewing needle with high-quality nylon thread;
- a thin awl or drill with a thin drill bit;
- pliers;
- durable steel wire;
- calipers;
- working knife with a durable, sharp blade;
- abrasive sandpaper for processing leather cuts.
The final stage: the scabbard
After completing the main work, you can work on the sheath. The new weapon should not be lying around anywhere. It needs to be given a decent frame. Don't forget about safety and convenience either.
Case made of planks
The simplest and most affordable material is small boards, for example, from boxes. Pine is not suitable for a hilt, but it is quite suitable for a sheath. The sequence of actions is something like this:
- Two boards are selected. A place for the blade is knocked out in them. When connecting these two parts, the knife should fit as tightly as possible.
- The future sheath is given the desired shape and the dimensions are adjusted. Conventional metalworking tools are used, for example, a hacksaw.
- The halves are connected using epoxy glue.
- Next you need to wait until the glue dries.
- A hole is made at the bottom to allow moisture to escape, and guides are cut in the upper part.
- The form is “brought to mind.” The last minor flaws are being eliminated. Emery works well for this.
Selecting materials for making knives yourself
The product manufacturing process dictates the preparation of the following basic materials:
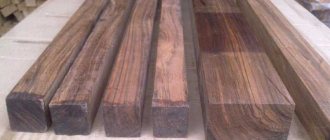
- Durable steel blank for the blade.
- The material from which the handle will be made (wood, polymer, plastic, horn or bone blank, etc.)
- Sandpaper of varying roughness.
- Steel rivets or any wire from which you can make homemade rivets to secure the knife handle.
- Varnish for finishing the finished handle.
Wooden knife
Now let's talk about how to make a knife from wood. As practice shows, blocks of wood can often be transformed, so we will take a plywood sheet as a basis.
All necessary materials for the work are yours. So let's get started.
- First of all, take the desired template and carefully transfer it to a plywood sheet, then simply cut it out.
- Next, take a file or sandpaper and go well along the edges of the knife so that they become smooth and free of small sawdust.
- Then you should use wood varnish. Apply a thin layer of varnish to your knife and wait 20-25 minutes for it to dry. This manipulation will make it stronger and get rid of harmful parasites.
- The final stage of the work will be its decoration, but what it will be like depends only on your imagination.
Step-by-step instructions for making a handmade knife
After all the tools and materials have been prepared, you can begin the actual work of making a handmade knife. The work process involves dynamics, therefore, to produce a knife with high quality characteristics, the master should adhere to the following work plan:
- Annealing of a steel billet.
The high initial hardness of the steel workpiece may not allow the future knife blade to be processed quickly and without loss. To reduce the hardness of a steel billet, they resort to a heat treatment operation such as annealing. The essence of annealing is to heat the workpiece to a temperature of 600-700 ºС, hold it at this temperature for several hours and then slowly cool it in a furnace.
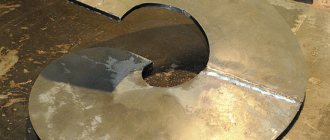
- Preliminary mechanical processing of steel blanks.
After the hardness of the workpiece has been reduced, you can begin its primary machining. To do this, using a cardboard sample cut out based on the prepared sketches, the necessary boundaries are marked on a steel blank with a scriber and then the knife is given the required shape with a grinder. The descents should be carried out slowly, gradually, with obligatory cooling in the water after each pass. Then the workpiece must be thoroughly cleaned from nicks and irregularities, which can play a negative role in the hardening process.
- Hardening of a steel billet.
Hardening a workpiece is a responsible job, because both the quality of the product and its service life will depend on it in the future. By hardening the steel base of the knife increases its hardness and improves its mechanical properties, which are responsible for the durability and service quality of the product. The hardening process can take place either in a factory electric furnace or be carried out using a gas burner, blowtorch, forge and other auxiliary devices that allow the product to be heated to temperatures of about 900 ºC. The heating temperature and holding time are individual for each type of metal, the values of which can be found in special thematic reference books on the heat treatment of metals. The heating temperature can be determined by the color of the metal.
Heated metal colors
After the metal has been heated to the appropriate temperature and maintained for the required time, it must be cooled in water or machine oil. To carry out cooling, the workpiece must be grabbed with long tongs and dipped into a bath of prepared liquid.
Please be aware that oil on the surface may ignite!
If water is chosen as the cooling medium, then in order to avoid the appearance of hardening cracks, several tablespoons of table salt must first be dissolved in a container with water.
Various options for homemade knives
Uneven heating of the product or its cooling can lead to steel defects such as warping. To prevent it, the steel workpiece should be cooled by lowering its blade with the cutting side strictly vertically down.
- Release of the workpiece.
To impart final mechanical properties to the workpiece, after hardening the workpiece should be subjected to a tempering procedure. To do this, the workpiece is again heated to a temperature range of 200-300 ºС, kept for a certain time and cooled in air to room temperature. An important point in the process of designing a pen is its future design. If you plan to apply a design to the surface of the handle, then it is imperative to carry out the etching procedure. After this procedure, you can begin assembling the knife.
- Making a knife handle.
Preparing the handle of a knife is no less important, because the shape of the handle will completely depend on the accuracy of the actions performed. The types of handles are very diverse, and you should choose the type of handle based on the type of purpose of the finished product. On the material chosen for the handle (for example, wood), you need to trace the borders of the handle using a simple pencil according to a cardboard sketch. Then give the handle the appropriate shape using a sharpening machine, a file and sandpaper.
- Preparing holes for rivets.
Rivets are the elements that will secure the handle to the steel base of the knife. It is necessary to drill 3 holes in the steel blank and in the handle of the knife with a drill at the same distance from each other along the diameter of the future rivets.
- Final assembly of the finished knife.
Assembling a homemade knife involves pulling together all the parts of the knife into a single product. To facilitate the assembly process, you can first glue all the parts together and leave them in a vice for the glue to set for a while. Then insert rivets into the holes; a good solution would be to insert not a rivet, but a thin hollow tube identical in diameter into the outer hole on the knife handle. Subsequently, you can insert a cord into this hole, and use it to secure the knife to your belt or backpack. The final processing of the knife handle consists of polishing it with polishing paper and processing it with felt.
Example of a knife with a hole in the handle
Drawings of popular models
The choice of material, dimensions, shape depends on the purpose: fishing, working in the kitchen, hunting, protection from enemies. A product with sharpening, handle protection, a blade over 90 mm, and a spine thickness of 2.5 mm or more is considered dangerous. When choosing a suitable drawing, you can see a butcher knife equipped with a T-shaped handle; it is usually used for concealed carry. Depending on the purpose, there are kitchen, tourist, hunting, fishing, and throwing structures.
A master who is going to make a switchblade with his own hands must have special skills. The model is very interesting, but difficult to implement.
Kitchen
When creating drawings of knives intended for cooking, you must remember that the tool is often used for cutting food on a cutting board. It is for this reason that the blade must have a straight shape so that the fit to the surface is complete. You can check the convenience of the future blade using plywood. The template is transferred to the material, cut out, and then tested.
When creating a drawing, you should pay attention to the shape of the handle. It is better to avoid sharp edges that cause discomfort. Ergonomic options that match the structure of the hands are optimal. It is quite difficult to determine which configuration will be the most practical, so it is easier to use a ready-made model with dimensions. A high-quality knife, made yourself, will be an excellent helper in the kitchen.
Tourist
Touring blades must be reliable, durable, and comfortable, since they are intended for use in extreme conditions. The choice of suitable materials is of great importance when making a knife. The configuration can be anything. Typically, the choice of model is carried out in accordance with the intended tasks and individual preferences of the owner.
The dimensions of the blade are determined so that the intended use of the product is as effective and safe as possible. A camping knife is used to perform several tasks:
- Cooking;
- cutting ropes, ropes, fishing lines;
- sharpening stakes for setting up a tent;
- protection from attacks by wild animals.
An excellent option would be a drawing of the famous Bowie knife with a characteristic bevel on the tip of the blade. When creating a sketch, you must remember that the tip is located on the midline if you draw a stripe along the entire product, including the handle.
Experienced tourists prefer to carry several blades with them for different purposes. Drawings of folding knives with multiple blades and other useful accessories are relevant for such situations. Pencil structures are used as auxiliary ones, since they are not designed for high loads.
Hunting
Hunting requires a particularly careful selection of ammunition. The cost of knives suitable for this craft is quite high, so most often the models are made independently. A suitable option would be a tanto knife, which you can make yourself. The design is characterized by high penetration properties, so it is suitable for fighting predators and cutting game.
When making such a knife, you must strictly follow the drawing, use recommended materials, and observe the parameters. It is better to start the production process by creating a plywood template, the size of which corresponds to the real product. The finishing of the handle deserves special attention; here the master can realize any creative ideas.
Fishing
The main task of this model is cutting fish carcasses. In addition, a fishing knife is used to repair gear, cut fishing line, build a tent and prepare food. Designs that are used in wild conditions must have versatility and convenience.
A wooden model will help you design the model correctly. It is necessary to check how the blade lies in your hand and whether it is comfortable to use. At this stage, possible adjustments are made.
When choosing materials, you should give preference to those that are not afraid of water. The blade is usually made of stainless steel, the handle is made of hard wood or plastic. If fishing is only a hobby, a small frontal knife that can easily fit in a pocket is suitable. This blade is ideal for solving basic everyday tasks.
Propelling
This type of blade is classified as a combat blade; if necessary, you can make a knife with your own hands that will not be included in the category of prohibited ones. The configuration of the model is designed taking into account aerodynamic features, so making the drawing yourself is a difficult task. It is better to use ready-made sketches and strictly follow the recommendations of specialists.
The same material is usually used to make the blade and handle; the handle is not supplemented with linings. First of all, a model is made of wood, which allows you to check the balance of the model and the accuracy of the calculations. If necessary, the drawings are adjusted.
Regardless of the chosen blade model, the main condition for effective work is the presence of a high-quality drawing of the handle and blade of the knife. The most successful options are the result of many years of work and scientific testing. With the help of accurate sketches, adherence to dimensions, and recommendations from specialists, you can independently make an excellent tool or tool for all occasions.
The process of creating a handmade sheath
A handmade sheath is a decorative element, the creation process of which is simple, and the result is surprisingly practical. The knife blade must be wrapped in a piece of cotton fabric and covered with paraffin. A piece of leather, previously well soaked in water, must be placed so that the two opposite ends of the piece of leather close on the sharpened side of the blade. Use clamps (any kind will do, even stationery ones) to fix the position of the leather case clearly along the contour of the blade. The product must dry well.
Homemade leather scabbard
After the leather blank has completely dried, you need to remove the clips and, following the contour that appears, stitch the future sheath. To do this, using an awl or a drill with a small drill diameter, it is necessary to make many holes at the same distance from each other, through which a needle with a strong thread is sequentially passed. Having completed the sewing part of creating a handmade sheath, you need to trim off the excess leather using a sharp knife. Treat the edges of the sheath with abrasive sandpaper. If necessary, determine the location of the hanger for the sheath, cut it out of leather and secure it to the sheath with glue. To add a decorative shine, the sheath can be treated with shoe polish to match the tone of the leather from which it is made.
Paper knife
To make a knife out of paper, follow these steps:
- Fold a sheet of A4 paper in half.
- Then make a triangle.
- Use scissors to make neat edges and start cutting everything out.
- When you have a knife, you will need to fasten it on both sides; this can be done using PVA glue or a stationery stapler.
- To make the handle, take a small piece of paper, fold it in half and cut out a small rectangle on it. After completing these simple manipulations, you will get a handle for the knife.
Features of sharpening the finished product
Sharpening the blade will be correct only if the angle of the blade to the block is chosen correctly. The main principle for choosing a sharpening angle is that the smaller the sharpening angle, the sharper the blade, and the larger the sharpening angle, the longer its sharpness. The universal angle for sharpening is an angle of 20º, but if particularly desired, the master can rely on the following generally accepted values:
- an angle of 30-35º is selected for hunting and folding knives;
- angle 40-45º - for knives that require edge sharpness and increased resistance to dullness;
- 25-30º - angle for household knives;
- 25-40º - selected for sharpening tactical knives.
Sharpening a handmade knife
Sharpening a knife should be accompanied by smooth movements. When sharpening the curve of the blade, you need to slightly lift the handle of the knife, which will create the same sharpening angle around the perimeter of the cutting edge. The direction of the blade should be such that the direction of movement is always strictly perpendicular to the cutting edge.
Making a hunting knife at home
The process of making a handmade hunting knife is no different from the step-by-step instructions given above and the main idea is to accurately adhere to the dimensions according to the prepared sketches.
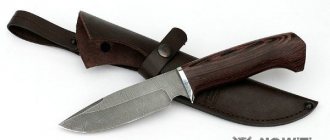
Hunting knife
A distinctive feature of a hunting knife is its configuration: the center of gravity of the blade is shifted to the handle and the blade is narrower in comparison with it. The handle at the base has a protective limiter, which allows you to protect the hunter’s hand during a strike. The material of the handle should be chosen in such a way as to prevent the hand from slipping from it. The average length of the blade is usually 12-15 cm with a width of 25-30 mm.
Any craftsman, inspired by a photo he liked on the Internet, or an unusual product spotted from a friend or store, can easily bring all his ideas to life, all you need to do is have a minimum set of necessary tools and the desire and result will not be long in coming!
Heat treatment of the blade
During all the previous stages, the steel of the blade was quite soft and easy to process. After heat treatment, the purpose of which is to reveal all the best qualities of the knife, the material will no longer be so pliable. Therefore, right now you should make sure that you are satisfied with everything in your product.
Heat treatment is performed in two steps:
- the first step is to increase the strength of steel;
- the second is a slight weakening.
The required temperature to which the metal must be heated in order to harden it depends directly on the grade of steel and is calculated in special tables.
Before starting the main process, be sure to stock up on gloves made of thick material (welder gloves).
The blade must be heated evenly on all sides, periodically changing its position. After some time, due to the high temperature, the steel will begin to change color.
When it turns deep red, we check it with a magnet. If the material is magnetic, then we heat it up further; if not, the temperature is appropriate.
After heating, the metal must be cooled; used engine oil is usually used as a coolant. Be extremely careful, as when you lower a hot knife into the oil, a flame will burst out of it.
The size of the container into which the liquid is poured must completely accommodate the blade. It is not necessary to harden the end of the shank in a kitchen knife.
Heat treatment of the blade.
The next stage of heat treatment is tempering. This process reduces the brittleness and hardness of the blade, but increases its flexibility. The ratio of hardness and flexibility depends on the heating and tempering time.
To achieve the required values, you can use special tables. Hardness is measured on the Rockwell scale; for a kitchen knife, the normal value would be 60-64 units.
After the holiday, we carry out final polishing with a small-grain abrasive.