Extruder for feed: drawings and useful recommendations
A simple to use feed extruder makes it possible to independently produce compound feed for animals. This device is considered an indispensable assistant both in large-scale agriculture and in small farms for raising animals and birds. In specialized stores, such equipment costs decent money. To save money, you can assemble the unit yourself; drawings and recommendations from specialists will serve as an auxiliary informant in this matter.
What it is
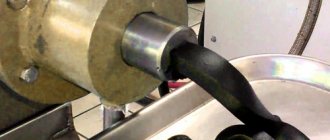
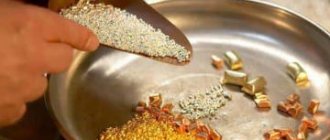
An extruder is used to process grain crops into compound feed, which is much easier to digest in the stomach of animals. Processing is carried out using a press under a pressure of 60 atmospheres and at high temperature. The result is a product shaped like 20-30 mm corn sticks, but with a dense structure.
Apparatuses for preparing feed exist with different power ratings, and the volume of product produced depends on it. For a small farm, a device with a productivity of 25-45 kg/h is perfect - the price of such a device starts from 47 thousand rubles. But a large farm will require more powerful models capable of producing up to 1.5 tons per hour and they cost from 160 thousand rubles.
Extruder device
Due to high prices, equipment for processing products into mixed feed, even second-hand, is available to a narrow circle of consumers. But if you make an extruder for feed with your own hands, you can save a lot. Only in this case you need to study in detail the structure of the unit, the principle of operation, and also have all the necessary spare parts available.
Diagram of a large extruder
The design of the device includes the following elements:
- frame - serves as the basis, all the details are fixed on it;
- drive unit;
- belt;
- loading capacity;
- cuff;
- dosing screw with separate drive;
- gearbox;
- receiving tank;
- motor;
- injection screw conveyor;
- Control block;
- carved blade;
- washer;
- adjustment key.
Operating principle
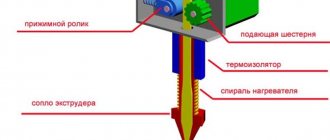
In a homemade extruder, the main function is performed by the pressing mechanism. The element includes a discharge screw unit mounted in the cylinder. The blade block gives the product the shape of oblong sticks.
The functions of the electrical appliance are not limited to pressing feed. With its help, you can grind grain, carry out heat treatment and disinfection of feed, and mix different components into a single mass.
The design of the injection screw includes:
- outer part;
- internal;
- heating washers;
- outgoing auger.
Each unit is installed on a stud with a left-hand threaded part and covered with a housing made of metal material. Thanks to the keys, the revolutions flow from the main shaft to the combined auger. All components are firmly fixed to the frame.
Detailed extruder design (download)
The housing element is equipped with a hole, and the receiving part is mounted to it. The internal area is equipped with longitudinal grooves, due to which all feed components are mixed along the longitudinal side of the axis.
A pellet regulator is installed on the output part; its design includes:
- matrix block;
- output housing;
- blade pressed by a spring element to the matrix block.
The rotation of the shaft with the blade is carried out by means of a rein. You can monitor the temperature using a thermocouple mounted on the frame. The grain extruder operates from electrical voltage. But there are already modifications that run on fuel.
Making an extruder for feed with your own hands
If you have the necessary material, parts and tools, you can make an extruder with your own hands. Let's look at how to get a low-performance model.
To do this you will need:
- electric motor with a power of 2.2 kW at 3,000 rpm;
- gears from a tractor box - parts from YuMZ would be an excellent option;
- spring 8 mm;
- rod with a cross section of 5 cm;
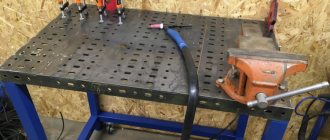
- welding equipment.
Step-by-step work on making a feed extruder with your own hands:
- To obtain a cylinder, you will need to weld the tractor gears together. As a result, a spare part with a cross-section of 625 mm should be produced. Next, a spring with a diameter of 8 mm is mounted on the hydraulic cylindrical rod. Weld all the parts; if the seam is uneven, treat the area with a grinder.
- Using turning equipment, grind 2 axle boxes that will be used for the auger and gearbox. Weld the auger, shaft element and axleboxes into a single piece, and do not forget to insert a bearing between the last parts.
Blanks in the form of axle boxes
- The equipment head is mounted on the screw; it will act as a regulator of the die to which the nozzles are welded.
Workpiece on auger
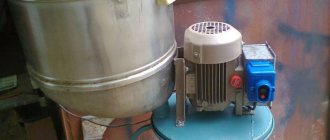
- The auger is covered with a housing, all parts are assembled and fixed to the frame, an electric motor, belts and a starting part are also mounted. A loading container is installed on top.
In general terms, a homemade extruder is similar in external and functional characteristics to a household electric meat grinder.
VIDEO: Making a screw granulator with your own hands (Part 1)
How to use a homemade design
A grain granulator assembled with your own hands before large-scale production requires preliminary testing and verification work. Equipment should be tested in a safe environment.
Homemade extruder for the production of animal feed
- The first thing that needs to be checked is the quality of all connections, as well as fasteners and the maximum level of lifting to the stop.
- Then the device is fixed on a flat, stable surface. If the coating is shaky, the device may not perform its functions properly.
- Connect to a power source, start and leave for a few minutes to fully warm up the system. To prevent the elements from rotating in vain, you can check by passing a light product in the form of flour or cake from sunflower seeds through the mechanism. The correctness of the form determines whether the device has warmed up sufficiently.
When the “sausage” shape becomes smooth and dense, then the unit is ready to work with grain
- After the feed comes out in the desired shape, you can add the grain product. The supply of grain must be regular without stopping; the mechanism must not be allowed to function idle. You should also add raw materials in even portions so as not to load the system and create a jam.
- At the output, you need to adjust the feed fraction by periodically tightening the bolt and reducing the hole in the spinneret plate.
- At the end of the productive process, it is necessary to thoroughly clean the internal components from product residues. To do this, you do not need to disassemble the device; just pour the seed shells into the equipment. This raw material is capable of well collecting grain product particles due to the oils it contains.
- Reduce the rotation level to gradually cool the mechanism components. If you need to disassemble the device, you should wear heat-protective gloves, there is a risk of getting burned.
The homemade device is capable of producing up to 40 kg/h of feed. The level of performance depends entirely on the degree of motor power that is included in the design of the equipment. For personal use, such processing efficiency will be sufficient.
Mechanized processing of raw materials makes it possible to fully provide livestock with compound feed, while reducing the cost of purchasing factory-made feed. In the process of preparing feed pellets, you can use a variety of grain products with additives, enriching the diet with various microelements and macroelements, which are so lacking in regular feed.
VIDEO: Making a screw granulator with your own hands (Part 2)
Granulator drawings
Drawings and videos of a granulator from a meat grinder with your own hands show that this is a very simple device. Even beginners can handle its production. It is convenient to use a meat grinder as the basis for the unit precisely because it requires minimal modification. When creating a granulator, you only need to remove unnecessary parts of the device and secure some additional elements.
The advantage of the meat grinder is the presence of a ready-made durable screw mechanism
The dimensions of a homemade granulator are determined in accordance with the dimensions of the meat grinder. The main attention should be paid to the matrix; it should fit tightly and without play into the unit body. During the manufacture of the device, the conformity of all fastened parts to each other is checked. A pulley on one side and a cutting knife on the other must be securely attached to the auger.
The do-it-yourself granulator is compact and suitable for installation on a table in the utility room
Technical features of extruders
The device consists of several parts, and is divided into three sections:
- The first is responsible for receiving raw materials,
- In the second, plasticization and compression occur,
- In the third - pressing.
Grain processing in industrial extruders occurs at high temperatures: from 110 to 180°C, and pressure above 40 atmospheres. Such conditions are necessary for the breakdown of fiber, proteins and starch contained in whole grains. The whole process takes only a few minutes, which means the split protein does not have time to coagulate.
Another advantage of extrusion is the production of clean and safe feed: almost all types of bacteria and fungi die during heat treatment.
The grain extruder is equipped with a special chamber in which the products are pressed. It also contains a shaft with screw pressing, intermediate and feeding elements. The power of the device depends on the engine and rotor, which is responsible for the operation of the cutting unit.
Design and principle of operation of a granulator from a meat grinder
To understand how a homemade granulator works, you first need to consider the operating principle and design of the factory device. It consists of several main parts:
- a bunker into which raw materials are poured - grain and products with a high protein content;
- a feeding mechanism, due to which the mixture moves inside the granulator;
- matrix - a disk with holes for forming pellets;
- a knife that cuts off the compacted granules at the exit;
- a receiving hopper into which the finished feed is poured.
When using a granulator, the mixture of raw materials is immersed in a hopper, the device is turned on, and the future feed moves towards the matrix in a dense flow. After the mass comes out of the holes, the knife automatically cuts it off. Small oblong pellets fall into a substitute container.
Industrial granulators are capable of processing, including solid feed, and produce on average about 200 kg of the finished mixture per hour. They are very convenient to use, but there is a drawback: such devices are expensive. If you have limited finances, it is better to assemble a granulator yourself; the basis for it can be an old metal mechanical meat grinder. The capabilities of the unit will be limited, and only soft feed will be processed in it, but such a device will also be of great benefit on the farm.
At the top of the granulator from the meat grinder you can attach a funnel for convenient loading of raw materials
A homemade granulator consists of several parts:
- the metal body of the meat grinder, which acts as a receiving hopper;
- an auger pushing the feed mixture to the outlet;
- a purchased or homemade matrix - a steel disk with drilled holes;
- knife for cutting off finished granules;
- a pulley with a belt drive - when turned on, it transmits rotation to the auger of the meat grinder;
- 220 V motor, it is necessary to bring the entire structure into operation;
- external container for receiving finished pellets.
The design of a homemade granulator almost completely replicates the design of the factory device. The difference lies in the dimensions - a home-made meat grinder unit is much smaller. In addition, the assembly of a homemade device is less reliable, and the engine is not as powerful. It is for this reason that a meat grinder is not suitable for compacting solid feed.
Types of homemade extruders
Industrial models of the device start at 45,000 rubles in price, which is not always acceptable for small farms and private farmsteads. To prepare complete and healthy feed for livestock and poultry, many farmers have learned to assemble the device themselves. There are several ways to make an extruder with your own hands:
- For large volumes of raw materials,
- From spare parts for agricultural machinery,
- From a vacuum cleaner.
Before you start manufacturing, you need to find diagrams and drawings. They will help you understand the intricacies and nuances of fastening and location of the main working units.
A homemade extruder will not only be cheaper. It can be made in a size suitable for the needs of the farm, equipped with additional figured knives or several matrices.
Extruder for large volumes of feed
This device consists of:
- Receiving bunker,
- Motor and drive,
- Frames,
- Gearbox,
- cuff,
- cutting unit,
- Dosing screw with drive,
- Cylinder.
The chamber of the pressing unit is a cylinder into which the injection screw is inserted. The auger is divided into three parts: initial, middle and outlet. For greater strength, each of them is secured with a stud with a left-hand thread. The unit is covered with a casing made of steel sheet.
The frame is welded from a corner or pipe sections. The dimensions depend on the planned volumes of processed raw materials and the length of the cylinder. The pressing unit is installed on the frame and secured with several bolts. Next, we begin to manufacture the receiving hopper. Usually it is welded from steel sheets, and a hole is made in the lower part under which a tray is placed. Through it, the raw material flows from the receiver to the supercharger screw. To move the grain, longitudinal recesses are made in the lower part of the body. At the end of the screw section, a cutting unit is installed to regulate the size of the granules. It includes:
The knives are pressed against the matrix by a spring, and the shaft rotates using a drive and a driver. The finished product comes out through the holes in the matrix and is cut with knives according to the specified parameters.
The feed extruder processes grain only at high temperatures created by the operation of the motor and gearbox.
They are connected to the shaft and bow housing by a chain drive and attached to the frame. For safety, the electrical assembly can also be covered with steel cuffs. Temperature regulation is carried out by changing the position of the matrix, and control is carried out with a thermometer. Install it next to the cutting element.
Extruder tempering systems
According to the method of maintaining the temperature in the cylinder, extruders with steam, oil and electric heating are distinguished; with water and air cooling.
To prevent premature plasticization of the granulate and its sticking to the walls of the loading funnel and screw, the extruder loading zone is equipped with a cooling “jacket”. Either demineralized water or oil is used as a coolant (used in extruders intended, for example, for processing polyamides or copolymers of ethylene and vinyl alcohol, when it is necessary to maintain the temperature of the loading zone more than 100 ° C). Maintaining the temperature in the loading zone at a given level ensures the stability of the process of feeding and further processing of polymers.
Demineralized water is used to cool the oil in the extruder drive lubrication system.
When processing polymers, extruders with electrical heating are most often used, divided along the length of the extruder into several (5-10) independent temperature zones with individual thermal insulation. Typically, electric heaters - contact or infrared - are used to heat the extruder barrel. Contact electric heaters can be cartridge or tape type. Temperature conditions individually set for each heating zone are automatically controlled by thermoelectric converters and recorded by devices with light or sound alarms when they fall below the lower limit and rise above the upper specified limit.
There are two main sources of energy in an extruder - the mechanical energy of the rotating screw, converted into heat, and
heat from the heaters, with about 80-90% of the total heat provided by the rotating screw. High temperature when the melt is overheated in the melting zone can cause thermal destruction of the polymer. Heating zones in extruders, as a rule, have the additional function of forced cooling, which is necessary due to the self-heating of polymers under the influence of shear deformations in the molten material advanced into the front part of the cylinder when the screw rotates. This function is performed either by air fans or water-cooled cylinder “jackets”.
The water tempering system includes: a pump, a heat exchanger-cooler, an expansion tank, a filter in the soft water circuit, a filter on the cooling water supply pipeline to the heat exchanger-cooler, instrumentation, supply and return pipelines of softened water with solenoid valves for each heated zone extruder. Softened water circulates in a closed circuit (extruder zone - filter - heat exchanger-cooler - pump - extruder zone). An expansion tank is used to replenish the circuit with softened water. Cooling of the softened water after the extruder is carried out in a heat exchanger-cooler, into which chilled water is supplied in the summer, and filtered river water in the winter.
In the new type of extruders of the E10 and E11 series from Oerlikon Barmag, the heating zones can be equipped with cooling fans, which, in combination with aluminum belt heaters, ensures that the melt temperature of high-viscosity PET or PA is maintained at a given level even at maximum extruder performance (Fig. 39).
Rice. 39. Air cooling (a) and tape heaters (b) of the extruder
Extruder made from spare parts for agricultural machinery
To make this device, you must have:
- Electrical engine,
- Gears from a tractor gearbox,
- Rod, diameter 5 mm, from a hydraulic cylinder,
- Wire, 8 mm thick,
- Sheet metal.
To make a cylinder, several gears are welded together. The result should be a screw with a diameter of about 6.25 cm. Next, a wire is wound onto it at variable pitches. The step width gradually decreases from 2.4 cm to 2 cm. All elements are welded, and the seam is cleaned with a grinding machine.
The next stage: turning the axle boxes on a lathe. One is made for the auger, the second for the gear shaft. When the elements are ready, the parts are welded together in the following sequence: shaft, axle boxes, bearing, auger. The extruder head is attached to the latter using a die.
The assembly of the feed extruder begins with welding the frame on which the motor is mounted. It is connected to the working unit and the starting element using a chain drive. A loading hopper is placed on top: it can be either a bucket or a box welded from iron. At the opposite end, a form is installed to compress the processed mass. Passing through the die, the grain is pressed through the holes and enters the dispenser.
A grain extruder operates on the principle of a meat grinder, and the size of the granules depends on the shape and size of the holes in the die.
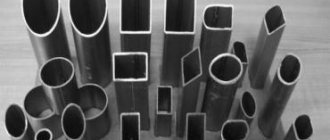
Construction of screws for polymer extrusion
Screw catalog
An auger (Archimedes' screw, literally from German schnecke - snail) is a metal rod with a helical surface. The screw is the main working element of extruders, injection molding machines and other equipment for processing polymer materials. The screw is the heart of the extruder; we can say that everything revolves around it, both literally and figuratively. The rotation of the screw provides both translational movement of the material and its heating and homogenization. Simply put, an auger can be thought of as a variable-diameter rod with a spiral groove cut into it. The outer diameter of the screw - the distance between the cutting shafts on opposite sides of the axis - is the same for almost all types of extruders. The gap between the screw and the cylinder is usually made very small; the ratio of this gap to the radius is usually 0.001, but can range from 0.0005 to 0.002. The turns, placed over the entire surface of the screw, during rotation ensure a continuous supply of the prepared, molten mass to the forming tool.
The performance of extruders directly depends on the geometric dimensions and configuration of the screws. Therefore, when choosing a tool, the following characteristics are taken into account:
- the diameter of the rod (D), its length (L), as well as the ratio of length to diameter (L/D);
- height of turns in different sections of the screw h1, h2, etc.;
- length of sections of screws with different heights of turns L1, L2, etc.;
- propeller flange width (e);
- screw thread angle (ϕ);
- the distance between the turns is the turn pitch (t).
According to current domestic and international standards, screws are produced in generally accepted sizes. Typically, the diameter of the working tool is 20, 32, 45, 50, 52, 55, 60, 63, 90, 125, 160, 200, 250, 320 mm. Depending on the design features, extruders are divided into short screw and long screw. Their type is determined by the proportional ratio of length to diameter (L/D). Indicators of short-screw extruders range from 12 to 18, long-screw lines start from 30 and above. The largest augers have a length to diameter ratio of up to 36.
Depending on the type of raw material being processed, screws can be divided into universal and special. The former are designed for processing various raw materials, the latter are designed to work with a specific material, for example, polypropylene, high- and low-density polyethylene, PVC, etc. Modern screws have different pitches of turns, their shape and size; such differences in configuration can improve productivity and extruder performance. The most popular types of screws are presented below in schematic drawings.
- Standard auger with increased feed rate in the feed zone;
- Auger without dosing and feeding zones;
- Screw with sharp compression;
- Decompression.
Various elements can be located on the screw: Maddock, Egen, Drey and others, which contribute to additional mixing and homogenization of the polymer mass.
The screw pair consists of a screw and a cylinder, the latter are divided into monolithic and prefabricated. Cylinders for single-screw extruders are most often made prefabricated, consisting of a shortened gripping sleeve (up to 3D) and a smooth cylinder tube. In order to improve the gripping properties of the screw, the loading window of the cylinder is positioned offset from the central axis, and longitudinal or oblique notches are applied to the section of the cylinder in the feed zone, which allows for more efficient capture of polymer granules. For processing secondary raw materials, as well as when casting PVC, screws with a degassing system are used to remove the resulting gases. In the middle of the degassing screw there is a decompression section through which the resulting gases are discharged. The length of the screw pair with a degassing system is on average 30D.
Extruder from an old vacuum cleaner
For production you will need:
- Housing and motor from a vacuum cleaner,
- plywood sheet,
- Steel blank for knives,
- Metal disk,
- Wooden pins,
- Fasteners and bushings.
This device is not very powerful, so it is most often used to prepare feed for a small number of poultry, rabbits, piglets or small cattle.
How to make a grain extruder: a square is cut out of a sheet of plywood - a base with a side of 30 cm. A motor is installed on it so that the shaft is 4 cm below the base. For the manufacture of knives, steel grade STZ or higher is used, or they are machined from car holders. The thickness of the knife should not be less than 1.5 mm, and the length and width should not be less than 20 * 1.5 cm. The knife should be sharpened in the direction of the rotating axis. For greater efficiency, the workpiece is shaped like a propeller or the angle of the corner edges is changed.
To attach the cutting element, a hole is drilled on the motor axis, and a regular bushing acts as a fastening element. The working chamber is made of metal sheet. Container dimensions: 70*6 cm. The sheet is bent into the shape of a cylinder, and the upper and lower parts are bent outward. Flanges 1 cm wide should form. They are needed to secure the chamber and hold the sieve. Three pins are installed at the bottom of the cylinder.
The mesh size of the sieve determines the size of the finished granules. The smallest is used to obtain feed flour. A receiving hopper with dampers is welded above the working chamber. With its help, you can regulate the volume of supplied raw materials.
Methods for making a homemade extruder
Method No. 1 - homemade extruder from metal tubes
In order to squeeze out the plastic, a piston is needed.
Therefore, the first stage in the manufacture of this homemade extruder is the creation of a piston.
I made it from a socket head, which I selected according to the diameter of the tube and installed it on the extension.
Next, I welded this end head to the extension, and welded the end hole of the head using a welding machine.
The result is the following design:
Source polymernagrev.ru
The second step was to make the camera itself.
The extruder chamber will be made of a metal tube 20 millimeters thick.
To do this, I took a tube with a thread at one end and made a loading window at the opposite end.
After cutting, I cleaned all the edges with a file.
And on the other end of the tube, the one with the thread, I screwed the adapter coupling.
The third step was to make the heating element.
I used two heating elements with a power of 400 W each.
And from the perforated corners I made a mount for the elements.
Next, I secured the heaters using metal clamps, and installed a copper tube between the corners in order to install a temperature sensor in it.
The result is the following design:
Source ytimg.com
The fourth stage was to carry out thermal insulation.
To do this, I wrapped the device with fiberglass, and wrapped metal tape over the fiberglass itself.
This thermal insulation will protect the user from burns in case of accidental contact with a working heated device, and it will also reduce heat loss from the extruder.
Source 3dtoday.ru
The fifth step was to assemble the extruder.
And at the sixth stage I made a nozzle for squeezing out the melt.
In my design, the role of the nozzle was played by a brass adapter, which I screwed into the adapter coupling, which is installed at one of the ends of the extruder body tube.
The seventh step was to make a lever.
First, I lengthened the piston pusher, and then secured the corners to the frame.
I attached a transverse tube to these corners.
Actually, it was necessary to connect a tube with a slot to this transverse tube, after which I took another piece of pipe.
One end of it was flattened in order to attach to the slot of the previously assembled structure, and the other end was connected to the piston rod itself.
The eighth stage is testing.
Well, in the end, as expected, it is necessary to test a homemade extruder device for plastic.
To do this, you first need to heat the extruder chamber slightly higher than the melting point of the polymers.
Then the prepared crushed plastic must be poured into the chamber itself.
Source ytimg.com
It is necessary to work with a device such as an extruder in a well-ventilated area, using protective equipment.
Method No. 2 - extruder in the form of a sealant gun
Now let's look at how to make a homemade extruder from a sealant gun.
The first step is to wind an asbestos cord around a piece of steel tube whose length is equal to the length of the sealant tube.
In this case, it is necessary to weld the end of this tube using welding and a piece of metal of the same thickness, and make a hole in the center of the resulting circle.
Next, you need to wind a nichrome thread over the asbestos cord.
Next, take the sealant gun itself and attach a mechanical thermostat from an old oven to it.
Then the bottom and neck are cut off from a regular plastic detergent bottle.
Afterwards you need to spread it lengthwise.
Next, the workpiece must be bent on one side, and notches must be cut at the bend.
The resulting sheet must be wound on any tube, the diameter of which should be approximately 5 centimeters.
After which the entire workpiece should be secured with tape.
The next step is to make a hole on the side of the manufactured mold, the diameter of which is equal to the diameter of the temperature sensor.
A prepared tube made of sheet plastic is inserted into this hole.
Then you will need to place the steel tube made earlier.
The next step is to fill the empty space.
To do this, you need to fill in a heat-resistant solution.
A mixture made of sand with gypsum plaster is ideal.
Source otdelka-expert.ru
A temperature sensor should be installed in the side hole.
The ends of the nichrome thread need to be connected to an electrical cable with a plug, after which you can fill in the plastic.
Source pkfst.ru
The melt output from this extruder is not suitable for normal filament processing.
Therefore, to solve this problem, you can install a thin spout on the end of the tube.
I recommend the following video, in which the author independently makes an extruder:
Recommendations for use
The grain extruder is installed on a flat, flat surface. It is advisable to use the device in a room with low humidity and good ventilation. The grain is fed evenly and constantly, otherwise the compartment with the press will be overloaded. To adjust the size of the finished granules, change the sieve or tighten the matrix bolt.
Finish the work by gradually reducing the speed. After each use, the device must be disassembled and washed to avoid clogging of the working and cutting units with particles of dried food.
How to make an extruder for feed with your own hands
The life of a farmer is full of worries, as many people know. You can make hard work easier with the help of modern technology or machines. The feed extruder is designed for preparing pet food of different qualities and in different quantities. But not everyone can purchase it for the farm due to its significant cost. A do-it-yourself feed extruder will significantly reduce costs and provide you with an excellent household assistant.
Is it possible to make such a unit with your own hands? Let's try to figure it out.
What is an extruder used for?
Using such a unit, you can process grain into animal feed with high digestibility. Any grain, even not the first freshness, can be processed in an extruder under pressure (no more than 60 atmospheres) and exposure to high temperatures (up to 1600 degrees). The output is products resembling rods or flagella with a diameter of about 3 centimeters . The power may vary depending on the desired quantity of the final product. A productivity of 20-40 kg/hour will be enough for a small farm, and for large farms - a device capable of processing 1-1.5 tons/hour.
Of course, you can prepare the food yourself, steam or boil the grain, adding different components to it. But its quality will be completely different, and animals will need more time to digest it. You need to spend a lot of time, production will produce a lot of waste. All these problems can be avoided by using a feed extruder.
Not everyone can afford to buy such a device, even if it has been used, due to its considerable cost. Many people use their imagination, ingenuity, and their own skillful hands - and creativity begins. Some craftsmen manage to assemble good examples of a household extruder with their own hands. Every owner can try to make one, the main thing is to familiarize yourself with the device and not be afraid to experiment .
Extruders with dynamic mixing devices
The problem of melt homogenization arises in connection with possible fluctuations in viscosity due to the structural and temperature heterogeneity of the melt during polymer extrusion. The mixing effect in a conventional single screw extruder is quite low. A significant improvement in melt mixing is ensured if mixing devices (homogenizing elements) are located along the length of the screw in the melting zone, the working length of which is 3 D. Many options for mixing devices have been developed. One way to improve mixing quality is to vary the depth of the auger channel.
Rice. 23. Pulsar mixing zone
The Pulsar mixing zone is known (Fig. 23), which is characterized by the presence of a spiral groove cut into a screw. In this case, the angle of inclination of the groove is greater than the angle of inclination of the cutting, which leads to the intersection of the channels.
Rice. 24. Strata-blend mixer
The core of the Strata-blend mixer (Fig. 24) has three grooves cut at the same angle as the main groove, which are interrupted. The material, moving in the channel, flows from one
grooves to another. Most mixers with variable channel depth do not have sufficient ability to fragment the flow and reorient it, so their efficiency is insignificant.
There are other types of mixing devices:
- a diamond-shaped mixer consists of several feed turns, broken by mixing turns in the form of diamond-shaped teeth;
- the grooved mixer has one or more intermediate grooves between each inlet and outlet channel;
- pinned mixing zone with pins between the main turns, rectangular grooves cut into the main turns, etc.
When using such mixing elements (Fig. 25), effective mixing and averaging over the melt temperature is realized. When using a standard screw, fluctuations in the temperature of the melt in the cross section of the channel are more than 15 °C and are reduced to 2 °C if, for example, a pin mixer is used.
Mixing elements are also placed at the end of the screw. LTM nozzles with similar mixing elements (Low Temperature Mixing - a trademark of nozzles) that Oerlikon Barmag uses in E10 series extruders have been developed and have been widely and successfully used (Fig. 26).
These elements sharply narrow the flow area, the polymer melt passes through narrow gaps of various sizes, resulting in high shear stresses,
Rice. 25. Mixing elements: a – screws with grooved protrusions; b – with pins between the turns
Rice. 26. Mixing elements at the end of the screw (a, b)
improving and accelerating the process of material homogenization. Replaceable mixing attachments at the end of the auger increase the flexibility of the equipment.
Rice. 27. Auger tips: a – standard; b - mixing
The shape of the nozzle tip also affects the nature of the melt temperature distribution at the exit of the extruder. Werner & Pfleiderer has developed
mixing screw tip (Fig. 27), which has a protruding screw thread, which reduces the spread in melt temperature between the central and edge values to 40°.
How the unit works
The extruder is composed of the following elements:
- frame base to which the entire installation is attached;
- drive;
- bunkers for loading grain;
- dosing screw and drive to it;
- injection screw;
- cylinder;
- receiving chamber;
- cutting knife;
- control center/controller;
- engine;
- gearbox;
- cuffs;
- belt;
- washers;
- nuts;
- adjusting key.
The main work is performed by the pressing unit. It is assembled from a forcing screw, which is inserted inside the collection cylinder. Using a matrix with a cutting knife, the resulting mass takes the form of sticks or flagella.
The injection screw consists of three stages:
- entrance part;
- middle part;
- output screw;
- heating washers.
All components are mounted on a stud with a left-hand thread. The part is closed with a metal casing. The keys transmit rotation from the main shaft to the composite screw. The entire structure is attached to the supporting frame using powerful bolts. The case has a window with an attached tray.
Inside the housing itself there are several longitudinal grooves that move components along the axis of the screw. A pellet regulator is located near the exit. It includes:
- bow body;
- matrix (disk), which regulates the process with a handle;
- roller and knife, which are pressed to the matrix by a spring.
Rotate the shaft with the knife through the leash with the fingers. The finished extrudates exit through the nose housing and the hole adjustment dial. The disk is fixed in one position with a bolt; when the position changes, the temperature and pressure level in the apparatus will change. A thermocouple placed on the housing allows you to monitor the temperature.
It runs on electricity, but new models are appearing that run on liquid fuel. Warming up occurs gradually . At the first stage, while the extruder is heating up, cake or flour is loaded into it. The grain is fed only when the system is well heated; it breaks and turns into sticks only at high temperatures and strong pressure.
Is it possible to make an extruder yourself?
You can do many useful things with your own hands if you have a set of tools and the necessary parts on your farm. Many drawings can be found on the Internet or by reading the instructions before the factory machines. To create a unit yourself, you cannot do without:
- electric motor (for example, 2.2 kW, 300 rpm);
- gears from the tractor box;
- rod from a hydraulic cylinder (diameter 50 mm);
- wire (8 mm) or springs;
- turning and welding machines.
After preparing the tools and workpieces, they proceed directly to the process of manufacturing the unit .
- To obtain a screw cylinder, two gears are welded together. The result is a part with a diameter of 62.5 mm.
- To make an auger, a wire is wound into three balls onto the hydraulic cylinder rod, each ball must be narrower than the previous one. Wind it as you feel comfortable. The presence of a spring greatly simplifies the task.
- All components should be boiled. If the seam is uneven, you need to trim it using a grinder.
- Turn a couple of axle boxes on a lathe (gear shaft and auger).
- Weld to connect the axle boxes, shaft and auger into one unit, without missing the thrust bearing between them.
- An experienced turner can help you make high-quality parts in a short time.
- The extruder head is fixed to the screw. Its adjustment will be carried out using a die to which the pipes are welded.
- The auger is hidden in a steel casing and is made separately.
- Next, we begin assembling the entire unit. The engine is mounted on the frame and connected by belts to the starting part and the extruder part. At the top there is a bunker for loading grain. Next is the loading part, into which the grain enters after passing through the bunker before entering the three-stage feeding system, gap, and press.
- The spinneret should compress the grain mass to the maximum and dispense the resulting product into the nasal dispenser.
A DIY feed extruder can operate continuously for a long time without consuming too much electricity. The operating principle is reminiscent of a regular meat grinder, only in the end you get not minced meat, but harder sticks. The size of the finished feed depends on how large the spinneret holes are.
Do-it-yourself granulator from a meat grinder: household for animal feed
Hello dear readers and subscribers of the blog, Andrey Noak is in touch with you! Today we will talk about how to make a granulator from a meat grinder with your own hands.
Introduction
Recently, home craftsmen have been modernizing and adapting more and more household appliances for the benefit of the household; for example, the engine from a washing machine can be attached to a lathe.
So they didn’t bypass the meat grinder. We decided to make a granulator out of it. I’ll say right away that it won’t be able to granulate anything solid, not under the right loads. Under increased load the rod will break, a household motor may not be able to withstand it, etc...
This granulator is ideal for feed:
- Mix several herbs for rabbits;
- Make some kind of compound feed for other pets.
What do we need
For our granulator from a meat grinder you will need:
- A sturdy table or workbench. You can either weld it from a corner or simply place our machine on a durable workbench;
- Meat grinder;
- Lathe;
- Drilling machine;
- A blank for making a matrix, approximately 6 cm thick. But I don’t know your feed right now and that’s why I’m talking approximately. Here, for each specific case, you need to make a matrix separately;
- An electric motor, perhaps from some kind of household appliance, for example, from a washing machine or from a vacuum cleaner. It is worth remembering that it will be more practical to install a 220 Volt engine, and 380 is more economical and profitable. 380 Volt engines are more powerful compared to 220 Volt analogues;
- Belt for connecting the meat grinder and the engine. When the meat grinder jams, the belt should slip, so there is no need to use a toothed belt;
- Two pulleys with a ratio of 1 to 2. We will lower the gear ratio to increase power and reduce the number of revolutions.
Step-by-step instructions for assembling a homemade granulator
The first thing we need to start with is, like any other event, creating drawings. On the drawings we describe how and what will happen.
What kind of engine will we have, how will it be located, and what do we generally need to make a mini granulator press. We draw everything out on paper so that there are fewer mismatches later.
In addition, do not forget that you will need to make a matrix, a lid and a knife for the meat grinder. To do this, you will need to take the dimensions from the mesh and make a matrix of the same diameter.
When making the matrix, you need to take into account that it should fit almost closely to the worm. Therefore, part of the matrix should be recessed.
If the ribs in the meat grinder get in the way for this operation, they should be removed.
So we begin assembling the granulator from the place where it will be located. We will need our sturdy table. We firmly attach our future press to it. Durable means bolted, for this you will need to drill holes in the legs.
After this we make the matrix. How to do it correctly is shown in the video below:
Next, you will need to sharpen a new cover for the matrix, since the old one most likely will not fit due to its increased thickness.
You need to sharpen the lid with an allowance so that if you decide to increase the thickness of the matrix, you do not need to make a new lid again.
After the lid is machined, you can weld pieces of 6 mm wire to it or cut grooves with a grinder. This way it will be easier to twist it by hand.
There are many versions of a pellet knife, and here are just a few of them:
- There is no need for a knife at all;
- You can drill a hole in the screw of the meat grinder and make a screw there, at the end of which a knife will be attached;
- You can weld a thin bolt onto which the knife is screwed.
Ultimately, it's up to you to decide. Our next step is to install the pulleys. Here I think there should be no problems if you are a person with a head.
The last step is to install the engine and tension the belt. We remember that you need to tension the belt so that it can slip if something happens, and the engine does not burn out at this moment.
We carry out commissioning and completion of our mechanism.
My services
If you want to build your own large-scale production or want to receive high-quality information about the production, heating or sale of pellets, then you can contact me at “SUPPORT” and always receive high-quality and up-to-date information.
I can provide advice on ENplus certification, help with the sale of your products, and help you choose equipment for pellets. And the most interesting thing is that I will even help you visit a real experimental production of pellets.
Write and we will organize everything!
Also, just recently I came out with a cool little book that explains why most companies deliver lines with defects. Which ones? And you will learn this from the book. Read more about it in the “MY BOOKS” section.
Good luck and see you again, Andrey Noak was with you!
Some useful tips
The homemade device should be thoroughly checked and tested before use.
- First you need to check the reliability of all connections and fasteners.
- The unit must be installed on a flat surface; any changes will disrupt the operation of the extruder.
- Connect to the mains and let the system warm up. At this time, you can pass a small amount of flour or sunflower cake through the press, observing the shape of the mass that comes out - this way you can understand whether the system has warmed up enough.
- Next is the grain supply. It must be constant to prevent the device from idling. Grain should be poured without excess, otherwise congestion may occur.
- At the outlet, the fraction of the exiting product is regulated by gradually tightening the bolt and reducing the gap of the die part.
- Once recycling is complete, the inside of the mechanism should be cleaned. Use the same flour or cake for this purpose - they will absorb the remaining grain and oil.
- To ensure that the mechanism cools down faster, clean at minimum speed. Disassembly should be carried out only with gloves to avoid burns.
The extruder, made by hand , can process no more than 40 kg of grain per hour. For a small farm this is quite enough. Food prepared by mechanical processing provides complete nutrition for pets, reducing the cost of purchasing food and reducing the time for preparing it.