The quality of the weld depends not only on the skills of the craftsman, but also on the conditions in which the work is performed. If the workpieces are at a comfortable height and firmly fixed, the result will be much better than when working on your knees. Therefore, a special table is required to perform welding work.
You can buy a ready-made table, but it is too expensive. In addition, existing models do not always suit users. Therefore, most home craftsmen prefer to make welding tables themselves. Let's look at ways to assemble a welding table with your own hands.
What it is
A welding table is a welder's workplace designed for fixing workpieces in the required position and performing welding work.
The name “table” in this case is arbitrary - it is, rather, a stand equipped with a lot of additional elements. There are tables of a solid type, but stands that resemble frames are more often used. They are more convenient, since sparks and drops of molten metal do not remain on the surface, but fall to the floor. they do not interfere with work and do not require constant cleaning of the table surface. In addition, they can be removed from the floor only once a day, and not every 20-30 minutes.
The material for manufacturing a welding table can only be steel. This is an important point, since the “ground” from the welding machine is connected to the table. When the workpiece is fixed on the table, it is automatically attached to the zero, which simplifies the work and avoids the need to constantly attach the zero using a clamp.
General characteristics of the rotary welding table
Externally, the design is very similar to equipment that is used in large industrial enterprises. The working surface of such a table has the form of a solid metal disk with a coating that is resistant to high temperatures. Due to the fact that its outer edge is free, parts of different sizes can be installed anywhere.
So that the rotation axes can be easily combined, beacons or markings are applied to the installation surface. This also helps eliminate weld runout when turning the workpiece.
The rotary welding table is the most complex unit available on the market today. But in some cases it is simply impossible to replace it with other options. For example, designs of other types are useless if you need to weld a circumferential seam on a cylinder, steel pipeline blanks, etc. In such situations, you cannot do without a rotary belt drive.
When it is possible to rotate the tabletop, the welder’s work is greatly simplified. As a result, achieving high quality of the most complex seam is not difficult. The master doesn't even have to change his location.
Design requirements
The design of the welding table must meet the following requirements:
- strength, ability to withstand the weight of workpieces and the blows of a plumber’s hammer when straightening structures;
- the presence of a contact element for connecting ground from the welding machine (inverter);
- there must be a place to store electrodes;
- it is necessary to install a copper strip, on which it is most convenient to knock down the edges of the electrodes;
- the design must be designed for the installation of removable clamps or clamping elements;
- there must be a special place for a container of water;
- For some users, it is important to be able to tilt the work surface, turning it into a real stand. This allows easy access to all points of the structure being connected.
In addition, there are general requirements for organizing a welder’s workplace:
- A hood that can effectively remove gases and smoke from welding.
- The supply air duct outlet is located 1.3-1.5 m to the left of the workplace.
- High-quality lighting, eliminating the presence of dark areas.
It is necessary to strive to comply with all requirements, although in home workshops they are not always relevant.
Work is carried out as needed, therefore, the arrangement of the workplace is carried out according to the principle of the required minimum. However, this approach significantly reduces the quality of work and limits the capabilities of the master. Therefore, it is recommended to treat the arrangement of the workplace with maximum responsibility.
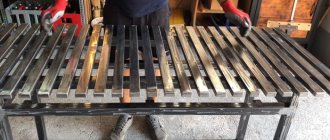
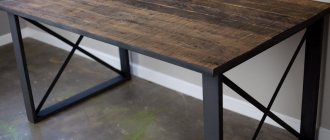
Working surface of the table
It is not advisable for the countertop to be manufactured in a fused form. It is better when it is welded from a professional pipe with dimensions of 60×40×2 mm. The grille inside the frame is made of a profile with dimensions 30×30×1.2 mm (8 or 10 channels can also be used).
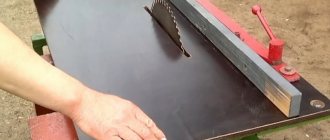
The elements of the parts are cut with a regular grinder; the ends of the cuts must be cleaned of burrs. First, the outer frame is prepared with as identical diagonals as possible.
Profiles for internal placement are cut directly along the opening of the finished frame. Afterwards, they are inserted approximately 30-50 mm from each other. The channel is placed on top of the frame.
Varieties
There are two main types of welding tables that can be used for a home workshop:
simple. They are most similar to a metalworking workbench with a height of 70-85 cm, the dimensions of the table top are 1 m in length and 0.8 m in width. Additionally, a screen can be installed to protect the welder from hard ultraviolet radiation;
semi-professional. These are more complex structures in which the tabletop is a set of guide elements. It is convenient to attach clamps, clamping devices and other devices to them. In addition, it becomes possible to ensure high accuracy of rectangular connections.
A simple table can be used as a mechanic's workbench, if necessary turning it into a welder's workplace. For a home workshop, this option is the most convenient if the work is carried out irregularly and in small quantities.
A semi-professional table allows you to perform a lot of additional operations - milling, drilling, installation and other work. Additional devices and fixtures can be attached to it to ensure precise assembly of certain structures. Such tables are most often used in small-scale production, when it is necessary to produce a certain number of identical units or parts.
Optimal sizes
The size of the working area is one of the key points that is very important for welders and affects the ability to perform certain jobs. It is this indicator that determines the size of the workpieces that the welder can subsequently work with. The dimensions of the table surface vary over a wide range of values: from small (approximately 70x70cm) to large (298x148cm). in height it should not exceed 1.4 meters.
Tables with a small workspace are used for working with small workpieces or assemblies. Tabletops of impressive dimensions provide more opportunities. You can place a corresponding structure or several nodes on them. Here you can leave the most frequently used equipment, which is easier to keep at hand.
Which type should I choose?
A welding table is a type of equipment designed to organize a convenient and ergonomic workplace. Each person needs a table created according to individual parameters. One should not rely on generally accepted standards in this matter, since they do not take into account the individual needs of a person. For example, the location of lighting and ventilation is designed for the average person. If the master is left-handed, he will have to mirror the working drawing.
In addition, other factors must be taken into account:
- height;
- specifics of the upcoming work;
- degree of table mobility (stationary or mobile);
- lighting conditions;
- possibility of tilting the tabletop.
Before drawing up an assembly drawing, you need to carefully consider all these issues, calculate the dimensions of the table, decide where and how to install additional equipment and containers for storing tools, consumables, templates and clamps.
You should not waste time on drawing up a project - it will pay off many times over later.
Safety precautions during welding
In order to carry out welding work conveniently and safely, you must follow simple rules. Compliance with these requirements will also help improve the quality of work performed.
Safety regulations:
- Work only in ventilated areas or in places where there is exhaust ventilation.
- Use all personal protective equipment necessary for a welder: special non-flammable clothing, shoes, leather or canvas gloves, a welding mask or shield, and in some cases a respirator.
- Insulate all welding cable connections; their insulation must not be damaged.
- All flammable materials and substances are removed from the workplace.
- Mandatory workplace lighting is installed without glare or flickering.
Assembly order
Making a welding table is a procedure that requires certain tools and materials. In addition, the master must have the skills to work with them, otherwise he will not be able to get the expected result.
Let's consider the procedure for assembling a welding table from profile pipes. Assembly takes place in several stages, which are best considered separately.
Tools and materials
To assemble the table you will need:
- grinder with cutting and grinding wheel;
- welding inverter;
- drilling machine (or electric drill);
- tape measure, ruler, square;
- building level;
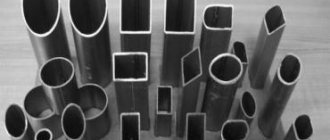
- rectangular profile pipe;
- corner and pipes for making the support system (legs and crossbars).
To make the supporting structure, you can use the same profile pipe if you do not want to purchase different types of rolled metal.
Fabrication of the supporting structure
The legs of the welding table must be as strong and reliable as possible, capable of withstanding operational loads.
The recommended assembly method is to weld all parts, previously cut to length. The use of bolted connections is not recommended unless the table is subsequently disassembled or modified.
Procedure:
- The necessary parts are marked and cut (vertical supports and horizontal load-bearing elements).
- U-shaped supports are welded (two vertical legs and one cross member).
- The supports are installed and fixed in a vertical position. Horizontal parts are welded to them to create a support for the tabletop.
- Additional cross members (stiffening belt) are attached to ensure complete rigidity and absence of mobility of the supporting structure.
- Weld seams are tapped with a hammer to remove scale. After this, the joints and ends of the pipes are ground, removing sharp burrs and other dangerous places.
Assembling the tabletop
A tabletop made of a profile pipe is not a single unit, but a set of individual elements fixed to the horizontal supports of the supporting structure.
Assembly order:
- Cutting the required number of parts - sections of profile pipe, the length of which is equal to the width of the table.
- Marking and making holes for clamps or threaded clamps.
- Installation of the end part, alignment with the supporting structure, welded connection to the crossbars.
- Alternately fastening the remaining sections of the profile pipe. The distances between them can be chosen arbitrarily, based on the specifics of the work to be done. The recommended pitch is 30 mm.
- Processing seams, grinding ends, removing all dangerous places.
After this, the production of additional elements begins.
Final operations
Assembling the tabletop means completing the basic procedure of making a table.
However, it is often necessary to install additional elements:
- containers for tools and consumables;
- water container;
- brackets for lighting;
- screen.
The need to attach these elements to the table must be carefully considered. Sometimes you have to work with dimensional parts, when the tabletop has to be freed from all removable elements. Therefore, it is better to place the lighting and containers on their own supports or in cabinets. This will free up the work surface, thereby expanding its base and functionality. You can also make them removable by installing them on pins in mounting holes made in the countertop pipes.
Welding table manufacturing process
It’s not difficult to make a table for welding work with your own hands, the most important thing is to prepare the correct drawings. You can calculate and draw diagrams yourself, or you can use ready-made
Pay special attention to this point so that the dimensions are carefully observed. Before the manufacturing process, thoroughly study the photos of the finished work so that you know what to focus on.
As you work, follow simple and consistent steps. First you need to weld the frames with the shelves, which will make a solid slab. To do this, it is necessary to combine the blanks from the corners using electric welding. In this case, the connected angle must be straight - 90 degrees. The other frame is assembled in the same way. Tabletops for welding are attached in a similar way. To do this we need a metal plate with an applied frame. Be sure to make several seams around the perimeter of the tabletop before you begin the main welding. This is necessary to protect the homemade table from deformation that it will undergo during welding work.
The second shelf is made in a similar way. After this stage, the rotary table must undergo installation work. Welding equipment is used for this. Make sure that the legs are positioned strictly perpendicular to the tabletop. A clamp is used to secure individual parts. After this, the next shelf is assembled and secured. The elements should be at a distance of 70 cm from each other. In this case, the parts are fixed using tacks and only after making sure that the resulting product is geometrically smooth. At the last stage, the seams are welded.
After installing all four legs, attention turns to the wheels. In this case, the holder on which the burner is installed must additionally be welded.
For this, a tube blank is used. Note that it is not difficult to make a welding table for work with your own hands. The most important thing is to put in a little effort and find the necessary materials. When searching for materials, pay special attention to their quality.
FAQ
Should I paint the table?
The specific nature of the operation of the welding table is such that the paint will constantly burn or peel off due to accidental impacts. In addition, the surface of the tabletop cannot be painted at all - the mass of the welding machine is attached to it, and the paint layer will become an insulator. Only the supporting structure can be painted.
What is more convenient, a small table or a large and massive stand?
It depends on the nature of the work ahead. For a home workshop, it is more correct to make a small (or mobile) table. However, if you have to work with heavy dimensional structures, you will have to make an appropriate table.
What weight should a welding table have?
This is not an idle question. The heavier the table, the less its mobility. When leveling and using a plumber's hammer, the base must be completely stationary. Experts recommend making tables weighing 180 kg or more - they are the most reliable.
Why is a profile pipe used to assemble countertops?
It has convenient dimensions (the best option is a rectangular pipe 50 × 25 mm), holds loads well, and allows the production of neat and durable structures. However, this is not the only option. The design of factory-assembled tables uses solid metal plates with perforations and grooves on the side edges (pressure devices are installed in them).
Is it necessary to have a screen?
From the point of view of fire safety, as well as protecting people from flying sparks and scale, the screen is a mandatory element. However, many craftsmen refuse it if the table is installed against the wall and there are no strangers in the workshop
Precautions when working at a welding table
It is no secret that working with a welding machine is accompanied by a certain danger and therefore a person must protect himself from possible troubles when working independently at a desk. Before starting any work, the following factors must be considered:
It is important to ensure high-quality ventilation at the work site. The best option is to install exhaust ventilation. Protection against electric shock
For this purpose, it is necessary to work in special welding gloves and ensure that they are always dry. Eye protection from arc radiation. To do this, you definitely need a protective mask or goggles. Protecting the desktop from metal splashes. Before carrying out welding activities, it is necessary to clear the work area of any debris, especially flammable ones. You need to remove paint containers, sweep away sawdust, and especially remove fuel containers if the workshop is located in a garage.
Also, protective equipment has been specially developed for welding activities, without which it is not recommended to start work.