Do-it-yourself liquid rubber at home is prepared from available ingredients, and in terms of performance characteristics it is not inferior to products produced in factories. The composition is one of the simple and affordable materials for waterproofing. With its help, you can protect the foundation, roof, various types of metal structures and many other objects from moisture. The substance has excellent adhesive properties - it sticks to concrete, iron and most other types of building materials. When hardened, it forms a durable polymer film. A preparation with waterproofing properties can be purchased at a hardware store or made independently.
Homemade liquid rubber is enough to perform small-scale work.
Natural rubber
The sap of rubber trees was widely used by the aborigines to make waterproof shoes, cover boats, protect huts from rain and solve other everyday problems. They extract it from rubber plants in a similar way to collecting birch sap in the spring. Polyisoprene, the carbohydrate that makes up most of natural latex, combines with oxygen in heat and becomes brittle over time. After heating, the molecular bonds become stable, and the substance does not react even to acidic solutions.
The value of rubber based on technical characteristics:
- high resistance to abrasion;
- good thermal insulation properties;
- does not dissolve in water and most aggressive liquids;
- plastic;
- elasticity.
The addition of plasticizers and river sand allows you to create a material with the planned qualities and color. Raw rubber is transformed into a product that retains its shape for a long time through vulcanization - heating under pressure to a temperature of 150 degrees.
Getting rid of silicone on clothes
Silicone sealants are widely used in repairs and construction. But careless handling of this substance can lead to the formation of persistent stains on the fabric, and to get rid of them you will have to use special cleaners or improvised means.
Acid-silicone sealant has a characteristic smell of vinegar, and its removal is carried out using a 70% acetic acid solution
When removing a stain from such silicone, you need to take precautions: wear glasses, strong rubber gloves and a respirator, since acetic acid negatively affects the eyes, skin of the hand and the respiratory tract. To clean the stain you need to apply it liberally, leave it for 30 minutes and remove the silicone with a rag. Alcohol-based silicone neutral sealant can be easily removed using alcohol-containing liquids
You can take medical, technical, denatured alcohol or vodka and apply it to the dirty area, and then remove the stain with a brush. Oxime, amine or amide silicone sealant can be removed using white spirit, benzene, acetone or solvent. The liquid is applied to the sponge, then to the stain and left for 30 minutes until the silicone dissolves. If necessary, the treatment can be repeated. Then wash the fabric as usual with washing powder.
There are also special compositions for cleaning the surface of fabrics from silicone. A remover under the trade name “Penta-840” or ANTISIL is ideal. It is necessary to carefully read the attached instructions before using any product.
In addition, the silicone stain can be cleaned mechanically using a plastic scraper. To do this, the fabric is stretched onto a flat surface and the stain is carefully scraped off. Residues can be removed using one of the methods listed above.
Raw Rubber Components
Natural and synthetic rubber, when heated to 50 degrees, turns into a soft mass that mixes well with other components:
- gray;
- gas soot;
- sand (silicon dioxide);
- oils;
- resins;
- dyes;
- softeners;
- accelerators.
The composition of the components varies and depends on the qualities that the resulting raw rubber must have. Sulfur is part of molecular compounds, and the hardness of rubber depends on it. Accelerators reduce vulcanization time. Soot and oil impart plasticity to the finished product. Sand and other organic substances make it harder, reduce abrasion, and increase tearing force.
Types of rubber
Based on hardness, there are three main groups:
- soft – latex;
- average;
- hard – ebonite.
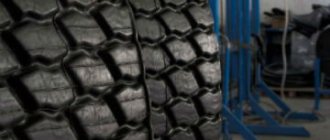
The natural component has the best performance qualities, which is why car tires are made from natural rubber. In small enterprises, rubber production involves cheaper synthetic material.
Latex is used to make gloves, toys, various insulating materials, waterproof clothing, and shoe soles. Medium density rubber is widely used in everyday life and in production. These are all kinds of gaskets in taps, mats, couplings in cars and mechanisms. Ebonite is used to make parts that require high hardness and abrasion resistance. These are elements of bearings, wheels, bushings.
Recycling
Crumb rubber is widely used in various areas of production, sold to the public or used for personal purposes. An excess of worn-out car tires and rubber products ensures the constant availability of consumables.
The cost of crumb rubber depends on the diameter and quality of the granules. Powdered crumbs and granules with a diameter of 2-4 mm are in great demand. The popularity of this size is due to lower production costs and lower consumption of adhesive, the price of which is several times higher than the cost of recycled materials.
Crumb rubber is used to make the following products:
- Roll coverings
- Rubber Shoes
- Paving slabs
- Fuel
- Rubber insulation and seals
- Three-dimensional figures cut from used tires
- Paths for private houses, gardens and summer cottages
- Waterproofing and noise-absorbing coatings for children's and sports grounds
- Rubber technical products
- Asphalt mixtures
- Seamless rubber coatings
Currently, the recycling industry is considered promising for starting your own business due to low competition and growing demand for waste recycling services. Even with a small amount of work performed, the financial investments spent on equipment pay for themselves in a short time. Recycling tires in a crusher is recognized as the most environmentally friendly method of disposal, allowing you to make a profit with a small financial investment.
Rubber manufacturing
There are three main unchanging stages when preparing raw rubber. The instructions and technology are simple, requiring simple equipment. The following are executed sequentially:
- rubber heating;
- mixing with additives;
- molding
Natural rubber, after standing for some time and fermenting, turns into a thick viscous mass. The artificial one is immediately produced in this form. Before use, it is kneaded like dough and heated to 50 degrees. In this state, it loses its elasticity, becomes pliable and soft and is able to mix with other substances.
The components of the future rubber are poured into a screw machine for mixing. Proportions and additives are taken depending on the planned qualities. All grades of raw rubber produced are standardized and the amount of each material is stated as a percentage. All that remains is to recalculate in relation to the available mass of rubber.
The resulting homogeneous mass remains heated, since friction against the machine part and particles against each other occurs with the release of temperature. As a result of the process, raw rubber is formed. It is shaped into strips of specified sizes (less often a cord) and packaged between polyethylene.
How to apply it correctly?
The entire process of waterproofing with liquid rubber consists of three stages:
- The surface is prepared (how to do this is indicated above).
- Priming. What is the essence of this stage of work? The first layer of rubber is sprayed onto a previously cleaned and well-dried base. The main task of priming is to completely remove remaining contaminants. After all, after preliminary cleaning, fine dust may remain on the surface, which is removed at this stage. As a result, adhesion to the base will be better.
- At the last stage, the main layer of liquid rubber is applied. In order for the material to be applied evenly, spraying should be done perpendicular to the base. It is important to maintain the distance between the sprayer and the surface to be insulated. It must be at least 40 cm.
The layer that should be obtained as a result of the work must be of a certain thickness.
It depends on the location and purpose of this insulation:
- For a new roof that is covered with concrete - 2 mm.
- For a roof with a membrane surface – 3 mm.
- To protect metal structures from corrosion – 1 mm.
- To protect a roof with a metal base – 1 mm.
- For insulation of concrete structures – 2 mm.
- When insulating brick walls - 1.5 mm.
https://www.youtube.com/watch?v=fZ_2aVvFMRI
Manufacturing of rubber products
To make products, the raw mass, after mixing, is placed in special molds, pressure is created and heated to 135-150 degrees. The process is called vulcanization. For small parts these are closed dies. Products such as rugs can be passed through hot drums with a shaped surface.
When exposed to high temperatures for a long time, rubber dries out and becomes brittle. Therefore, sulfur and other accelerators are introduced into the composition, which can significantly reduce the vulcanization process.
Recommendations for creating a matrix for casting
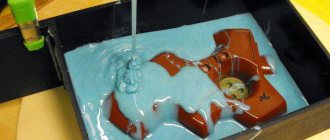
Before starting the process of creating silicone, it is worth stocking up on a container or box to work with. Assembly boxes make it easy to remove the part from the case. There should be no gaps in the container design, since elastics tend to leak out.
Before placing the material in a box, it must be covered with a separator - quite greasy or soapy. If you plan to make a matrix for a vertical product, it needs to be secured to the bottom of the container, using plasticine for adhesion. Next, the manufactured compound is poured around the part. The material must be poured in a thin stream until the figurine is completely covered inside the container.
First recipe
Preparation. First you need to prepare all the “tools” - a small container, a spatula for stirring, a container for pouring and a template figure, a copy of which you want to receive as a result. You will also need glycerin and gelatin in equal proportions; they must be melted in one container in a water bath, stirring regularly. Melting occurs within 10 minutes; You can't let the composition boil.
Now you can proceed directly to production. The bottom of the container (cardboard or wooden) is filled with the prepared composition. Next, the figurine needs to be placed in silicone and immediately pulled out, and then promptly transferred to a container. The template souvenir is attached to the bottom; You must immediately pour the hot mixture into it, completely filling the container.
The silicone hardening process occurs in a matter of minutes. After the material has completely hardened, the resulting form is released from the container and its bottom is cut off. Then you can remove the figurine. The empty space of the workpiece can only be filled with epoxy resin.
Disadvantages of the recipe:
The resulting workpiece is unsuitable for further work with gypsum, since it does not repel moisture;
It will also not be possible to make soap - the mass tends to melt;
The product is not designed for long-term use; it quickly loses its appearance and properties.
Second recipe
Preparation. You will need: construction sealant and starch. It is also worth preparing the figurine immediately. The shape you will receive is quite hard and will have a sunken depression, so in this way you can only create a one-sided product.
The process itself takes place in several stages:
The working surface is sprinkled with anti-stick starch;
A little sealant is poured into the center of the table;
The sealant is sprinkled with talcum powder or starch and quickly mixed; the material should not stick in the end;
The material is formed into a small, dense cake, the size corresponding to the future product;
Quickly, while the sealant has not yet set, you need to press the template figure into the mass;
The silicone must cure for at least 24 hours;
Next, you need to release the souvenir from the mass and lubricate the resulting form with talcum powder, and then fill it with plastic clay;
Now the workpiece can be dried in the oven.
Advantages of this method:
Possibility of reusable sample use;
These molds allow you to work with a hot soap base.
Among the disadvantages are the need to work very quickly, since the working mass sets quickly, as well as the strong unpleasant odor of the sealant.
https://liveposts.ru/articles/home-garden/sdelay-sam/kak-sdelat-rezinu-v-domashnih-usloviyah-svoimi-rukamihttps://domsad.guru/sovety/izgotovlenie-silikona-v-domashnih- usloviyah-kak-ego-sdelat.htmlhttps://moreremonta.info/strojka/kak-sdelat-silikon-zhestche/https://usamodelkina.ru/7387-biologicheki-razlozhimyy-silikon-svoimi-rukami.htmlhttps:// polymax10.ru/articles/izgotovlenie-silikona-dlya-form-svoimi-rukami-v-domashnih-usloviyah
Homemade raw rubber production
Rubber, especially artificial rubber, requires a lot of effort to knead. A person does not have enough strength to knead it with his hands like dough. A special device is made for this. Mixing with additives is a labor-intensive and time-consuming process. Substances with different dispersion, specific gravity and physical state must be converted into a homogeneous mass.
You prepare raw rubber yourself in a machine with screw shafts. The screw protrusions grind everything that is put into the container and mix it. The production speed depends on the number of shafts. He is usually alone at home, and it takes a lot of time to bring the mixture to the desired state.
For molding into sheets and strips, two shafts are sufficient, one of which moves, changing the size of the gap, and therefore the thickness of the finished raw rubber. The mass is placed in a storage tank and goes to molding. When deformed, it cools down and loses its ability to flow, becoming tensile.
Equipment for a home workshop can be purchased at a store or made independently. Take the equipment available in the kitchen as samples. The engine will fit from a broken washing machine or any other machine. Automotive belts and pulleys.
Unit design
The design of the shredder is a knife mechanism (shredder), which allows you to process tires, tubes and other rubber elements. With this method of grinding, the material retains its molecular formula and does not lose its elasticity. The performance of equipment depends entirely on its power rating.
Main components of the rubber processing unit:
- Electric motor - ensures the speed of processing rubber waste, recommended engine power is 4-5 kW.
- Box with cutting discs - crushes raw material to the required size.
- Crumb calibration grid - regulates the diameter of the resulting crumb rubber.
- Worm gear – eliminates jamming and jamming of material.
- Unit frame - ensures a stable position of the machine.
- Loading hopper
- Guide tray
Read also: What types of propane cylinders are there?
The entire mechanism of the machine is placed in a housing, on top of which a loading hopper is installed. Before loading the material, foreign metal objects (spikes, nails, etc.) must be removed. Tires are cut into strips, reducing processing time.
Box with cutting discs
The main part of the unit is a shredder unit. The box contains heat-treated steel milling discs of high strength. They are quite wear-resistant and do not require frequent replacement during operation of the machine. Manufacturing the structure requires precise calculation of holes and cutting discs, so the work should be entrusted to the designer.
Grid for calibrating crumbs
A calibrating grid is installed under the box with the milling shafts, which allows you to adjust the diameter of the crumb rubber obtained when shredding tires in a shredder.
Worm gearbox
The mechanical gearbox converts angular velocity using a worm gear and allows you to process rubber material of varying elasticity without winding or freezing. The mechanical transmission of rotational motion is set in the range from 25 to 35 units, ensuring high performance of the unit.
Unit frame
Safe operation is guaranteed by the machine frame, made of profile materials. It ensures a stable position of the unit during the period of crushing and loading of raw material.
Loading hopper
The machine is equipped with a hopper for loading tire raw materials, which for convenience is located on the upper part of the body and a guide tray. They ensure a uniform flow of raw material into the shredder (shredder), preventing the formation of congestion during operation.
Tire cutting device
To cut tires and remove metal cord, a structure of a rack and a supporting frame is used. The housing contains a bar clamping system, which rotates together with the bar during cutting. The rack of the structure is equipped with a wedge-shaped knife that can be adjusted to a specific tire size. This design installation technology saves time on preparing consumables for further grinding in a shredder.
The technological process of grinding involves the following procedure:
- Sorting of tire raw materials and removal of foreign metal (nails, spikes, etc.)
- Removing metal cord
- Cutting tires into strips
- Shredding raw material in a shredder
- Calibration of the resulting crumbs
Crude rubber: application
At home, rubber is widely used for repairing rubber products. These are tires and tubes of bicycles and cars, shoes. Using vulcanization, gaskets for taps and various small parts are created.
For patches on punctured wheels, raw rubber sheets are most often used. Instructions for use:
- Clean the edges of the chamber at the cut site with sandpaper so that their ends do not touch. Cut off torn protrusions.
- The area around the cut is degreased and processed with a file.
- A patch is cut from raw rubber and applied to the camera.
- It is clamped with a clamp and heated.
A ready-made vulcanizer is used for heating, but you can make it yourself. In the case of an industrial installation, one millimeter of thickness should be heated for 4 minutes. In a homemade device, the time increases to 10 minutes; it is more accurately determined in a practical way.
Advantages and disadvantages
If we compare liquid rubber with materials of the same purpose, then this material has many advantages:
- It is able to replicate the relief features of the surface being coated. This effect cannot be achieved using rolled waterproofing materials.
- The surface that forms after drying is seamless and has no joints.
- This product is able to adhere to any surface. It works even in high humidity.
- The material is elastic and flexible. This guarantees many years of service without deformation or tearing.
- Capable of penetrating into all pores, crevices, and cracks. It fills them and seals them.
- Weather conditions do not affect the quality of the coating in any way. It is not afraid of frost, it does not melt in the intense summer heat.
- The material is non-toxic.
- Rubber can withstand any biological, atmospheric or chemical influence.
- Working with this material is absolutely safe. It does not require heating, the use of dangerous devices and installations.
- The application speed is quite high.
- This material is absolutely safe for human health. It does not contain toxic components.
- Wide range of colors.
- If damage occurs to the coating, there is no need to completely renew the insulation. It will be enough to treat the damaged areas.
Despite this list of advantages, this material still has some disadvantages:
- The material is quite expensive. In fact, good material cannot be cheap. Having so many positive aspects, it is not a pity to pay a high price for it. But not everyone can afford it.
- If you do waterproofing yourself, you may not get the desired result. It takes practice, so the job will require experienced personnel. Special equipment is also required.
- There are types of rubber that suffer from ultraviolet radiation. This must be taken into account during operation. Often, the surface is covered with durable paint, which must be water-based.
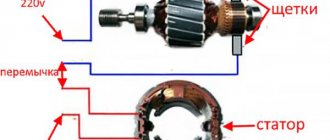
Making a vulcanization device
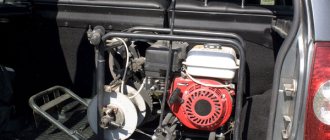
Homemade vulcanizers are divided into electric and gasoline. They are made from parts that have served their useful life. Main nodes:
- fixed table;
- a heating element;
- clamp.
The simplest electric model is made from an old iron that has a working coil. This option has a regulator, which means it is more convenient than others. The working surface is the sole. It is better to remove the handle, turn the iron over, and install it on a bracket made of thick sheet. The item to be repaired is placed on top and clamped with a clamp.
For the gasoline version, it is convenient to use the engine piston. Gasoline is poured into it and set on fire. To control, place paper on the patch. It begins to turn yellow at a temperature critical for rubber.