We disassemble the microwave and remake the transformer
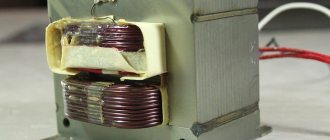
First, let's take a microwave. Inside this device there is a transformer, which consists of a core and two windings: primary and secondary.
The transformer core is sealed with two thin welds as shown in the picture.
To open the seam, you will have to use a grinder or a hacksaw, and to get to the windings in the transformer, you will need to work with a hammer and chisel.
When removing the primary winding, you should be extremely careful not to damage it, because we will use it in the future.
The winding of the secondary winding is usually very tight, so it is difficult to remove. Since it is not useful for the welding machine, it can be sawed and pulled out in parts.
After completing the described actions, you should have at your disposal a whole and undamaged primary winding of the transformer and its core, divided into two pieces.
How to use a directional microwave emitter
A powerful microwave gun can be used for the following purposes:
- Destruction of beetles and other harmful insects. Microwaves turn liquid molecules into steam - this way you can exterminate bugs gnawing on wooden buildings. The wood itself does not suffer from microwaves.
- Melting of non-ferrous metals.
- Drying and sterilization of cereals (kills bugs and bacteria).
- Disabling listening devices. Microwaves interfere with the operation of any “spy” devices.
- There is interference from the neighbor's TV, which is turned on at full volume - you can easily turn down the volume. Please note: telephones hang up 10 meters from the gun, and sound distortion occurs in computers and televisions. Do not use these devices for long periods of time as they may explode.
- Ignition of fluorescent lamps from a long distance.
- Boil a small amount of water.
Winding the transformer
The next step is to wind the secondary winding of the transformer. We will use a copper cable as the material for the secondary winding, the thickness of which will be approximately equal to the slots of the core. The cable is wound in two turns.
After winding the cable, you need to glue the transformer core and base. To do this, we use regular 2-component epoxy resin.
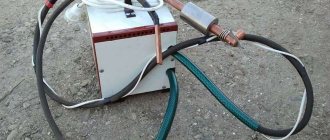
When the epoxy dries, the transformer should look something like this.
The output voltage in the transformer is 2 V, however, the current is 800 A.
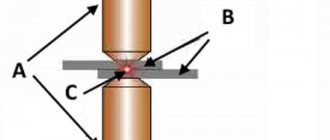
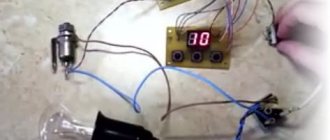
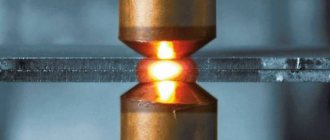
Let's check the performance of spot welding:
How to make a microwave gun
You will need a microwave oven - any one will do, even a burnt one. We will make the gun from a magnetron - this is the main element of any microwave oven. It must be in working order. To create the device you will also need:
- Container - for example, a tin can. The best option is a speaker enclosure.
- Wire and other small things that may be useful when connecting parts of the device.
The first step is to remove the magnetron. Initially, this element was created to generate microwave electromagnetic oscillations in radar stations (radar stations). Microwave ovens have magnetrons that generate microwaves with a frequency of 2.45 GHz.
How does a magnetron work?
In appearance, the emitter resembles a radiator topped with a pin. The radiation power is 0.7-0.8 kW. If you buy a magnetron secondhand, on the radio market, it will cost you about 800 rubles.
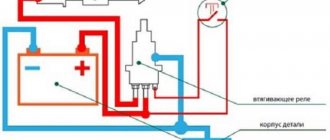
The electrical circuit diagram allows you to thoroughly understand the magnetron, which is essentially a diode. The cathode heats up and electrons are knocked out of it. The anode is cold and has resonators that complicate the appearance of the electric field generated in the emitter. The latter is placed between coils with current - they create a magnetic field that bends the straight path of electrons. Without the action of a magnetic field, electrons would tend to the anode in a straight line, but the path of electrons is curved under the influence of the Lorentz force.
It is necessary to provide power to the emitter: for example, from a converter with a charger from a computer uninterruptible power supply unit.
You need to work with the gun with extreme caution: the radiation must not be focused on the body, this is especially dangerous for the eyes.
Why do you need an antenna?
For targeted action, a microwave gun needs an antenna. To do this, make a hole in the jar.
In a jar with a height of 175 mm and a diameter of 75 mm, a hole with a diameter of 20 mm is made on the side, departing from the bottom by 37 mm. The magnetron is removed from the stove body, and the wires going to it are extended with wire.
When designing, be careful. A microwave device based on a magnetron gets very hot, so do not turn it on for a long time. You should be wary of microwave radiation: its effect on the body has not been fully studied. When working with the emitter, be sure to use protective equipment.
Spot welding body
After this, we should start making a case for our device. It could even be made of wood.
The rear panel of the case must be equipped with a switch and a power cord, for which a couple of holes should be cut.
The next stage is sanding, priming and painting all parts
When the painted body has dried, we should finally assemble our device.
You should cut two copper wires, approximately 2.5 cm in length, they will serve as electrodes, and clamp them in the holders.
After this, we install the power cable switch to the rear panel of the device.
We mount the transformer on a wooden base using ordinary self-tapping screws. One of these self-tapping screws is used to secure the terminal from which the “ground” is output.
The electrical component of the device is now complete, however, to ensure greater safety and convenience, we will install another button (microphone), which is attached to the upper arm with a slight slope. This is done to ensure that spot welding only works when the switch is on and the microphone is pressed.
Don't forget to carefully insulate all connections!
The levers are fastened like this: the levers are placed one on top of the other, and holes for them are drilled in the sides, into which ordinary nails are inserted, the tips of which are bent.
Installation of contact electrodes is carried out from the ends of the levers.
A regular rubber band is used to secure the upper arm.
After assembly is complete, the device should look something like this
Spot welding tests:
Replacing welding electrodes:
220 Volt microwave generator
In this case, you will need to remove the motor from the microwave, the one that rotates the bowl. The uniqueness of the electric motor from a microwave oven is that it is capable of generating decent voltage, over 110 Volts, and has a power of 50 W.
To make a simple generator from a microwave, you will need to take a small cream jar with a lid in which the motor will actually be installed. Next, on one side of the cover you will need to drill a hole for the handle, which is then connected to the motor. Thus, by rotating the handle, you can set the motor from the microwave in motion, which will produce electrical voltage.
Be sure to provide a small socket or just an outlet on the back side of a homemade microwave generator to which current consumers could be connected. Without a doubt, a homemade generator from a microwave engine will be an excellent helper on hikes where there is no electricity.
In addition, the microwave motor can be used to make an effective turning mechanism for an incubator.
Design Features
A spotter is a device for one-sided spot welding used in body repair. The design of the device is quite simple, so it is not necessary to buy it for a lot of money.
The spotter is used to straighten dents in metal
To make a spotter, you can take both an electrical transformer and a metal case from an old microwave oven. But it is necessary to take into account some features of a homemade design:
- A do-it-yourself spotter will be inferior in power to the factory unit. It can be used in a home garage, but if we are talking about professional repairs, it is better to purchase the tool for money.
- A homemade spotter made from a microwave oven requires greater effort when straightening the body and does not allow work to be carried out at high speed. True, for beginners this becomes more of a plus; with careful and leisurely alignment of the dent, there is less risk of making a mistake.
Important! Before you start assembling a homemade spotter, you must take into account that in any case you will need to purchase additional elements for it - variable resistors, thyristors, diodes.
Recommendations
When assembling a spotter with your own hands, you need to take into account several important nuances:
- The new secondary winding for converters must be covered with a layer of reliable insulation.
- The control unit for a homemade spotter based on a microwave oven can be made independently using the appropriate diagrams or purchased ready-made. In the latter case, the process of creating a welding unit will be reduced to searching for current converters and installing the device elements into the housing.
- When working with a spotter, do not press the pulse button for long. The welding effect should be short but powerful. It is to ensure the latter condition that the unit is made using two or three electrical transformers simultaneously.
Advice! If the units of the welding machine are located in a metal casing, then ordinary cardboard can be laid between them and the walls.
Electrodes
To figure out how to make a welding transformer from a microwave, it is very important to highlight the topic of electrodes.
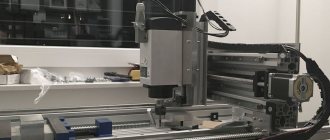
Assembling a spot welding machine from a microwave.
The parts are multifunctional and can:
- compress the sheets being joined;
- supply current to the area to be welded;
- remove heat.
When selecting an electrode, it is necessary to take into account its shape, size and other parameters. They are the ones who determine whether the weld will be of high quality or not. There are several types of geometric shapes of the parts in question - straight and curly.
A straight line is often used, since thanks to it it will be possible to easily get into even the most difficult area where welding work needs to be carried out.
To choose the right electrodes for a microwave welding transformer, you need to carefully study the relevant GOST standards, which indicate all the parameters regarding the necessary parts from 10 to 40 millimeters.
The copper rod used as an electrode must have a diameter several times larger or be the same as the diameter of the wire with which the specialist will work.
To prevent the electrodes from actively oxidizing during their operation, they must be secured to the working wire using soldering.
In any welding equipment, electrodes tend to wear out frequently and quickly during operation. To avoid such unpleasant moments in work, it is best to constantly sharpen them to the shape of a sharpened pencil. This can be achieved using a file.