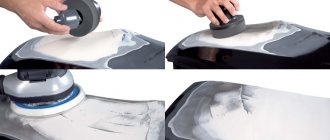
The grinding process is aimed at eliminating irregularities and roughness on the ceiling surface. To achieve this goal, an abrasive mesh is used in repair work. It is a perforated material for high-quality work with uneven surfaces. To do this you will need the following tools:
- Sanding mesh
- Bar with side loops for attaching skins and nets
- Sandpaper (sandpaper)
The sanding mesh has an abrasive structure (lat) abrasion - scraping. When mechanically processing surfaces, fine-grained, high-hardness substances included in the mesh polish and level the area. In the manufacture of both skins and mesh for grouting, solid natural elements are used:
- Diamond
- Corundum
- Emery
- Flint
- Pumice
Abrasive Sanding Mesh, 4Walls
Artificially produced substances are also used:
- A mixture of glass and sand
- Electrocorundum (aluminum oxide)
- Carborundum (silicon carbide)
- Synthetic diamonds
- Elbor
The mesh for putty is woven from fiberglass and covered with abrasive shavings on both sides. In most cases, silicon carbide (SIC) is used in production. It is made in the form of rectangular-shaped canvases. And for large-scale work it is produced in rolls. The dimensions of the canvas are determined by the manufacturer, so a variety of footage goes on sale. This is a convenient and economical option for consumers.
Mesh for putty - we bring the walls to perfect condition
Functionality of the abrasive mesh
The degree of pollination with an abrasive, in other words, grain size , affects functionality. All types of grits can be used in ceiling sanding. It should be noted that the mesh has proven itself to be an invaluable assistant in hard-to-reach places. By cutting off the required piece of cloth and wrapping it around your finger, you can easily polish corners, window, door and ceiling beams, and radiator locations. At the same time, the elasticity of the mesh is maintained, and it performs its function efficiently.
Leveling process
To ensure high quality grinding, you must adhere to some rules for carrying out work:
- You can start grouting only after the finish coating has completely hardened. It is recommended to wait at least 24 hours after applying the last layer of putty;
- before starting work, you need to protect furniture and floors from dust with a covering film;
- First you need to mark the most obvious surface defects. You can determine their location using a lamp;
- It is recommended to start cleaning from the corners. Do not put too much pressure on the grater, otherwise you can create a “bald spot”, which will then have to be putty again;
- It’s better to immediately decide which sandpaper to rub the putty on. It is not recommended to change the abrasive material during operation;
- If you find depressions in the coating, you should not try to smooth them out with grout. It is better to then carefully putty them and sand them again.
Processing walls with a sander takes less time, but requires some skill. You may not calculate the force of pressure and ruin the coating.
Important! Ultimately, walls after mechanical grouting of putty require modification, because after it, as a rule, a lot of small defects remain.
Mesh marking and determination
Which sanding mesh should be used to grind surfaces at the initial stage of work?
Note: Start by sanding, as a rule, with coarse-grained skins. As sanding progresses, the mesh is replaced with a fine-grained one. In some cases, it is replaced with sandpaper.
The characteristics of abrasive materials mainly depend on their grain size. The grain size ranges from 1 mm to 5 microns. The designation ISO 6344 is considered to be the global standard. It has also been used in Russia since 2005. The grit size of abrasive materials is designated by the capital letter P and a number from 12 to 2500 (for example, P60 or P140). The numbers that make up the number indicate the ratio of the number of sieve wires per 1 inch. Therefore, the smaller the grain size, the higher the number in the marking.
Mesh with markings
Sometimes you can find Soviet-style markings, where the number indicates the grain size and the letter symbol N or M (short for micro). Dimensions M are usually called “zeros”. Countries such as the USA, Japan and China have developed their own labeling systems. Therefore, there are different types of abbreviations.
The choice of mesh depends on what surface to sand. At the starting stage, they begin to sand with coarse-grained sandpaper.
- Initial rough type of work; Marking 80-Н to 25-Н, Р22 to Р60
- Grain size 800 µm – 315 µm
- Primary grinding;
(a) Marking 20-N to 10-N, P80 to P120
(b) Grain size 200 µm – 100 µm
At the finish, sanding is done with a fine-grained mesh.
- Final polishing;
(a) Marking 5-N, M63, P240
(b) Grain size 50-20
- For jewelry polishing processes, minimal abrasiveness is used;
(a) Marking N-0/M-10, N-00/M-5, N-1/M-7 or P1200 – P2500
(b) Grain size 10 to 3 µm
Standard markings are applied to the material with waterproof paint on the reverse side of the sheet.
Classification
Grinding meshes have a standard size of 110 by 270 ml, but vary in grain size. In stores today you can buy nets:
- P 40,
- P 80,
- P 120,
- P 150,
- P 180 and P 240.
For sanding finishing putty for painting, use 180-240 series; for cleaning walls under wallpaper, 120-150 grit is sufficient; for rough sanding, use AC 40-80. The higher the grain size, the finer the material is intended for work.
If you sand the surface for painting with mesh No. 40-120, then there will be marks on the wall or ceiling that the paint will not cover. If you clean the wall under the wallpaper with a material with a grain size of 180-240, the surface will be mirror smooth, but this will take a lot of time and effort.
Using sanding mesh in practice
You can purchase mesh in specialized construction hypermarkets or on the market. When purchasing this material, you should remember the size of the beam on which the abrasive mesh will be placed during operation. The parameters of the bar web and the skin sheet must correspond to each other. The area of the grinding surfaces is also taken into account, on which the calculation of grinding material consumption will depend. When choosing a mesh for grouting the ceiling, take into account the shape of its surface at the time of polishing.
Sanding mesh for grouting putty on ceilings is used with great success. It makes it possible to grind sand-lime, gypsum, cement putty and plaster. It is more effective than sandpaper due to its perforated structure. Therefore, it is less clogged with construction waste. In manual mode, light tapping with sandpaper is sufficient to remove accumulated dust in the cells. Used in the operation of electric grinders.
Devices for work
For high-quality grinding of the top layer of putty, one sandpaper or grouting mesh is not enough. It is necessary to have an arsenal of additional devices that will make the process easier and faster. The mandatory list includes:
- Grinders or graters, which are a block on which abrasive material is fixed using a manual or automatic clamp. Correctly attaching the mesh or paper to such a device is not difficult.
Attention!!! It is better to buy a grater with an elastic rather than a hard working surface. This will make the grouting of the putty better.
- Portable light source (flashlight, night light or spotlight from a projector). By directing the beam at the wall, you can identify all the irregularities formed as a result of grouting.
- Eye and respiratory protection. Sanding work is very dusty, so this precaution is justified.
For high-quality processing of corners, you can purchase a spongy trapezoidal block coated with abrasive.
This device will be a good help when grouting hard-to-reach places.
Release forms and types
Our usual form of release is in rolls or sheets. The sheet can be based on cardboard, or it can be on thick paper. Most often it is more rigid than rolled. Roll sanding is most often used on belt sanding machines, and for manual use too. In addition, there are the following types of abrasive materials:
- Abrasive wheels. Used for installation on attachments for special machines. These can be grinders, drill attachments, angle grinders. There are different types:
- Regular circles of different diameters and different grain sizes.
- With Velcro glued to the back.
- Petal ones are when strips of sandpaper are glued to the base. Can be of different grain sizes. They are used for rough processing of metals (usually) and for removing paint (including from concrete).
Abrasive sanding paper is available in the form of sheets, rolls, tapes, and wheels. There are other forms - for attachments to instruments
There are also sanding sponges. This is an abrasive that is applied to polyurethane foam. This type of abrasive is used to smooth surfaces with grooves, threads, and recesses. Abrasive particles can be applied to one, two or four sides of the sponge. May be the same size or different. But usually, this is a fine grain, just of varying degrees of “fineness”. Sponges are more convenient because they can take any shape; in addition, they can be washed to remove dust and dried. The number of washes is not limited. They do not suffer from washing; they can be used while the grain is still intact. And this depends on the quality.
Characteristics
The abrasive mesh consists of perforated fiberglass sheets, onto the surface of which crushed silicon carbide is applied using glue. Usually it is made in the form of a rectangle measuring 105 × 280 mm, but material for grinding is also in demand in the shape of a circle.
p, blockquote 4,0,0,0,0 —>
p, blockquote 5,0,1,0,0 —>
The main technical characteristics of the mesh for grouting the putty surface is the grain size, which reflects the size of the abrasive substance fractions. It is indicated on the packaging and on the back of the sanding sheets.
p, blockquote 6,0,0,0,0 —>
Mesh marking is carried out similarly to foreign-made sandpaper (see next photo). In addition to grain size designations, the code may include other symbols by which they can be recognized:
- country of manufacture of the material;
- method of applying an abrasive layer;
- wear resistance;
- moisture resistance;
- appointment.
p, blockquote 7,0,0,0,0 —>
Advice! Even if the fabric is resistant to getting wet, it is undesirable to allow it to interact with water, since the material may lose its performance characteristics.
p, blockquote 9,0,0,0,0 —>
When choosing a mesh for grinding the surface of walls or ceilings, it should be taken into account that a larger number corresponds to abrasive particles of minimal size.
What should be the grit of sandpaper for the job?
As you understand, different sanding cloths are used for different processing of materials. Now we are not talking about the form of release, but about the size of the grain and the method of applying it. The type of abrasive and method of application is of secondary importance. They have a greater impact on the durability of the material. But as usual, better means more expensive. Here everyone chooses for themselves. But it is better to select the grain size for specific tasks.
Sandpaper for sanding wood for painting: choosing a grain size
What sandpaper to sand wood
To prevent the skin from clogging, the grain should be applied at intervals. This is an open type of application. In this case, you won’t have to “knock it out” or change it often. Base type - paper or fabric. Paper is cheaper, fabric is more expensive. If you have a sander, check the instructions for it. For manual processing, you can fix the piece on a special holder or nail it to a block.
How to choose sandpaper grit for wood processing
Recommendations for choosing grain size are given in the table. For primary processing, sandpaper from P40 to P80 is used. This is giving shape, removing a thick layer. We use the same materials to remove varnish and paint from wood. To prepare wood for painting you need P100 to P240. For sanding after applying the first layer of varnish, use P360 or P400. And bringing it to smoothness - actually polishing and varnishing - is already very small P500 and above. In general, polishing is a separate topic, and there you need to sand and apply paint or varnish step by step. And each time the grain is taken finer and finer. And the polishing is completed with a generally soft polishing (felt) material.
For grinding and polishing metal, you need a different type of sandpaper, and we select the grain size according to the type of work
The principle of selecting the grain size is the same: for rough processing, increased “roughness” of the coarse grain; the finer the processing, the finer the abrasive. To remove rust and level out the main roughness, use the coarsest sandpaper. The thinner the layer, the smaller the grain size. So everything is logical here. But note that for each type of work there are two or three grit sizes. This does not mean that you need to take any of the above. This means that to get a good result you need to process each size. Although, if appearance is not so important to you, then you can use one of the recommended sizes.
Sandpaper for plastic, stone, ceramics and glass
Regarding the type of abrasive and its application, the recommendations are the same: stronger, more dense. But sanding is recommended with water supply, so a waterproof modification of the sandpaper is required.
Sandpaper for plastic: choice of grit
For finishing plastic and glass, sandpaper even with the smallest grain - the same zero or P800 - will be too coarse. It will leave visible scratches. These materials are brought to smoothness using GOI paste and even finer grinding compounds. But this is a separate story and its own technologies.
Using an abrasive mesh to clean the walls before wallpapering or painting the surface allows you to create a smooth, uniform texture on the base. The consumable material has a number of advantages over classic sandpaper, as it lasts longer and does an excellent job of sanding.
Sandpaper markings
Sandpaper marking is a set of letters and numbers that encodes complete information about the type of base, abrasive, application method, composition and grain size. We have already looked at graininess. This parameter appears at the end of a series of letters and numbers. It’s more or less clear with him. In general, sandpaper markings display the following data (starting from the first character):
Sanding paper markings
Let's look at the rest of the characteristics that are encrypted in the labeling. The letters here are in Latin. Let's take an example of what the following marking means: KK19XW. So:
- first K - type of abrasive - normal electrocorundum;
- second K - base - cotton fabric;
- 1 - two-layer application of a binder (resin + resin).
- 9 — type of application is unclear;
- X - textile type - hard.
- W - indicates that the material is waterproof.
Next should be the letter P and numbers that determine the grain size of the sandpaper.
Types of abrasive
The first letter in the marking indicates the material from which the abrasive is made. It is the abrasive material that is responsible for how much effort must be applied during processing. The stronger it is, the longer you can work with one piece of sandpaper. Unfortunately, the rule here is true: the better, the more expensive.
- K - “normal” electrocorundum. The abrasive is brown in color (shades may vary). The most common and relatively inexpensive material.
- C—silicon carbide. Very durable material. It does not wear off for a long time and clogs little. For processing glass and plastic, for finishing metal polishing.
Types of sandpaper. They differ not only in grain size, but also in the material from which this grain is made.
If, looking at the photo, you decided that the emery was tinted, then in vain. Different colors are given to it by various additives used in the manufacture of abrasive substances. Another thing is that most often we see brown, gray or dark gray sandpaper for sanding. They are simply the cheapest and most popular.
Types of base
The base of the sanding paper is the material on which the abrasive is glued. This material determines the degree of flexibility and resistance to deformation. It also depends on the base whether this type of sandpaper can be used for dry or wet sanding.
In the marking, the type of base is encrypted by the second letter.
- Woven base. Fabrics are woven from cotton and synthetic fibers:
- K - cotton fabric. High strength, wear resistance, not afraid of getting wet. The disadvantage is that it can lengthen during operation. This is bad for belt sanders.
- X - polyester textile. Compared to cotton, it is more wear-resistant. Used for the production of tapes of various widths. The base is dense. It can stretch slightly when inserted into grinding machines and does not deform for a long time.
Emery cloth - sandpaper on a woven (textile) basis
Sandpaper is another name for sandpaper.
If we talk about the base, then the cheapest sandpaper is paper based. It is usually used for manual processing or mounted on a hand holder. For sanding machines, a woven base is often used. But cotton or polyester is your choice. Who likes what more?
Binder
In the third position in the marking of the sanding paper there is a number that encodes the method of fixing the abrasive to the base. They use glue or polymer resins or combinations thereof. The glue “adheses” well to the abrasive and the base. Single-layer application of the binder (number 2 in the corresponding position on the marking) is used where the emery is not subject to heavy load.
Methods for gluing abrasive to a base. Glue or resin is used, their combinations in different orders
To hold the grains more firmly, a second layer is poured over the glue. Most often this is a resin (phenolic or any other). The result is a bundle - glue + resin (number 3 in the marking). The second layer of binder makes the sandpaper more resistant to abrasion.
There is another option - resin + resin (this is 1 in the encoding). That is, both the first and second layers are made of bakelite resin. The cost of this option is higher, which determined its area of use - production.
Method of applying and pouring grain
There are two ways to apply grain to the primary binder layer: free and electrostatic. When free, abrasive particles simply pour in. They lie in a free order, their direction is random. With the electrostatic method of filling grain, the paper is passed through an electric field. As a result, the grains have the same orientation, which makes the surface rougher.
Abrasive is applied in different ways
In addition, there are two types of grain filling: open and closed. They differ in the number of particles per unit area. When the backfill is open, the sharp fragments are located at a distance from each other, and the base is visible (open). This paper is good when working with loose materials. For example, with wood. Wood dust wakes up, the abrasive does not clog.
How to sand the walls and ceiling after puttying - choose an abrasive
Required tools and materials
No matter how hard you try, it is impossible to get perfectly smooth walls after puttingtying them. In any case, traces of the spatula, uneven transitions of the treated areas, bumps, depressions and other defects will remain on the surface. This is why you need to sand the walls. Let's figure out how to sand the walls after puttying.
How to sand the walls after puttying?
The first step is to acquire the necessary tools and consumables. You will need:
- Several types of abrasive mesh or sandpaper.
- Sanding block.
- Sanding sponge (used for hard-to-reach places).
- Ladder.
- Good lighting: spotlight or pendant lamp.
- Small construction spatula.
- Personal protective equipment: respirator, safety glasses, hat.
Experts recommend sanding the walls after they have been puttied, before painting the surface or before wallpapering. Grinding is often carried out for other types of construction work. The grinding process is relatively simple, but quite labor-intensive and dusty. How to sand walls after puttying? When sanding by hand, you can use sandpaper or a special abrasive mesh. The choice of material depends on the personal preferences of the master.
- Abrasive (grinding) mesh for putty - its advantage lies in its perforated structure. All construction dust will pass through the holes, so during work it will not clog as much as regular sandpaper. The mesh needs to be changed when it wears out, which can be determined by its appearance: if it starts to tear or you feel that the grinding process is no longer as effective, then it should be replaced. As a rule, the mesh for grouting putty is sold on the market in pieces, the sizes of which correspond to the size of the bars, so all you have to do is install it and get to work. But remember that the bars are also different, so when purchasing a mesh, take this factor into account. The disadvantage of the sanding mesh is its higher price than sandpaper.
- Sandpaper for putty - its main drawback is that during work it will constantly become clogged with construction dust, so it will have to be changed much more often than the mesh. You can purchase sandpaper in a variety of options: ready-made pieces, small rollers or large rolls. If you decide to go with rolls of sandpaper, you need to decide how you will cut it based on the size of the bar to ensure minimal waste. Of course, you can buy already cut pieces, but such a purchase will cost much more.
In addition, sandpaper has such a concept as grain size, which is indicated by a number marking. The choice of grain causes some difficulties for inexperienced craftsmen. The higher the serial number of the sanding belt, the higher its grain size (the number of grains per square centimeter), and vice versa. For example, coarse-grained tapes include tapes in the following range: from P20 to P220, and fine-grained sandpaper labeled from P240 to P2500.
Sanding the walls after puttying is carried out in two stages. Here you need to remember that the first grinding is done using coarse-grained sandpaper, and the final grinding is done with fine-grained sandpaper . To carry out renovation work in an apartment, sandpaper with a grit size of P80–P280 is mainly used. Not so often (for “jewelry” processing) smaller abrasives can be used – P320–P360. After treating the surface of the wall with starting putty, it is recommended to polish it with a rough grinding stone P100–P180. Sometimes, for initial processing, sandpaper marked P80 is used, but this is too coarse material and, for example, it is not suitable for painting. After treating the walls with finishing putty, the surface is sanded with fine-grained sandpaper P220–P280.
How to sand walls after puttying?
Before sanding the walls after puttying, you should make sure that the finishing layer is completely dry and ready for processing. Take care of good lighting in advance - it is necessary that the light falls on the treated area at an angle and only from one side. Remember to take care of your personal safety, always wear goggles, a hat and a respirator. There will be a lot of dust!
Large overhangs can be removed or trimmed using a small, clean putty knife. After this, secure the rough sandpaper to the sanding block. You always need to sand the wall in the direction from top to bottom and from left to right; in this case, not the entire surface is processed at once, but is divided into small sections.
If you have never sanded walls before and are not sure whether you have chosen the right abrasive grit, then first be sure to practice on a small area somewhere in the corner. After a short grinding, check the result - if you find scratches on the surface, it is better to replace it with an abrasive with a finer grain.
It is still permissible to use coarse-grained emery for wallpapering, but it will no longer be suitable for painting walls, since even minor defects cannot be allowed to appear - they will show themselves very clearly after painting.
When grouting, you should not press too hard on the sanding block, although, of course, you will still have to put in some effort. It is not recommended to grind in one place for too long, so as not to overdo it: sand it, inspect the surface for unevenness, and move on to the next area. If large depressions are found during the initial polishing process, it is better to skip them and treat them with putty later.
After sanding the main surface of the wall, you need to start processing corners and other hard-to-reach places. In this case, the use of a sanding bar can only harm the putty layer. Therefore, it is best to use sanding sponges that have beveled corners. If this material is not available, the corners can be sanded with a sheet of fine sandpaper folded in half.
How to sand a ceiling after puttying?
The ceiling attracts no less attention than the walls, and every flaw on its surface will be evident. The technology for sanding this surface is no different from sanding walls, except that working on the ceiling is much more difficult. Therefore, it is better to understand the question of how to sand a ceiling after puttying if you have grinding machines in your arsenal.
A putty sanding mesh No. 60–80 is put on the machine if rough sanding is being done, and mesh No. 100 is being used if finishing sanding is being done. To reach the surface, you need to use a stepladder. If a machine with a special rod is used, surface treatment is performed directly from the floor. The surface is sanded in a circular motion until it is perfectly smooth.
Primary grinding of the putty allows you to remove large defects. After its completion, you need to remove construction debris, debris, dust and check the surfaces for cracks and minor flaws, and then you can apply a layer of finishing putty. When the surface is dry, you can begin final sanding using a fine-grained abrasive. The technology remains the same as described above, but in this case all movements should be less sweeping and more accurate.
Dimensions
The standard dimensions of the abrasive cloth are 115x280 mm. The material is sold in packs of 5 and 10 pieces of the same abrasiveness. In addition, canvases with a size of 106x280 mm are available for sale. They are suitable for narrower spatulas. These nets are packed 25 pieces per pack. There are also options with a width of 110 mm.
Taking into account the abrasive, thickness, length, the material is marked, for example, like this: P 80, 106x280, P 600, 115x280 mm. Narrow meshes are often purchased to order. Other manufacturers offer customers products in rolls with different grain sizes.
This mesh option is used for large-scale work. The dimensions of the canvas are determined by the manufacturer, which is why the footage of the roll can be very diverse. The rolled type of mesh is a convenient and economical option for buyers and craftsmen who are constantly engaged in repair work.
Tips for choosing
Abrasive mesh is not a universal material for surface treatment. To choose it correctly, you need to take into account the standard size of the consumable and correlate it with the parameters of the grater or automatic tool. In addition, different grain levels need to be taken into account:
- if you need to sand the dried layer of starting putty, while simultaneously removing defects, take a package of cloths with a fraction of 40-80;
- Velcro abrasive of any shape.
- Food grade silicone tubes and hoses.
High quality materials
- when you need to clean an almost even starting surface, buy material with grain 120, 150, 180;
- mesh with fine abrasive (220, 240, 280) is suitable for working with finishing materials applied in thin layers.
You need to select meshes taking into account the specific material: coarse grains will simply riddled the silky finishing plaster. It will leave lattice grooves on the surface.
If a wall is being prepared for wallpapering, pay attention to its thickness. The thinner the wallpaper, the better and smoother the wall should be, and, therefore, the smaller the abrasive size. For example, mesh fabric No. 220 and higher is suitable.
Choosing the right abrasive will reduce the consumption of mesh sandpaper several times. On the contrary, if you buy an option with a soft abrasive for a rough surface, then the blades will have to be changed almost every 1-1.5 m.
As for the width of the canvas, you need to take such meshes, the width of which coincides with the width of the grater bar. Otherwise, stripes will form on the sides during work. The mesh should not be wider than the bar or, conversely, narrower.
As for quality, you can evaluate it right in the store. High-quality mesh is cut into rectangular sheets with parallel edges. A bad product has edges cut with a bevel.
In addition, with good material the abrasive does not fall off from the lattice base. If scattered grains of grain are visible in the packaging, such a product is not worthy of purchase. When processing the surface, particles can be pressed into soft plasters, which is unacceptable when finishing bases for a topcoat.
Abrasive meshes for grinding machines have a size that perfectly matches the working sole of the device. They are easily attached to the device and are selected in the same way as conventional analogues.
How to rub putty
The final stage of repair work on finishing walls for painting or wallpapering is the grouting of putty. The purpose of this procedure is the final correction of unevenness remaining after applying the finishing layer and smoothing out excess grain. The choice of materials and grinding method depends on the structure and area of the surface being processed. Even those who have never done repairs before can cope with the task.
Why clean the surface after puttying?
Before considering the question of how to sand putty, you need to find out why you need to mechanically treat the surface? Finishing before applying the decorative layer consists of several stages:
- Primary stage. Includes cleaning the building base to eliminate unevenness. At this stage, do not use sandpaper, but a grinding machine. This helps eliminate large differences, but does not completely level the building foundation.
- Second phase. This includes the application of starting and finishing putty. Such manipulations eliminate defects and level the surface.
- Finishing stage. This is mechanical grinding. Allows you to eliminate unevenness of the building foundation. Cleaning also removes the marks left by the spatula from the surface. Using sandpaper and other abrasive materials is the only way to hide the boundaries between strokes and prepare the walls and ceiling for the final coat.
Sanding walls
