Homemade engraver with flexible shaft
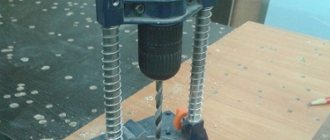
In a home workshop, cases periodically arise when, during the manufacture of a part, it becomes necessary to process or modify a surface that cannot be reached with universal equipment. So the part may turn out to be bulky, fragile or not rigid, there is no way to secure the part or the surfaces need to be modified in place.
For this case, a hand-held device with a flexible shaft and mechanical rotation of the cutting tool is used. The device is called differently - an engraver with a flexible shaft, a mini-drill, a drill, etc.
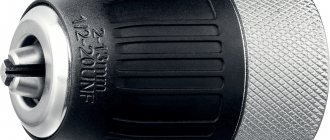
This is a device that looks like a fountain pen, with a rotating, replaceable processing tool connected by a flexible shaft to an external electric drive. A hand engraver, used in conjunction with a flexible shaft, allows you to process hard-to-reach places on any product.
This device is universal because, using a set of various tools, it can be used to mill, grind, polish, engrave and cut material, drill small-diameter holes, and clean surfaces. By equipping the device with an appropriate working attachment, you can successfully use it for working on ferrous and non-ferrous metals, wood, bone, stone, glass, ceramics, plastics and other materials.
Although it is not difficult to purchase such a device on the modern market, many people act differently and make an engraver with their own hands. A homemade device will be inexpensive and will not cause any special problems during manufacture. Despite the simplicity of the design, a homemade engraver allows you to successfully perform the same operations as a serial model engraver.
To make a simple yet easy to use functional engraver, you will need some components. — Flexible shaft (located on the farm or purchased). — Working attachment (research or manufacturing). — Two ball bearings with a diameter of 22 x 8 mm. — Engraver drive. — A set of tools with which processing will be performed. For a homemade working attachment, any tool with a shank diameter from 1 to 3.5 mm is suitable.
However, as a flexible shaft for the engraver, it is possible to use the drive shaft from a drill or the shaft for the speedometer of a car or motorcycle. We use this option for our homemade product.
Due to the flexible shaft, the device has an advantage. There is no unnecessary strain on your hands during operation of the device. This is due to the fact that the shaft head is several times lighter than a power tool with a built-in drive.
Making a working attachment
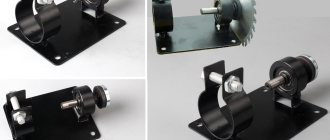
The threaded part of the housing is designed to connect it to the used flexible speedometer shaft and corresponds to it in thread. In our case, it is M18x1.5 with a length of 10 mm. The 70 mm long body is bored out for two ball bearings with a diameter of 22 x 8 mm. As a drive shaft with a collet clamp, which will be installed in the housing, we use a double-sided hand tool with replaceable collets, which is sometimes used for drilling holes in boards. It's time to mechanize this tool.
For the width of the bearing, to ensure a tight fit, we clean the corrugations from the edges of the tube. We press the bearing on one side. To fix the shaft when clamping a cutting tool in a collet, select a sleeve of suitable dimensions, install it in the middle of the tube and secure it with a pin. We drill a 3.5 mm through hole through the installed bushing, in diameter, to install a stopper when clamping.
On one side (instead of a collet), we screw a piece of copper tube with a diameter of 6 mm into the threaded hole of the tool tube. To do this, at one end we first cut an M6 thread, and carefully compress the other end until the square fits tightly at the output end of the flexible speedometer shaft. As a result, the total length of the drive shaft must match the length of the housing.
We measure the distance from the front end of the tube to the hole for the stopper. We install the assembled shaft into the housing, all the way to the rear wall. Mark the location of the locking hole on the body. We remove the drive shaft and drill a locking hole in the housing. After lubricating the bearings, we assemble the working attachment. Check the alignment of the holes for the stopper. If the bearings are unprotected, cut out and install, on the collet side, a protective washer made of plastic or felt.
After the working nozzle body is completely assembled, the open end of the drive shaft should coincide with the end of the body, and the crimped end of the copper tube should be flush with the threaded end.
Install the collet of the required size.
We attach the flexible shaft to the body.
To secure the cutting tool
We use a drift as a stopper.
Tool
The following tools are used to transform a compact engraving device into a multifunctional processing device: - drills, with the help of which the engraver turns into a mini-drill; — milling cutters of various designs, allowing processing of flat and shaped surfaces, as well as holes, grooves and recesses of various configurations; — disk tools used to perform cutting operations on materials of small thickness; — metal brushes, which are used to clean the treated surfaces from traces of corrosion and other contaminants; — abrasive tools with working heads of round, semicircular, oval and cylindrical shapes, used for grinding and polishing surfaces; — tools with a conical working head for applying inscriptions and patterns to the surface of the workpiece; — tools, the working head of which is made of felt, for performing polishing operations.
Sufficiently high-quality cutters for engraving machines can be made from broken drills, if you give their working part the required configuration using a regular sharpening machine.
Device drive
A drive electric motor, which can be used as any motor powered by an electric current of 220 volts. This could be the motor from a washing machine or other household appliance that you do not use.
An electric motor from a sewing machine is optimal for a homemade engraver, since it is possible to regulate the shaft rotation speed within a fairly wide range. Such motors, as a rule, are capable of shaft rotation speeds of up to 6 thousand rpm, which is quite enough for a household engraver. It is better to work with soft materials at slow speeds, since a high rotation speed will lead to overheating of the tool or melting of the edges of the workpiece. It is recommended to work with metal at medium speed. It is best to process hard natural stone at maximum speed.
Flexible shaft and engraver holder
About a year ago I reviewed a small engraver. Although why small, rather, on the contrary, large? For almost a year I was completely satisfied with it, but in the process of work I was faced with the fact that in certain situations they are not always convenient to work with. In a conversation with one of my friends, I complained about this problem and he told me a couple of devices that are suitable specifically for my engraver; in fact, I will show both of these devices today in my review. Since there is not much to tell here, for the most part the review will consist of photographs with small explanations.
First, let me explain why I needed all this. I ran into one problem this winter; I had to cut out six or seven floor tiles. Or rather, how to cut it, it was necessary to cut the seams between the tiles. The seams were very thin and it was impossible to get through with a grinder; I had to take an engraver and cut several meters of the seam. It was convenient to do this with the help of a thin diamond wheel; it went through perfectly, but the dimensions of the front part of the engraver did not allow placing the disk perpendicular to the floor, so cutting, although possible, was very inconvenient.
A flexible shaft allows you to simplify such tasks, since the diameter of its front part is noticeably smaller than the diameter of the engraver. I’ve seen flexible shafts for Dremels before, but they seemed small to me, and it’s not like they would fit, and since the flexible shaft also needs a holder for the engraver, I looked for that too. It turned out that there is both, and both are suitable for my engraver, which is actually why I ordered it.
Now you can move on to the review, where I will explain the rest and show what it is all about.
Just a few words about the packaging. The holder was in a cardboard box wrapped in a sheet of polyethylene foam. but this did not help and the box was pretty much chewed up by the mail. Link to this product in the store - Grinder Holder, price 15.99
The flexible shaft was packaged much more simply, no wrapping or box, just a plastic bag, but it is even more difficult to damage :))) Link to this product in the store - 6mm Electric Grinder Extension, price 18.85
The front part of the flexible shaft was lubricated and separately wrapped in polyethylene.
Here is the actual holder. I will describe all the components separately below, but I think most will understand the principle of its operation from this photo.
The tool is clamped into a mandrel located at the top, and this entire structure is fixed with a screw and a wing nut. The design turned out to be surprisingly convenient.
The minimum and maximum clamping diameters are approximately 37 and 43 mm. They also included a plastic spacer, it allows you to use a tool with a front diameter of approximately 24-27mm, but since I have a large engraver, now I will think about how not to lose it, because at the moment I don’t need it. The upper part is fixed with a screw, so it is quite possible to remove it and use the remaining part as a holder for something else.
The total length of the entire assembled structure is 260mm.
The upper part is rotary, the principle is simple, a ball that is clamped by the body of the upper part. It’s interesting that they used a nut as a washer :). The solution is not very pretty, but it works. But here I have a much more significant remark: this entire structure is made of some kind of material similar to silumin, therefore there are some doubts about reliability. I tried to tighten it tightly, everything held together and nothing broke, but the design of the clamping unit still looks weak.
Bottom of the holder.
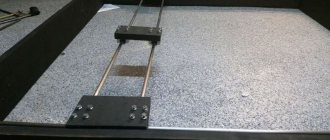
And here is the second remark. The screw part of the clamping mechanism is not hinged, so when the holder is fixed to the table top, it rotates along with the screw. Why is this bad: 1. It is less convenient to fix; it is necessary to hold this entire structure more firmly when fixing it to the table. 2. The bottom surface of the table may be damaged by repeated installation/removal of the holder.
The maximum thickness of the tabletop is about 50-52mm, there are no questions here. For example, I don’t have a countertop thicker than 40mm at home.
Flexible shaft. I haven't weighed it, but it looks and feels pretty impressive in my hands.
The kit included a key to the cartridge and a pair of small hex keys. At first I didn’t know why hexagons were needed, but I figured it out as I prepared the review.
The front part with a cartridge, its dimensions are 110x26mm.
Here the ruler is more for approximate size estimation, the stated length is 110cm, the real one is closer to 100.
Springs are installed on both sides of the flexible shaft to protect the rubber part from breaking.
Surprisingly, a good cartridge was installed. I don't know its brand, since I couldn't pick it out, but I liked the alignment. The gap between the handle and the chuck is about 0.5mm, there is a small axial play, I did not notice any radial play at all. A key cutout is visible at the top. In general, tightening the cartridge without holding it with your hand is not very convenient, but the developers apparently tried to hide the cartridge inside the handle as much as possible, although it is not entirely clear why. The minimum diameter is stated to be 0.3mm. maximum 4mm. In reality, you can clamp drills with a diameter of up to 4.5mm.
The front part can be removed very easily; a “wavy” washer was found inside.
There are two bearings inside the handle, which are also lubricated. Bearing brand Z809.
And here I will explain why I took the holder. The fact is that this entire structure is fixed only in the tool chuck, and if you put a large load on the shaft and do not hold the tool itself (in this case, the engraver), then it will try to rotate in the opposite direction. It would be nice if the flexible shaft was also fixed to the front part of the engraver itself, but since this is not the case, and the engraver must be held, a holder is used for this. This is why it is better not to attach the holder to light objects when working with a flexible shaft, since at high speeds and jamming there will be a not very pleasant picture in the form of an engraver jumping around the apartment together with the flexible shaft and what this entire structure is attached to. Shaft diameter 6mm, offset - 20mm.
But why the manufacturer prudently included a pair of hex keys. The entire structure is collapsible.
First, I unscrew the right screw, this allows you to remove the flexible shaft itself, made in the form of a steel cable, which is located inside the steel spring. Disassembly of the mechanism is necessary for cleaning and lubrication. Although judging by the rather closed design of the unit, it is more likely to be lubricant.
Unscrew the second screw and remove the cable completely. The shaft that is clamped in the engraver chuck is not removable. The same bearing is installed inside as in the front part, only there are two bearings there, and one here.
From the very beginning I noticed that in the front part there is a flat spring pressing a steel ball. Having suffered a little, I took it apart too. This unit is responsible for the ability to rotate the front part regardless of the rubber hose in which the flexible shaft itself is located.
Flexible shaft completely disassembled.
And here is the tool for which I took everything that I showed above. It’s obvious that he got it in a year. Basically, it was hard when cutting a tile seam; the dust was almost like after cutting with a grinder, and since the engraver has active cooling, all this dust was driven through it; it will have to be disassembled and cleaned. In general, I worked quite a lot as an engraver during the year, cutting aluminum, grinding, drilling (by accident). During the entire operation, there was only one complaint, heating under prolonged loads.
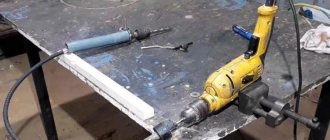
You can work with a flexible shaft as shown in the photo, but in this case there is clearly not enough fastening of the structure in the front of the engraver, which would be very convenient. You could connect the shaft and just put the engraver somewhere nearby. Since the front part is not attached, someone needs to hold the engraver while working.
It is more correct to secure the engraver in the holder. But first I decided to do a little experiment, first I turned on the engraver without load.
Then I connected the flexible shaft and turned on the engraver, the shaft was in the position as in the photo, only of course I was holding it in my hands. By the way, the noise has noticeably increased. In general, the noise increased after fixing the engraver on the table, but increased even more after installing the flexible shaft. Let's just say that working has become less comfortable, although noticeably more convenient.
I compared the consumption without a shaft and with a shaft, checking it at idle and at minimum speed. It turns out that the shaft gives a load equivalent to 10 Watts. Well, of course, you need to subtract the engraver efficiency from this figure, i.e. The shaft accounts for approximately 7-8 watts, it will be a little warm during operation. It is clear that the losses depend on the bending of the shaft, the more we bend, the greater the losses, I checked in the worst case scenario.
The holder allows you to install the tool at different angles, quite conveniently. The fixation is very strong, the only place where there was a slight movement was the fastening to the table itself, but I did not tighten it too much, since I was simply sorry to spoil the table. The truth is worth making a reservation. I have been working with these “ball” joints for a long time, and I don’t really like them. Over time, the clamp weakens and the reliability of fixation decreases, I think that the same picture will happen here. Due to the fact that the cartridges are installed differently, therefore the keys are different, it is not very convenient when there are two different keys on the table that are externally the same size
There is also a cutout in the hinge assembly that allows you to install the top at a 90-degree angle to the table surface. I don’t think it will be useful, but it is there. In general, the photos are “staged”, i.e. I won’t work in this situation. For work, it is better to install this entire structure noticeably to the right or to the left (if you are left-handed), for example, at the edge of the table. But since taking pictures in this position is not very convenient, and I would have to clean up the table, I took a picture of how it turned out
1. With this disk I cut about 4 meters of tile seam. It suffered quite a bit, the coating on the edges was worn off, but it did its job. 2.3. It is very convenient to work, formally it turned out to be a small unit with a lot of power on the shaft. True, I would not call the shaft completely flexible; due to the thick rubber, it still has some rigidity. 4. In principle, you can drill, but for drilling it is better to have a special stand, it will be much more convenient. And since the engraver has quite high speeds even at minimum speed, it will not be possible to drill with thick drills in manual mode. drills will “burn”, and thin ones can be broken, although the chuck can fix them.
Well, in principle, now you can use the engraver as a mini sharpener, but also because of the high speeds, I would not use large-diameter wheels.
Here's a mini review. Due to the lack of a video camera, I was unable to shoot a video, so I tried to convey everything with the help of photographs, I hope that I succeeded, and now a short summary.
First, I’ll say about the flexible hose; I have no complaints about it at all. It is really very convenient to work. I only have a wish for the design; it would be nice to be able to attach this entire structure to the engraver body, then it would be absolutely great. There is no radial play, no beating, and it is comfortable to hold. It’s just not clear to me, on the store page the maximum speed is indicated at 1000 rpm, the engraver even at the minimum gives 10 times more. Is it really impossible to work with a flexible shaft at such speeds or is this an error in the description? I worked with the disk, everything is fine, but somehow it’s not clear, maybe I’m doing it wrong?
But with the holder, not everything is so simple. pros
In general, a convenient design. Good fixation of the tool. Wide range of possible tool positions.
Minuses
Weak hinge design, I'm not sure it will last long. Not a very good choice of material; the hinge joint would be better made of steel. Rigid fixation of the screw part of the clamp to the table interferes with installation and scratches the table from below.
My opinion. I will definitely use the flexible shaft, I like it. Good cartridge, convenient design. But the holder is so-so, it’s better not to tighten the hinge unit too much. but what’s more frustrating is that if I break the holder, I won’t be able to use the shaft normally. Although at this stage it’s convenient to use the holder.
That’s all, as always, I’m waiting for questions, and I will also be glad to receive advice on improvements or alternative options for such systems.
The product was provided for writing a review by the store. The review was published in accordance with clause 18 of the Site Rules.
Why do you need a flexible shaft and where is it used?
Using a flexible shaft is very convenient when you need to tighten or unscrew fasteners in narrow places with difficult access, where you cannot insert a screwdriver in the working position
Flexible shafts are also used to drive hand tools for fine and precise work. Placing a heavy, high-speed electric motor in the tool itself would lead to rapid operator fatigue and loss of precision in operations. An example is a dentist's or engraver's drill.
As a result, the user gets the opportunity to work for a long time with a comfortable, light and small-sized device, and the level of vibration from the electric motor transmitted to the hand is reduced.
Flexible shaft for screwdriver
A feature of the use of a flexible shaft is the limitation of the maximum torque that it is capable of transmitting. If this limit is exceeded, the cable becomes twisted and the shaft fails.
How to disassemble the handle
After some time, a hypothesis arose that the solid shaft with the cartridge and bearings could be pulled forward from the handle, which was miraculously confirmed:
Photo 3. Heat the handle - pull the shaft by the chuck
We heat the handle with some kind of hot air gun to 90 degrees (I heated it with a soldering hair dryer set at 120°C, but I think it reached the handle no more than 90), then, holding the handle with a hand in a heat-resistant glove, we pull the shaft with the other hand by the pip in front ( see Photo 3), you can jerk it. Total what's inside:
Photo 4. What's inside the flexible shaft handle. Device. Scheme
Also, for some reason, I pulled the flexible shaft out of the handle from the back... It was glued there through its gray insulation to the plastic of the handle, as a result, a piece of this insulation came off (and remained glued in the handle). So, there is no need to pull out this entire wire in order to eliminate play, because the solid shaft (which has a cartridge) has play relative to the bearings. But since we are seeing this flexible shaft “in cross-section” here, this is what it consists of:
- Spring-loaded drive shaft with a square-crimped end.
- A spring within which the shaft rotates.
- Twisted/spring steel outer shell.
- PVC insulation.
Design Features
The main design feature and at the same time the main advantage in application is the ability to bend it anywhere in any direction. This is achieved by using the following components:
The outside of the wire is covered with a corrugated plastic sheath, inside of which there is a grease. It reduces friction, prevents abrasion of the core cable and protects it from moisture and dust.
The design of the flexible drill drive also includes bearings to which the cable is attached. They keep it spinning. At one end the cable is fixed in a socket, at the other it is provided with a mount for a tool.
Extension shaft with collet clamp
Such a drive is intended for light and delicate work; you should not count on using it to unscrew a soured bolt or screw in a 130 mm self-tapping screw at full speed; you must remember that the torque transmitted by the flexible shaft is limited.
Flexible shaft from China: how to disassemble the handle and eliminate chuck play
In my household I have this homemade drill and a mini-drill made from a Soviet motor (DPM... something there; there were markings on the body, but it was erased over time from squeezing in the hand) and a collet chuck:
Photo 0. The simplest drill/minidrill - motor with collet chuck
Recently, the increased along-axial play has become very annoying, reaching an amplitude of as much as 2 mm. In this regard, a flexible shaft was urgently purchased on Aliexpress for $8 in the hope that it had no play, a more comfortable handle (longer and thinner), a universal chuck (it was too much trouble to change the collets for different diameters of the tails of the bur attachments - 2.0, 2.15, 3.0, 3.17, 4.0 mm).
Photo 1. Purchase in original form
But that was not the case, it’s Chinese... Here, too, as it turned out, there was a small along-axial play. The handle does not look collapsible at all. At first it seemed that something could be done by disassembling the tail:
Photo 2. Input shaft diameter 3.17 mm
Here, the bearing is secured by means of a retaining ring in a large black frame (clip), which is the tip of the outer shell of the flexible shaft (Photo 2), and the end of the flexible shaft in the form of a pin-solid-shaft-diameter-3.17mm is secured in the bearing with a lock washer. That's all. Nothing is loose or regulated here.
Fact: there are no threads on the frame, i.e. it does not need to be screwed onto anything. We attach the motor to the shaft, and the frame just dangles in the air. The shaft shell does not rotate because on the other side there is a handle, which we hold in our hand.
How to make it yourself
Those who like to make tools with their own hands can easily make a flexible drive for a drill on their own.
Important! You won’t be able to make armor braiding yourself; this requires industrial equipment. It is also important to understand that a homemade flexible shaft for a drill will be inferior to a factory one, first of all, in terms of working life. And it’s better to use it occasionally - then it won’t let you down at a crucial moment. For professional work in large volumes, it is better to invest in a purchased extension cord.
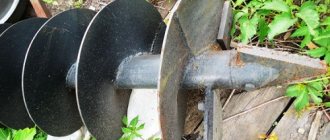
As an option, you can take a cable from a car speedometer, as well as a motorcycle gas or clutch control drive as a starting material.
How to do it yourself?
You can make such a product yourself, using a cable as a base. It can be from the clutch, gas or speedometer. You can buy braided wire or take one you already have - it’s almost impossible to make it yourself. It is threaded inside the cable.
One end of the future core is connected to the shank, for which a nut and welding are used. The second end is fitted with a screwdriver cartridge.
When using a homemade flexible shaft, it is important to hold on not to the cartridge, but to the protective shell, that is, the cable
The choice of the finished product should be approached with great responsibility. Work performed using a flexible shaft is complex and time-consuming. A malfunction of one mechanism will disrupt the operation of all others.
When purchasing, you need to pay attention to the manufacturer of the product. A tested and correctly made device will ensure high quality of work performed.
A hasty purchase will result in double expenses. In addition, if the work needs to be done urgently, deadlines will be missed.
In the next video you will find an overview of the flexible shaft for a screwdriver.
Flexible shaft for engraver
The engraver, or drill, develops high speeds - up to 30 thousand rpm. The device is small-sized and fits comfortably in the hand and is used for operations:
Working as an engraver requires high precision of the master's movements. The effort involved is small, compared to, say, tightening self-tapping screws. The torque is also low. Such devices are used by jewelers and artists who create works that are not inferior to the best examples of wood, stone, and embossing carvers. Engraving is performed on materials such as:
Flexible Shaft Engraver
The flexible shaft for the engraver allows the user's manual efforts to be reduced to a minimum, turning many hours of work into an exciting activity.
Shafts for lawn mowers
Mechanical scythes with electric and gasoline drives use both flexible and rigid shafts.
Powerful brush cutters, capable of cutting tall, hard and dense grass and even small bushes, use all-metal rigid drives. Such devices are designed for long-term operation and have high torque. They are also large in size and weight and are worn on shoulder straps. The working tool is thick, rigid fishing line or powerful steel knives - two, three or four - bladed.
Speedometer flexible shaft
The flexible shaft transmits torque from the car or motorcycle transmission to the magnetic speedometer sensor. If the speedometer needle, when driving at a constant speed, begins to twitch or goes to the extreme position, it means the cable is faulty. You can replace it yourself. The flexible shaft is selected according to the parts catalog for your car brand. It must match in terms of attachment points and length. If the cable is too long or too short, there is a risk of bending it at too small a radius. This leads to extraneous noise (similar to howling), increased wear and premature failure of the unit.
Source
Self-production of a flexible shaft
Those who like to make devices with their own hands can buy a flexible shaft - its braided wire core - in the store. It is impossible to screw on armor yourself without special equipment. The seller will cut the required length from the skein. All that remains is to seal the ends, install the outer casing and fill with lubricant. A shank from a broken drill is suitable for attaching to a drill.
Features of using a flexible shaft for an engraver, drill and screwdriver
A flexible shaft, the main purpose of which is to transmit torque over a considerable distance, is most often used to equip engravers. This type of equipment, which is essentially a miniature grinding machine, is actively used for processing small-sized parts. In particular, the engraver is used as a mini-drill; it is used to perform miniature cutting, selective grinding of small elements of products and a whole list of other works.
The flexible shaft simplifies the use of the engraver, eliminating the need to hold the tool above the work site
The most common areas where flexible shaft engravers are used are the jewelry and electronics industries. Such equipment is actively used by design specialists, employees of car repair stations and workshops involved in the repair of household appliances and electronic equipment.
An electric engraver, on which a flexible drive is installed, is especially relevant in situations where processing must be performed in hard-to-reach areas of the product. Using replaceable attachments, such equipment can be used in all stages of processing, from roughing to finishing.
Flexible engraver shaft with protective springs at the ends that protect the rubber casing from damage
What operations are performed using an engraver with a flexible drive?
Special attachments help turn an engraver with a flexible shaft installed on it into a truly universal device, which include:
To ensure ease of operation with such a device equipped with a flexible drive shaft, you can purchase additional accessories - rubber grips on the handle, a power button lock, etc.
All kinds of holders are very useful, in which, in addition to the shaft and the engraver, you can attach various attachments
Engravers on which a flexible drive shaft is installed also include a drill used in dentistry, a manicure machine, equipment for processing natural stone and applying inscriptions and drawings to the surface of products made from it.
You can also use a flexible shaft for a drill or purchase a flexible shaft for a screwdriver. With this improvement to conventional power tools, a screwdriver attachment or drill can be successfully used to perform work even in the most difficult to reach places.
Operations performed using an engraver
If we talk about buying an assistant for delicate work, then you should choose a reliable tool that itself costs a decent amount, even if it comes with a limited number of attachments. Additional accessories can be purchased later:
- the use of grinding and polishing wheels helps to achieve a flawless smooth and shiny surface;
- brushes are used to remove rust from the material and grind seams that are difficult to reach with standard tools;
- an attachment in the form of a cutting wheel will allow you to obtain miniature pieces of workpieces and smooth out their torn edges;
- a set of thin drills is useful when forming the smallest holes;
- cutters will help to process hard-to-reach surfaces; abrasive devices are also used for this;
- A compact tool with the help of feather-shaped attachments will make it possible to easily perform openwork in miniature writing and make minor restoration repairs, allowing you to make elegant souvenirs.
To make operations easier, various additional items are sold:
- rubber pads will allow you to better hold the device during operations;
- so that you can pay more attention to the work, rather than holding the button in the working position, a mechanism for fixing the button is provided;
- a flexible shaft for the engraver will allow you to transfer torque to the nozzle;
- To make it easy and convenient to change attachments, the design has a spindle lock button.
The work of an engraver is akin to that of a jeweler, of course, not always requiring miniature precision. But the criterion for the quality of work has always been the use of high-quality and durable tools. An engraver belongs to one type of tool, the direction of activity changes with the use of different attachments. The category of engravers includes both a drill in a dental office and a manicure machine in a hairdresser. Engravers of inscriptions and drawings on the surface of natural granite and marble also use this compact and affordable device to create monuments and crafts.
How does the engraver work and how does it work?
The engraver, which allows you to process parts with high precision and productivity, works on the principle of a conventional drill, and in appearance it is very similar to a large automatic pen. The main structural elements of such a device are:
Rotation from the engine is transmitted to the axis of the flexible shaft, the reverse side of which is connected to the working nozzle. The mounting locations of the nozzles are unified, so there are no problems with choosing the required tool and replacing it.
Equipment selection criteria
When choosing an engraver, you should focus on a number of characteristics.
Based on the power level of the device, on which its performance directly depends, one can indirectly judge the operating life of the drive motor. The power of the engraver, which for serial models can be in the range of 35–300 W, should be selected based on the tasks for which it is planned to use such equipment. In addition, you need to consider how long it will work between turning on and off. The duration of the operating process depends on the hardness of the material from which the product being processed is made. The longer the engraver is used at one time, the more power it should have.
Low-power compact engraver is convenient for simple work without a flexible drive
The speed at which the motor shaft and the flexible drive shaft attached to it rotate is also selected depending on the hardness of the materials to be processed by the engraver. Models offered on the modern market can provide tool rotation speeds in the range of 10–35 thousand rpm. Low-speed models can be purchased if they will be used primarily for finishing grinding and polishing. When performing such operations, a small load is placed on the tool, so the engraver itself does not overheat, and therefore does not fail.
If you need a more universal device with a flexible shaft, it is better to give preference to engravers that provide the ability to adjust the rotation speed of the tool.
The speed controller significantly increases the functionality of the engraver
The weight and dimensions of the engraver influence how convenient and easy it will be to manipulate such a device during processing with its help. Engravers that have significant dimensions and weight are much more difficult to work with, but such devices, as a rule, have higher power and productivity. The weight of an engraver with a flexible drive shaft can be in the range of 0.5–8.5 kg. When choosing such a device, first of all take into account the required power and functionality, and only then pay attention to the weight and dimensions.
Since an engraver works by constantly holding such a device in his hands, its ergonomics, which characterizes the ease of working with the equipment, is an important factor when choosing. When assessing the ergonomics of a device, you should pay attention not only to its design, but also to the build quality, manufacturing materials, button placement and comfortable handle design.
Before purchasing a tool, you should hold the engraver in your hands and try out the buttons and latches.
These parameters are not indicated in the equipment passport. It is advisable to pay attention to them if the engraver will be used quite often. To evaluate how much noise and vibration the device makes during operation, you just need to turn it on and evaluate these parameters. As a rule, medium-power engravers make more noise, and in more high-speed equipment this problem is provided for by the manufacturers and is eliminated by including special elements in the design. You can only estimate how hot an engraver equipped with a flexible drive shaft gets during operation.
Rules for working with an engraver equipped with a flexible shaft
There are a number of rules that should be followed when using a flexible shaft engraver to process various materials.
What to do before you start
Before starting work, select nozzles. All of them should be at hand, so as not to waste time searching for them later. While the device is turned off, it is better to hang it on a special hook, which comes complete with most modern models.
You can prevent the chips formed during processing from sticking to the surface of the tool if you first coat it with a layer of paraffin. It should be kept in mind: if the design of the tool does not provide for forced ventilation, you can work with it for no more than 15–25 minutes, and then you need to give it time to cool naturally. By doing this, you will protect your engraver from premature failure.
When holding the engraver with your hands, you should try not to cover the ventilation slots with your palms
Changing mode
It is necessary to change the speed at which the tool of an engraver equipped with a flexible shaft rotates both when changing the operations being performed and when switching to processing another material. At low speeds, softer materials, such as plastic, are processed. If such materials are processed at high speeds, this can lead to intense heating of the tool and melting of the edges of the workpiece. At medium speeds they process metal products, at high speeds – from hard natural stone.
How to properly care for your engraver
Like any other technical device, an engraver equipped with a flexible drive shaft requires appropriate care. If performed correctly and regularly, such maintenance will not only allow you to use the device at its maximum capacity, but will also significantly extend its trouble-free operation.
During the processing performed with the help of an engraver, its fan blades are actively clogged with dust and small particles of waste material. For this type of fan to work effectively, it must be cleaned regularly using a soft cloth soaked in soapy water. Under no circumstances should you use various solvents and aggressive detergents for these purposes, which can lead to premature damage to the fan blades.
To clean and lubricate the insides, the tool must be disassembled. This infrequent procedure requires certain repair skills
The technical condition of the attachments used with the engraver must also be checked regularly. Worn attachments should be immediately replaced with new ones, as they can cause increased vibration of the device, which will ultimately lead to its premature failure.
It is very important to pay constant attention to the technical condition of the flexible drive shaft of the engraver. The protective shell of the shaft, which is made of polymer materials, should not have serious mechanical damage that could lead to premature failure of the shaft. After each use of the engraver, it is advisable to clean its flexible drive shaft from dust and other contaminants, wipe and, if necessary, lubricate the tips with which it is connected to the electric motor and the working attachment.
After each use of the engraver, it is advisable to clean its flexible drive shaft from dust and other contaminants, wipe and, if necessary, lubricate the tips with which it is connected to the electric motor and the working attachment.
Liquid oil is used to lubricate the internal cable.
During operation, care must be taken to ensure that the flexible shaft does not bend too much. Both during storage and during operation, it is necessary to protect the flexible shaft from mechanical damage.
Flexible shaft design
A flexible shaft for an engraver or any other equipment whose torsional rigidity has higher requirements than bending rigidity, as mentioned above, is used to transmit torque to elements that change their spatial position during operation.
The main part of the flexible shaft, which is responsible for the main function of such a device, can be a wire rod or a special cable. This element is made of materials with high torsional rigidity. Additional layers of twisted wire are wound onto the main core of the flexible wire shaft to give it higher rigidity. To ensure safe use of the flexible drive shaft, as well as to protect its surface from damage and retain lubricant on it, this device is placed in a flexible protective shell, which is stationary in relation to the rotating core.
This flexible shaft is equipped with a bit holder on one side and a union nut on the other to secure it to the engraver.
Depending on the design, flexible shafts can be of right or left rotation, which should be taken into account when selecting and using them. Not only the design of flexible shafts can be different, but also their length, sometimes reaching five meters.
The design of the fastener for such a device also depends on where the flexible shaft is installed - on a drill, engraver or screwdriver. Thus, fastening nuts or other types of fastening fittings can be placed at the ends of the shaft.
The tip of this shaft can be removed for cleaning and lubrication, for which there is a hole on the side
Various mechanisms and equipment are driven by flexible shafts of different designs. In addition to engravers, drills and screwdrivers, internal vibrators, brush cutters and many other types of technical devices are equipped with such shafts. The simplest and most familiar option for using a flexible shaft is to clear sewer pipes from internal blockages.
Mechanical car speedometers are also driven by a flexible shaft. Making a flexible shaft with your own hands is, of course, possible, but given the loads under which such a device operates, it is better not to experiment and purchase serial products from trusted manufacturers. You can only be puzzled by the issue of making a flexible shaft yourself if it will be used to drive low-power equipment operating at low speeds.
Flexible shaft device
The multi-filament alloy steel cable is housed in a flexible casing. Wire shafts have several layers of braiding with alternating directions clockwise and counterclockwise - armor. On one side of the device there is a shank, such as on a tool. The second ends with a cartridge. Under the shell there is a lubricant that reduces friction and prevents corrosion and moisture ingress. For the body, hoses are chosen from plastic and nylon, and special ones are created - from conical bushings and spirally twisted tapes.
The cable is secured in the housing through bearings or bushings at the ends, allowing it to rotate freely. Torque is transmitted to the shank and through the wire to the attached tool. The immobility of the outer shell of the flexible shaft is ensured by its fastening to the housing parts.
The handle on the shaft, installed on the side of the free end, makes work convenient. In expensive models, there is a button on it that prevents it from turning when replacing a tool. You can choose any flexible shaft in the store. The price for high-quality attachments starts from 2,000 rubles.