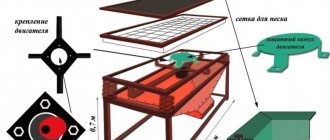
Plastic bottles are used as containers for a huge number of drinks, after which they are used as garbage. Europe has long been engaged in industrial plastic processing, but in Russia this is not yet such a popular business. But the mechanism of making tiles from plastic bottles in mini-factories and even at home is being actively mastered.
It is quite easy to make homemade tiles from a plastic bottle for personal use. This does not require the purchase of expensive equipment. Raw materials are cheap and available in abundance.
Decor for the garden - photos of ready-made examples
Armed with imagination, in addition to interesting plastic garden paths, you can make a good fence for the site.
If you buy glue and fasten the lids together in the shape of a circle, you will get an unusual table for tea drinking.
Thematic material:
Photo: cork table
Mosaic lovers can be patient and try to create a whole picture that will delight the eyes of others for many years.
Photo: mosaic of lids
A simpler, but no less interesting option is to use whole bottles, turned upside down, as a fence for a flower bed.
Photo: flowerbed border
By choosing corks according to color and shape, you can create wall compositions. They will become an interesting decoration for a fence, walls of outbuildings, gazebos, bathhouses, and houses.
Photo: other crafts
This is how you get original decorative elements from unnecessary things, which are easy to make yourself. And if you invite children to help, landscaping the site will turn into an exciting creative process for the whole family.
Recommendations
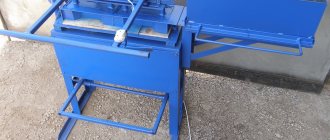
The production of plastic tiles is not complete without melting molds. They can be made of rubber, fiberglass or plastic.
Rubber type molds are rarely used because... they are massive, expensive and have a short service life. Fiberglass is best suited for the production of large-sized products. In this case, a special lubricant is applied to the mold, which prevents the frozen raw materials from sticking to the structure.
Most often, molds made of special heat-resistant plastic are used to produce this coating. In some cases, combined technologies are used.
During the production of the material, defects may appear in the form of scraps of different shapes. They must be crushed again in a crusher and used as raw materials for the manufacture of new products.
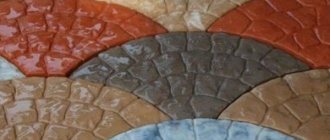
The humidity of sand during production should be about 10%. If you do not add dye to the product, it will turn out dirty gray. Such paving stones will fit perfectly into the design of the garden plot.
When making tiles from plastic waste at home, the melting molds must be lubricated each time with a special preparation that will prevent the solution from sticking to their walls. You can purchase such a mixture on the Internet or a building supplies store.
Covering with lids or bottoms
Such coatings are made using the same technology: the cut-off bottom with figured ribs or the lid must be sunk into sand or concrete mortar so that a small part appears above the base.
To perform such work, you need to dig a trench, as described above, and place a cushion of ASG or sand on the bottom. The thickness of the layer under the concrete base is 10 cm. If the base is made of sand, then you just need to fill the trench to the top, compact the sand and add more as needed, leveling the path with the ground surface. For a concrete base, formwork should be installed on a sand bed, the edges of which will be raised above the soil by 5-7 cm.
Since the lids or bottoms need to be immersed in the base material, which takes time, it is better to prepare the concrete solution in small portions and fill individual sections of the path. Each part must be made of such a size that you can install all the plastic elements before the concrete sets. It takes a lot of time to create a mosaic pattern from colored parts. Rice. 3. All this must be taken into account when choosing the size of a fragment of a path with a concrete base.
On any basis, installation of plastic elements is carried out according to the following scheme:
- 1In accordance with the chosen pattern, place the bottoms, cut at a height of 10 cm, or bottle caps on the prepared base.
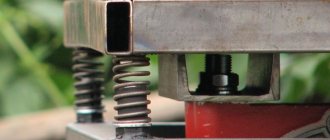
- 2Press a plastic piece into the solution or sand. The bottoms are a little more difficult to press in than the lids, so you can use a rubber mallet to immerse them in the base material and level the mosaic surface. With light blows on the bottom it can be very accurately adjusted to those already installed.
- 3 Using a broom or brush, sweep away any crumbs of sand or mortar that accidentally fall on the surface of the plastic.
3afce5cb41fb1c03c79b4102bb5c2160.jpe
Concrete takes about 10 days to completely harden, and a sandy path paved with lids or bottoms can be used immediately.
When paving paths with a mosaic of colored parts, you need to be extremely careful and follow the chosen pattern. Lids or bottoms can be of different sizes. Gaps between larger parts can be filled with smaller ones. The combination of plastic with fragments of tiles or glass elements also looks very good.
Important nuances and measures to prevent errors
The quality of work is affected by the shape and size of the tiles. If you have to make frames around objects already located on the ground or the paths are winding, small paving stones will do, but using large tiles will result in too much waste.
Ideally, you should choose a material that contains elements to create curves. For a platform under a car, the paving stones must be wide and thick (at least 6 cm), then the wheels will not push through the coating. The thickness of the sand cushion is made at least 30 cm.
Since the technology of laying paving slabs on sand involves the use of water as one of the sealing agents, it is better to carry out work only in the warm or hot season, when wetted building materials dry quickly. When it rains, work is stopped because it disrupts production technology.
How to lay paving slabs on sand, watch this video:
https://youtube.com/watch?v=fNX6aJT3LeE
Let's get down to business
By making garden paths from plastic bottles, you will improve the garden and divide it into cozy zones.
How to make a garden path using whole bottles
- We dig a shallow trench along the length of the future path;
- we put up the formwork;
- we lay broken bricks or other similar waste;
- cover with earth;
- we ram;
- we arrange a sand cushion;
- ramming again;
- pour sand into bottles;
- compact the contents;
- Place the bottles horizontally on the prepared base with their necks towards the edges;
- We place the board on top and press it, pressing the bottles evenly;
- pour sand mixed with cement in between;
- put the board on again and tamp it well, and to do this we just walk on these boards;
- remove excess filler;
- pour water;
- When the cement hardens, remove the formwork.
Nothing complicated, right? And to make the path pleasing to the eye and look more aesthetically pleasing, you need to try harder:
- If you have a lot of yogurt bottles, then they themselves are beautiful and elegant. We arrange them as they are;
- Transparent water bottles filled with sand, frankly, don’t look very good, so:
- In an empty bottle we place colored paper or foil, basically whatever you can think of, and then sand. In this case, before putting it into the bottle, roll it into a tube - it will straighten out and lie on the walls, but you can also mix sand with pieces of elegant candy wrappers or add dye and then the sand will be colored. In other words: do everything your imagination allows;
- when you remove the formwork, you will see that the necks of the lids along the edges of the path look somehow inharmonious. And make a border: from the same bottles or bricks, or a floral one - just choose flowers such that their lashes do not lie on the path, otherwise they may completely cover it.
You can put this figurine at the curb, the material for which is also, if not exactly plastic bottles, then their caps:
Useful: want to get a snow-white carpet? Pour chalk into the bottle.
Paths made from bottoms
We proceed in the following sequence:
- We take scissors and cut off these very bottoms, leaving 1/5 of the height of the bottle;
- just as in the first case, we make a trench, compact the earth, pour sand;
- Water the trench well. The sand should be completely wet;
- We press the bottoms into the sand.
Keep in mind: do not throw away what is left after cutting off the bottoms, but set it aside. In the spring, the leftovers from the bottle will make excellent greenhouses:
Decorative garden paths
In addition to the fact that a plastic bottle is a cheap material, it is also waste-free. We have already looked at how to make a garden path using different parts of its body; all that remains is the plugs. This work is so exciting and creative that it will not leave any family member indifferent. The plugs can be placed:
- creating an even coating;
- ribs up, then you will no longer have a path, but just a mat for massaging your bare feet.
The only problem can be that you will need a lot of traffic jams, so announce to all your friends and acquaintances that from now on the traffic jams will not be thrown away, but will be collected and delivered to you. By joint efforts, it is quite possible to accumulate material for such a track. To prevent the lids from popping out over time, we will change the installation technology a little:
- we will make a trench, but not a continuous one, but divided into rectangles;
- drive in supports;
- we make formwork from boards, attaching them to supports;
- We place spacers along the edges to increase the strength of the formwork. Distance 100 cm;
- we place crushed stone there;
- compact;
- we sort corks based on color and size;
- We prepare the mixture in the ratio: 1:3 - sand and cement, glue used to glue ceramic tiles - 1 part;
- Add water gradually, stirring afterwards. Everything should be fairly wet, but in no case liquid;
- alternately add a mixture of sand, cement and glue to each rectangle;
- quickly lay the lids, pressing them into the solution, until the cement sets;
- if the path consists of stripes, then when making a turn, we unfold the stripes diagonally.
It is permissible, when paving garden paths, to lay the covers not on cement, but on wet sand, but then the strength characteristics will be worse.
Important: when making formwork, nails must be driven in so that the heads are inside, and not the sharp part. The lids can be used to lay out intricate patterns:
The lids can be used to lay out intricate patterns:
- using cross stitch patterns;
- pictures that come with the children's mosaic;
- lay out in disorder whatever comes to hand;
- use your own imagination.
Pouring technology
In order to properly pour concrete paths in a dacha or suburban area, you need a flat area, preferably concrete or asphalt (without large differences, bulges, recesses and cracks). If there is no such thing, then any open area on which sheet iron is laid under the forms will do. Because the main requirement for tiles is smooth planes.
Mixing concrete solution
The recipe for concrete mixture for garden paths is classic:
- one volume of cement grade M400;
- two volumes of sand;
- four volumes of crushed stone or fine gravel (up to 5 mm) - not always used.
As for the amount of water, in the classic recipe it is equal to 0.5 of the volume of cement being laid. If a concrete mixer is used for mixing, then all indicated proportions are strictly observed. If the mixing is done in a trough with shovels, then more water can be taken to facilitate and increase the convenience of mixing the components of the concrete solution.
If a concrete mixer is used, then cement is first placed in its drum and water is poured. The main thing is that all the cement particles are well wetted. After which sand and crushed stone are laid in portions.
If the kneading is carried out in a trough, then all the dry ingredients are mixed well with each other. And then water is poured into the mixture. And the solution is thoroughly mixed.
Mixing concrete in a troughSource manesu.com
Pouring concrete into molds
Concrete tiles for paths are a product that is subject to reinforcement. The reinforced frame is a lattice assembled from metal rods with a diameter of 4-5 mm. Typically, steel rod is used for this. The grille elements are fastened together by electric welding or binding wire. You can use a ready-made steel mesh with cells of 20x20 or 25x25 mm as a reinforcing frame.
The production of concrete tiles begins with pouring concrete mortar to half the height of the formwork. The laid solution must be compacted. It is ideal if a vibrating table is used during the manufacturing process. But if there is none, then they pierce the laid mixture with a trowel in order to remove from it the air that gets into the concrete during its mixing. Air pores and cavities reduce the strength of the concrete product.
Then a reinforcing frame is laid on top. Its dimensions are slightly smaller than the internal space of the formwork. And concrete mortar is poured from above to the edges of the form. The poured mixture is pierced, and then the surface is leveled along the edges, removing excess material. The surface of the tile is smoothed with a trowel, achieving maximum smoothness.
Pouring the solution into moldsSource sewerge.ru
If the task is to decorate the finished product, then it is at this stage that the upper surface of the slabs is finished. For example, pebbles, pieces of ceramic tiles, and other materials are placed on top. If you need to make tiles of any color, then pigment is added to the concrete solution itself. The latter is poured into the concrete mixer drum during the process of adding fillers.
Chamomile from bottles
Instructions on how to make crafts from plastic bottles for the garden.
For this craft you will need 2 plastic bottles of brown, white and 2 green colors. You also need acrylic paints, a sharp nail and wire.
ce02af9672cb1c864da0e5f1fc9ade10.jpe 701c4fe58f57334b6bd48059675cc880.jpe
The neck with the cork is cut off from a brown bottle to a length of 3 cm. Then it is cut into thin longitudinal strips. These will be the stamens. A hole is made in the middle of the cork with a sharp nail. The bottom of the white bottle is cut off, 3 cm from the edge.
Then the edges of the bottle are divided into equal 5 parts according to the number of petals. Oblong petals are cut out of five parts. The neck of a white bottle with chopped white petals is carefully cut off, not cutting 3.5 cm to the petals.
Finally, chopped white petals are inserted into the brown bottle between the cork and the stamens.
A thin strip is cut into a spiral from a green bottle and tightly wrapped around a thin wire. The beginning of the strip is secured to the end of the wire with a heat gun.
The wire is inserted into the hole in the cork and secured. You will get a white chamomile. The wire can be stuck into a piece of foam. You can cut out leaves from another green bottle and fasten them to the stem with a stapler or glue.
Also, petals can be cut from 2 bottles in the same way, so that there are more petals and the flowers are more magnificent. You can burn the edges of the petals on a candle so that they are wavy
You will have to be careful when bringing it to the fire so that the edges do not burn. Clean the soot.
Advantages and disadvantages of such tracks
Plastic and glass materials have a number of advantages and disadvantages.
- The advantages of using plastic containers and lids are:
- durability;
- moisture resistance;
- availability;
- immunity to rotting;
- the ability to choose a variety of background colors;
- cheapness.
- Disadvantages of using plastic:
- deformation due to temperature changes;
- slips during rain or frost; subject to deformation under load;
- a large quantity is required for construction (relevant for lids).
Did you know? When purchasing mineral water in plastic containers, 90% of the price is the bottle itself, and the cost of the water accounts for the remaining 10%.
- Glass has its positive qualities:
- availability of material (can always be found);
- cheapness;
- environmental cleanliness;
- decorativeness;
- durability.
- The disadvantage of using glass containers is:
- its fragility;
- may break and cause injury to a person;
- heats up quickly in the sun;
- gets dirty easily.
Creating a pedestrian zone from glass or plastic containers is painstaking and slow work. But, having completed it, you can show off to your neighbors a decorative path made of inexpensive material.
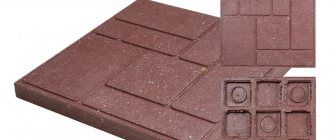
Existing types
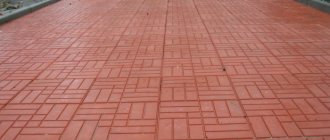
Paving slabs 500x500x50 mm and 500x500x40 mm are divided by type of production. There are two types. The first is vibro-pressed tiles, and the second is vibro-cast tiles. The material is produced using a special mold for paving slabs, into which the solution is poured and left until it hardens.
Inexpensive, practical material is used to cover areas in the city. For example: paving slabs 500x500x50 gray, or paving slabs 50x50. The undoubted advantages are durability, beautiful appearance and ease of installation.
It is possible to provide additional protection for tracks from strong mechanical loads. To do this, reinforce it with fiberglass or a metal frame. Reinforced paving tiles 500x500x50 have an order of magnitude superior wear resistance to others.
Plate 500x500x40
How to do
Corks can be laid in different ways:
- face up (resulting in a flat surface);
- ribs up (this path can be used instead of a massager);
- the inside side up (the coating is textured).
In the photo - do-it-yourself paths made from plastic bottle caps:
The latter option is only suitable for small areas under a canopy. Otherwise, during rainfall, water and dirt will accumulate in the recesses of the plugs. And such an uneven surface is difficult to care for.
Mosaic laying scheme
This is the most creative part of the job. Before you start paving, you need to decide exactly what your path should look like. You can lay out the lids in even rows, regardless of color. The result is a colorful scattering of colored highlights in your garden. This path attracts the eye and looks impressive.
But if you want something more extraordinary, choose a pattern for your path yourself. Cross stitch patterns will help you with this. Paths with colored geometric patterns look good. If you are confident in your abilities, you can choose more difficult drawings. Some summer residents create real story panels under their feet in their garden. It is at the dacha that such decorations are popular.
Experiment with color. Involve children in this work. During a fun game, you can come up with your own design for the path.
Tools and materials
Despite the cheapness of the material, the approach to creating tracks from corks must be serious. Sometimes it is advised to simply level the ground before laying cork mosaics and start creating by sticking the caps directly into the ground or a layer of sand.
This type of carpet will not last long. Not only will the lids not last long and will begin to fly out one after another, but also the grass will hasten to grow between them. It’s better to spend more time, but do everything well.
- lids of different colors;
- cement;
- sand;
- construction or ceramic tile adhesive;
- wooden blocks and boards for formwork.
Any path must have a base. Be it a path paved with paving stones, wood or plastic covers. First, the site is prepared. To build a path you need:
- determine the area of the path and make markings;
- remove turf and topsoil;
- dig a trench 10 cm deep;
- drive supports along the edge of the recess;
- make wooden formwork, and the nails need to be driven in from the inside of the structure;
- install spacers for reliability (the optimal distance between them is 1 m);
- fill in a layer of crushed stone, gravel, broken brick;
- prepare a solution of cement and sand (4:1) and add one part of glue to it, the mass should be of medium consistency;
- pour a small amount of solution onto the prepared area;
- quickly lay the covers according to the chosen pattern, lightly press them into the cement;
- the solution should almost completely cover the lids;
- After the cement has hardened, walk over the top layer with a stiff brush to remove excess cement.
The mortar hardens quickly, especially in hot weather, and laying the mosaic takes a long time. Do not fill the entire path with cement. Work by sector. Break your drawing into parts or conditional squares and fill in small areas.
on: DIY paths in your garden
Advantages
- The coating performs an aesthetic function without sacrificing a practical one.
- The material does not require material investments.
- Plastic tolerates temperature changes well.
- Such paths do not lose their aesthetic appearance for quite a long time.
- Paths made from unusual mosaics are easy to repair: any cover can always be replaced.
- The lids do not need to be painted. They contain a durable dye that will survive the winter without any problems.
Disadvantages and methods to combat them
But such paths are not ideal; they have serious drawbacks. But knowing in advance what difficulties may arise with them, you can easily avoid them.
- Plastic paths made from lids become very slippery after rain. Such coverings should not be installed on central paths. Their place is in the garden and near recreation areas.
- An icy path becomes dangerous. If you need to walk on it in winter, it is better to combine a mosaic of plastic covers with designs made of cement, ceramics or wood.
Here you can see the laying of sand paving slabs.
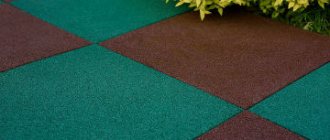
Laying modular tiles
Modular polymer tiles are presented in the form of a product with a perforated surface, which ensures the absorption of excess moisture and dust through the structure of the material. The connection of individual fragments of such a plastic track occurs by fastening special locks along the edges of the ribs. Even a schoolchild can assemble this type of coating. After all, it is reminiscent of a child's game with a puzzle.
Modular plastic tiles
It is recommended to lay the coating on a flat surface with a height difference of no more than 5 mm. If the installation is on the lawn, there will be no difficulties at all. Even preliminary preparation of the surface is not necessary, since it was leveled before planting the grass.
Laying modular tiles on the lawn
If you plan to build paths in a local area or in a garden, lay non-woven material before installing plastic fragments. This will eliminate the possibility of weeds pushing through the tile cavity.
Modular tiles in the design of the landscape of the local areaIf there is an old ceramic coating on the site, and you want to install a plastic path on top of it, it is worth bringing it back to normal condition. To do this, eliminate surface defects with cement-sand mortar. And then lay the plastic material.
average rating
more than 0 ratings
Share link
Do-it-yourself pebble garden path step by step
One of the most creative and perhaps painstaking ways to make your own stone garden path is to line it with river pebbles. This material is available to almost everyone - the shore of any body of water is strewn with pebbles of various sizes and colors. Such a path will become a real decoration of any site and will cause admiration among all neighbors.
Making a pebble path with your own hands is quite simple, but painstaking. Before you begin the process itself, you need to use your imagination a little and prepare a drawing of the path. And depending on your design, you need to select pebbles - they can be of different colors and sizes, combined in an ornate pattern or a strict geometric pattern. To create such a masterpiece you will need the following materials:
- pebbles
- plywood
- fine river sand
- cement (M300)
- level
- hard brush
- gravel chips
Before starting work on the marked area for the path, you need to dig a trench. Then pour a mixture of cement, sand and gravel chips onto the bottom, and you can lay out pebbles according to your design.
At the end of the work, you need to pour a mixture of cement and sand into the gaps between the stones and pour it from a hose for compaction. It is better to cover the composition with plastic wrap for a day.
Important: the resulting path will take several weeks to dry, so it is better not to walk on it during this time so that the result has time to take hold.
Photo source stroiremdoma.ru
Common types
Tiles with holes for vegetation can come in different colors and shapes. The shapes of these products are as follows:
- Honeycomb-shaped. Such tiles can withstand pressure up to 20,000 kg/m², so they are excellent for arranging bicycle paths, parking lots, playgrounds and other places of intensive use.
- Square. These products are extremely durable and can even withstand trucks. Most often, such tiles are laid in areas with active traffic.
- Individual. This material can have very different shapes. It all depends on the preferences of the customer and the capabilities of the manufacturer. However, custom-made products may have low strength. Such lattice paving stones are used to improve local areas or pedestrian paths.
Manufacturers offer the following ready-made color solutions:
- blue;
- green;
- yellow;
- brown;
- red;
- grey.
PET bottles for decorating a summer cottage
Due to their properties, plastic containers have long been successfully used by our summer residents to create garden decor. Next, let's look at several examples of the successful use of plastic bottles of various sizes in garden decoration.
Fencing beds and flower beds
The simplest design of a fence made from plastic containers is a palisade. In order to make a continuous fence of such a design, you will need a mass of bottles of the same volume and shape, filled with earth (sand, clay)
Now the small matter is small: we assemble the structure. We dig each container into the ground halfway, creating a “bottle picket fence.” After construction. You can leave it as is, or you can paint the resulting border in any color of the rainbow.
c3b22d457dd72185e3aede4d131ec94d.jpe
You can take a simpler route: do not dig in the elements of the palisade, but fasten them together with tape.
The structure is simply placed on the grass, outlining the boundaries of a flower bed or bed.
garden path
To create a garden path you will need bottoms from PET bottles with a capacity of 2 liters.
- the soil is leveled.
- covered with a layer of wet sand, layer thickness 70-100 mm.
The bottoms are laid out on the future path and carefully driven into the sand until completely filled. The joints between the bottoms are filled with dry sand, and for better fixation - with sand-cement mortar.
Flowers from PET bottles
You can simply decorate your summer cottage using “plantings” of plastic flowers.
Making such a composition is extremely simple: you just need to awaken your imagination, pick up a knife, several plastic bottles and a coil of thick wire.
From the tapering part of the bottle you can create beautiful flowers, which will be used to create bouquets and decorate crafts for the home and garden.
We cut the neck lengthwise, forming six petals. We round each one with scissors. We melt the edges of the petals over an open flame to give them volume. The inner part of the flower can be cut out of plastic of a different color. We glue (sew together) the structure using polymer glue or thin wire.
Animal figurines for garden decoration
The Internet is replete with photographs of funny animals made from plastic bottles. If you decide to decorate your garden with funny little animals from PET containers, then the easiest option is funny pigs and bunnies.
The bunny is made simply:
- in the tapering part two cuts are made for the “ears”;
- The ears themselves are cut from a plastic bottle.
The structure is assembled using glue.
On this topic:
BACK
FORWARD
1 of 40
Pigs are made similarly, but only horizontally. The main thing is to color your creation correctly and make it recognizable.
Components of the material
For the production of PVC paving stones, not only plastic bottles, but also other polymers can be used. In addition, you will need dye and sand. Ordinary containers are suitable as raw materials, which do not even need to be cleaned of food residues and stickers. Excess components burn themselves during processing. In this case, the raw materials do not need to be sorted.
Plastic tile makers can also use parts from plastic canisters, boxes, film and bags. Moreover, it is recommended to use polyethylene parts in order to add shine to the finished product.
Soft types of polymers can increase the plasticity of finished tile products. If they are not added during production, the product becomes more fragile. Manufacturers adhere to the following proportions:
- solid polymer compounds - 60%;
- soft plastic - 40%.
Taking these proportions into account allows you to achieve the optimal degree of rigidity of the paving stones. Using this technology makes it possible to fully utilize plastic waste. It is prohibited to add rubber, fluoroplastic and polycarbonate to the tile composition, because these components disrupt the homogeneity of the material.
The sand that is used to make polymer paving stones is thoroughly cleaned of excess inclusions. In this case, the manufacturing time of the product depends on the dryness of the sand component. The quality of the product depends on the uniform mixing of plastic and sand. The ingredients are taken in the following proportions:
- coloring matter - 1%;
- polymer elements - 9%;
- sand - at least 90%.
High-quality polymer paving stones are produced with the addition of inorganic dyes.
Lids are also used
A more interesting version of a country path if you use bottle caps.
Call the children to create such a path. Making mosaics will lift their spirits. But first you need to prepare your workplace.
Lay out the future path. If desired, install formwork and thoroughly compact the soil in the selected area, first placing construction waste there.
We lay out all the plugs.
Place the boards on top and compact them so that the lids are on the same level.
For a pleasant look, you can also fill the gaps with sand and walk again with a board, then with a brush to remove unnecessary soil on the finished country path.
A path made of traffic jams will look more elegant if you lay it out like a mosaic, in the form of a beautiful pattern.
A path of inverted lids will be a pleasant foot massage.
The principle of creating a path is similar, only at the end of the work there is no need to fill it with construction mixture.
This path is not intended for constant walking, only for medicinal and decorative purposes.
Vertical method of making a border
When looking at a photograph of a flower bed made of bottles made using the vertical method, everyone mistakenly believes that it is complex, but it is not.
The vertical method is simpler than the horizontal one. You will need plastic bottles of absolutely any capacity.
c11edd7d4ec829a6cff194cca84e509e.jpe
6037b377d72f49c72964a7ebb1d030ce.jpe d4ab21d19073106d529ca85316adb6f0.jpe
It is preferable not to take bottles with soft plastic, but to opt for hard plastic. When filled, bottles made of hard plastic will hold their shape more steadily.
You need to bury it in a pre-dug trench of shallow depth. You will get a good, rather high fence. The only drawback is the weak stability of this design.