When constructing fences on a metal frame, a welding machine is usually used. It helps attach the elements to each other. But the equipment is not available to everyone, and not everyone knows how to use it. Many owners of country houses prefer not to build a fence without welding, but using various fasteners.
Wicket design without welding
Selecting a profiled sheet
When purchasing a profiled sheet, you need to pay attention to the markings and method of surface treatment. Profile flooring can be different in thickness, have different shapes and “wave” sizes. Taking into account the height of the “wave”, the rigidity of the structure is determined.
Profiled sheet options
Marking:
- “C” – wall corrugated sheeting. It has a small thickness and “wave” height. Used to construct barriers.
- “NS” is a universal profile. Used as roofing, construction of fences and gates.
- “N” – load-bearing corrugated sheeting. Used for the construction of hangars and for roofs of large premises. It is not advisable to choose to install a fence.
Execution options
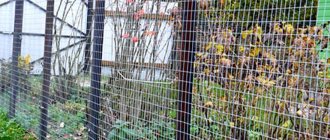
The operating conditions of the chain-link require a protective coating for the wire, otherwise the mesh fence will become covered with rust after several rains. Galvanized wire successfully resists metal corrosion in areas remote from sea coasts.
Chain-link fence at the dacha
High air humidity with a high salt content requires more serious protection of the entrance structure material, so homeowners in the coastal zone install chain-link fences coated with PVC.
Metal mesh, protected by a polymer coating of different colors, in addition to its high anti-corrosion properties, has decorative qualities. By choosing a chain-link with a protective PVC layer of a suitable color, the fence and gate harmoniously fit into the color scheme of the estate.
The photo shows the gate of a private house.
Mesh structure on site
General rules for welding hinges
In order for the installed hinges to work properly and last a long time, and for the gates not to sag under their own weight after time, all work should be done according to the rules and very carefully.
So, what should you focus on when welding:
- The evenness of the seam and its continuity. The weld should be as complete as possible, without gaps.
- Maximum welding depth. Ideally, it is necessary to weld the hinges with the entire plane that is adjacent to the surface of the post.
- The canopies should be welded very evenly so that there is no excessive pressure on them during operation and in a standing position.
- For heavy structures, it is necessary to supplement the hinge system with an additional pair, which is located slightly below the upper load-bearing hinge.
In general, there are no more rules, but these should be adhered to and taken with complete seriousness.
Wicket installation
You can make a gate yourself. Like the fence itself, constructed without welding, the gate is secured using mechanical fastening of the parts. For this purpose, the frame is first screwed on the reverse side. It is a rectangular profile measuring 40×20, which is mounted around the perimeter of the sheet.
In addition, the rigidity of the gate is increased by another crossbar. It is fixed inside the frame to opposite corners diagonally.
The gate is suspended using hinges; they are pre-fixed to the support. The gate leaf is attached to the hinges with bolts. The self-tapping screws for this may eventually become insufficiently reliable, and after a while the structure will begin to fail.
Preparing for construction. Calculation of the dimensions of the structure
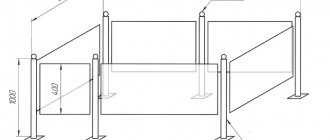
The dimensions of the gate must correspond to the height of the fence and the standard width of the entrance for the car. If the fence on the site reaches, for example, one and a half meters at the top point, then the height of our product should be the same for aesthetics. The standard size for vehicle entry is three meters. It turns out that the optimal dimensions of each sash are 1.5 m x 1.5 m.
We will use this example in further calculations. Before you start calculating the profile dimensions and the amount of materials, you need to make sure that there is a sufficient opening in the fence for the future structure. Next, you need to install racks for attaching the sashes of our product.
These verticals are made from wooden blocks with a profile of 50 mm x 50 mm or metal corners of 50 mm x 50 mm. They are attached to the fence or buried in the ground and concreted. When installing racks, strict verticality must be observed. The distance between them should be equal to the width of the gate plus the free space for the hinges. The latter is taken to be optimally 1 cm on each side.
In our example, the distance between the posts will be L = 1.5 m + 1.5 m + 0.01 m + 0.01 m = 3.02 m.
The upper and lower hinges are attached to each sash, departing from the corner by approximately 20 cm.
Choosing a professional pipe: which one is better?
Before selecting suitable workpieces, it is necessary to decide on the material of rectangular rolled products. The latter is produced using the following types of steel:
- carbon (regular),
- galvanized (coated for corrosion protection),
- stainless.
The last option is immediately eliminated, since the specified material is too expensive for any standard gate. If the budget is planned to be minimal, we choose carbon steel. When there are enough funds, it is better to use galvanization. In our example, ordinary steel will appear.
Profile pipes are also divided according to the method of their manufacture - they can be welded, hot- or cold-rolled, or seamless. The latter are also not taken into account due to their high cost. For gates, welded and at the same time cold-rolled ones (for furniture frames) are usually used, since hot-rolled ones have low accuracy.
As a result, we will use blanks from a rectangular profile pipe, welded and cold rolled, made of simple carbon steel.
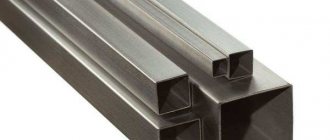
Example of square profile pipe blanks
A square gate profile is ideal because it is cheaper than an elongated rectangular one and is easier to work with. We choose the side size based on the following considerations.
The value must be greater than the average diameter of the self-tapping screws used (up to 5 mm), while no requirements are imposed on the strength of the workpiece. At the same time, an increase in size leads to excess weight of the structure. Therefore, it is enough to take a profile of 10 mm x 10 mm.
But the wall must have sufficient thickness for welding with electrodes. The minimum size suitable here is 1.5 mm. Result: for our example, we take a rolled piece of square section 10 mm x 10 mm x 1.5 mm.
Material calculation
Let us take for consideration the simplest gate design: squares with diagonals. That is, each leaf will look like a square with two diagonals crossed in the center. Let's calculate how much material is needed for such products. The perimeter of each rectangular gate element in our example is L = 1.5 m + 1.5 m + 1.5 m + 1.5 m = 6 m. After all, any side of the gate is 1.5 m.
Any diagonal of this gate element is the hypotenuse of a right triangle with legs of 1.5 m each. The length of the hypotenuse, according to the Pythagorean theorem, will be equal to the root of the following sum of squares of the legs: S = 1.52 + 1.52 = 2.25 + 2.25 = 4.5. When we take the root of the last number, we get the final result: approximately the diagonal is 2.12 m.
Product drawing with dimensions
We have two gate leaves. Each now has a calculated perimeter and two calculated diagonals. Therefore, we find the total length of the required blanks as the sum of the perimeter and diagonals, multiplied by two. Ltot = (6 m + 2.12 m + 2.12 m) x 2 = 10.24 m x 2 = 20.48 m. We accept with a margin Ltot = 21 m.
To strengthen the corners of the valves, you will also need gussets - small right-angled triangles made of sheet metal. They will be welded where the diagonals join the horizontal and vertical profile pipes. The sizes of the scarves are the same and standard: 10 cm is enough for each leg.
The material of these elements is ordinary sheet steel 2 mm thick. They can either be purchased as is or cut from a sheet. It is better and easier to buy such parts ready-made with suitable dimensions, because they will maintain perpendicularity at a right angle.
It remains to prepare four hinges. Simple garden mechanisms that open like a book are suitable, with an optimal height of at least 10 cm. The general list of materials will be as follows:
- profile pipe 10 mm x 10 mm x 1.5 mm with a total length of 21 m,
- scarves 10 cm x 10 cm - 8 pieces (according to the number of corners of the valves) 2 mm thick,
- hinges - 4 pieces.
It is worth thinking right away how the closed gate will be secured - with a padlock or a simple deadbolt. Depending on this, you also need to purchase the appropriate parts.
If you plan to use a padlock, then buy two simple lugs and the locking mechanism itself with keys. The lugs can also be screwed on after installation of the gate using self-tapping screws. The same goes for the bolt - it can be easily attached after finishing the work using screws.
Required Tools
Let's first calculate the consumption of electrodes. According to standard standards, about 0.3 parts of one consumable will be used for 1 m of seam. The length of all seams is calculated as follows: to weld the scarf, you need to fill its two sides, that is, 20 cm. And there are 8 such parts. We get 1.6 m. We throw 40 cm over everything else. We get 2 meters of seam. This means that 0.6 electrodes are enough. Let's take 2 pieces so that we have enough.
To work you will need the following tools:
- welding machine,
- electrodes in the amount of 2 pieces,
- square,
- Bulgarian,
- file.
In this case, a grinder is needed to cut off rolled blanks, and a file is needed to remove burrs.
Installation of metal gate supports
The installation of supports for gates should be carried out more thoroughly than for a fence, the reason for this is the increased load experienced by the axles when closing and opening the doors. Therefore, it is necessary to install gate supports very thoroughly. Garage hinges are structurally optimal as canopies for metal swing gates; it is better that the diameter of the internal section is over 120 mm. For a gate of a simple design, four hinges are enough; for a more massive project, six canopies are needed. Metal plates 0.5 cm thick are welded to each loop thoroughly on both sides over the area of the entire contact contour.
Installation of gate supports
To make supporting posts for gate leaves, you need to take a square profile, from which you need to cut two identical pieces, which should be 15-30 cm shorter than the height of the leaves. Hinge plates are welded to the racks; both structures should be identical. After which it is necessary to fix the structures on the gate supports using fasteners, which must be clearly screwed horizontally and vertically. The work must be carried out in such a way as to make as small a gap as possible between the support pillar and the supporting post, preferably up to 3-5 mm. After fixing the support post, you need to cut the top piece of the profile to size, after which it needs to be installed on the upper ends of the posts. The structure is inspected to ensure that all components are in an even position, after which the entire structure must be “pointed” by welding.
Fixing the crossbars
If you do not plan to use a welding machine, then the most convenient method of attaching horizontal crossbars to vertical ones is with bolts. At the fastening points, holes of the required size are first made with a drill. The crossbars are placed so that their widest part touches the pillars.
Fixing
The crossbars are laid in several stages:
- Upper, lower at a distance of 20-30 cm from the upper, lower edge of the calculated position of the profiled sheet.
- Central - placed when the design requires it, only when the fence height is more than 2 m. It is located in the middle, perpendicular to the supports.
Mounting supports
To erect a fence, the height of which will be 2 m, on ordinary soil, you will first need to prepare pillars 3 m long. They are dug into the ground at a depth of 1 m. The work is carried out sequentially:
- Make markings, stretch the cord along the line of the future fence, securing it to the pegs installed in the corners of the turns.
- The points for installing supports are marked. Equal distances between them must be maintained.
- Dig holes up to 110-120 cm deep, lay a cushion of crushed stone. Its thickness is at least 10 cm, compact thoroughly.
- Place a post in each prepared hole, clearly checking the vertical. The stand should not give way; it should be additionally secured with supports, stones, etc.
- Mix a mixture of concrete, add a bucket of cement, 2.5 buckets of sand and 4 buckets of crushed stone, it is better if its size is 40 mm.
- Fill the supports in the holes at ground level.
After installing the support beams, 3 weeks should pass. During this time, the concrete mixture will have time to fully set and dry completely. Some self-taught craftsmen who do the work on their own do not pay attention to these timing recommendations and start work earlier, resulting in base distortions.
Material calculation
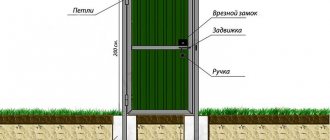
Typically, craftsmen recommend installing gates of standard sizes: 100 cm wide and 200 cm high. The exact height level is often selected arbitrarily, taking into account the height of the gate and the fence itself. In addition, there are different designs for the frame of the gate - the volume of material spent depends on this parameter.
For supports, it is better to choose metal profiles with a square cross-section of 60×60 mm, at least 2 m in length. Instead of profiles, you can install pipes with an equal diameter. An additional option is timber, but the tree has a high risk of rotting and needs repair work soon.
The approximate distance between the pillars is 3 m. The distance between the two pillars at the corners multiplied by the span length is the number of pillars required. The height of the pillar will be the height of the corrugated sheet and another 1 m margin for stability in the ground.
A metal profile is required for the crossbars, size 40×20 mm, 2 mm thick. It is ideal when the length of the profile is equal to the length of the span, but in reality this is a rare coincidence, so the excess size will need to be cut off.
Material calculation
When the height of the future structure exceeds 2 m, then 2 rows of crossbars are made. If more, you need an additional row for reliability and strength.
The corrugated sheets are 0.5 mm thick, the wave height is about 20 mm. This will help the fence to successfully withstand strong gusts of wind. The sheets are not placed end-to-end, but always overlapped into a wave.
Crab elements
Universal fasteners designed for connecting rectangular/square profile pipes. Each “crab” consists of several parts, which are bolted together during installation. The parts of the “crab” are made of 1.5 mm metal with a durable polymer or zinc coating.
Crab fastening for profile pipe
There are these types of crab elements:
- volumetric (designed to connect three pipes in the corners or four inside);
- T-shaped (designed to connect three pipes);
- X-shaped (designed to fix four pipes);
- L-shaped (designed to connect two profiles).
Types of fastening profile pipes with a crab system Home craftsmen use crab systems to assemble without welding:
- greenhouses, greenhouses;
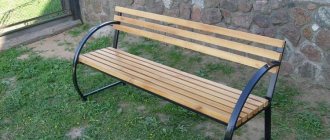
- racks, benches;
- Summer shower;
- pet cages, aviaries;
- gazebos, canopies;
- supports for climbing plants, lightweight fencing.
Such fasteners are used in greenhouses and hotbeds
On a note! Crab systems are also used for temporary connection of parts when repairing welded structures. In general, this is a fairly reliable connection method, hardly inferior to welding in strength.
pros
- long service life (up to 50 years);
- structures can be assembled/disassembled many times;
- affordable cost of crab elements;
- Even an unskilled worker can handle the assembly;
- versatility.
Minuses
- pipes larger than 40x40 mm cannot be connected;
- joints must be protected from corrosion, as moisture accumulates in them;
- pipes can only be connected at an angle of 90 degrees;
- if a large tensile load occurs, pipes may be pulled out of the crab elements;
- The nuts need to be tightened regularly.
How to make a gate with a wicket?
The process of assembling swing gates with a door is exactly the same. Simply, four elements are inserted into one of the leaves to form an opening for the door. Vertical ones are installed at full height, horizontal ones between them in the form of crossbars. The doorway structure is assembled at the stage of manufacturing the frame for the sash.
The door itself is manufactured in exactly the same way as the gate sections, with the assembly of the frame and installation of the metal sheet. The complexity of the manufacturing process of the leaf itself, in which the door is installed, lies in the fact that the doorway remains uncovered by a sheet of metal, and the remaining planes must be closed with it. All of them will not be equal to each other, so each section must be accurately measured, transferred the dimensions to the sheet and cut them out. After which, each cut piece is transferred to the frame with spot welding around the perimeter. In this case, the laid sections of sheets must be joined on additional profiles that create rigidity of the frame structure.
The size of the gate is selected taking into account the convenient passage through it, as well as the dimensions of the gate leaf. For example, if the leaf width is 1.5 m, then the width of the gate should not exceed 1 m. As for the height, the height of the gate and the location of the door itself relative to the lower elements of the gate frame are also taken into account. At the same time, the maximum height of the location is 40 cm. The height of the door itself is within 1.8-2.1 m.
Types of fencing
Before you make a gate with your own hands without welding, you need to consider all the advantages and disadvantages of the profile sheet. Main advantages:
- ease of installation;
- profitability (corrugated sheeting costs much less than wood or brick);
- attractive appearance (products are made in a different range of colors, so you can easily choose exactly what best complements the exterior of a country house);
- practicality (gates can be different in design and control methods);
- long service time.
Location on
Taking into account the opening method, the design can be:
- swing;
- recoil;
- lifting;
- sliding
The most popular are sliding and swing systems.
Retractable design
Swing design
This is a classic fencing method. In this case, there are sashes on two supports, which are then sheathed with corrugated sheets. The gate has a soft move due to the fact that there is a hinge with a bearing on the supports. The entrance door in these designs is most often placed separately, but sometimes the gate can be located on one of the leaves.
Fences can be closed and opened manually or automatically. An electric drive design is usually installed in industrial areas where there is constant movement of vehicles.
The main advantage of swing systems is their affordable cost and ease of installation. But to open the doors you need a certain space. This is the only drawback of such designs.
Sliding gates
It is much more convenient to install sliding systems. In this model, the doors do not open, but are retracted behind the fence. This prefabricated structure does not have guides in the opening. This makes it possible for cars of any height to drive freely. Also, unlike swing gates, in winter you will not need to regularly remove snow in order for the doors to open normally.
Typically, sliding gates are made with automatic control, since it is very difficult to roll back large doors.
Sliding gate diagram
The disadvantages include the following:
- assembly and fastening of the finished structure is much more expensive in contrast to the swing type;
- you need to additionally purchase special components;
- Before making a gate without welding with your own hands, you need to fill the foundation.
Selection of opening pattern
First, we will “tie” the gate to the fence - we will coordinate them according to their ability to withstand operational loads; the main one is wind. What's the point of fencing an elegant and solid structure if the very first storm turns it, along with a good piece of fence, into a crumpled “propeller”? The second thing to consider is the load from the gate itself on the fence. If it is excessive, it will not have an immediate effect, and it will be difficult to fix a rickety fence. Finally, it is necessary that the sash does not somehow give way to the car in the “fifth point”. And it is advisable to equip the gate with automatic equipment so as not to push, slipping, in the rain or snow.
Gates made of corrugated sheets are made swinging or sliding. The first ones are cheaper, simpler, put little stress on the fence, but can knock, it is very difficult to equip them with automation yourself, but a purchased one will be prohibitively expensive and will work under a heavy load, i.e. not particularly reliable. To do the latter yourself, you will have to try, you need a place to roll back the sash and a strong fence: with the sash weighing 250 kg (this is still light), short-term loads on it can exceed 2 tons.
Therefore, we will immediately decide on the installation location. Swing gates must be installed if any of the following conditions are not met:
- On both sides of the gate opening, the free space on the fence is less than 1.5 times the width of the opening plus 0.45 m for gate fittings. If it is, for example, 3.8 m (minimum car width), then there must be at least 6.15 m of completely free fence to any nearest corner post;
- All fence posts on both sides from the gate opening to the corners must be concreted to a depth of at least 1.2 m in the middle zone and at least 1.7 m in areas with severe winters;
- Gate pillars must be either brick with a walled-in stiffener bar made of 60x80x2 corrugated pipe, or welded from 4 of the same pipes (see figure).
Designs of gate posts For sliding gates, all three conditions must be met, and with some notes. It is better to make the opening no narrower than 4.2 m, so that the truck (you will have to bring something at some point) can enter the yard with some turning. As for the depth of concreting of pillars, it must exceed the depth of soil freezing in a given area by at least 0.6 m. The best way to determine the required concreting depth is to ask your gas workers at what depth they lay main pipes.
Pillars welded from corrugated steel pipes are cheaper and stronger than brick ones, but the places where the internal corners of the pipes meet must be welded at the top and bottom; welding location - in the center of the right pos. rice. This will increase the stiffness of the post by about a quarter. The upper end must be covered from precipitation with a lid made of any suitable material.
Final works
To ensure that a self-installed fence made from corrugated sheets has a finished look, a U-shaped strip is placed on the upper edge of the sheets. With it, the fence will be safer and prettier. Forged products installed on top of the fence increase its attractiveness and prevent intruders from climbing over the fence.
Plastic plugs are driven into the ends of the supports with light blows. To protect the pillars from moisture getting inside, decorative covers of various shapes and colors are also used. They are easy to choose in accordance with the design of the site.
A self-made metal fence will reliably protect the area from stray animals and uninvited guests. With the right color, it will fit perfectly into any landscape design, complementing or highlighting the decoration of the house. Manufacturers have mastered the production of profiled sheets with imitation of valuable wood species. You can do all the work yourself without involving specialists. All you need is desire and time.
Flanges
Such fasteners consist of a pair of rectangular or round metal plates with holes for bolts and pipes. The assembly algorithm looks like this:
- the ends of the pipes must be cut perpendicular to the axis;
- burrs should be removed and then the flanges should be put on;
- a rubber gasket is installed between them, and care must be taken that its outer edge extends evenly by 8-10 mm;
- at the end the flanges need to be fastened with bolts and nuts.
Flange for a square pipe To make the connection durable and reliable, you need to follow a few simple rules during assembly.
- There should be one gasket, no more, otherwise the tightness will decrease.
- The condition of the gasket should be checked every one to two years.
- It is better to tighten the nuts in diametrically located pairs - this will also increase the tightness.
- It is important that the gasket does not touch the bolts.
- If a water supply is being assembled, the gaskets should be made of cardboard, impregnated with drying oil.
- The thread of the bolt should not extend beyond the nut by more than ½ of its length.
- Asbestos cardboard is used to seal joints in heating systems.
There are a number of rules for connecting profile pipes with a flange
Couplings
This method of connecting straight sections without welding is used when high tightness is required on pipelines operating under pressure. Installation is carried out in the following sequence:
- The ends of the profile pipes are cut at an angle of 90⁰.
- Remove burrs, clean from dirt and corrosion.
- Mark the location of the coupling by applying it to the pipe so that the joint line is in the middle of its body. The position is marked with a felt-tip pen. The operation is repeated on another pipe.
- The ends are coated with silicone grease.
- The ends of the profile pipes are inserted inside the coupling so that the marks align with its edges. Once axially aligned, the joint is secured with coupling bolts.
Clamps
To connect pipes to fences, clamps with bolts are used, consisting of 2 halves. One part is installed on the ceiling/wall. The pipe is inserted, its position is fixed by the second half by tightening the bolts. This connection method is called a clip.
Clamp for connecting square pipes
If you choose the right dimensions, the elements are assembled without sagging. Using adjustable clamps, you can connect pipes of any cross-section. But it is important to remember that steel profiles must be connected with steel clamps, and polymer profiles with plastic elements.
Fastening the corrugated sheet
The sheets are secured with roofing screws or bolts. On crossbars and profiled sheets, you first need to drill holes of the selected diameter. Self-tapping screws can be screwed directly into the metal. To simplify the process, it is recommended to use a low-speed screwdriver.
It is required to install profiled sheets from the corner support. You need to pay enough attention to working with the first sheet. Subsequent ones are aligned to it. For a strictly vertical position, be sure to use a building level. The sheet is fixed at four points - approximately 15 cm from the edges, where the wave comes into contact with the beam. The next one overlaps the wave.
After finishing hanging the canvases, it is important to carry out additional fastening. This process is carried out by screwing in self-tapping screws every two waves along the entire length of the crossbar. If you do this less often, the sheets will bend, causing knocking and loosening of the entire fence.
If you stretch a string from the outside of the fence along the entire perimeter at the level of the crossbar, then getting into the beam will be much easier, and installation will be faster.
Disadvantages of corrugated fences without welding
It would be fair to mention the pitfalls of weldless structures. The main disadvantage of fences with bolts and self-tapping screws is that attackers can unscrew them with a screwdriver. This can be solved by using non-standard fasteners that cannot be taken with standard tools, or by grinding the heads of the screws.
In addition, the fasteners will have to be selected very carefully for a specific frame to ensure maximum fit. However, pipes for fences made of corrugated sheets are fairly standard in size, so this should not cause any particular difficulties.
Gates without welding for self-assembly main advantages
Do-it-yourself sliding gates, having recently appeared on the market, instantly attracted the closest attention due to their advantages: · firstly, gates for self-assembly allow you to save a significant amount not only on the product itself, but also on its transportation; · secondly, the assembly of such gates is simple and straightforward, so that almost anyone can do it and takes only 2-3 hours; · thirdly, already during the assembly process you can change the direction of opening of the gate leaf - the design of our gates is universal and allows you to do this; · fourthly, you have a lot of space for covering the gates - you can choose any material you like: wooden lining, profiled sheets, metal siding, metal mesh, etc. And, in addition, sliding gates made by your own hands - this is another reason for pride. You can always show them to your friends and acquaintances and tell them that these gates were assembled without any help from specialists.
Fitting
When it is necessary to connect profile pipes with branches and bends, special fasteners and fittings are installed at the ends. There are options for indoor and outdoor connections. According to their intended purpose, they can be made in the form of:
- tees and crosses for creating branches of the same or different sections;
- angles that are installed at turns and elbows if you need to change the direction of the pipeline;
- couplings for joining straight sections.
Fittings are assembled in the following order:
- crimp nuts are put on the ends;
- install clamping, pressure and sealing rings;
- then put on the fitting;
- the parts are fastened by tightening the nuts at both ends.