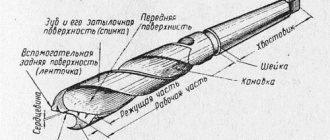
Correct installation of the drill in the drill chuck
While we are trying to figure out how to correctly install a drill in a hammer drill, it is better to learn how to insert a drill
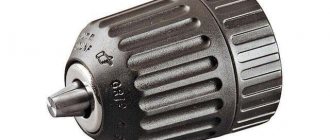
into a drill. The element of its design in which the drill shank is fixed is the chuck. Most models of modern drills are equipped with jaw-type chucks consisting of:
- cylindrical bodies;
- rings or sleeves that rotate around the outer surface of the body;
- cams installed in the inside of the housing.
Jaw chuck design
When the sleeve rotates clockwise, the cams immediately move closer to each other, thereby tightly clamping the shank of the drill being installed. Accordingly, the question is what, how to get it out
a drill bit from a drill, it’s not difficult to solve: just start twisting the sleeve counterclockwise. Here the cams will begin to diverge, which will allow you to simply pull the drill out of the drill. It should be noted that before installing the drill, the cams should be opened with enough space; here the tool can be simply inserted.
The convenience of using cam-type chucks lies not so much in the efficiency and the highest reliability of tool installation, but not in the fact that you can stick drills of virtually any diameter here. With the introduction of such cartridges, there are no difficulties with how to change a drill bit in a drill. A correctly inserted tool is held tightly in such chucks and does not allow drilling a clear hole.
If you begin to notice teeth slipping when tightening the chuck, replace the worn key with a new one.
Jaw chucks are used in both industrial and household tools. household drills are available for two ranges of drill diameters: from 0.8 to ten and from 1.5 to thirteen mm.
The design of jaw chucks can provide for two different methods of clamping a tool: the main one is not quick-clamping.
First, the sleeve is activated using a special key, the conical working part of which has teeth. To activate the clamping mechanism, the key must be inserted into the holes on the side of the cartridge body and not twisted. There may even be three such holes in some models. Accordingly, in order to loosen or tighten the cams, the key must be inserted into each of them and not start rotating counterclockwise or clockwise.
After loosening the cams and inserting the key, you need to turn the cartridge itself counterclockwise, which will allow you to increase the distance between the cams to the required value. The inserted tool is fixed in the reverse order: first the cartridge itself is clamped (as it rotates clockwise), and then the sockets are clamped using a key.
Screwdriver Power Supply From 220v Network
Screwdriver power supply from 220V network
How to change the drill bit in a drill so that attempts are not in vain?
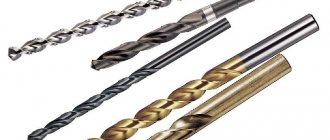
Today, drills are made from high-speed, alloy or carbon steels. To work on durable materials, they are equipped with heavy-duty, durable soldering tips. According to their design features, they are divided into feather-type, centered, with straight grooves and spiral (for deep penetration).
Based on the material being processed, they are distinguished as follows: wood, metal, stone and concrete, glass and ceramics, diamond and universal. Each of them is suitable for a specific type of work, this should be taken into account before inserting the drill into the drill.
During prolonged work, situations arise when the drill gets stuck in the drill, breaks, becomes dull, or the chuck jams. In such cases, it needs to be removed, which is sometimes not so easy. We will try to carry out the operation with the least losses.
Before removing the drill from the drill, you should pay attention to the design of its chuck. There are two types of chucks: key and quick-release chucks. The key chuck is more reliable, especially if you are working in impact mode. This cartridge is made of metal, therefore, less susceptible to mechanical damage.
Its disadvantage is that before removing the drill from the drill, you need to release the clamping jaws of the chuck with a special key.
Plastic keyless chucks are usually equipped with small drills. Replacement is done by hand. Quick-clamping options are single-clutch and double-clutch. The replacement is, of course, different, but not fundamentally. Before changing the drill bit in a drill with a double-clutch keyless chuck, you need to switch your tool to reverse mode, fix the lower clutch with one hand, and unscrew the upper clutch with the other.
Replacing the attachment in a single-socket chuck is done with one hand, because it is only installed on drills with automatic shaft locking.
It happens that the working tool gets stuck in the chuck, and it doesn’t want to come out. The question arises: how to remove the drill from the drill? To pull it out, you need to clamp its free part in a vice. Next, you need to tap the chuck jaws with a hammer through a wooden adapter until the drill shank comes out of the quick-release chuck.
If this does not help, you need to remove the chuck from the drill and soak it in gasoline, or spray it with WD-40 liquid or foam cleaner. You just need to drop a little machine oil into the key cartridge.
Sometimes while working, for example, on a reinforced concrete wall with an impact drill, the drill gets stuck. When I pull the trigger, the drill buzzes, but nothing happens. This happens when the drill goes deep into the wall and gets pinched between the reinforcement and the concrete. In such cases, you need to stop pressing the trigger or loosening the drill along with the drill.
This will lead not only to breakage of the drill, part of which will remain in the wall, but also to failure of the entire tool. The first step is to remove it from the cartridge. After this, another drill is inserted into the drill and careful knocking out of the concrete around the stuck element begins. In this case, you need to avoid hitting the victim stuck in the wall. Having broken off pieces of concrete around, you can easily remove it by hand.
ogodom.ru
Drill design - what do you need to know about the tool?
The jamming of a drill in a drill or screwdriver chuck has happened at least once to every owner of the tool. To understand why this can happen, you need to understand how the drill works. This tool converts electronic energy into mechanical energy, which can be due to an electric motor that spins the shaft. Through the gearbox and gears, rotation is transmitted to the fastener, in which the drill is fixed.
Now let’s look at the operation of an electronic drill from the reverse side, provided that the drill was fastened incorrectly or not firmly enough. The vibrations that occur during operation will lead to deviations in the drilling direction, resulting in an uneven hole. Vibrations from vibrations will be transmitted to the gears and gearbox, engaging the shaft and the engine itself - this does not immediately threaten breakage, but a decrease in the service life of the tool is guaranteed! Often carelessness when securing the drill leads to it jamming. From time to time, jamming occurs as a result of the drill slipping from the drilling point - to avoid this, use a spring punch to make recesses on the surface for the drill.
In addition to jamming, a loosely fixed drill can jump out of the fastener, and this is fraught with quite severe injuries for the person working with the equipment and those around him, taking into account the speed of rotation of modern devices. Therefore, never strengthen the drill in a hurry; always disconnect the drill from the current to avoid accidental starting of the drill.
HOW TO REMOVE A DRILL FROM A DOUBLE-CLAMP DRILL IF THE DRILL IS STUCK
Keyless chuck (double). The usual way. get the drill stuck in the drill. ART. HOUSE (art.
Non-traditional use cases
In addition to its direct purpose, an electronic screwdriver is used to perform various non-standard operations. These include the following types of work:
- Polishing the car and its headlights;
- Mixing small volumes of different building mixtures and paints;
- Drilling holes in ice (for this purpose the tool is equipped with a special drilling attachment);
- Reinforcement knitting;
- Refueling;
- Mowing grass (to do this, transform the device into a trimmer or lawn mower, or simply insert an attachment with blades into the cartridge);
- Grinding soft grass or thin branches (for this, a garden shredder based on a drill-screwdriver is created);
- Flat grinding;
- Cutting materials;
- Twisting wires.
This is by no means a complete list of unusual work performed using battery-powered or corded models of electric screwdrivers. An inventive idea does not stand still. In fact, every specialist has options for working that are not typical for this power tool.
Using a screwdriver, you can return the car to its original color and shine. To polish your car, use the following types of attachments:
- Leather or fabric mugs, they are used for primary cleaning of surfaces;
- Felt is used for initial processing and final polishing (sheepskin attachments are suitable);
- Foam rubber.
Polishing pastes and polishes are also used together with the equipment. They come in the following types:
- Silicone;
- Abrasive;
- Non-abrasive.
Headlights are also polished using similar equipment.
The quality of the achieved result is determined by the correct combination of attachments with polishing agents, as well as the accuracy and skill of the work.
Knitting reinforcing bars with metal wire is very common in the construction industry during the construction of reinforced concrete (solid) structures, for example, foundations and houses. Even if there is a small amount of work to be done, crocheting or pliers are not very productive. A cordless or cordless electronic screwdriver equipped with a hook will help tie the reinforcement much faster. In this case, the power indicator of the tool is not particularly important.
Twisting the docked ends of wires, for example, in junction boxes, is also quite a routine job. You can speed up the process by using a screwdriver with a special attachment. How twisting is done is shown below:
READ Cutting skirting boards at a 45 degree angle
Recommendations for proper instrument care
Both cordless and networked models require recurring maintenance and ongoing care. Coupled with proper storage and lack of operational overload, these reasons can extend the life of the screwdriver.
High quality care includes the following:
- Do not allow water to come into contact with the instrument. Therefore, store the product in a specially designated dry place.
- It is forbidden to throw an electronic screwdriver.
- Don't overload the power tool: you can partly focus on heating the body. Use only sharp drill bits.
- The cartridge needs to be lubricated from time to time: the regularity of this is indicated in the instructions for use.
- If dirt, dust, shavings or other contaminants get in, remove them with a dry cloth (especially be careful with fuels and lubricants). You should also wipe down your used device at the end of the day. The drilling rig must also be kept clean at all times.
- Store batteries so that there is no short circuit between their terminals. Avoid deforming the drives and do not leave them in direct sunlight.
- It is recommended to store lithium-ion batteries half charged at their highest capacity, NiMH. when fully charged, Ni-Cd. somewhat discharged (but not much).
- Nickel-cadmium drives after storage (or new ones) must be subjected to three complete charge/discharge cycles before use so that they retain their capacity, and nickel-metal hydride drives - 4-5 cycles.
- Manufacturers advise storing and operating electric screwdrivers at temperatures from 5 to 30 degrees.
- The charger for battery models must be disconnected after charging the batteries to avoid overheating.
- Before and after work, it is recommended to check the integrity of the operating product, especially its moving parts.
- When drilling, it is recommended to cool the bit from time to time using different methods.
Following these care tips does not take much time, but significantly extends the life of the product.
Before you start using the newest screwdriver, it is recommended that you first read the instruction manual from the manufacturer. It already indicates the design features of the model, its technical properties, suitable area of implementation, frequency of maintenance, advice on transportation and storage. There are also safety rules that must be followed.
If during work
the equipment smells of melted plastic or heat insulation, smoke, unusual noise, excessive vibration, then its implementation should be completed immediately.
When a product is under warranty, it is better to take it to a service center. Otherwise, you can try to repair it without the help of others.
How to replace the chuck - updating the drill
In most cases, it is the cartridge that becomes unusable first in a drill. It is difficult to dismantle it at home, but it can be done! The fastener is screwed onto the spindle itself, but in addition it is also secured with a bolt with a left-hand thread. In order to get it, you need to completely unclench the cartridge - it is inside. The whole difficulty of unscrewing it is that many people do not know about the left-hand thread, and when trying to unscrew it, they twist it even more, tear off the cap and ultimately take it to the service center.
By unscrewing the bolt, you can also unscrew the cartridge itself, although this is not so easy to do. Some models have recesses at the base of the thread for a wrench - in this case, you can lock the spindle and unscrew the fasteners using a lot of force. The real difficulty comes when there are no wrench cuts. You will have to remove the housing cover to fix the spindle inside the drill. Difficult, but doable.
Removing a cartridge is one thing. Finding a new one is completely different. In addition to the drill clamping methods described above, different chucks also have different threads! The surest way not to confuse anything is to take an old cartridge with you and show it to the dealer, or how to choose a suitable one based on the layout. When you have mastered this task, all that remains for you is to screw the chuck onto the spindle and screw in the bolt, which in our case is screwed counterclockwise.
READ How to Break Concrete Without a Hammer
How to insert, change and remove a drill bit from a Metabo screwdriver?
indicates how to correctly insert and remove a drill from a Metabo screwdriver at home, and naturally how.
Pulling out and installing drills with insertion is much easier and not faster. In a computer, the sleeve is actuated by manually rotating it. To limit the force of tightening the cams, they are often equipped with locking elements.
Before inserting the drill, first make sure that the drill is in good working order and do not turn off the power. Only after this fact we begin to install the drill.
Types of keyless chucks
How to Remove a Drill from a Screwdriver
How to remove a bit from a screwdriver
Screwdriver design
What is a screwdriver? Basically, this is the same drill, but a screwdriver differs from it in that it has the lowest rotation speed of the chuck and, immediately, greater torque.
Another difference is that if on a drill the rotation speed changes smoothly, then on a screwdriver, usually, “fixed” chuck rotation . This is due to the “slipping” function of the screwdriver chuck: when the screw is tightened, the chuck stops spinning, although the engine is still running. This function allows you not to tear off the splines or even “drive” the self-tapping screw inside.
Different types of speeds are designed for specific jobs and materials, as well as the “drilling” mode. Just like a drill, a screwdriver has a reverse function. The design features of the screwdriver allow them to do a wide range of work: tightening and unscrewing self-tapping screws and screws, screws and nuts, drilling soft materials.
The introduction of a screwdriver, for example, in the production of plasterboard partitions or when assembling furniture, increases the speed of work with good results. Therefore, a screwdriver is actually considered the most common tool in any master’s kit.
The designs of all screwdrivers are approximately the same. They are quite light and have a “pistol” handle, designed for working with equipment with one hand.
How to properly insert a bit into a screwdriver?
The start button is designed in such a way as to regulate the rotation speed by pressing force.
The fundamental element of a screwdriver is its power source. If drills are produced in both mains-powered and autonomous (battery) versions, screwdrivers, due to the peculiarities of their implementation, are almost exclusively battery-powered. The battery is the heaviest and most expensive part of the screwdriver.
Household models of screwdrivers are usually equipped with nickel-cadmium batteries (designated “Ni-Cd”), while more expensive professional models are equipped with lithium-ion (“Li-Ion”) batteries. Their difference lies in the fact that nickel-cadmium ones have the shortest service life (about 1000 recharges), and also have one unpleasant feature: if the battery is low discharged, its capacity decreases the next time it is charged.
https://www.youtube.com/watch?v=pK9wOhLfvQs
However, whatever the battery, its capacity is limited by the weight of the tool. Therefore, even the most expensive models of screwdrivers can work continuously for less than some time.
Some domestic manufacturers solve this problem by introducing a screwdriver
second spare battery. But, this significantly increases the price of the instrument. The battery is charged from a regular network.
The charging speed again depends on the model and ranges from 2-3 to 6 hours, although some models of screwdrivers provide “fast” charging in 10-15 minutes.
: How to insert, change and remove a drill bit from a Metabo screwdriver?
indicates how to correctly insert and remove a drill from a screwdriver
Metabo on its own, as well as.
VLOG: HOW TO REMOVE A DRILL FROM A DOUBLE-CLAMP DRILL IF THE DRILL IS STUCK. LIFE HACK (double cartridge)
Keyless chuck (double). the usual method is to get a drill
if it gets stuck in the drill. ART. HOUSE (art.
03/23/2013 at 14:03
Cordless drill/driver
Cordless drill/driver Bosch PSR 18 Li-2.
A fairly ordinary screwdriver for independent use, the main thing is that the gaming slots of the device have a universal rechargeable lithium battery, suitable for a jigsaw and delta grinder.
The weight of the screwdriver together with the battery is 1.3 kg. In other words, it is not heavy, but not light. At the same time, the highest torque is 46 Nm, which is very good.
The speed is regulated, as in the main part of other screwdrivers and drills - with a button. Also standard, a chuck rotation .
The screwdriver has a standard quick-release three-jaw chuck. The largest diameter of the drill shank that can be clamped into this chuck is 10mm.
The manufacturer does not recommend using this screwdriver to drill large holes: in steel more than 10mm, in wood more than 35mm.
To fix the bit or drill bit in the quick-release chuck of a screwdriver, just fix the chuck with your hand and turn on the screwdriver at high speeds.
Features of the screwdriver
A screwdriver is the same as a drill, but it has the lowest rotation speed of the chuck and the ability to adjust the twisting force. Many hours of twisting and unwinding with your own hands have never brought pleasure to anyone. A screwdriver will help you quickly and efficiently tighten and unscrew fasteners. Also, using this device, you can make holes in materials of various densities - metal, wood and stone. The screwdriver is powered from the mains or battery.
The construction device is divided into the following types:
- standard;
- cordless screwdriver;
- drill-driver;
- impact wrench
What is the speed on a screwdriver for?
Typically, modern models of corded screwdrivers have two or three speeds. The first of them is characterized by a minimum number of revolutions per minute with maximum torque, therefore it is usually the one that is used for tightening or unscrewing fasteners.
Interesting materials:
How to reduce vibration on iPhone? How to make everything smaller on iPhone? How to reduce notification sound on Xiaomi? How did Alexey Batalov die? How did Kim Jong Il die? How did my mother's Siberian die? How did Megalodon die? How did Nikita Sergeevich Khrushchev die? How did Elizabeth the first die? How to multiply a cubed number?
Hard case
Well, it happens that the cartridge does not want to turn away in any way, which means that the drill cannot be pulled out of it. This should not happen on working cartridges, because if under any circumstances the cartridge does not spin up, this may indicate a malfunction.
Usually this does not happen abruptly - the cartridge begins to wedge before it clamps so that it does not turn around later.
In such a situation, you can resort to two methods. I would like to immediately say that the cartridge will then need to be changed. In this case, the drill actually needs to be removed in order to save the drill itself, and also to make it possible to remove the faulty chuck from the screwdriver. This cannot be done with a stuck drill.
- The first method is quite humane. It is necessary to hold the drill in a vice and try to turn the entire screwdriver around it. To make the task easier, you can spray WD-40 into the cartridge. It will be possible to turn the entire screwdriver with the chuck only if its design is such that the chuck is aggressively coupled to the screwdriver and cannot be turned except by pressing the start button. But not all models provide this, so you can twist the cartridge using a gas wrench - the plastic part of it will deteriorate. If the drill gives way, then you need to twist the chuck back and forth and evenly pull it off the drill.
- If the drill does not give in, then you will have to resort to the “vandal” method. We take a grinder and simply cut the cartridge. You just need to cut so as not to destroy the screwdriver spindle and the drill itself, if you need it intact. Not a single drill can resist this technique.
These are the methods for removing the drill from the screwdriver. If you have the second case, then I’m sorry, but I don’t know a more humane method and I think that there is none. At least this is how I got the drills out. And this is where I end this article - see you next time!
Magnetizing and hardening bits
The majority of nozzles on sale are mainly made in China. They are made of soft material, which causes them to quickly lose their original shape. It cannot be restored, so such samples are characterized by a short service life.
In order not to constantly buy new bits, it is recommended to harden them. To carry out the procedure, wrap a piece around the nozzle and heat it red hot over a gas burner. After the equipment turns red, it is lowered into a tin can previously filled with machine oil for 5-6 seconds. This manipulation is carried out several times, taking breaks for 2-3 seconds. An element is considered hardened after it has turned black.
Prices in online stores
The magnetization procedure will provide more comfortable work. There are several ways:
- The bat is placed with its working ends between 2 neodymium magnets, which are placed in such a way that they repel each other. To hold them together they are connected with plasticine. You will have to wait at least 10 hours for the effect.
- Insert the bit into a special device for magnetizing and demagnetizing screwdrivers. The desired effect is achieved by placing the element in a square window.
- Copper wire, from which the insulation has been previously removed, is wound in 3 rows on a plastic tube. The nozzle is inserted inside. The ends of the wire are connected to the terminals of the battery or battery. To enhance the effect, connect 2-3 batteries in series. After a minute, the result of magnetization is assessed.
Craftsmen also offer a simple option - rub the equipment on all sides against a magnet. They are trying to hold the fastener. If necessary, repeat the manipulation.
How to insert a drill into a screwdriver?
An indispensable power tool with a self-explanatory name, a screwdriver is intensively used in construction work. The most common procedure with such a device is replacing the drill. Sometimes it seems that this process is very difficult and virtually impossible. But in fact, changing the drill bit in a screwdriver will not be particularly difficult; the main thing is to follow the instructions step by step and pay attention to the details.
Fastening device – non-combat cartridge
The chuck is the name given to the fastener in which the drill is fixed. The fastener itself is screwed onto the tool spindle. In most cases, drills are equipped with a jaw chuck. This design is a hollow cylinder with metal “fingers” inside. When you turn the adjusting ring, which is located outside the unit, the “fingers” converge or spread along the inner cone-shaped surface. In such a “fist” you can clamp both a drill with a cylindrical shank and a hexagonal one.
Convenience and ease of implementation have made the cam mechanism popular. But it is not without its shortcomings. One of them is difficulties in working with small drills. A short product may simply fall inside. You can still secure it by placing the drill in a horizontal position, but you cannot put too much pressure on it while working. If another drill was inserted into the drill, you can remove it by turning the adjusting ring in the appropriate direction. It is not always possible to do this manually; for this purpose, there is a special key that acts like a lever, increasing the force. By the way, it is also not recommended to tighten the drill without a key - the larger the diameter of the drill, the more reliable the fastening should be.
The quick-release fastener, the second most popular, can operate without a key. All you have to do is stick the drill in and turn the lever; this can often be done with one hand. The drill fixation that this type of chuck provides is sufficient for most jobs, but compared to the traditional fastening option, it is inferior in reliability and is more expensive. The main advantage of a quick-release fastener is the speed of changing the drill and the safety of the process, since such a chuck is devoid of teeth that can injure your hands. The absence of a special key is also a significant advantage! Experienced builders know how easily it disappears, so very often you will be able to see the key taped with tape or tape to the wire.
True, this does not add convenience, but there is at least some confidence that the key will not have to be found throughout the construction site. How to change the drill bit in a screwdriver? The scheme is completely similar - the chucks of most drills are identical to the fasteners on screwdrivers. Of course, the latter tool cannot be a real replacement for a high-quality drill, if only because fasteners are not provided for drills with a huge diameter, and the speed of a screwdriver is usually lower.
Varieties by purpose
The application option is determined by the shape of the working part of the nozzle. According to this principle, they are classified into the following types:
- for bolts and nuts;
- with anti-vandal slot;
- with a “fork” type design;
- spring and magnetic;
- for drywall;
- for professional use.
The first option allows you to tighten or unscrew the bolts and nuts. They are distinguished by the non-standard shape of the working part, which, unlike other samples, is not convex, but has a hole. The advantages of such bits include a wide size range.
The anti-vandal slot option is also called “snake eye” , since the shape of their tip is adapted to a fork wrench. Models with a “fork” design are a variation of the previous type of bit. Externally they are similar to the flat version of the head, but have a slot in the middle. They are made from high-quality steel, so their advantages include durability and strength.
The spring lock ensures reliable fastening of the nozzle in the adapter. And the magnetic tips provide good adhesion to the fastener notches and prevent the head from slipping. Such options guarantee comfortable screwing of screws and self-tapping screws in hard-to-reach places on the ceiling. The presence of a flexible spring allows you to tighten the fasteners at an angle exceeding 90 degrees.
Nozzles for drywall are distinguished by the presence of a limiter, which prevents damage to the material during installation. Experts recommend avoiding strong pressure when screwing in self-tapping screws, since drywall sheets are very fragile.
Professional bits are characterized by reliability, high strength and long service life. They are made of high-quality metal and covered with a special protective coating. They are chosen for tightening a large number of fasteners. If you secure more than 400 screws with such a bat, then it will not need to be replaced.
The set of professional samples includes a torsion bit for an impact screwdriver. In appearance, it is distinguished by a narrow section between the shank and the spline. The design also includes a flexible insert in the form of a torsion spring. This feature allows you to screw a self-drilling fastener into a solid material (for example, recess a self-tapping screw with a head in metal).
Prices in online stores
Experts recommend purchasing different equipment options as a set, since purchasing them individually will cost more.
Replacing the cutting tool
The “tail” of the screwdriver drill is fixed in the chuck. It comes in different sizes, as do the attachments. If the cutting tool is installed incorrectly, the screwdriver can cause damage to the work process and harm to health. For example, due to the “wrong” drill, holes of different sizes with a warped surface can be obtained. When a sharp element “flies” out of the cartridge, it will cause serious injury.
READ Do-It-Yourself Charging for Lithium Screwdriver Batteries
Most modern screwdrivers have jaw chucks. They consist of a cylindrical body, a sleeve and cams. When the sleeve rotates clockwise, the cams immediately press down on the drill.
The process of replacing it is easy, but has a number of personal features. The whole process can be outlined as follows:
- you need to select the right attachment (bit) for the drill;
- then you need to take the cutting tool and install it in the center of the chuck (between the open “cams”);
- after which it should be secured by turning the sleeve clockwise (with a main type cartridge, the key is installed in the recess);
- twist the sleeve until the nozzle is secured.
Changing a drill is not difficult, but first you need to remove the previous one. There are the following options for the development of the situation:
- standard removal of the drill (the chuck is not damaged);
- pulling out the drill in the absence of a key;
- removing a stuck cutting element.
If the screwdriver is working properly, there should be no problems when replacing its working tool - the operation is simple. To do this, you need to take a key, which is designed to loosen the cartridge, and stick it into the recess. Turn counterclockwise. Unwinding is carried out due to special teeth that are found on objects. There is also another option for removing the drill. To do this, turn on the reverse rotation mode on the screwdriver, hold the outer body of the chuck and press the “start” button. This way, the drill will simply come free.
In the absence of a special key, the drill can be removed using a Phillips screwdriver or a nail. It needs to be inserted into the recess on the cartridge and fix its half. We twist the reverse part of the cartridge by hand. But if such unwinding does not bring results, then we take a gas wrench or a vice - these tools will help increase the rotation of the cartridge. If previous options for pulling out the drill failed, then you should resort to “heavy reinforcement block”. In some cases, it is difficult to get a drill due to its external damage. In this situation, you need to relax the “fists” using gas wrenches and a vice. We completely clamp the cartridge with the keys and rotate (unscrew) it.
A constructive option in the most hopeless situation would be to twist the cartridge from a screwdriver. To do this, you need to squeeze it in a vice and forcefully knock out the cutting tool from the inside using a punch. Naturally, after a similar procedure, the screwdriver should be taken for repair. To summarize, it is worth seeing that the procedure for inserting a drill into a screwdriver is quite simple and even someone who has never done it can handle it. The main thing in this process is to follow the advice.
For information on how to insert a drill into a screwdriver, see below.
How to remove a drill bit from a drill
Welcome everyone to another article! When operating this or that device, the user sometimes encounters unpleasant moments. Today I will touch on one of them. In this text, I decided to give some tips on how to remove a drill from a drill if you can’t do it. The reasons why you cannot do this seemingly simple thing can be very different. Here I described the main aspects on this topic and identified three main areas that I consider necessary to disclose:
- replacing a drill in a normally working chuck;
- pulling out a drill without a key;
- removing a drill that is stuck due to some existing damage.
Let's consider each of these circumstances separately.
How to remove a drill with a working chuck
If everything is in order, then in theory there should be no problems with getting it out. Therefore, this section is rather dedicated to users who are completely ignorant of power tools, since the operation itself is elementary. But there are still a lot of people, so maybe someone will need this information.
In this situation, you will need a special key to unlock the key chuck, or straight hands to loosen its quick-clamping counterpart.
In the first case, you need to insert the key into one of the recesses on the cartridge and start rotating it counterclockwise. Unwinding occurs due to the existing teeth on both objects.
In the second, the drill should be turned on in reverse mode (reverse rotation). With one hand we hold the outer body of the cartridge, and with the other we press the start button. If your machine is not equipped with reverse, then this is not very good - in fact, this should not happen, since only key cartridges are installed on such devices. But still, if this happens, then you need to somehow fix the drill axis (for example, with an open-end wrench) and rotate the outer body of the chuck counterclockwise. In general, it would be better to remove such a cartridge here and install a key one.
How to change a drill bit in a drill without a key
As is clear from the subtitle, we are talking about key cartridges here.
The most common method is to use a Phillips screwdriver or a nail of a suitable diameter, which is inserted into any of the existing recesses on the cartridge, thereby fixing its first half. You can try to twist the other half by hand. Usually this makes it quite easy to unwind.
However, if you can’t unscrew it this way, you can use a gas wrench or a vice instead of your hand. Using them, you will be able to create the necessary force, which will most likely be enough to carry out the rotation.
If these steps still don't work, try what's described in the next section.
How to remove a drill from a damaged chuck
Here we will also talk about cases when the drill itself is damaged.
Damage usually occurs in the form of a broken cam or damaged threads. It also happens that the drill is damaged, for example, by turning between the cams. As a result, chips are formed, which interfere with normal rotation, as they are driven into different slots, which prevents rotation.
So, first you can try to relax your fists. This can again be done using two gas keys or one in conjunction with a vice.
In the first case, each part of the cartridge is clamped with its own key and rotated to unscrew. In the second, one of the parts is fixed not with a key, but with a vice. Since this creates a fairly large force, unlocking occurs quite easily.
In addition, in the absence of a gas wrench, you can clamp one part in a vice, and apply gentle tangential blows to the second with a hammer. Relaxation occurs due to the vibration created.
If the previous methods do not help, for example, because the threads on the cams are broken, then you will have to resort to the next step.
First you will need to unscrew the chuck from the electric drill. I have already described how to do this on this page. Then we clamp it in a vice and knock out the drill from the inside with a punch of a suitable diameter, which is threaded through the hole into which the spindle is inserted.
That's all. These are the basic solutions that can be applied if you need to remove the drill bit from the drill. As you can see, everything is very simple. Of course, in special cases different devices may be required, although most home craftsmen have those that I have described. I hope my tips will help you. I wish you that you will not have such problems again. See you again!
instrument-tehnika.ru
Drill design - what do you need to know about the tool?
The jamming of a drill in a drill or screwdriver chuck has happened at least once to every owner of the tool. To understand why this can happen, you need to understand how the drill works. This tool converts electronic energy into mechanical energy, which can be due to an electric motor that spins the shaft. Through the gearbox and gears, rotation is transmitted to the fastener, in which the drill is fixed.
Now let’s look at the operation of an electronic drill from the reverse side, provided that the drill was fastened incorrectly or not firmly enough. The vibrations that occur during operation will lead to deviations in the direction of drilling, and you will end up with a curved hole. Vibrations from vibrations will be transmitted to the gears and gearbox, engaging the shaft and the engine itself - this does not immediately threaten breakage, but a decrease in the service life of the tool is guaranteed! Often carelessness when securing the drill leads to it jamming. From time to time, jamming occurs as a result of the drill slipping from the drilling point - to avoid this, use a spring center punch to make recesses on the surface for the drill.
In addition to jamming, a loosely fixed drill can jump out of the fastener, and this is fraught with quite severe injuries for the person working with the equipment and those around him, taking into account the speed of rotation of modern devices. Therefore, never strengthen the drill in a hurry; always disconnect the drill from the current to avoid accidental starting of the drill.
Some tips for using drilling tools
To avoid the possibility that a flying tool or concrete chips will harm your health, drilling work must be done in compliance with all safety measures. To ensure such safety, you should use safety glasses, gloves, earplugs or headphones that protect your hearing. Naturally, all work must be done in special clothing, in which there should be no hanging parts that could wrap around the drill.
To prevent overheating of the electronic tool used for drilling, you need to rest it often. It is very important to insert the drill correctly (this must be done until the tool stops).
Two methods for clamping a narrow drill in a chuck if the jaws do not reach the shank a little
If the drill gets stuck in the wall during drilling, it should be removed without removing the tool from its surface. To do this, you need to remove the drill from the hammer drill and insert another one, with the help of which you need to begin to destroy the wall around the drill stuck in it.
Installing a working tool on a hammer drill
As mentioned above, the hammer drill must be checked for functionality before installing the drill. To perform such a check, the operating mode of the hammer drill is set to drilling without a fight. If, after pressing the start button of the device, you hear and feel that its engine is running smoothly and without shocks, it means that the hammer drill can be used for its intended purpose, having previously inserted a drill or auger into it.
To secure a drill with a cylindrical shank in a hammer drill, use an adapter with a jaw-type chuck
Before inserting the drill into the hammer drill, you need to treat the shank of the working tool with a special lubricant that will protect it from corrosion. The procedure for installing a drill in a hammer drill is as follows.
- The back of the hammer drill is installed on the floor or other hard surface.
- The moving part of the clamping device is pulled back.
- The tool is inserted into the hammer drill until it stops. In this case, the drill or drill that needs to be inserted into the hammer drill must be held vertically. If you neglect this requirement, you may encounter the fact that the tool will fly out or even break, and this may also lead to failure of the hammer drill itself.
READ How to Test a Screwdriver Battery for Performance
You should press until it clicks, then pull the drill; if it doesn’t come out, everything is fine.
Taking into account the fact that the chucks on modern rotary hammers have a fairly common operating principle, questions about how to remove a drill from a rotary hammer usually do not arise.
After removing a used tool from a hammer drill in order to exchange it for another, it is better to immediately clean its shank from grease and construction dust. With all this, the shank of the drill that you are going to insert must also be cleaned and lubricated beforehand. A tool replaced in this way will not harm the clamping mechanism of the hammer drill and will last much longer.
Lubrication extends the service life of both the drill itself and the hammer drill
Using a hammer drill, you can not only get a drilled structural element, but also perform processing using a special chisel. You can also install a mixer as the working body of such a device.
Home craftsmen often also have questions about how to insert a drill into a screwdriver or how to change the chuck on a hammer drill. Solving the first question is quite easy, because the design of the screwdriver uses cartridges of the same design as those used in drills and rotary hammers. But the question of how to correctly change the cartridge on a hammer drill should be approached with knowledge of the matter: it is difficult to perform such a function without certain knowledge and abilities.
How to insert a bit correctly
How to change the bit on a screwdriver and place it correctly depends on the type of chuck in the design of the screwdriver. There are 2 main types of holders - key and quick-clamping. The difference is the need for a special key that allows you to change the nozzle in the first type of cartridge.
To secure the bit in the key holder of the equipment, perform the following steps:
- Take a key that is shaped like a rod with a lever and a mounted gear wheel.
- It is inserted into the groove on the chuck, and the gear is mounted on the teeth of the crown.
- Rotate the key to release the cams.
- Insert the tail part of the bit into the chuck.
- Clamp the cams with the key, rotating it alternately in each groove in the opposite direction.
To fix the attachment in the quick-release chuck, the jaws are moved apart manually by rotating the coupling counterclockwise. Insert the bit into the resulting hole. In this case, the holder coupling should be tightened in the opposite direction. In a single-sleeve chuck, the procedure can be performed with one hand. If a two-clutch version is installed, then the near sleeve is held with the right hand, and it is rotated with the left.
The correctness of the procedure is checked by turning on the screwdriver in idle mode. If the nozzle wobbles, experts recommend removing it and pressing it deeper.
How to correctly insert and remove a drill bit into a hammer drill, screwdriver and drill
The popularity of the question of how to insert a drill into a hammer drill or electronic drill can be explained quite easily: such devices are intensively used both in industrial and domestic settings.
The cartridges are different, as are the attachments fixed in them.
An incorrectly installed drill can lead to a number of problematic situations:
- inability to work with a hammer drill or drill;
- obtaining uneven holes with a broken inner surface;
- the drill may fly out, which can result in serious injury.
Despite the fact that it is not so difficult to insert a drill bit into a hammer drill or hammer, you should approach this issue carefully.
For newbies
So, let's start with the most common option - with inexperienced users. Screwdrivers have something called a torque regulator. It looks like a scale around the front of a screwdriver, which is right behind the cartridge. Numbers from 1 to 10, 15, 20 or even more are printed on it - different for different models - and the last position on it is indicated in the form of a drill. If you turn this regulator and set it opposite the special mark so that one of the numbers is next to it, then when a certain torque is reached, the cartridge will no longer rotate, but will begin to click. If you put it on a “drill”, the screwdriver will try to twist with all its might, as much as the motor power allows it.
However, it should be noted that with two-speed screwdrivers at 2nd speed, even in the “drill” position, if the torque reaches a certain value, then a protective system is triggered, which simply turns off the current supply. At the very first speed, the screwdriver will also try to turn “to the last.”
And a beginner can start drilling or driving screws, for example, when the torque regulator is set to one of the numbers, or the screwdriver is set to speed 2 (and it is actually recommended to drill on it).
The drill can get quite clamped, and as a result, when you start to release the drill or bit using the standard method (turning on the reverse, holding the chuck and pressing the start button), either the torque limiter or the protective system may work.
Therefore, in such a situation, you just need to put the screwdriver at first speed and set the torque regulator to the “drill” position. On single-speed models, it is enough to simply set the torque regulator to the “drill” position. Well, then we unscrew it again using the standard method.
How to remove a bit from a screwdriver
.
What is a screwdriver? Essentially, this is the same drill, but a screwdriver differs from it in that it has a lower rotation speed of the chuck and, at the same time, greater torque.
Another difference is that while on a drill the rotation speed can change smoothly, on a screwdriver, as a rule, “fixed” rotation speeds of the chuck are set. This is due to the “slip” function of the screwdriver chuck: when the screw is tightened, the chuck stops rotating, although the motor is still running. This function allows you not to tear off the splines and not “drive” the screw inside.
Different types of speeds are designed for specific types of work and materials, as well as the “drilling” mode. Just like a drill, a screwdriver has a reverse function. The design features of the screwdriver allow it to perform a wide range of jobs: tightening and unscrewing screws and self-tapping screws, screws and nuts, drilling soft materials.
Using a screwdriver, for example, in the production of plasterboard partitions or when assembling furniture, increases the speed of work significantly. Therefore, a screwdriver is rightfully considered one of the most common tools in any craftsman’s kit.
The designs of all screwdrivers are approximately the same. They are quite light and have a “pistol” handle, designed for working with the tool with one hand.
How to properly insert a bit into a screwdriver?
The start key is designed in such a way as to regulate the rotation speed by pressing force.
An important element of a screwdriver is its power source. If drills are produced in both mains-powered and autonomous (battery) versions, screwdrivers, due to the nature of their application, are almost exclusively battery-powered. The battery is the heaviest and most expensive part of the screwdriver.
Household models of screwdrivers are usually equipped with nickel-cadmium batteries (designated “Ni-Cd”), while more expensive professional models are equipped with lithium-ion (“Li-Ion”) batteries.
Their difference is that nickel-cadmium ones have a shorter service life (about 1000 recharges), and also have one unpleasant feature: if the battery is not completely discharged, its capacity decreases during subsequent charging.
But whatever the battery, its capacity is limited by the weight of the tool. Therefore, even the most expensive models of screwdrivers can work continuously for no more than a few hours.
Some manufacturers solve this problem by introducing a second spare battery into the screwdriver kit. However, this significantly increases the cost of the tool. The battery is charged from a regular network.
The charging speed again depends on the model and can range from 2-3 to 6 hours, although some models of screwdrivers provide “fast” charging in 10-15 minutes.
Operating rules
Working with a screwdriver is easy. The jaws of the chuck hold the attachment required for the job (“bit”, or wrench, or drill), and by pressing the screwdriver with some force, pressing the button rotates the chuck. If it is necessary to unscrew a screw or pull out a drill, “reverse” is activated. When working, you should follow several rules:
- Fully charge the screwdriver before using it. At the same time, strictly follow the charging time instructions - “overexposure” of the battery in the charger shortens its service life.
- When working, choose the “screwing” or “drilling” mode correctly - this way you will protect the motor and gearbox of the screwdriver from damage.
Please remember that the screwdriver is not designed for drilling into stone or concrete. - Try not to throw or drop the screwdriver - it is a rather fragile tool.
- Keep the screwdriver clean - remember that fine dust and dirt particles act as an abrasive in the rubbing parts, and the screwdriver elements fail faster.
- Now you have a general idea of what a screwdriver is and how to work with a screwdriver. It's time to pick up the instrument and create!
03/23/2013 at 14:03
Cordless drill/driver Bosch PSR 18 Li-2.
A fairly simple screwdriver for home use, the main advantage of the device is a universal lithium battery, suitable for a jigsaw and delta grinder.
The weight of the screwdriver including the battery is 1.3 kg. That is, it is not heavy, but not light either. At the same time, the maximum torque is 46N*m, which is not bad at all.
The speed is regulated, as in most other screwdrivers and drills - with a button. Also standard, there is a chuck rotation direction switch located nearby.
The screwdriver has a standard quick-release three-jaw chuck. The maximum diameter of the drill shank that can be clamped into this chuck is 10mm.
The manufacturer does not recommend using this screwdriver for drilling large holes: more than 10mm in steel, more than 35mm in wood.
To fix a bit or drill in the quick-release chuck of a screwdriver, just fix the chuck with your hand and turn on the screwdriver at high speed.
How to use a screwdriver
And the chuck will clamp the drill itself.
To remove a drill or bit, you need to switch the screwdriver to reverse, lock the chuck and turn on the screwdriver: the cams will open and release the drill or bit.
The torque limiting clutch has become standard in screwdrivers. At the top of the case, opposite the cartridge, there is an arrow that indicates the number. The larger the number, the greater the torque the clutch can withstand without tripping.
In total, the clutch has 10 positions with different torque settings, plus a drill mode. In drill mode? which is marked “DRILL”, the torque limiting clutch is disengaged. And with the help of a screwdriver you can already drill.
This screwdriver has two speed ranges from 0 - 400 rpm and from 0 - 1340 rpm.
The speed can be switched using the red slide switch at the top of the screwdriver, in the “backward” position, the screwdriver operates at the first - low speed.
If the engine is moved forward, the second speed is activated. In addition, the speed number can be seen in the window next to the switch.
A convenient option for a beginner is the direction of rotation indicator: two triangles at the top of the device will help you determine in which mode the screwdriver is operating: a forward arrow means that the chuck rotates clockwise and screws the screw accordingly; if the backward arrow lights up, the chuck rotates counterclockwise and turns out the screw.
The screwdriver has an indicator showing the charge level of the battery.
And nearby there is a “POWERLIGHT” backlight lamp, which will be a great help when working in poorly lit places.
We drill a wooden block in the “drill” mode, i.e. with the clutch disconnected. For a relatively thin drill, you can turn on the second speed.
To drive a screw, you need to select a bit that is suitable for this type of screw. The main types of splines, in the photo from left to right:
- 1) Philips,
- 2) positdrive,
- 3) straight,
- 4) star-shaped (torx),
- 5) hexagonal (hex).
In addition to the shape, the slots differ in size and for each slot size of a screw or screw, you need to take a bit of the right size.
So, the required bit is selected and clamped in the chuck, but to screw in the screw, you should turn on the first speed and set the clutch to limit the torque. In our case, for this diameter of screws we select position “17”.
The photo shows the result of screwing in a screw to different depths. When the screwdriver fully tightens the screw, the screwing force will increase and the torque limiting clutch will begin to operate. Thanks to this, the screw will not go deeper than necessary and will not split the block.
The lithium-ion batteries on which the battery is built are very good and you will not need to replace the batteries in the screwdriver for a long time.
Published by: admin - April 2, 2013, Remember the article:
Related posts in this category:
Forum / Tools and equipment / BOSCH GSR 12 V screwdriver chuck clamp jammed
Ask a question you are interested in on our forum without registration
and you will quickly receive an answer and advice from our specialists and forum visitors!
Why are we so sure of this? Because we pay them for it!
Many people are already making money just by communicating on our forum! For example, like this. Or like this.
You can start communicating on the forum now. Just log in or register, it will take one minute.
Source: https://stroyvolga.ru/%D0%BA%D0%B0%D0%BA-%D0%B2%D1%8B%D1%82%D0%B0%D1%89%D0%B8%D1% 82%D1%8C-%D0%B1%D0%B8%D1%82%D1%83-%D0%B8%D0%B7-%D1%88%D1%83%D1%80%D1%83%D0 %BF%D0%BE%D0%B2%D0%B5%D1%80%D1%82%D0%B0/
Hard case
Well, it happens that the cartridge does not want to turn away in any way, which means that the drill cannot be pulled out of it. This should not happen on working cartridges, because if under any circumstances the cartridge does not spin up, this may indicate a malfunction.
Usually this does not happen abruptly - the cartridge begins to wedge before it clamps so that it does not turn around later.
In such a situation, you can resort to two methods. I would like to immediately say that the cartridge will then need to be changed. In this case, the drill actually needs to be removed in order to save the drill itself, and also to make it possible to remove the faulty chuck from the screwdriver. This cannot be done with a stuck drill.
- The first method is quite humane. It is necessary to hold the drill in a vice and try to turn the entire screwdriver around it. To make the task easier, you can spray WD-40 into the cartridge. It will be possible to turn the entire screwdriver with the chuck only if its design is such that the chuck is aggressively coupled to the screwdriver and cannot be turned except by pressing the start button. But not all models provide this, so you can twist the cartridge using a gas wrench - the plastic part of it will deteriorate. If the drill gives way, then you need to twist the chuck back and forth and evenly pull it off the drill.
- If the drill does not give in, then you will have to resort to the “vandal” method. We take a grinder and simply cut the cartridge. You just need to cut so as not to destroy the screwdriver spindle and the drill itself, if you need it intact. Not a single drill can resist this technique.
These are the methods for removing the drill from the screwdriver. If you have the second case, then I’m sorry, but I don’t know a more humane method and I think that there is none. At least this is how I got the drills out. And this is where I end this article - see you next time!
Sources:
https://instrument16.ru/instrument/shurupoverty/kak-dostat-sverlo-iz-shurupoverta.html https://instrument-tehnika.ru/kak-iz-shurupoverta-vytashchit-sverlo/