Care and storage
- regularly disassemble and clean the internal elements of the screwdriver from carbon deposits, dust and dirt;
- If unstable operation occurs, carry out diagnostics. Check the wear of the brushes so that you do not have to change the motor armature;
- Do not leave the instrument in areas with high humidity or under the sun. The same goes for the battery;
- Do not keep the battery near keys, coins or other short metal objects. In case of accidental contact with the poles, the battery will short circuit. As a result, a fire may occur;
- At the end of the working day, take a clean rag and wipe the instrument. The cloth can be slightly moistened with water without using detergents;
- The screwdriver should be stored in a dry environment with positive temperatures. Use a case or other packaging to prevent the instrument from becoming covered in dust.
Operate a screwdriver, observing safety precautions and the rules described in the instructions.
Choose the right equipment. And then the tool will serve you for a long time. How to insert a drill
into
a drill
and hammer drill
- 1 Varieties
- 5 How to insert a drill
- 3 What to do if the drill gets stuck
- 4 Videos
There are often problems that arise when working with a rotary hammer or another drill. Basically, the problem may lie in the inability to work correctly with drills. First, let's look at some differences between the cartridges and the drills.
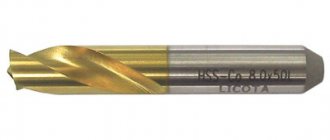
Magnetization and hardening of attachments
A large number of nozzles are made in China from soft material. Therefore, they quickly lose their shape. A new bit doesn't last long. To extend its service life, the nozzle must be hardened. You will need: machine oil, a gas burner or gas stove, a small container for oil from any tin can, a piece of steel wire.
- Wrap the wire around the bat so that it does not fall out.
Bat wrapped in wire
The bat must be red hot
Black bat - hardened
A hardened bat will last longer than a regular one.
Video: oil hardening bits
For ease of use, especially in hard-to-reach places, the nozzles are magnetized. This can be done in several ways.
Method 1
You will need to purchase a special device for magnetizing and demagnetizing screwdrivers. Insert the bat there. A square window magnetizes, while a stepped window does the opposite.
Device for magnetization and demagnetization
Device for magnetization and demagnetization
Method 2
- Take the insulated wire and wind the spool in three rows onto the plastic tube.
Circuit diagram for magnetization
Method 3
- Take a magnet and rub the nozzle against it on all sides.
Magnetizing a bit with a magnet
Video: magnetizing attachments with a magnet
Method 4
- Buy neodymium magnets at a radio store.
- Divide them into two parts and place them in one row so that the resulting groups repel each other. Place a plastic pen cap between them. To hold the repelling magnets, secure them with plasticine.
Magnetization with neodymium magnets
The process of magnetizing bits with neodymium magnets
As a result, the attachment will magnetize the fastener better than a new one.
Video: magnetizing bits with neodymium magnets
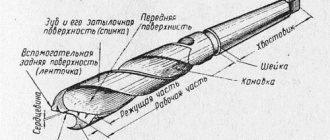
Device and purpose
A screwdriver is used for various construction and repair work, but its main function is to quickly screw in and tighten fasteners: self-tapping screws, screws, bolts, screws.
It helps to cope with a large volume of tasks in significantly less time than using a screwdriver.
Budget screwdrivers of low and medium power are used in the assembly, installation and dismantling of furniture, equipment, construction of frame structures (partitions, walls, suspended ceilings) and other objects. A powerful tool with an impact mechanism copes with drilling holes.
In addition to the standard operations listed in the instructions for the screwdriver, it can also be used for other tasks. Use a mixer attachment to mix thin solutions. Using a special adapter, the device is connected to an ice auger to quickly make holes.
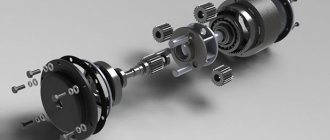
The body of most screwdrivers is made of plastic, which reduces the overall weight of the tool. Inside the case are located:
- engine. Depending on the type of device, it can be electric or pneumatic. The former operate from a network or battery, the latter from a compressed air tank or compressor.
- Gearbox. A gear mechanism that transmits rotational motion from the motor to the spindle.
- Clutch-regulator. Connected to the gearbox, it is used to adjust the screwing depth and torque.
- Start capacitor. He starts the engine.
- Chuck. Bits, drills, and socket heads are inserted into it. The most common are quick-clamping three- or four-jaw ones.
- Power source (battery) and/or power cord.
The body houses a control panel with a power button and a speed switch. To operate in unscrewing mode, reverse is used. Additionally, the screwdriver can have a backlight and a fuse.
How to work in twist mode?
Before you start work, you need to prepare the tool. If it runs on a battery, you need to charge it.
The next step is to install the bit. To choose the right nozzle, you need to take into account the size of the fastener head and the type of slot. Bits vary in type and diameter:
- splined. Most often used. Designed for tightening screws with a countersunk head with a thread for a flat screwdriver, screws. Tip width varies.
- Cross. They are used to tighten and unscrew self-tapping screws and countersunk head screws. The tip has 4 radial diagonal ribs.
- Hexagonal. Used for fasteners whose heads have hexagonal recesses. Screws and screws of this type are used in assembling furniture and appliances.
- For bolts and nuts. A nozzle with a tip, inside of which there is a hexagonal recess. With it, the tool is used as a wrench to tighten screws, screws, and bolts.
There are other attachments, but they are used less frequently. How to change or even remove a bat? Having determined which bit is needed, insert it into the chuck. The installation method depends on the type of cartridge. The quick-clamping attachment is inserted like this: the chuck is twisted counterclockwise until the distance between the jaws increases. Push the end of the nozzle between them, twist the cartridge clockwise so that the cams close and securely fix the part.
For newbies
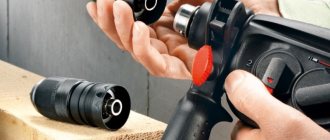
So, let's start with the simplest case - with inexperienced users. Screwdrivers have something called a torque regulator. It looks like a scale around the front of the screwdriver, which is right behind the chuck. There are numbers on it from 1 to 10, 15, 20 or even more - different for different models - and the last position on it is indicated in the form of a drill. If you rotate this regulator and set it opposite the special mark so that one of the numbers is next to it, then when a certain torque is reached, the cartridge will no longer rotate, but will begin to click. If you put it on a “drill”, then the screwdriver will try to twist with all its might, as much as the engine power allows it.
However, it is worth noting that with two-speed screwdrivers, at the second speed, even in the “drill” position, if the torque reaches a certain value, then a protective system is triggered, which simply turns off the current supply. At the very first speed, the screwdriver will also try to turn “to the last.”
And a beginner can start drilling or screwing screws, for example, when the torque regulator is set to one of the numbers, or the screwdriver is set to the second speed (and it is recommended to drill at it).
The drill can be clamped quite tightly, and as a result, when you start to release the drill or bit in the standard way (by turning on the reverse, holding the chuck and pressing the start button), either the torque limiter or the protective system may work.
Therefore, in such a situation, you just need to set the screwdriver to first speed and set the torque regulator to the “drill” position. On single-speed models, you only need to set the torque regulator to the “drill” position. Well, then again we unscrew it in the standard way.
How to remove a bit from a screwdriver
.
What is a screwdriver? Essentially, this is the same drill, but a screwdriver differs from it in that it has a lower rotation speed of the chuck and, at the same time, greater torque.
Another difference is that while on a drill the rotation speed can change smoothly, on a screwdriver, as a rule, “fixed” rotation speeds of the chuck are set. This is due to the “slip” function of the screwdriver chuck: when the screw is tightened, the chuck stops rotating, although the motor is still running. This function allows you not to tear off the splines and not “drive” the screw inside.
Different types of speeds are designed for specific types of work and materials, as well as the “drilling” mode. Just like a drill, a screwdriver has a reverse function. The design features of the screwdriver allow it to perform a wide range of jobs: tightening and unscrewing screws and self-tapping screws, screws and nuts, drilling soft materials.
Using a screwdriver, for example, in the production of plasterboard partitions or when assembling furniture, increases the speed of work significantly. Therefore, a screwdriver is rightfully considered one of the most common tools in any craftsman’s kit.
The designs of all screwdrivers are approximately the same. They are quite light and have a “pistol” handle, designed for working with the tool with one hand.
How to properly insert a bit into a screwdriver?
The start key is designed in such a way as to regulate the rotation speed by pressing force.
An important element of a screwdriver is its power source. If drills are produced in both mains-powered and autonomous (battery) versions, screwdrivers, due to the nature of their application, are almost exclusively battery-powered. The battery is the heaviest and most expensive part of the screwdriver.
Household models of screwdrivers are usually equipped with nickel-cadmium batteries (designated “Ni-Cd”), while more expensive professional models are equipped with lithium-ion (“Li-Ion”) batteries.
Their difference is that nickel-cadmium ones have a shorter service life (about 1000 recharges), and also have one unpleasant feature: if the battery is not completely discharged, its capacity decreases during subsequent charging.
But whatever the battery, its capacity is limited by the weight of the tool. Therefore, even the most expensive models of screwdrivers can work continuously for no more than a few hours.
Some manufacturers solve this problem by introducing a second spare battery into the screwdriver kit. However, this significantly increases the cost of the tool. The battery is charged from a regular network.
The charging speed again depends on the model and can range from 2-3 to 6 hours, although some models of screwdrivers provide “fast” charging in 10-15 minutes.
Operating rules
Working with a screwdriver is easy. The jaws of the chuck hold the attachment required for the job (“bit”, or wrench, or drill), and by pressing the screwdriver with some force, pressing the button rotates the chuck. If it is necessary to unscrew a screw or pull out a drill, “reverse” is activated. When working, you should follow several rules:
- Fully charge the screwdriver before using it. At the same time, strictly follow the charging time instructions - “overexposure” of the battery in the charger shortens its service life.
- When working, choose the “screwing” or “drilling” mode correctly - this way you will protect the motor and gearbox of the screwdriver from damage.
Please remember that the screwdriver is not designed for drilling into stone or concrete. - Try not to throw or drop the screwdriver - it is a rather fragile tool.
- Keep the screwdriver clean - remember that fine dust and dirt particles act as an abrasive in the rubbing parts, and the screwdriver elements fail faster.
- Now you have a general idea of what a screwdriver is and how to work with a screwdriver. It's time to pick up the instrument and create!
03/23/2013 at 14:03
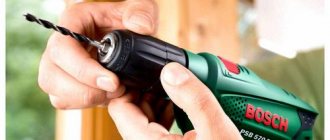
Cordless drill/driver Bosch PSR 18 Li-2.
A fairly simple screwdriver for home use, the main advantage of the device is a universal lithium battery, suitable for a jigsaw and delta grinder.
The weight of the screwdriver including the battery is 1.3 kg. That is, it is not heavy, but not light either. At the same time, the maximum torque is 46N*m, which is not bad at all.
The speed is regulated, as in most other screwdrivers and drills - with a button. Also standard, there is a chuck rotation direction switch located nearby.
The screwdriver has a standard quick-release three-jaw chuck. The maximum diameter of the drill shank that can be clamped into this chuck is 10mm.
The manufacturer does not recommend using this screwdriver for drilling large holes: more than 10mm in steel, more than 35mm in wood.
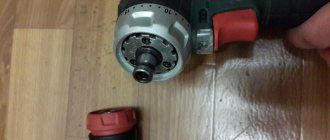
To fix a bit or drill in the quick-release chuck of a screwdriver, just fix the chuck with your hand and turn on the screwdriver at high speed.
How to use a screwdriver
And the chuck will clamp the drill itself.
To remove a drill or bit, you need to switch the screwdriver to reverse, lock the chuck and turn on the screwdriver: the cams will open and release the drill or bit.
The torque limiting clutch has become standard in screwdrivers. At the top of the case, opposite the cartridge, there is an arrow that indicates the number. The larger the number, the greater the torque the clutch can withstand without tripping.
In total, the clutch has 10 positions with different torque settings, plus a drill mode. In drill mode? which is marked “DRILL”, the torque limiting clutch is disengaged. And with the help of a screwdriver you can already drill.
This screwdriver has two speed ranges from 0 - 400 rpm and from 0 - 1340 rpm.
The speed can be switched using the red slide switch at the top of the screwdriver, in the “backward” position, the screwdriver operates at the first - low speed.
If the engine is moved forward, the second speed is activated. In addition, the speed number can be seen in the window next to the switch.
A convenient option for a beginner is the direction of rotation indicator: two triangles at the top of the device will help you determine in which mode the screwdriver is operating: a forward arrow means that the chuck rotates clockwise and screws the screw accordingly; if the backward arrow lights up, the chuck rotates counterclockwise and turns out the screw.
The screwdriver has an indicator showing the charge level of the battery.
And nearby there is a “POWERLIGHT” backlight lamp, which will be a great help when working in poorly lit places.
We drill a wooden block in the “drill” mode, i.e. with the clutch disconnected. For a relatively thin drill, you can turn on the second speed.
To drive a screw, you need to select a bit that is suitable for this type of screw. The main types of splines, in the photo from left to right:
- 1) Philips,
- 2) positdrive,
- 3) straight,
- 4) star-shaped (torx),
- 5) hexagonal (hex).
In addition to the shape, the slots differ in size and for each slot size of a screw or screw, you need to take a bit of the right size.
So, the required bit is selected and clamped in the chuck, but to screw in the screw, you should turn on the first speed and set the clutch to limit the torque. In our case, for this diameter of screws we select position “17”.
The photo shows the result of screwing in a screw to different depths. When the screwdriver fully tightens the screw, the screwing force will increase and the torque limiting clutch will begin to operate. Thanks to this, the screw will not go deeper than necessary and will not split the block.
The lithium-ion batteries on which the battery is built are very good and you will not need to replace the batteries in the screwdriver for a long time.
Published by: admin - April 2, 2013, Remember the article:
Related posts in this category:
Forum / Tools and equipment / BOSCH GSR 12 V screwdriver chuck clamp jammed
Ask a question you are interested in on our forum without registration
and you will quickly receive an answer and advice from our specialists and forum visitors!
Why are we so sure of this? Because we pay them for it!
Many people are already making money just by communicating on our forum! For example, like this. Or like this.
You can start communicating on the forum now. Just log in or register, it will take one minute.
Source: https://stroyvolga.ru/%D0%BA%D0%B0%D0%BA-%D0%B2%D1%8B%D1%82%D0%B0%D1%89%D0%B8%D1% 82%D1%8C-%D0%B1%D0%B8%D1%82%D1%83-%D0%B8%D0%B7-%D1%88%D1%83%D1%80%D1%83%D0 %BF%D0%BE%D0%B2%D0%B5%D1%80%D1%82%D0%B0/
How to replace the chuck in a drill with your own hands?
To attach the chuck to the drive shaft of the drill, a threaded connection or Morse taper is used. A visual inspection of an electric drill will not always help indicate how to secure the drill chuck. This can be indicated by the marking on the cartridge: it is stamped on its surface.
Replacing the conical type of part
The standard size of the Morse cone (according to GOST 9953–82) consists of 9 values: from B7 to B45. The larger the number after the letter B, the larger the diameter of the cone.
The marking on the cartridge indicates the type of fastening
Thus, having found the marking “B” on the surface of the cartridge, we can conclude that this is a device with a conical mounting base. With this method of attachment, the cartridge can be easily removed. It is enough to use a drift and a plumber's hammer.
Video: how to remove a chuck with a cone from an electric drill?
Replacing the reversible threaded chuck
To secure the drill clamp to an electric household drill using a threaded joint, two types of threads are used:
- inch (for foreign models);
- metric (from Russian manufacturers).
On an electric household drill, two types of threads are used using a threaded joint.
The following type of marking is applied to the surface of the body of the threaded clamping chuck: 1.5–13 1/2 – 20UNF or 1.5–13 M12x1.25.
The reversible threaded cartridge for fixation has a screw with a left-hand thread. You need to know this nuance when removing a broken cartridge. In order to get to the screw head, it is necessary to recess the cams into the collet completely. As soon as the head of the screw is visible, use a hardened Phillips screwdriver to unscrew it to the right clockwise. Then hold the hex key in your fists and hit it sharply in a counterclockwise direction. After the cartridge is torn from its place, it can be easily unscrewed.
Video: how to remove a chuck from a reverse drill or screwdriver?
On other models there are other options for mounting the cartridge on the thread. In some cases, the cartridge is twisted entirely from the threaded end of the shaft. In other cases, the screw can be fixed with a special thin key using a narrow groove. The main difficulty is to move the cartridge from its place when unscrewing.
Sometimes this is very difficult to do. In any case, to remove the cartridge you need: a mechanic's tool, the necessary skill and patience.
Chuck rotation direction
The design of the drill-screwdriver has a push-type switch with which you can change the direction of rotation of the chuck to tighten or unscrew the fastener.
There is a directional designation on both sides of the instrument near this switch. By pressing the switch, you can reverse.
It must be remembered that the direction of rotation can only be changed when the electric motor is completely stopped.
In the middle position, the switch blocks the operation of the tool. This locking is used while replacing bits or drills.
If necessary, the drill-driver chuck can be replaced. It must be borne in mind that it is fixed with a screw with a left-hand thread, which means it must be unscrewed clockwise.
This screw can be accessed through the front of the chuck.
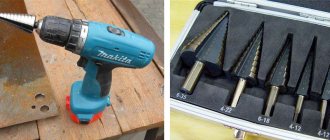
The tool kit also includes a set of drills of different diameters. All of them are designed to work in relatively soft materials.
The drill bits are clamped in the chuck in the same way as a bit attachment (see photo above)
To care for the instrument, simply wipe its body with a damp cloth and then dry it; do not use household chemicals or solvents.
Freezing of the battery is not allowed.
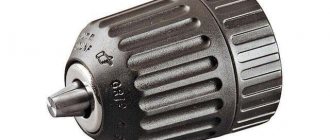
Fastening device – non-combat cartridge
The chuck is the fastener in which the drill is fixed. The fastener itself is screwed onto the tool spindle. Most often, drills are equipped with a jaw chuck. This design is a hollow cylinder with metal “fingers” inside. When you turn the adjusting ring, which is located outside the assembly, the “fingers” converge or diverge along the inner cone-shaped surface. In such a “fist” you can clamp both a drill with a cylindrical shank and a hexagonal one.
Convenience and ease of use have made the cam mechanism popular. However, it is not without its drawbacks. One of them is the difficulty of working with small drills. A short product may simply fall inside. You can still secure it by placing the drill in a horizontal position, but you can’t put too much pressure on it while working. If another drill was inserted into the drill, you can remove it by turning the adjusting ring in the appropriate direction. It is not always possible to do this manually; for this purpose there is a special key that acts like a lever, increasing the force. By the way, it is also not recommended to tighten the drill without a key - the larger the diameter of the drill, the more reliable the fastening should be.
When purchasing fasteners, make sure that they are rubberized - this way you will be less likely to injure your hands when securing the tool.
The quick-release fastener, the second most popular, can be operated without a key. Simply insert the drill and turn the lever; this can often be done with one hand. The drill fixation that this type of chuck provides is quite sufficient for most jobs, however, compared to the classic fastening option, it is inferior in reliability and is more expensive. The main advantage of a quick-release fastener is the speed of drill replacement and the safety of the process, since such a chuck is devoid of teeth that can injure your hands. The absence of a specialized key is also a significant advantage! Experienced builders know how easily it gets lost, so very often you can see a key taped to a wire with tape or tape.
True, this does not add convenience, but there is at least some confidence that you won’t have to look for the key throughout the construction site. How to change the drill bit in a screwdriver? The scheme is absolutely identical - the chucks of most drills are similar to the fasteners on screwdrivers. Of course, the latter tool cannot be a full-fledged replacement for a high-quality drill, if only because the fasteners are not provided for drills with a large diameter, and the speed of a screwdriver is usually lower.
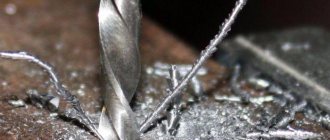
Why does a drill bit fall out of a screwdriver?
There are several reasons why drill bits may fall out of a screwdriver. Most often, the problem occurs due to an insufficiently tightened cartridge. In this case, the bit will not be fully clamped and, due to the increased load, the tightening will weaken. The drill falls out of the chuck.
In cases where the screwdriver has a keyed chuck, there is an increased likelihood that the master may not clamp the bit correctly. It is also worth considering that the cartridge has holes. During the tightening process, do not install the key in one hole and pull it all the way. The bit should be tightened evenly to prevent the chuck from unwinding. In this case, you will need to insert the key in turn into each of the recesses.
Often during operation the cartridge may jam. This causes the drill to fall out. In this case, experts recommend lubricating it with VD-40 liquid. The problem also occurs when dust/dirt gets on one of the elements of the tool.
A failed chuck causes the drill to fall out when working with a screwdriver. In such a situation, you will need to replace the worn part.
Types of instruments: characteristic features
Screwdrivers can be classified into the following types:
- Drill/driver
- Impact wrench
- Cordless screwdriver
- Standard screwdriver
The operating principle of the tools is similar to each other, but there are still differences in functionality.
A drill-driver can not only tighten a screw, but also drill a hole. The impact wrench specializes in bolts and nuts. The third representative is a cordless screwdriver, designed exclusively for screwing/unscrewing fastening elements with a cross-shaped head. The latter type is characterized by low power, unlike the above.
Features of the screwdriver
A screwdriver means the same drill, but it has a lower rotation speed of the chuck and the ability to adjust the twisting force. No one has ever enjoyed twisting and unwinding with their own hands for many hours. A screwdriver will help you quickly and efficiently tighten and unscrew fasteners. Also, using this device, you can make holes in materials of various densities - metal, wood and stone. The screwdriver is powered from the mains or battery.
Construction equipment is divided into the following types:
- standard;
- cordless screwdriver;
- drill-driver;
- impact wrench
All types of tools differ only in purpose: a screwdriver (regular) is used only when working with fasteners, a drill will help you drill the required hole, a screwdriver is intended for tightening and unscrewing fastener elements with a cross-shaped “hat”, a device with a self-explanatory name, a wrench, does an excellent job with bolts and nuts .
How to replace the chuck - updating the drill
Most often, the cartridge is the first to become unusable in a drill. Dismantling it at home is not easy, but it is possible! The fastener is screwed onto the spindle itself, but in addition it is also secured with a bolt with a left-hand thread. In order to get it, you need to completely open the cartridge - it is inside. The whole difficulty of unscrewing it lies in the fact that many do not know about the left-hand thread, and when trying to unscrew it, they twist it even more, tear off the cap and eventually take it to the service center.
By unscrewing the bolt, you can also unscrew the cartridge itself, although this is not so easy to do. Some models have recesses at the base of the thread for a wrench - in this case, you can fix the spindle and unscrew the fasteners using a lot of force. The real difficulty comes when there are no wrench cuts. You will have to remove the housing cover to secure the spindle inside the drill. Difficult, but doable.
Removing a cartridge is one thing. Finding a new one is a completely different matter. In addition to the methods for clamping the drill, which are described above, different chucks also have different threads! The surest way not to confuse anything is to take an old cartridge with you and demonstrate it to the seller, or choose the right one based on the layout. When you have completed this task, all that remains for you is to screw the chuck onto the spindle and screw in the bolt, which in our case is screwed counterclockwise.
An indispensable power tool with a self-explanatory name, the screwdriver is actively used in construction work. The most common procedure with such a device is replacing the drill. Sometimes it seems that this process is very complicated and almost impossible.
However, in reality, replacing a drill in a screwdriver will not be difficult, the main thing is to follow the instructions step by step and pay attention to the details
How to regulate speed and force
The rotation speed is changed by a switch located on the screwdriver body. High speed is used for large bolts and screws, as well as for drilling, if such a function is present.
Many models have a force limiting clutch. Its presence in a power tool can be determined by a rotating ring with numbers. Some users do not understand the meaning of the clutch and do not touch it. Using a ratchet, you can adjust the depth of screwing in the screw. If the material is too soft, the head of the fastener is easily recessed and can pass right through. When using small fasteners, very high torque can destroy it. The ratchet prevents the slots of the screws from being cut off and the screwdriver bits from wearing out. To determine the desired value on the adjusting ring, make several passes, starting with the minimum. For drilling mode, maximum torque is used. But only if such a function is available.
How to change a drill bit in a drill - we can do it ourselves!
It is not always possible to remove a drill from the chuck in the usual way - as a result of heavy load or improper fixation, it can jam the chuck. How to get a drill out of a drill without damaging the fastener and the tool itself? First of all, try to cool the cartridge thoroughly. Sometimes this is enough for the cams to release the drill a little and you can pull it out.
Tips for working with a drill and screwdriver
Before starting work, you should make sure that all parts of the tool are in good condition;
After a long break in operation, the battery still discharges; in this case, it should be recharged;
It is necessary to make sure that there is no electrical cable passing through the drilling areas and no water or gas pipes are buried;
When operating the tool, it is necessary to avoid frequent braking of the electric motor, this can damage the battery;
Be careful to check the polarity when connecting to the charger;
The first battery charge can last up to 12 hours;
Avoid getting moisture on the instrument body;
A screwdriver is a tool designed for tightening fasteners. If you have drills and special attachments, you can also perform some other operations with it.
Instrument care rules
The screwdriver requires minimal maintenance. In order for the tool to work properly, you must adhere to the recommendations specified by the manufacturer, do not use it for tasks that are not specified in the technical data sheet, and do not overload it too often. Periodically, the inside of the chuck and rotating parts must be lubricated with machine oil.
The instrument should be stored in a dry place, away from sources of heat, dampness and sunlight. After each use, wipe the housing with a clean, dry cloth to remove construction dust. If drops of mortar get on the screwdriver, you can clean it with a well-wrung out soapy cloth.
If you follow the operating rules and do not use the tool for tasks exceeding its capabilities, you can significantly simplify repair and construction work. In order for a screwdriver to work for a long time and not break down at the wrong time, you need to take care of it promptly, monitor the condition of the parts and recharge it before use.
Bits - attachments
The screwdriver comes with several types of bits with different working edge shapes.
Straight edge bits are designed to work with fasteners that have a single slot (spline). Depending on its length and depth, a suitable bit is selected.
The shape of the cross-shaped bit is selected in the same way - the width of the slot and the dimensions of the fastener head itself are taken into account here. For reliable operation, the edge of the bit must fit tightly into the splines, otherwise there is a risk of “licking off” the edges of the splines.
To attach the bat to the chuck, a special attachment with a magnetized holder is used, which prevents the structure from falling apart and reliably holds the bat in a variety of positions.
To secure the bit attachment, you need to unscrew the moving part of the chuck.
Insert the nozzle and screw the cartridge in until it stops.
There are also very convenient double-sided bits that can be fixed in a chuck without an attachment.
Video: How to Insert a Drill Bit into a Bosch Drill
Pulling out and installing drill bits is much easier and faster when using a quick release chuck. In it, the sleeve is rotated manually. To limit cam force, they are often equipped with locking elements.
Before inserting the planter, first make sure the planter is in working order and disconnect it from the power source. Only then can you start training.
Types of Eyeless Cartridges
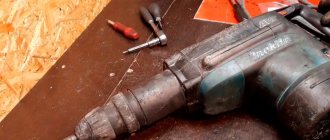
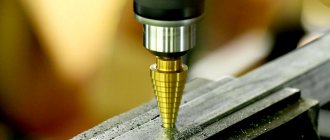
Installation of working tools on a hammer drill
As stated above, the hammer should be checked before installing the drill bit. To perform such a test, the perforation mode is set for non-combat drilling. If you hear and feel that the motor runs smoothly and without shock when you press the start button on the device, this means that the hammer can be used for its intended purpose after drilling or drilling.
To attach a straight shank drill bit to a hammer drill, use a jaw adapter
Before inserting a drill into a hammer drill, the shank of the working tool must be treated with a special lubricant that will protect it from corrosion. The procedure for installing drill bits in a drill is as follows.
- The hammer drill is installed on the back of the floor or other hard surface.
- The moving part of the clamping device is retracted.
- The tool is inserted into the punch until it stops. In this case, the drill bit or insertion bit should be held vertically. If you do not comply with this requirement, you may experience breakage or even breakage of the tool, which can also cause the drill bit to malfunction.
Press until it clicks, then pull the drill out if it doesn't work. Everything is fine
Due to the fact that the chucks on modern hammer drills have a fairly simple operating principle, questions about how to get a drill from a hammer drill, as a rule, do not arise.
After removing a used tool from a hammer drill to replace it with another, it is recommended to immediately clean the shank of grease and construction dust. The drill bit you are going to insert should also be cleaned and pre-lubricated. The tool replaced in this way will not damage the impact mechanism and will last much longer.
Lubrication extends the life of both drill bit and bit
With a hammer drill, you can not only get a drilled structural element, but also perform processing using a special chisel. You can also set the device's mixer as an operating element.
Home workers also often have questions about how to insert a drill into a screwdriver or how to replace the cartridge on an impact drill. The first question is easy to solve, since the design of the screwdriver uses chucks of the same design as for drills and rotary hammers. But the question of how to correctly replace a cartridge with a hammer drill must be approached with skill: carrying out such a procedure without certain knowledge and skills is not easy.
Some tips for using drilling tools
To avoid the risk of injury to your health from flying tools or concrete chips, drilling operations must be carried out with all precautions. To ensure this safety, you should use safety glasses, gloves, earplugs or earplugs
Naturally, all work must be carried out in special clothing, which should not contain hanging elements that could be wound around the drill.
To prevent the power tool used for drilling from overheating, it should be rested regularly.
It is very important to insert the drill correctly (this must be done until the tool stops)
Two ways to compress a thin cartridge if the jaws extend just short of the shank
If a drill bit gets stuck in the wall while drilling, it should be removed without removing the tool from its surface. To do this, remove the drill bit from the hammer drill and insert another one with which you want to start breaking the wall around the drilled hole in it.
If the drill bit cannot be removed from the drill or hammer drill, it should be clamped in a vice and then pressed down with a hammer using a wooden spacer to press the jaws of the clamping mechanism. This can be helped by oil, a few drops of which are poured into the key cartridge.
What to do if the drill gets stuck
Often, craftsmen ask how to change the attachment on a screwdriver if it is stuck in the chuck and they cannot get it out. The cutting element may jam in the drill for the following reasons:
- If you insert equipment larger than the maximum permissible size. The cams are moved apart to their maximum value, but it is not possible to compress them all the way or then unclench them to remove the drill.
- A large amount of chips, debris or scale has accumulated under the shaped parts of the jaws. In this case, the cams jam due to free movement during compression and expansion.
- Due to overheating, insufficient sharpening, poor quality materials, or choosing the wrong drilling angle, the nozzle may break during operation. The tool jams because the shank size does not match the chuck clamping mechanism.
You should not pull out the drill yourself if you do not have the necessary knowledge and skills. To solve the problem, it is recommended to contact a service center or a specialist.
The most proven method to help remove the cutting element is to tap the cams. The cartridge is first removed from the unit, multi-purpose grease or machine oil is poured inside for 15 minutes. Then they fix it in a vice and apply a wooden plank to it, through which they tap.
At the same time, the grip of the cams is weakened, and the nozzle is easily removed. After filling the inside with lubricant, you can warm up the cartridge with a hairdryer. The liquid penetrates the area where the drill is jammed, allowing it to be removed.
Prices in online stores
You can solve the problem using 2 adjustable wrenches. With one they clamp the base of the cartridge, and with the second they try to unscrew it, carefully rotating the upper part. To reduce the risk of damage to any elements, soft and thin but dense gaskets are used.
In some cases, cooling the tool holder helps remove a jammed element. At the same time, the cams weaken the grip of the nozzle, the latter is easily removed.