11.25.2019 Author: VT-METALL
Issues discussed in the material:
- What are the features of horizontal pipe welding
- How to do horizontal pipe welding
- How to check the quality of horizontal pipe welding
Electric welding allows you to connect metal products by heating and melting them with an electric arc. Today, this technology is actively used in a variety of industries and even in everyday life. Next, you will learn how horizontal pipe welding occurs.
Necessary equipment
For horizontal welding, the following equipment and tools are used:
- Welding inverter . Used to reduce the mains voltage to the required value. Suitable for metal parts of various thicknesses.
- Transformer . Reduces voltage to working voltage.
- Rectifier . Converts alternating current to direct current. Creates arc stability.
- Electrodes . They are a rod with a protective coating.
The welder must have equipment that ensures safety during work: clothing made of fireproof material, a protective mask.
Welding vertical seams
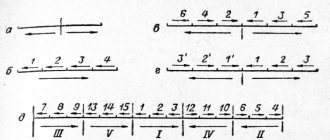
Welding of vertical seams can be done from the bottom up (ascending, diagram a) in the figure), or from top to bottom (downhill, diagram b) in the figure). It is recommended to weld from bottom to top, if possible, and with as short an electric arc as possible. When welding from bottom to top, the underlying metal has time to partially crystallize and the resulting crater in the form of a shelf prevents the deposited metal from flowing down and helps to retain it.
With the uphill welding method, it is easier to ensure good penetration of the weld root and welded edges, because liquid metal flows from them into the weld pool and improves heat transfer from the arc to the base metal. But, at the same time, the surface of the weld turns out to be scaly.
When welding downhill, it is more difficult to obtain good penetration and high quality welding. Liquid slag and molten metal, under the influence of gravity, flow under the arc. They can be kept from flowing down by the repulsive force of the arc and the force of surface tension, but often they are not enough and the liquid metal flows down to areas that have not yet been welded.
When downhill welding, the electric arc is excited when the electrode is positioned perpendicular to the edges being welded. After exciting the arc, the electrode is tilted down and welding is performed with the shortest possible arc (diagram c) in the figure). Recommended electrode diameter is 4-5mm, welding current is 150-170A.
Horizontal seam welding technology
High-quality welding of a horizontal seam consists in the fact that it is necessary to select the cross-section of the electrode and the current strength. What is important is the welder’s ability to competently move the electrode in the direction of the seam and hold it at the correct angle. Do not allow the joints to overheat and the arc to die out prematurely.
When a horizontal weld is made, welding causes liquid metal to flow down. To avoid this, welding is carried out by alternately performing narrow beads. Each previous one becomes a support for the next. Transverse vibrations are not allowed. Surfacing is carried out in the direction from bottom to top. The welding current is selected as high as possible for the thickness of the materials being welded.
The weld pool begins to fall down. To avoid this, the electrode should be tilted. The angle of inclination of the electrode relative to the vertical plane is about 80 degrees. Welding a horizontal seam on a vertical surface ensures the formation of its required width and depth thanks to careful movements of the end of the electrode. Relaxing the welder's hand helps guide the electrode in wave-like movements. Various cross stroke patterns are used.
In addition to moving the electrode, current parameters play an important role in obtaining a high-quality seam. The larger the diameter of the electrode and the thickness of the metal being welded, the higher the current strength. An even seam is obtained with an optimal ratio of current strength and speed of movement of the electrode.
Welding seams in vertical, horizontal and ceiling positions
Welding vertical, horizontal and ceiling seams requires increased professional skill from the welder. Unlike welding seams in a lower position, welding seams in a vertical, horizontal and ceiling position has its own characteristics and difficulties. One of these difficulties is the spreading of molten metal from the weld pool or the penetration of molten electrode metal past it.
To eliminate such moments, they try to weld metals with the shortest arc possible. The movement of the electrode is most often performed with transverse oscillatory movements.
When welding in the lower position, gravity does not contribute to the spreading of liquid metal beyond the edges being welded. And when welding in other spatial positions, the liquid metal, under the influence of gravity, spreads beyond the metal bath. And in this case, the metal can be kept from spreading only by the force of surface tension.
Therefore, to increase the surface tension force, a large volume of the weld pool should not be allowed. To reduce the volume of the bath, it is necessary to move the electrode away from it from time to time so that the liquid metal can partially crystallize.
Next, it is necessary to reduce the width of the welding beads. It should not exceed three electrode diameters. In addition, when choosing manual arc welding modes, the current strength is set 10-20% lower than the value used when welding in lower positions. Electrodes for manual arc welding in inclined positions are used with small diameters: for welding vertical and horizontal seams no more than 5 mm, and for welding ceiling seams no more than 4 mm.
How to properly guide the electrode when welding metal.
If we move the electrode evenly, we get a “thread” seam. It may be enough to weld the metal through its entire thickness. If the products being welded are thick, then to warm them up, various manipulations must be done: from reciprocating movements in a spiral to moving in arcs across the seam.
As a result, we linger longer over each section of the seam, warming up and filling it better. There are single-pass welds (usually on metal up to 3 mm thick) and multi-pass welds, when several passes are required to fill the entire volume of the weld.
Below are video lessons: welding metal with an inverter for beginners, how to weld with inverter welding and other useful things.
Instructions for Beginners
Working with an inverter for beginners requires wearing the following pieces of protective equipment:
- work suit, gloves, boots made of fire-resistant materials;
- a headdress covering the back of the head;
- welder's mask to protect the eyes and face.
To join metals, proper manual or semi-automatic equipment is used. Electrical components must be isolated from other parts by a durable enclosure. Do not use cables with damaged braiding that do not meet the technical specifications of the device. The welder's workplace is equipped with everything necessary: a special table, a grounding bus, a lighting device, and fire protection equipment.
First, workers learn the rules of electric welding and how to form welded joints.
Types of welding, step-by-step instructions and safety instructions
There are different welding methods:
- Crescent. The electrode is positioned at a right or acute angle with respect to the surface and moves in a wave-like manner along the seam level.
- Ladder. The electrode must be positioned in the same way as in the previous version, but when the material is heated, it must be moved away and then brought back.
- Reciprocating. The electrode must be returned to the seam, which hardens.
The Crescent is suitable for beginners and is considered the easiest, but not as reliable as the others. The second and third types will require a little more time, but the result will be better.
Crescent welding method Source i.ytimg.com
There is also a step-by-step instruction for electrode welding:
- The first stage is the processing of areas that will be welded in the future. Cleaning occurs with an angle grinder or a wire brush.
- Next, you need to weld the root of the seam with an electrode to 0.3 cm, making a bead.
- If you need to weld from the outside, then the electrode should be pressed against the material for 1 second or less, then remove it and repeat the procedure again.
- During the process, it is necessary to monitor the uniformity of the arc.
- After this, it is necessary to clean the roller from the slag that formed during the process. If the shape turns out to be convex, then it must be brought to an even state.
- When performing the following steps, you must use a 4 mm electrode.
Cleaning places for welding Source svarkagid.ru
According to these instructions, even an inexperienced user holding a welding machine in his hands for the first time can start welding. Also, when using the system, you must remember several safety rules:
- It is always necessary to cook in a special mask and suit that protects against sparks;
- There should be no flammable objects nearby;
- it is necessary to monitor the serviceability of the machine (or apparatus) in order to avoid dangerous situations.
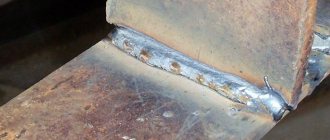
During welding, you also need to make sure that the seams lie neatly, without creating too much of a bulge, otherwise it will be difficult to clean it off later.
Correct seam Source i.ytimg.com
How to weld a butt seam?
Let's start learning how to weld a vertical seam. A butt joint is used, as a rule, when it is necessary to connect sheet metal or the end parts of pipes together. The workpieces should be positioned relative to each other in such a way that there is a slight gap between them, the value of which should not exceed 2 mm. If possible, they should be firmly fixed using clamps. During the welding process, the gap will be filled with molten metal.
If the metal thickness does not exceed 4 mm, then professional welders do not resort to any special preparation measures with the exception of rust removal. The product is welded strictly on one side. With a greater thickness, a double seam is formed. Special cutting of the edges of the workpiece is also required.
Prepare connections using one of the following technologies:
- If the element has a thickness of 4 to 12 mm, then the edges should be cleaned using one of the convenient methods. The edge cutting will need to be done on only one element. With a thickness of about 8-10 mm, stripping is carried out in the shape of the Latin letter V. Other cuts are technologically more complex, so they are used quite rarely;
- When obtaining welded joints with a metal thickness of more than 12 mm, a double weld must be made, since it is not possible to heat and melt such a thick workpiece on only one side. The edges are cut using double-sided technology in the shape of the letter X, since ordinary cutting leads to too much metal cutting.
Preparation of the workplace
Before starting work, think about what, how and in what order to do so that it is safe for you and others. Before you start work, you need to prepare your workplace:
- Check the completeness of the equipment: welding cables, the condition of the insulation of wires, power supply cables from the network to the inverter, the device itself;
- remove foreign objects;
If a violation of the integrity of the insulation of wires, power supply cables, as well as a violation of the integrity of the connectors for connecting them to the network is detected, you cannot begin work until the faults are eliminated!
- Prepare the parts to be welded;
- check whether there is sufficient ventilation of the workplace;
- check whether the work area is sufficiently illuminated; if there is insufficient natural light through window openings, provide additional lighting by installing lamps;
- prepare a place where you will sit while working;
- prepare to inspect the necessary auxiliary tools;
- check the electric grinder (electrical safety requirements are the same as indicated above);
- prepare the necessary abrasive wheels (grinding, cutting), the wheels must be marked, there should be no cracks or chips on them;
- Check the availability of fire extinguishing means (fire extinguisher, sand) at the workplace.
After completing these routine but mandatory activities, you can begin preparing the parts to be welded.
Ceiling seam
Now you can figure out how to weld a ceiling seam using electric welding. It is necessary at a small distance from the surface using a refractory electrode. Because of this, a cap appears at the end that can prevent the material from spreading. As the seam is created, the end of the electrode is evenly removed, and then approaches the arc. As it moves away, it goes out and the metal hardens. To know how to weld a ceiling seam, you should familiarize yourself with the information about what electrodes are used for it. Regardless of the direction of the seam, it should be of small diameter.
When working with ceiling welding, gas bubbles float up at the root of the seam. This could lead to marriage. It is recommended to use it only when it is impossible to complete the bottom seam.
Ceiling connection Source i.ytimg.com
What does a novice welder need to get started?
First of all, you need to prepare equipment and clothing.
Tools and protective equipment
You will definitely need a welding machine, a set of electrodes, a hammer and chisel for knocking down slag, and a metal brush for cleaning seams. The electric holder is used to clamp, hold the electrode and supply current to it. You also need a set of templates to check the dimensions of the seam. The diameter of the electrode is selected depending on the thickness of the metal sheet. Don't forget about protection. We prepare a welding mask with a special light filter that does not transmit infrared rays and protects the eyes. Screens and shields perform the same function. A canvas suit, consisting of a long-sleeved jacket and smooth trousers without cuffs, leather or felted shoes to protect against metal splashes, and gloves or mittens, canvas or suede, with overlapping sleeves. Such straight, closed clothing protects the welder from getting molten metal on his body.
There are special protective equipment that are used for working at heights and inside metal objects, when working in a lying position. In such cases, you will need dielectric boots, a helmet, gloves, a mat, knee pads, armrests, and for high-altitude welding you need a safety belt with straps.
