Broken household appliances can be given a second life if the body of the device and many internal parts are used to make original products. A burned out microwave can also be repurposed for other functions. It is absolutely not necessary to construct anything complex and dependent on the household electrical network.
Excellent preparation for crafts
The microwave body can be used for storing food or as an original mini-laboratory for growing herbs or seedlings.
We'll tell you what other crafts can be made from a faulty microwave oven.
Homemade products from the microwave
What homemade products can you make from a microwave?
Today, many people have microwave ovens in their homes, which appeared on the markets several decades ago. Some models have become outdated or broken over time. However, do not rush to throw the microwave in a landfill, because you can make quite useful homemade products from it.
Many craftsmen adapt transformers, fans and even electric motors from microwave ovens for their own purposes. For example, you can make a good 220-volt generator from a microwave motor, which will be a convenient find on a hike.
As easy as pie
If you are not going to tinker with spare parts, wires, or make at least some kind of device, it is quite possible to create a storage facility for bread. To do this, you need to remove all the insides and cut off the cord. The box will become much lighter.
To give it a presentable look, the top can be decorated to your taste. Some people use the decoupage technique, others solve the problem even simpler - they cover it with self-adhesive wallpaper.
What is important is that here any bakery products can be perfectly stored in paper bags without drying out. What else can you make from a microwave with your own hands?
What homemade products can you make from a microwave?
A broken microwave can be given a second life and used to make homemade items. The housing from an old microwave can be easily adapted for storing vegetables and food, and also as a wall cabinet.
It is often much more expensive to repair a microwave than to buy a new one.
Therefore, you can either install a heating element in the microwave and use it as an oven, or disassemble it into spare parts, and this is: a transformer, from which you can make spot welding, an engine, from which you can easily make a 220-volt generator and a fan, which can easily be used for a homemade incubator.
So, on the website navseryki.ru, let’s look at the top homemade microwave products that are sure to come in handy in every craftsman’s household.
Put electrical components into use
If you made a bread box or an oven, you still have a mountain of unused components. Working spare parts can be put up for sale on Avito or other trading platforms. And give the rest a second life if desired.
- Fan. Use it for a homemade freezer or incubator. Having beautifully designed the fan, you can install it indoors.
- Home craftsmen make various crafts from a transformer, including welding machines and chargers.
- Electric motor of the rotary table. It will be useful in a homemade incubator for the purpose of automatically turning eggs. To adjust the time intervals between procedures, you need to build a time relay into the electrical circuit. Also, together with the glass disk, the engine turns into a decorative stand or an unusual lighting fixture in a garden or summer cottage.
- The capacitor, control module and other radio components are excellent “toys” for radio amateurs, who, at their discretion, turn them into intricate, sometimes unnecessary, but very interesting products.
220 Volt microwave generator
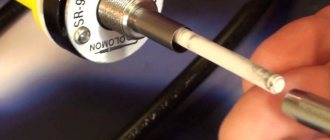
In this case, you will need to remove the motor from the microwave, the one that rotates the bowl. The uniqueness of the electric motor from a microwave oven is that it is capable of generating decent voltage, over 110 Volts, and has a power of 50 W.
To make a simple generator from a microwave, you will need to take a small cream jar with a lid in which the motor will actually be installed. Next, on one side of the cover you will need to drill a hole for the handle, which is then connected to the motor. Thus, by rotating the handle, you can set the motor from the microwave in motion, which will produce electrical voltage.
Be sure to provide a small socket or just an outlet on the back side of a homemade microwave generator to which current consumers could be connected. Without a doubt, a homemade generator from a microwave engine will be an excellent helper on hikes where there is no electricity.
In addition, the microwave motor can be used to make an effective turning mechanism for an incubator.
Operating principle of the bracket
A bracket is a device that holds objects on the wall. It is distinguished from ordinary hinges by its complex, durable design, capable of extension and tilt. True, the simplest brackets can be built without such luxury.
Microwave brackets are often curved angles that are attached to the wall and connected together for added strength. Complex models are panels with fastening strips and other structures.
The entire structure consists of different types of planks fixed to the wall. The principle of operation is to hold household appliances, in our case a microwave, in a place convenient for the owner.
Microwave welding machine
If not everything in the microwave burned completely, and the power transformer remains intact, then you can use it to make a homemade charger for a car battery.
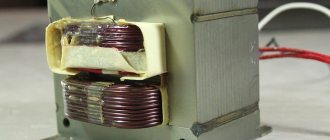
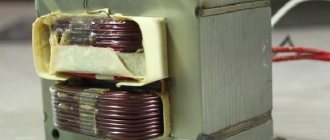
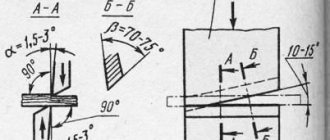
You can also make a welding machine for spot welding from a microwave transformer. To do this, you just need to get rid of the secondary winding of the transformer, instead of which you will need to wind several turns of thick copper wire.
Microwave battery charger
When making a car charger, you will also need to remove the secondary winding on the microwave transformer. Next, by winding a certain number of turns from the previously removed wire, you should achieve a stable 12 Volts. In this case, you can make a simple charger from a microwave.
As you can see, homemade products from a microwave and a transformer with a motor from it turn out pretty good. However, you should understand that some microwave parts can be very dangerous, so when using them you should follow safety precautions as much as possible and not do what you don’t know.
power of attorney to submit documents to Rosreestr from an individual
Changing the mica plate at home
You can change the mica plate yourself at home, without calling a specialist, according to the instructions described below:
- turn off the device from the network, use a screwdriver to unscrew the old layer. Sometimes the manufacturer attaches it with latches, which makes dismantling much easier;
- wipe the mica from grease, attach it to a new plate and cut out the same piece with a stationery knife;
- Use an awl to make holes for the bolts, and clean the edges with sandpaper. Do not use scissors for cutting. Mica is just a compressed alloy, so the edges when cut will be uneven and will crumble a lot;
- clean the new part from dust, shavings, wait until it dries after washing, degrease;
- Before screwing the new plate into place, check that everything is in order with the magnetron. If it burns out, it needs to be replaced;
- screw the new trim onto the old bolts or insert the fasteners.
Homemade products from a microwave and its electrical parts
Broken household appliances can be given a second life if the body of the device and many internal parts are used to make original products. A burned out microwave can also be repurposed for other functions. It is absolutely not necessary to construct anything complex and dependent on the household electrical network.
Excellent preparation for crafts
The microwave body can be used for storing food or as an original mini-laboratory for growing herbs or seedlings.
We'll tell you what other crafts can be made from a faulty microwave oven.
Household use of stoves
In everyday life, such devices are used quite rarely, although similar technologies can be found in heating systems. They can be seen in the form of microwave ovens, electric ovens and induction cookers. In the environment of new technologies, this development has found wide application. For example, the use of eddy currents in induction cookers allows you to cook a huge variety of dishes. Since they take very little time to heat up, the burner cannot be turned on if nothing is standing on it. However, special utensils are required to use such special and useful cookers.
Homemade products from a microwave and its parts
It is often more expensive to repair a household appliance than to purchase a new one. For example, if the magnetron turns out to be inoperative, it is not always possible to purchase an original spare part for a microwave oven manufactured more than 10 years ago. In such cases, the device body can be used for its intended purpose, and a regular heating element can be installed as a heater.
Before you start making any homemade products that will subsequently be connected to the power grid, you need to take care of the safety of such products. All internal wiring must be well insulated, and the device body must be connected to a grounding conductor.
The simplest device in which food can be easily heated is manufactured in the following sequence.
1. All unnecessary parts located inside the device body must be removed.
All unnecessary parts must be removed
To do this, remove the back cover of the device and, having previously discharged the high-voltage capacitor through a well-insulated high-resistance conductor, unscrew the transformer, magnetron and plate motor. All these parts can be used to make useful household devices, including spot welding.
It is also necessary to remove the rotating plate and its drive from the microwave chamber.
2. Purchase a suitable-sized air heating element with a power of about 1 kW and install this part at the bottom of the device. The heating element should be fixed in a stationary position, so metal guides should be installed before carrying out installation work.
The heating element should be positioned in such a way as to completely remove the connected part of the part from the heating chamber. Usually, for this purpose, it is enough to make 2 holes in the chamber with a drill, the diameters of which should be equal to the outer diameter of the heating element.
Heating element for oven
3. Connect the heating element to the wires coming from the microwave electric filter.
4. Place racks or a baking sheet in the microwave oven chamber at a distance of 3-4 centimeters from the heating element.
Baking tray for a homemade oven
5. Connect the device to a 220 V network using wires with special high-temperature insulation.
Disassembling a microwave oven yourself
If the above reasons are not confirmed, then you need to disassemble the device to troubleshoot. Before doing this, be sure to turn off the oven from the network and wait a couple of minutes.
Microwave fuse
What should you look for when looking for breakdowns? There are several main elements that often fail:
- Circuit breakers
- Capacitor
- Diode
- Transformer
- Magnetron
These elements are directly involved in the operation of the device and were mentioned earlier. First you need to check the serviceability of the fuses. Their breakdown is immediately visible, because when burned, the conductor inside is destroyed. If this does not happen, then you should look further. For further checking, you need to take a multimeter, because externally it is extremely difficult to find a breakdown on the remaining parts. To check the capacitor, you need to switch the device to ohmmeter mode and then connect it to the part. If there is no resistance, the part must be replaced.
It is impossible to check a high-voltage diode with a tester. It is recommended to replace it if other parts break, because often it also gets hit. It can be checked using a slightly different method - by connecting it to the network on the way to the light bulb. If the light is dim or blinking, then the part is working properly. If it lights up brightly or does not turn on at all, then the diode must be replaced
It is important to follow safety precautions, because this element can hold a charge for a long time. It will take several minutes to discharge a working capacitor, and much longer if the discharge resistor breaks down.
It is worth discharging it on the body or not touching it at all if you have no experience working with such equipment. Next, the transformer windings are checked.
How to check a microwave transformer:
You need to remove the terminals and check the device terminals one by one with an ohmmeter. First, the primary winding is checked, for which the norm varies from 2 to 4.5 Ohms. For the secondary winding, the limits are 140 and 350 Ohms. It is also worth checking the filament winding by connecting the terminals leading to the magnetron to a multimeter. The norm here varies from 3.5 to 8 ohms. All previous tests have failed, then the problem may lie in the magnetron.
To test the magnetron, simply connect the tester to its power terminals. The tester switches to ohmmeter mode. If the resistance is 2-3 Ohms, then this means the device is broken. The same situation occurs if the tester shows infinity. In both cases, the device must be replaced.Original bread box
If the microwave burns out and there is no way to fix it or convert it into an oven, then the body of the device can be used to make a spacious bread bin. It is enough to transform the appearance of the device.
As in the case of a low-power oven, it is advisable to remove all internal parts from the device to reduce weight, as well as the power cord. After this, paint the outer surface with any metal paint. You can transform the appearance of the device not only by painting, but also by stickers.
Alternatively, you can add some LEDs to the camera as a backlight that can be activated at night. For such a modification, you do not need to remove the power cord from the device, but install a miniature step-down transistor in the internal part, from which the backlight will be powered.
Microwave bread bowl
Fan
Such a product will always find application, for example, for cooling eggs in an incubator, which many users did not even realize. But cooling is a very important technique in improving the development of embryos during the incubation process. The quality of hatched chicks is no worse than in a natural way, because cooling occurs in a very similar way, when the hen moves away from the nest to meet her needs. In chickens and turkeys, this process occurs by air, and in waterfowl - combined, due to the evaporation of moisture from the surface of the eggs when the duck or goose returns after water procedures.
We use electrical parts
When making an oven or bread box, practically no internal parts of the device are used. Many parts removed from an old microwave can be sold, provided they were not broken during the dismantling process.
If the desire to make something with your own hands is not limited to just using the microwave body, then a second life can be given to the following parts removed from the device:
1. Fan - can be used in various devices, for example, in a homemade freezer or in an incubator.
This part can also be used in the summer as a stationary fan.
2. Transformer - this part can be used for various purposes, but most often it is used by home craftsmen to make a homemade welding machine.
Making the device is not at all difficult: for this purpose it is enough to get rid of the secondary winding, instead of which you should wind several turns of thick copper wire.
The transformer can also be used to make a powerful battery charger. For this purpose, the secondary winding is also removed and the required amount of copper wire is wound to obtain an output voltage of 12 V.
3. Plate motor - this part is used in homemade incubators for turning eggs.
Considering the fact that this function must be turned on after a certain period of time, in order to ensure the required interval, a time relay is installed in the electrical circuit.
The engine with a gearbox and a podium can also be used for various decorative crafts with lighting that can be installed in the garden.
4. The capacitor, control board and other radio parts can be used for a variety of electronic crafts.
When using microwave parts, you should be careful: the products may contain substances that are hazardous to humans. Older microwaves may also contain hazardous substances in the high-voltage capacitors.
From a microwave oven and its parts you can make a lot of interesting and useful household items, while the financial costs in many cases will be limited only to the purchase of soldering accessories.
Controls
Self-made resistance welding is not a complex apparatus. However, when creating a spot weld from a microwave with your own hands, you need to provide controls. The main ones are a switch and a lever element, with the help of which the necessary force will be created on the electrodes and the workpieces being welded.
The level of quality of the connections created will depend on the degree of pressure.
That is why it is worthwhile to provide the longest possible lever. It is also necessary to take into account that microwave welding must be securely installed on the work surface. It may even be worth fixing it, for example, with a clamp.
It is possible to increase the applied forces with the help of levers or lever-screw mechanisms, which you can equip your design with. It is advisable to fix such a mechanism on a lever. In this case, it will not take much time when operating with it. In addition, there is freedom for the other hand, which can hold the elements being welded.
An important feature is that current can be supplied to the electrodes only in a closed position. If this is done before compression, sparking will occur during contact with the part. This also contributes to burnout of the electrodes and breakdown of the device.
The switch should be installed in the primary winding circuit. If you mount it in the secondary, it will create additional resistance, leading to welding of the electrode parts together. It should also be taken into account that a significant current flows in the secondary winding, which not every machine can withstand.
Also, welding from a microwave transformer must be equipped with a basic cooling system. It is possible to use an ordinary computer cooler. In this way, it is possible to cool the transformer itself, electrodes and current-carrying elements. Naturally, it will not be possible to effectively cool the device and you will have to take regular breaks in operation to cool all parts. The homemade machine welds parts no worse than factory models. Therefore, it is worth studying the assembly process in more detail on the video and trying to assemble it yourself.
Resistance welding is increasingly used not only in manufacturing plants, but also in home workshops and garages, where it can be successfully used for various metal-related work. Serial equipment for performing such a technological operation is quite expensive, but a device for resistance welding can be made with your own hands from an old microwave.
One of the options for a resistance welding machine from a microwave oven
To manufacture equipment for contact welding at home, you will need the following components, accessories and tools:
- a transformer that can be removed from an old microwave oven (if you need a high-power device, you will need two such transformers);
- thick copper wire or small diameter wiring harness;
- levers that will be used as clamps;
- lever of the required length;
- a reliable base on which the welding machine will be installed;
- clamping clamps;
- Screwdriver Set;
- cables and winding materials;
- electrodes made of copper, due to which welding will be performed.
Excellent homemade transformer from a microwave for a car
This homemade product is designed to unscrew stuck and rusty nuts by heating them with electricity. Everything is done quickly and simply.
For homemade work, we need a transformer from a microwave oven.
The secondary winding will need to be removed from it. I cut the secondary winding like this, took a grinder and carefully cut the winding, I repeat once again, cut carefully so as not to catch the primary winding.
When the winding is cut off, the remains are simply knocked out with a hammer and submitted for metal color.
Now our transformer is ready to wind another, secondary winding.
But first I connected the power wire to the primary winding; the wire itself was taken from an old iron.
The secondary winding needs to be wound with a wire of 7 mm, I just got 3 turns of such wire, like in the photo.
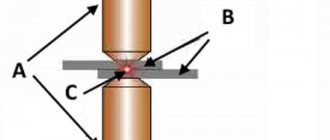
The device itself is almost ready, now you need to make tongs and contacts that will clamp and heat the nut or part.
To do this, I took one crocodile from the cigarette lighter, attached 2 strips of fiberglass to it (as an insulator), I think that everything will be clear from the photo.
I screwed metal plates to the strips, and to the plates there were already bolts to which the ends of the wires were screwed. Yes, I forgot to say that I took the bolts from the solenoid relay because they are copper.
I put heat shrink on the crocodile's arms.
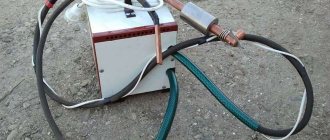
Well, I decided to immediately make a box for my device, I made the box from leftover chipboard, and I also installed a fan from the computer there to cool the transformer. And I cut off a piece from the timing belt and screwed it on, it turned out to be a handle, and in the end I got this device.
Well, now to the test...
Nails and bolts heat up almost immediately.
The M6 nut heats up in 1 second.
M8 also heats up quickly
M10 is already heating up more slowly.
But here I already tested it in real conditions, the nut did not unscrew on the intake manifold.
Here the device did a great job and the nut was easily unscrewed, but the wires also got hot, but not much, that is, they didn’t melt there, they just got hot.
Of course, if anyone wants to make their device more powerful, then accordingly they need to take wires thicker than 7 mm, take 10 millimeters and I am sure that the device will work many times more powerful, but for me this power is quite enough.
The result is an excellent device that will be useful in any workshop and in any car enthusiast’s garage.
Popular;
Microwave heater
An old broken microwave lay idle in the pantry for a long time. I decided to make something useful out of it. The microwave has a powerful transformer, if properly modified, you will get a powerful resistive heater for heating rusted nuts and other small metal parts.
Almost any transformer from a microwave oven, even a faulty one, is suitable for this homemade product, the main thing is that the primary network winding is intact. I got a 700-watt copy, but the more powerful the better.
Remaking the transformer involves removing the secondary winding. And winding two turns of large-section copper wire. That is, we need to rewind the transformer in such a way as to lower the output voltage to 1.2 volts and increase the current to 600 amperes.
Let's get down to business, take a hacksaw and cut the secondary winding. You need to cut from both sides and very carefully so as not to accidentally damage the network winding.
Now you need to secure the transformer in a vice and use a hammer to knock out the inner part of the secondary winding through a metal attachment.
The new winding must be wound with thick copper wire. The ideal option would be a welding cable with a core cross-section of 16 mm ; the thickness of the copper core is about five millimeters. It is advisable to take a welding cable with thick rubber insulation.
We make two turns. The welding cable fits tightly into the transformer window. This completes the conversion of the microwave transformer. Copper tubular stamps must be placed on the ends of the welding cable and splashed.
We measure the voltage at the output, from two turns of the welding cable it turned out to be 1.2 volts, and the current strength with such a cable thickness will be approximately 600 amperes.
And of course tests. We will test it on a nut; in fact, this homemade product is intended for heating nuts. In just a couple of minutes, the M8 nut became white hot. Ah, this is probably a good result.
A microwave heater will be a very good helper for both the home handyman and the car repairman. After all, very often you have to unscrew rusted nuts using heating and sudden cooling with cold water.
Friends, I wish you good luck and good mood! See you in new articles!
I recommend watching a video on how to make a microwave heater
Disassembling a microwave oven yourself
If the above reasons are not confirmed, then you need to disassemble the device to troubleshoot. Before doing this, be sure to turn off the oven from the network and wait a couple of minutes.
What should you look for when looking for breakdowns? There are several main elements that often fail:
- Circuit breakers
- Capacitor
- Diode
- Transformer
- Magnetron
These elements are directly involved in the operation of the device and were mentioned earlier. First you need to check the serviceability of the fuses. Their breakdown is immediately visible, because when burned, the conductor inside is destroyed. If this does not happen, then you should look further. For further checking, you need to take a multimeter, because externally it is extremely difficult to find a breakdown on the remaining parts. To check the capacitor, you need to switch the device to ohmmeter mode and then connect it to the part. If there is no resistance, the part must be replaced. It is impossible to check a high-voltage diode with a tester. It is recommended to replace it if other parts break, because often it also gets hit. It can be checked using a slightly different method - by connecting it to the network on the way to the light bulb. If the light is dim or blinking, then the part is working properly. If it lights up brightly or does not turn on at all, then the diode must be replaced
It is important to follow safety precautions, because this element can hold a charge for a long time. It will take several minutes to discharge a working transformer, and much longer if the discharge resistor breaks down. It is worth discharging it on the body or not touching it at all if you have no experience working with such equipment
Next, the transformer windings are checked
It is worth discharging it on the body or not touching it at all if you have no experience working with such equipment. Next, the transformer windings are checked.
How to check a microwave transformer:
You need to remove the terminals and check the device terminals one by one with an ohmmeter. First, the primary winding is checked, for which the norm varies from 2 to 4.5 Ohms. For the secondary winding, the limits are 140 and 350 Ohms. It is also worth checking the filament winding by connecting the terminals leading to the magnetron to a multimeter. The norm here varies from 3.5 to 8 ohms. All previous tests have failed, then the problem may lie in the magnetron. To test the magnetron, simply connect the tester to its power terminals. The tester switches to ohmmeter mode. If the resistance is 2-3 Ohms, then this means the device is broken. The same situation occurs if the tester shows infinity. In both cases, the device must be replaced.
https://youtube.com/watch?v=8N6_PDELdOs%3F
Second life of the microwave
What can you make from an old microwave oven?
If your old mechanically controlled microwave oven has deteriorated, for example, the MOT (Microwave Oven Transformer - microwave oven transformer) or magnetron has burned out, or for some other reason you will not repair this kitchen appliance, you can try to make a regular oven out of the microwave by installing instead of a motor that rotates a tray, a heater (heater) or a burner, for example, from an electric stove. True, there are still questions about the temperature regime of the device, but you can try.
You can even leave the mechanical control unit and additionally install a temperature sensor. True, most likely, you will have to replace the glass with heat-resistant glass and make guides for the baking sheet.
Perhaps the rework will revive the microwave and give you an equally interesting device. Apparently, it won’t be possible to bake pies on it - the door and other parts are not very heat-resistant, but heating food (and the microwave is very often used for this) may be possible.
Microwave body
You can make anything from the case If the processor module is working, then the bread box will have a clock!
Transformer
You can make a resistance welding device from MOT
Fan
Use the fan for its intended purpose, for example to mix air in an incubator, etc.
Plate rotation motor
The tray motor with gearbox can be tamed to turn eggs in the incubator by adding a time relay to it.
Control block
But the control unit may be useful for other work.
Let's use a control unit from an old microwave oven with mechanical control to regulate the temperature of the soldering iron tip.
The appearance and designation of the terminals may differ, but the principle of operation and control should not; you just need to use a measuring device to find out which contact is which.
Microwave diagram
A radio amateur, especially a beginner, needs a soldering iron with adjustable tip temperature.
The usual practice is to assemble a device using a thyristor, according to circuit diagrams common on the Internet.
But for those who are still “you” with electronics, you can use a mechanical regulator.
This option has many advantages - it is suitable for regulating the power of soldering irons connected through a step-down or isolation transformer. The proposed regulator has a wide range of power adjustment, and this can be useful, for example, when used for heating an etching solution or melting plastics, or when feeding a tin bath. Of course, it does not have the functions of a thermostat, its advantages are simplicity and functional completeness!
The mechanical control unit of a microwave oven consists of a low-speed motor and 2 gearboxes, one of which operates as a timer, the other as a power regulator. At the output of the gearboxes, software gears and associated cams are installed, interacting with contact pairs. One pair of contacts is responsible for the time delay, the other for regulating the power in the load.
The cams of the power control gear are designed in such a way that when you turn the power setting knob, the ratio of the time of the closed and open state of the contacts changes. And the timer cams move along the spiral of the program gear, the shape of the spiral is made in such a way that the time scale is stretched at the beginning and compressed at the end, at long time delays.
Low-power oven
If your microwave or microwave oven with mechanical control is broken and you are not going to repair it, then you can make an ordinary low-power oven out of it. To do this, the electric motor that rotates the platform is dismantled and a heating element or a burner from an electric stove is installed.
Remember that before dismantling, the microwave oven capacitor must be discharged by shorting it to the housing, because it can retain a high voltage charge for a long time.
It remains to consider the issue of installing guides for the baking sheet, installing a regulator for modes and replacing the glass with a more heat-resistant one. The new product will not be able to bake pies: the door and many parts are not designed for prolonged exposure to high temperatures, but it will perform the heating function perfectly, working as an oven in a solo format.
How to use a directional microwave emitter
A powerful microwave gun can be used for the following purposes:
- Destruction of beetles and other harmful insects. Microwaves turn liquid molecules into steam - this way you can exterminate bugs gnawing on wooden buildings. The wood itself does not suffer from microwaves.
- Melting of non-ferrous metals.
- Drying and sterilization of cereals (kills bugs and bacteria).
- Disabling listening devices. Microwaves interfere with the operation of any “spy” devices.
- There is interference from the neighbor's TV, which is turned on at full volume - you can easily turn down the volume. Please note: telephones hang up 10 meters from the gun, and sound distortion occurs in computers and televisions. Do not use these devices for long periods of time as they may explode.
- Ignition of fluorescent lamps from a long distance.
- Boil a small amount of water.
How to make a microwave gun
You will need a microwave oven - any one will do, even a burnt one. We will make the gun from a magnetron - this is the main element of any microwave oven. It must be in working order. To create the device you will also need:
- Container - for example, a tin can. The best option is a speaker enclosure.
- Wire and other small things that may be useful when connecting parts of the device.
The first step is to remove the magnetron. Initially, this element was created to generate microwave electromagnetic oscillations in radar stations (radar stations). Microwave ovens have magnetrons that generate microwaves with a frequency of 2.45 GHz.
How does a magnetron work?
In appearance, the emitter resembles a radiator topped with a pin. The radiation power is 0.7-0.8 kW. If you buy a magnetron secondhand, on the radio market, it will cost you about 800 rubles.
The electrical circuit diagram allows you to thoroughly understand the magnetron, which is essentially a diode. The cathode heats up and electrons are knocked out of it. The anode is cold and has resonators that complicate the appearance of the electric field generated in the emitter. The latter is placed between coils with current - they create a magnetic field that bends the straight path of electrons. Without the action of a magnetic field, electrons would tend to the anode in a straight line, but the path of electrons is curved under the influence of the Lorentz force.
It is necessary to provide power to the emitter: for example, from a converter with a charger from a computer uninterruptible power supply unit.
You need to work with the gun with extreme caution: the radiation must not be focused on the body, this is especially dangerous for the eyes.
Why do you need an antenna?
For targeted action, a microwave gun needs an antenna. To do this, make a hole in the jar.
In a jar with a height of 175 mm and a diameter of 75 mm, a hole with a diameter of 20 mm is made on the side, departing from the bottom by 37 mm. The magnetron is removed from the stove body, and the wires going to it are extended with wire.
When designing, be careful. A microwave device based on a magnetron gets very hot, so do not turn it on for a long time. You should be wary of microwave radiation: its effect on the body has not been fully studied. When working with the emitter, be sure to use protective equipment.
Magnetron
The magnetron contains a very important central core, which can be removed from the mechanism and scrapped. The magnetron consists of the following elements:
- cathode;
- heater current leads;
- anode block;
- volumetric resonators;
- output communication loop;
- coaxial cable;
- magnets.
The magnetron is responsible for the microwaves that a microwave oven produces to heat food. For the same purposes, you can use the device to warm up components in other devices. The main thing is that the magnets are in full working order, as is the structure itself. Test the condition of the magnetron before use, because often the microwave stops working precisely because of it.
Parts from old and unusable equipment will definitely be needed for new independent inventions. Do-it-yourself appliances are excellent helpers in the home and everyday life. Don’t rush to throw away your old microwave oven and other devices, because the parts from them can really come in handy.
Carefully and carefully disassemble the frame of the microwave oven, choosing the most important elements for yourself. Review them for suitability and implement your main technological ideas. Remember to follow safety rules and be careful. Do not operate with the microwave on. Come up with new uses for old parts and give your equipment a second life!
Friends will also be interested in this