In the process of roofing work, it is important to choose not only a good quality coating, but also durable fastening material that will also bear the load. The durability and aesthetic appearance of the roof will depend on the quality of the hardware used to attach the metal tiles to the roof frame.
Self-tapping screws with a drill or sharp tip are the most popular consumables, the choice of which must be approached with all responsibility. To ensure a tighter fit of metal profile sheets, hardware with a press washer is used.
Types of self-tapping screws
The variety of building materials can confuse an inexperienced beginner. Nevertheless, you need to navigate the entire heap of the offered assortment, at least in order to buy everything you need at a reasonable price.
All self-tapping screws existing on the market can be divided into 3 large classes:
- On wood (with a sharp end). They are usually black in color;
- For metal (with a drill at the end, painted or galvanized);
- Universal. They can be either black, gray or golden.
The press washer is often an integral part of the hardware. It can be either collapsible or cast. This design of the self-tapping screw allows you to compress the parts being connected much more strongly without damaging them. The presence of a drill allows you to eliminate the use of a drill and significantly save time in the process of roofing work.
Self-tapping screws with a pointed end make it easy to connect materials made of wood, fiberboard, chipboard, or hang a shelf or cabinet on the walls.
Bonus: With a nut
The nut must fit exactly the diameter of the drill. It should be clamped with any tool (safety precautions should be observed). Using a hammer, firmly press in the nut with a smaller diameter. Now you can screw it onto the bolt and drill a hole in it. It will turn out smooth with a minimum number of tools used.
Making holes in bolts and studs without a lathe is easy. When performing plumbing work at home, you must strictly adhere to safety regulations. After all, you have to work with small parts, so the slightest mistake or carelessness can lead to injury.
Self-tapping screw heads, thread
Hardware also differs in head shape and thread pitch. Metal screws with a drill at the end can be:
- With a round head;
- Hexagonal;
- Flat-headed;
- With fine, large and medium threads.
A hexagonal screw-drill allows you to use a wrench or a special attachment for a screwdriver during the fastening process. When the metal is thin, there will be no problems with screwing in hardware. The self-tapping screw will easily enter the material and connect it reliably and firmly.
When the thickness of the metal sheet exceeds 2 mm, it is recommended to pre-drill holes so as not to break the self-tapping screw when screwing in, since the load on it will be much higher. Hardware can crack and fly apart both in the area of the head (cap) and the drill. Picking it out later will be problematic.
If it was made from high-quality non-Chinese steel, then drilling it out will not be an easy task. Therefore, we first make holes at the joints that are smaller in size than the self-tapping screw itself and calmly screw it in.
Processing with a drilling machine and a block
This method is suitable if you need to drill a part without damage. Place a piece of wood under the machine and make a hole that is exactly equal to the diameter of the part that needs to be processed. Having made a hole, carefully insert the bolt into it: it will already be centered on the drill.
Now you can drill, but the drill must be of a suitable diameter. If the workpiece begins to spin during processing, there is no need to worry: it is already centered. When the bolt is pinned, you need to take it by the head with pliers and continue drilling. The block must remain motionless; this is the main thing for the quality and safety of the work.
Material of manufacture
All high-quality self-tapping screws are made of carbon steel with subsequent protection against corrosion (rust), which further determines their color and purpose.
To work with metal profiles, phosphorized self-tapping screws with a sharp tip (black) are used. With thin sheet steel, plastic, wood, plasterboard - galvanized, silver or gold.
Miniature hardware with fine threads, cross notches on the head and a drill are widely used for working with thin metal.
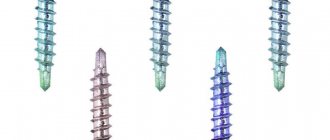
To work with roofing, self-tapping screws are made in different colors (the heads are painted with a special composition), which allows the roof to look aesthetically pleasing.
Most modern companies immediately offer a complete kit for working with the roof, which includes all the necessary fastening material. And there is no need to buy anything in addition.
Several ways to unscrew a broken bolt.
During the process of repairing a car or other equipment, an unpleasant situation may occur when a bolt or pin breaks. Moreover, according to the law of meanness, they break level with the part or, even worse, in the depths of the part. Thus, the broken thread turns out to be recessed into the part.
As a rule, bolts and studs break when unscrewed if they are heavily rusted and stuck. They can also break when twisted if a very high torque is applied to them.
There are several ways to solve this problem. Moreover, the choice of method depends on the specific situation. Let's consider each method separately.
Preparing to unscrew.
If the bolt is rusty and welding will not be used when unscrewing it, then it should be lubricated with a penetrating lubricant. There is no point in lubricating the connection and then burning off the grease.
You can use the common and well-proven WD-40 lubricant. Or you can make a mixture of kerosene and machine oil in a 1:1 ratio and fill the bolt with this mixture. After lubrication, it is advisable to wait some time, for example 1 hour. It takes time for the lubricant to penetrate into the joint.
How to drill a broken bolt without damaging the thread.
If the bolt is broken deep in the part, then in this case a metal sleeve can be used to center the drill. Its outer and inner diameters are selected according to the diameter of the drill and the diameter of the hole in the body of the part. This bushing can be ordered from a familiar turner or made from a metal tube of suitable diameter.
You can also take a drill of a larger diameter that matches the diameter of the hole in the body and use it to drill a small centering recess for the next drill. Then we take a drill of a smaller diameter and drill according to the previously made alignment.
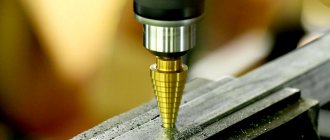
There are special centering drills. They are mainly used for turning operations. With such a drill, you can easily perform alignment without the risk of damaging the thread, and then drill the hole with a regular drill.
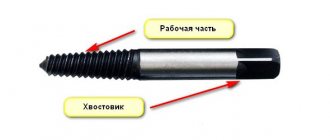
Unscrew the broken bolt using an extractor.
What is an extractor? This is a special tool in the form of a conical drill with a left-hand spiral. This tool has increased strength, that is, it must be hardened. This applies only to high-quality instruments. Chinese crafts are made almost from “plasticine”.
Set of extractors.
How does the extractor work? He screws the pre-drilled hole into the broken stud with his left-handed tapered thread until it is jammed into it. Further torque applied to it leads to unscrewing of the stud, since in most cases it has a right-hand thread.
You need to understand that an extractor is not a panacea. It has its drawbacks.
First, it requires a pre-drilled hole in the broken stud. Not all studs can be drilled. If it turns out to be hardened, that is, very hard, then the drill may not take it. In this case, you will have to stop using the extractor.
Secondly, the extractor, due to its taper, crushes the pin and jams it even more into the body of the part.
Thirdly, the extractor itself can greatly aggravate the problem if it breaks off inside. This is the worst option. As a result, instead of a “soft” pin, you can get a piece of a hard extractor, which additionally wedges the pin with its taper.
We unscrew the broken bolt using available tools.
If you don’t have an extractor at hand, you can use a torx-type bit, a triangular file, a reamer, a hexagon or a regular screwdriver. The screwdriver must have a metal handle, as it will need to be hit with a hammer.
For all tools, except for a regular screwdriver, the procedure is the same.
First, in the broken part, we drill a hole with a slightly smaller diameter than the diameter of the tool. Afterwards, the tool is driven into the hole and wedged into it with its edges. Now you can try to twist it out.
Again, the disadvantage of this method is that the tool, just like the extractor, will wedge the pin in the body of the part. In addition, there is already a possibility that this tool may break during operation, which will further aggravate the situation, since this entire tool is hardened, well, except for a regular screwdriver.
Let's look at the method using a screwdriver in more detail.
The advantage of this method is that the screwdriver does not wedge the bolt in its seat, therefore, the force that must be applied to unscrew it will be less than when using an extractor, sprocket or reamer.
The downside is that you will need to drill two holes instead of one.
The essence of the method is to make a slot for a screwdriver. To do this, drill two holes side by side with a depth of approximately 5mm, trying to ensure that they partially overlap each other.
Drill two holes as in the photo.
If it was not possible to drill the holes correctly, then we drill the body of the part between the two holes, trying to connect them together to obtain one whole slot.
Then we put a screwdriver in the slot and unscrew it. When unscrewing, you can simultaneously hit the screwdriver or you can use an impact screwdriver.
You can also try removing the bolt using two separately drilled holes that do not partially overlap each other. To do this, you need to take a regular nail and bend a bracket from it. By inserting this bracket into the holes and taking an adjustable wrench, you can try to unscrew it.
We drill the broken bolt with a drill with a left-hand spiral.
There are drills with a left-handed spiral; they drill metal when rotating counterclockwise. First, you can drill the alignment with a regular small-diameter drill, then gradually drill out the body of the fragment using a larger-diameter left-hand drill. It is imperative to control the direction of drilling so as not to damage the thread. In this case, the remnants of the fragment will unscrew themselves, since the drill with its edges catches it in the desired direction for unscrewing. If the thread is still slightly damaged, it can be easily corrected with an appropriate tap.
All of the above methods of unscrewing can be suitable for slightly rusted bolts. If it is strongly stuck in its threaded connection, then in this case something more serious is needed.
We unscrew the fragment using another bolt.
This method may not be suitable for all situations, as it requires an additional tool that not every master will have. Also, for fragments of small diameter, this method is also not suitable.
The essence of this method is to drill a hole in the center of the fragment body for a thread of a smaller diameter than the diameter of the fragment. Then use a tap to cut a left-hand thread in the hole and screw in a bolt with a left-hand thread. Now if you twist it counterclockwise, it will twist more tightly into the fragment and at the same time unscrew it.
We unscrew the broken bolt using welding.
Welding offers a number of advantages.
Firstly, it heats up the fragment strongly and quickly, while the body of the part remains cold. Due to the temperature expansion of the metal, decoking of the stuck thread occurs.
Secondly, it creates a strong connection with the fragment.
Thirdly, it helps if the fragment is made of high-strength steel and is hardened. In this case, drilling it out is quite problematic, and welding is best suited here.
If the fragment is hard and hardened, then it is made of steels that are not intended for welding. In steel reference books in such cases they write limitedly weldable steel or not intended for welding. But we need to weld, what should we do in this case? You just need to take it and cook it, but after welding, under no circumstances cool the welding area with water or any other method. Allow the welded joint to cool slowly. Then the weld seam will not crack due to the difference in temperature expansion of the material of the fragment and the part being welded. Also, after heating the fragment and its slow cooling, the metal is tempered, that is, it will lose its hardness and become softer. True, this will be the case if it is heated to red and slowly cooled down. Even if the fragment is made of soft, non-hardened steel, that is, it can be easily taken with a drill, then in this case it is better not to cool the welding site.
Let me give you an example. The part can be made of steel st45. This steel has limited weldability, has twice the strength of steel 3 (the cheapest and softest) and can be hardened. If you harden it, the drill will not take it or will be very difficult to drill. If the steel is not hardened, the drill will drill through it easily. If you weld to a fragment of such non-hardened steel and sharply cool the welded joint, then with a high probability, during cooling, microcracks will form at the boundary of the weld and the fragment, and when it is unscrewed, the weld will come off.
So, we use welding. There are several options here.
- If the bolt is broken off level with the body into which it is screwed or protrudes slightly from it, then you can put a washer of suitable diameter on it and weld it from the inside of the washer. Then weld the nut to the washer and unscrew the bolt. Why is the washer first and then the nut? The washer is thinner than the nut and is better welded, making the connection more durable, although you can do without it.
Instead of a washer and nut, you can use a strip of metal 2-3mm thick. First, we drill a suitable hole in the strip, put it on the bolt, weld it and unscrew it.
After welding, you must allow the welded joint to cool and then unscrew it. While the fragment is hot, it becomes wedged in the threaded hole due to thermal expansion.
- If the part is broken deeply, then it can be unscrewed using a metal tube inserted into the hole. Welding should be done with an electrode through a hole in the tube. This method should be used if the stud is screwed into an aluminum or cast iron body. This eliminates the possibility that the tube or pin will weld to the body. If it is screwed into a steel case, then it is better to use some other method.
- If the stud is broken off at a small depth from the surface of the body, then it can be increased by welding to a level where a nut or strip of metal can be welded to it. To make the welded joint more durable, drill a small hole in the center of the stud and then begin welding by welding this hole. This will increase the area of the weld seam.
What to do when nothing helps or the thread of a bolted connection is severely damaged?
Drill a larger hole and cut a new thread.
If the broken part is hardened and the drill does not take it, then you can try heating it until red hot and letting it cool slowly. Under no circumstances should you cool it with water or any other method! Heating can be done by welding or cutting. This heating and cooling should be done several times. In this way, thermal tempering of the metal will occur, and the part will become softer. Then you can try to drill it out. In an aluminum case, it is not advisable to heat it to red. There is a possibility of the body warping at the heating site or melting.
What to do if the extractor, drill or hexagon is broken?
You can etch them with nitric acid. One condition is that the body into which the broken part is screwed must be made of aluminum alloy. Nitric acid is one of the strongest acids. It dissolves metals well, but does not touch aluminum. The chemical reaction will take several hours, approximately 10-24, it all depends on the properties of the steel, the diameter of the fragment and the ambient temperature. Nitric acid must be diluted with water before use. For example, 57% acid is diluted with water in a 1:1 ratio. That is, the acid must be diluted to 30-35%. During the chemical reaction, nitric acid will itself be reduced and at the same time destroy the metal.
Nitric acid is poisonous, so be careful when using it and try not to inhale its fumes.
Features of working with self-tapping screws
When installing drywall, “ferrous hardware” with dense (frequent) thread turns with a sharp end is used. In this case there is no need to drill holes.
When selecting self-tapping screws for specific work with metal profiles, plastic, plasterboard or wood, you need to focus on their sizes. There are plenty of all kinds of tables indicating what is best to use.
Lanyard for rigging workCrab system for profile pipes: features of the selection and use of fastening systems and connecting elements
What is a rigging shackle? Size standards, modern types, rules and features of choice
It is only worth noting that window self-tapping screws with a drill used for working with metal-plastic profiles have fine threads for easy connection of important components during the assembly process. They have specific notches on the head, which allows them to be distinguished from other hardware products.
To work with the roof, you need to pay attention to hardware that has a gasket made of vulcanized high-quality rubber that fits tightly to the surface.
Self-tapping screws used for installing metal tiles will constantly experience static and dynamic loads and be exposed to aggressive environmental influences. It is important to choose high-quality fastening material so that you don’t have to correct or redo anything later.
Processing using a drilling machine and pliers
In this case, you can do without markings. There is a small depression at the bottom of the workpiece. It is clamped tightly and drilled from the rod side.
The pliers should be loosened from time to time. This is required for alignment and to avoid damaging the bolt. The disadvantage of this method is that the pliers can ruin the thread. It should also be remembered that the length of the drill should be slightly less than the workpiece.
How to choose high-quality screws for metal
It is not enough to choose the type of self-tapping screw to do the job; you need to choose from among the many types high-quality, reliable products that will serve for a long time.
You need to carefully examine the self-tapping screw; it must meet the following aspects:
- Same color. Products from the same issue must be of the same color and tone, meaning black and yellow fasteners. When all the screws are painted the same color, this is proof that the entire batch has undergone the same type of processing, under the same conditions and has the same parameters of strength and corrosion resistance;
- The pitch between the thread curls is better to be equal;
- Self-tapping screws of the same size range cannot be visually distinguished from one another;
- When models with a drill are taken, there cannot be burrs, the sharp edge cannot be broken;
- The hole for the slot is clear, symmetrical and has sufficient depth;
Self-tapping screws are of good quality and are often marked like a capital letter of the Latin alphabet. This indicates factory production.
When the selected screws are consistent with the aspects mentioned above, then this is indeed a quality fastener that will not break during use.
Advantages of self-tapping screws for metal
Let's consider the advantages of products for fastening:
- Simple and quick installation;
- There is no need to drill a hole to secure the hardware;
- High level of protection against oxidation and corrosion processes;
- The ability to combine materials of different densities;
- Strong, reliable and rigid connection;
- Careful installation without causing damage to structural surfaces.