In the first and second cases, casting at home does not require large financial investments. You can start an injection molding business simply now.
Manufacturing using liquid plastics
The manufacturing process is carried out using liquid plastics and silicone molds. Now it is possible to produce plastic products in small batches at home:
- souvenirs;
toys;
There are components for the manufacture of parts from thin-walled plastic, which can significantly expand the range of products and produce parts of any complexity.
For example, mixing two components of the Axson FASTCAST F32 brand from a French manufacturer makes it possible to obtain a super-liquid plastic that flows into the smallest folds of the relief of the model’s shape.
In addition, it is harmless to children and has no odor.
Pre-production
To organize production, you will first need a sample model. Using it, you first need to make a mold from special silicone or polyurethane components.
With experience and the quality of materials, you can learn to remove molds from models at such a high level that fingerprints will even be visible on the products (if necessary).
That is, the copy will be at the level of identity, which cannot be distinguished with the naked eye. Plastic products can be given complex compounds with any relief.
When your product is ready, you can design it using related products that come with liquid plastics:
Naturally, in some cases you cannot do without creativity, and you will have to manually paint the products, which may affect productivity. But creating every business is undoubtedly a creative process. After all, financial management is an art.
We make a product from liquid plastic
The technology for creating an ideal small relief when making it in a silicone mold with your own hands. First you need to prepare all the components and materials. We will need:
- Silicone Platinum.
- Liquid plastic Axson FASTCAST F18 (white color, has the consistency of water, odorless!).
- Scarlet dye for silicone.
- Polyurethane varnish.
- Scales.
- Syringe.
- File-buff.
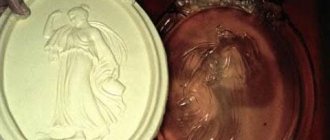
We securely fix the sample model to the bottom of the formwork to form the mold, using neutral wax plasticine (to avoid leakage of silicone). We paint the silicone from which the finished mold will be made scarlet, so that the quality of mixing the components of the liquid, white to the color of the plastic can be clearly seen on the mold.
Damaged plastic of a 2022 car is not a death sentence: we restore it quickly and for a long time
Maintaining a car in an aesthetically attractive condition means caring not only for the paintwork of the body, but also for the external and internal plastic elements.
Over time, their surface cracks, scratches, and fades in the sun, so it needs to be regularly updated and protected. For these purposes, polishes intended for the restoration of plastic are used. They have gained wide popularity for maintaining the aesthetic appeal of the car. They are used during pre-sale preparation of a car, renovation of the exterior and interior.
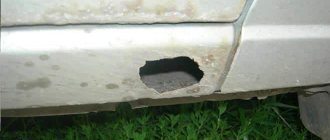
How to repair a bumper by hand is possible, but it’s better not to
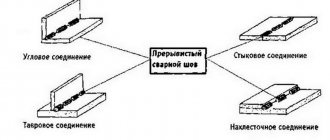
- Let's start with the most famous and controversial method - soldering a brass mesh into a fracture. The essence of the repair is to use a powerful soldering iron to heat the mesh until it is immersed in the molten plastic. The method really allows you to fasten cracked pieces of a bumper, and you will be able to meet dozens of craftsmen who “have been doing this for 100 years, and no one has complained yet,” but this technology has a number of disadvantages:
- metal, brass plates and plastic have different temperature expansion coefficients, so the repair area is not a monolithic structure;
- metal corrosion. Brass has very good resistance to rust, but often damaged parts are soldered or screwed into metal parts, which begin to corrode over time. The process occurs especially quickly if individual fragments of soldered metal parts remain openly sticking out from the inside of the element. Rust will penetrate inside in a relatively short time, thereby compromising the strength of the connection, and can even cause a defect in the paintwork (paintwork) on the outside of the bumper;
- loss of elasticity with a large repair area. In the cold, long cracks after soldering the mesh plates become oak, which is why even a slight deformation of the bumper can lead to new cracks.
What is liquid rubber?
Liquid rubber for cars is an innovative coating for protecting the paintwork (abbreviated paintwork) of a car, and changing its appearance and style. In essence, liquid rubber is a rubber-based paint that can be applied directly to the car body, or to individual body elements or rims.
Painting a car with liquid rubber allows you to achieve high protective, shockproof and anti-slip properties of the surface of the painted elements. This coating is highly waterproof and elastic, it is resistant to temperature changes and ultraviolet radiation, and if necessary, it can be easily removed.
Rubber paint can have either a matte or glossy texture. At the same time, it does not have a very wide palette of colors, but by mixing the available ones, you can achieve many different shades.
Liquid rubber also comes in the following types:
- Metallic,
- Neon,
- Chameleon,
- Nacre,
- Transparent,
- Thermal.
Thermal rubber paint has the property of changing color with changes in body temperature and ambient temperature.
Liquid rubber compounds for cars are widely represented on the Russian market under the following brands:
- Plasti Dip (USA);
- Rubber Paint (Russia-China);
- Dip Team (Russia).
The products of the first two manufacturers are especially popular among car enthusiasts. In addition, Rubber Paint liquid rubber already has positive reviews, probably no less than Plasti Dip, despite the fact that it costs less.
You can buy liquid rubber for cars in small aerosol cans with a sprayer, or in canisters (for application with a spray gun). Naturally, spray paint will cost more, but to paint body parts or wheels you won’t need a lot of liquid rubber (see consumption tables below). Moreover, even an inexperienced car enthusiast can use the can.
How to make liquid plastic with your own hands? Manufacturing technology and scope of application
Plastic is a universal material. It has found wide application in the manufacture of various components and parts in both industrial and household appliances. Products made from it are used in interior design of residential premises and offices.
A type of material called liquid plastic allows you to create crafts of a wide variety of shapes and sizes. This makes it possible to implement original design solutions. How to make liquid plastic at home?
Materials for production
To make liquid plastic with your own hands, you need to prepare the following:
- container made of glass or metal;
- acetone;
- Styrofoam.
In this case, the amount of acetone used depends on the desired volume of the finished product.
If you want to make liquid plastic with your own hands, the recipe for its preparation will be based on dissolving polystyrene foam in acetone. For this, polystyrene foam is used. It is a packaging container for various household and electronic equipment.
How to make liquid plastic with your own hands
The step-by-step recipe for preparing the named material looks like this:
- Open the container with acetone and pour the liquid into the glass container so that its level from the bottom is approximately 1 cm.
- Polystyrene foam must be broken into many small pieces, each of which will be easily placed under the thickness of the solvent.
- You can make liquid plastic with your own hands by dropping each piece into a container and waiting for it to completely dissolve.
- Polystyrene foam should be added to the container until it stops melting. Then you need to wait 5-10 minutes for the unused acetone to evaporate.
- After this, a viscous mass is formed at the bottom of the container, which can be used to produce a variety of products.
Knowing how to make liquid plastic, remember that complete hardening of the mass lasts 20-30 hours. Consequently, the part being manufactured cannot be removed from the mold within this period of time.
The substance should be applied with a small rubber spatula. Movements should be smooth. Liquid plastic must be stretched over the surface to be treated. If you use it to fill cracks, it is better to use brushes with hard bristles. They need to “push” the mixture into the gaps. After the plastic has hardened, it is recommended to apply another layer of the substance.
The described product has long been sold in finished form. It only needs to be heated in a water bath or in special equipment. A hair dryer is also often used for this.
As a rule, liquid plastic is produced in dense packaging. Its terms and storage conditions are strict. The temperature in the room where it is located should not fall below 15 degrees. Otherwise, the product will lose its performance characteristics:
- viscosity;
- elasticity;
- hardness after hardening;
- practicality;
- durability.
The cost of liquid plastic is quite high. That's why it's better to do it yourself.
Precautionary measures
Acetone is a very dangerous liquid that has an extremely negative effect on the human body. Therefore, it is allowed to make liquid plastic with your own hands only if the following precautions are strictly observed:
- Before working with acetone, you must carefully study the instructions for its use. It is indicated on the container label.
- Special sealed safety glasses should be used. They will protect your eyes in case of liquid drops and vapors. Working without them can cause serious eye injury.
- Acetone is toxic, so it should only be used in a well-ventilated area. In this case, it is necessary to use respiratory protection.
- This is a highly flammable product. Therefore, liquid plastic is made with your own hands away from sources of open fire. Smoking is strictly prohibited when performing work.
- Residues of acetone must not be poured into the sewer system.
- At the end of the process, as well as after pouring the finished plastic into molds, you must thoroughly wash your hands.
Applications of liquid plastic in finishing
The product has been used for finishing for a long time. After its application, an elastic film appears on the treated surface.
It is highly waterproof and UV resistant. The material protected by such a film is not afraid of exposure to aggressive detergents.
The smooth surface has a pleasant shine and retains its characteristics for many years.
Liquid plastic in window work
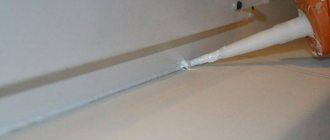
Most newly installed plastic windows have gaps in the joint area.
To eliminate this phenomenon, all parts of the window structure that are connected to each other are treated with the described substance. After drying, it creates an elastic, sealed film on the surface.
Applying liquid plastic to windows with your own hands is possible after making the material according to the above method.
Anti-corrosion agent
Liquid plastic is also characterized by a high degree of adhesion to the metal surface being processed. This property of the substance began to be used in anti-corrosion treatment of steel. Liquid plastic is applied to the surface without prior priming. It dries out in a few hours. After this, a film is formed on the surface that will protect the material from rust.
Coating a car with liquid plastic
A car protected in this way will not only please its owner with its spectacular appearance longer, but will also retain the value of the car in the event that it needs to be sold. Thanks to this coating, you will now need to wash your car much less often than before.
The car processing process is carried out using a special technology and includes several stages:
- The vehicle is carefully prepared. At the initial stage, it is washed and dried well, then a careful inspection is carried out in good lighting. All detected scratches, chips, as well as rust on the body are removed and cleaned, and scratches on plastic are also removed. Then a full range of repair work is carried out to eliminate defects locally.
- Plastic is applied to the car as the first layer. It penetrates into all existing microcracks and will serve as reliable protection for the car from various aggressive substances that destroy the coating from entering these places.
- After the first layer has dried, the next one is applied. It kind of “preserves” the car’s coating in the condition in which it is at the time of processing.
- Polymerization of plastic on the body takes about 10 days. During this period, you cannot operate the car, and it is strictly forbidden to wash it. After this period, a technological wash is carried out.
DIY liquid plastic at home - Metals, equipment, instructions
Nowadays, plastic products have become popular. They are convenient and practical to use. Plastic molding at home is a good idea for starting your own business or just for free time. Well-made items are elegant and interesting to look at and are easy to keep in order.
In addition, they have the necessary strength. To set up production of this kind on private property, you need to learn a couple of simple rules.
- Preparation of material
- Form
- Filling the part
- Progress
- Business ideas
First of all, you need to find plastic scrap to make a future product. This is not a problem, since in the modern world there is a huge amount of broken things, bottles and other scrap plastic.
Scrap plastic boxes
However, it is necessary to take into account the fact that each type of plastic has its own melting temperature.
That is why one type of scrap is needed to cast a particular product. Mixing several varieties of plastic products, even when studying its melting point, at low tide often provokes the appearance of bubbles in the product.
The best option in this case is to buy liquid plastic in a store or replace it with dioxide resin, this will allow you to get a high-quality product that will last a long time. You will also need a number of additional aids:
- melting container;
- silicone;
- lithol.
Plastic fumes are poisonous and highly toxic. Care must be taken when making products at home.
Form
To prepare a product at home, first of all, you need to build a model. First of all, you should decide on the material for making the mold. The following materials are suitable for this:
- tree;
- plasticine;
- gypsum and others.
Then you should go through the production of casting matrices, which will be directly used for casting. The mold must be coated with lithol or any other lubricant.
If the choice fell on silicone molds, then it is necessary to take into account that this substance works with a coefficient of more than 200%. It is also necessary to pay attention to its viscosity; the lower it is, the more accurate the mold will be.
Silicone mold
Filling the part
Do-it-yourself plastic molding directly depends on the material that the craftsmen chose to make the future structure.
Resins and liquid plastics work well for cooking, but they have different degrees of viscosity, so they will last for different times. All parameters should be studied in the instructions upon purchase.
There are recipes for preparing pasta at home; they require the master to be meticulous and meticulous when forming the composition of the raw materials. To make the material, mix 5 parts of fine sawdust with 2 parts of talc. Pour the mixture with wood glue (its consistency should correspond to the state of sour cream).
Everything is thoroughly mixed to obtain a dough of the same consistency.
There is another tricky move: you should add 0.5 parts of aluminum alum, it will prevent the appearance of mold on the dough, and the plasticity will increase several times.
The process of making your own casting dough is labor-intensive and requires excellent knowledge on the topic. That is why many novice pourers give their preference to ready-made mixtures.
Plastic molding at home
Progress
Casting occurs in several stages:
- It is necessary to take the mold and clean it thoroughly. After preliminary preparation, it must be completely cleaned and dried. All remaining material after preparatory activities must be removed.
- If you need to give the future product a tint, you need to add a couple of drops of paint to the casting composition. Water-based paints are not suitable for this.
- Preparatory degassing of the mixture is not required. The thing is that at home the duration of operation is short. And to remove excess air bubbles from small products, you will have to apply force and remove them yourself.
- Gently mix the pouring compound and fill the template mold.
- Everything is poured slowly in a small stream.
- The mixture is poured until the volume is completely filled, touching a small portion of the casting channel. The fact is that after degassing, the volume of material will decrease and become necessary for casting.
- The final stage is cooling the future structure.
The plastic is poured into the mold and then allowed to cool gradually.
To obtain a high-quality product, the template must be cooled gradually.
Business ideas
If a small manufacturer decides to enter a large-scale production, it is worth thinking about starting your own business.
Having tried your hand at home, you should draw up a business plan, register as an individual entrepreneur and begin making your dream a reality.
But buying equipment will not bypass the entrepreneur. And it’s hard to cast molds to produce a lot of products with your own hands. It is necessary to prepare the first products and sell them, and with the funds received, buy a certain machine for plastic injection, a press.
How can you make the plastic injection molding process profitable in your region? Seven simple casting rules will allow you to prepare a high-quality product that will be interesting to look at and also pleasing to the eye. And over time, entrepreneurs will be able to ask themselves about expanding their skills and setting up a personal business.
: Plastic molding at home
Applying the product to the car body
The process of applying “liquid plastic” and processing the car body with your own hands is quite labor-intensive and includes several main stages:
- Preparing the car: at this stage, the vehicle is thoroughly washed and dried. Next, a careful visual inspection is carried out, where all chips, scratches and dents are identified, after which the surface, if necessary, is cleaned of rust.
- Applying the first layer of “liquid plastic”, which penetrates all microdefects and creates a strong and reliable connection with the previous coating. The main effect of plastic at this stage is to create a protective barrier that prevents the penetration of aggressive substances into the metal of the car.
- Applying a second layer is an additional protective layer and preserves the coating that was initially formed. This creates enhanced protection for the entire body.
- Polymerization of plastic: this procedure continues for 10 days. During this time, the “liquid plastic” and the paint acquire a strong connection. During this period, the car should absolutely not be washed or subjected to various mechanical influences.
As you can see, applying “liquid plastic” and processing the body is not much different from conventional paintwork. However, there are various nuances that an unprepared person can miss, thus violating the technology and carrying out the work poorly.
The best coatings such as “liquid glass” or “liquid cover”
Such products have completely different mechanisms of action, but are grouped into one category due to the processing method. “Liquid glass” will be an excellent choice for drivers who care about the appearance of the car, because this composition, in addition to the protective effect (the active coating is several times thicker when compared with the polish discussed above), creates the impression that the car has been properly varnished.
This innovative development is distinguished by an exclusive composition based on alkaline solutions of sodium silicates, which interact at the chemical level with the paint surface of the car, forming a glass film on the body that protects the car for about 3 years.
The product is applied in an even layer to the prepared car body (as a rule, the procedure is performed with a sponge), after which the body is manually polished with a soft cloth.
If you cover a car with “liquid glass” at a maintenance service, the procedure will cost the car owner about 6 thousand rubles.
“Liquid cover” will be an excellent option for temporary application. As a rule, this is a product that dries quickly and has some similarities to balloon film. The composition is quite simply applied to a clean car body using an ordinary brush.
Experts recommend repeating the procedure a number of times in order to obtain the most durable coating, which is durable and easy to remove.
1 place. Silane Guard
Manufacturer's product from Japan, which occupies a leading position in the market. It features excellent performance characteristics. One package of this composition is enough to treat the car 2-4 times.
When using this composition, the car owner does not need to mix anything. Everything you need is already provided by the manufacturer.
Among the obvious advantages, buyers note the ease of use of this 1-component product. Processing is carried out as follows:
- The car is washed.
- The sponge is moistened with the product.
- The car is covered with “liquid glass”.
- Drying time – 10 minutes.
- The machine is wiped with a special cloth.
Overall, this is an excellent composition that many car owners use at home. It gives the body an intense color and protects the car from minor scratches.
The average price is 850 rubles.
Silane Guard
Advantages:
- repels water;
- excellent result;
- complex type protection;
- inexpensive;
- everything you need for processing is included in the kit.
Flaws:
- not detected.
2nd place. Smooth Egg Liquid Soft
The composition is made on the basis of silicon dioxide, which is used to increase strength and update the protective properties of a car body in combination with “liquid glass”.
The product improves the water-repellent effect of the protective layer and increases service life. Can also be used as an independent layer of protection. In addition to the product itself, the package includes a cloth for processing.
How to use:
- Before applying “liquid glass” you need to wash the car.
- The composition is applied to the body and wiped with a cloth.
The average price is 1,300 rubles.
Smooth Egg Liquid Soft
Advantages:
- renews the water-repellent effect;
- used as an independent layer of protection;
- protects and increases the durability of the layer based on “liquid glass”;
- Suitable for application to unpainted plastic elements.
Flaws:
- not detected.
What it is
Liquid plastics are polymer materials that are fluid before use, but harden after application. As a matter of fact, any synthetic glue can be classified in this category. But this concept is much broader. This also includes paints and varnishes and liquid rubber.
The composition of flowable plastics is:
- single-component;
- two-component.
One-component ones can be applied immediately; they already contain a solvent and a plasticizer, so the transition to the solid phase occurs independently. With two-component liquid plastics, hardening occurs after the two substances are mixed, as in epoxy resin.
Based on functionality, these polymers can be divided into two categories:
- for repairing plastic parts;
- for external coating and surface protection.
Vacuum metallization
The technology consists of spraying nichrome or aluminum onto plastic using a vacuum. The application of metal to plastic using a vacuum is carried out in a special chamber. The technique is widely used for applying metal film to various surfaces, for example, car parts, plastic fittings, plumbing fixtures, lighting equipment, etc. To protect the metal, special paint and varnish compositions are used that are characterized by increased hardness and resistance to moisture.
Vacuum chamber for metallization
How to determine the type of plastic without markings
- take a glass of cold tap water,
- cut a small piece of your plastic, about 1 centimeter in size, a couple of millimeters thick,
- clean this piece so that it is free of dust and oils,
- dip a piece into a glass:
- if the plastic floats easily on the surface, it is most likely thermoplastic labeled PE, PP, PP+EPDM ;
- If a piece has sunk, try to set it on fire, if it burns,
- most likely it is thermoset, marked PUR/TPUR , if it does NOT light up,
- most likely it is PC
Coating a car body
The procedure for applying liquid plastic and the preceding body preparation are practically no different from regular car painting. Therefore, it is quite possible to carry it out in the garage with your own hands, without violating the technology and having the necessary knowledge regarding this process. It consists of four main stages.
Depending on the manufacturer of liquid plastic, the interval between coating layers can range from several hours to several days. Therefore, it is recommended that before purchasing such a product, you carefully familiarize yourself with the method of its use.
The best polymer-based protective coatings
Polymer-based products are indeed good protection against significant aggressive environmental influences and mechanical damage. It guarantees waterproofing, copes with grains of sand and gravel flying from under oncoming cars, and also protects the car from reagents and salt in the winter season.
Polymer protective coatings are simply adored by pickup truck owners. They apply the composition to the bodies of their cars and do not worry about chips and scratches.
1 place. Willson WS-01261
With the advent of this product, drivers can quickly not only make their car shine, but also protect it thanks to a layer of polymers.
The product does not require polishing, since One TIME technology and a fiber cloth make it possible to easily coat the car with the composition to form high-quality body protection.
Due to the presence of light-sensitive substances in the composition, the polymerization process is carried out both under artificial and sunlight. The package includes a fiber cloth that can be washed after each use.
How to use:
- Wash the car: wash off dirt and dust from the surface.
- Dry the car using synthetic suede.
- Fold the napkin included in the kit to the size of your palm.
- Apply a little product (a couple of 4 cm strips) onto a napkin and rub in a circular motion over the car body until a shine forms.
Experts do not recommend applying a lot of product at once!
- If the product on the napkin has dried, use the other side of the napkin.
- Upon completion of the procedure, wash the napkin using a soap solution.
The average price is 1,300 rubles.
Willson WS-01261
Advantages:
- does not require polishing;
- ease of application;
- provides high quality protection;
- polymerizes quickly.
Flaws:
- lasts approximately 1-1.5 months.
2nd place. SONAX Polymer Netshield
A product made on the basis of polymers using mixed technology, which is suitable for any paint and varnish coatings. Protects the paintwork of a car body due to a resistant mesh of elements of organic and inorganic origin, which provides hermetic protection of the surface for a period of about six months.
The composition is quickly applied and is easy to use, richly renews color and guarantees improved water-repellent effect. Reduces the adhesion of dirt, dust and insects, and makes it easier to clean the coating within the specified period of use.
The average price is 1,200 rubles.
SONAX Polymer Netshield
Advantages:
- protects the body for six months;
- intensely renews color;
- improves hydrophobic effect;
- reduces the impact of adhering contaminants, insects and dust;
- simplifies cleaning of the coating within the specified period of validity.
Flaws:
- not detected.
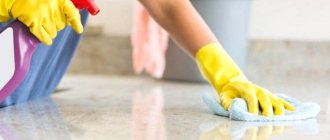
Do-it-yourself painting of plastic car parts
In order to efficiently paint plastic parts of a car interior, you need to adhere to a certain algorithm of actions, and first of all, correctly prepare the surface for painting. To do this you need:
- Remove the part and, before degreasing, rinse it thoroughly, inspecting it for cracks and other defects.
- Using solvent or white spirit, remove grease and oil stains, as well as other contaminants.
- Treat the surface with an antistatic agent to prevent static electricity from attracting dust.
- If there are defects, you need to eliminate them with a special putty for plastic and give the surface time to dry.
- Sand all rough spots with sandpaper. In this case, you need to sand “wet”, using abrasive P300 or P400.
- Rinse, dry thoroughly and degrease the product again.
Painting plastic parts of a car with your own hands is a matter for the patient; you must strictly follow the technology
- Apply a thin layer of adhesive primer and 1-2 layers of acrylic primer with an interval of 10-15 minutes for each layer to dry. If you want to get a structural surface, use a texture primer in the last layer.
- After the primer has dried, clean the primer with P400–P500 abrasive sandpaper.
The surface is completely ready for painting. At home, if you don’t have a spray gun, you can use a can of aerosol paint or an ordinary brush. The paint is applied in 2-3 layers with an interval of 15-25 minutes, and the parts are allowed to dry thoroughly. Only after this can the surface be varnished and polished with a special paste.
Instructions. DIY soldering of plastic using brass mesh
For repairs, you will need a soldering iron with at least 40 W (preferably 60 or 100 W). Prepare pieces of brass mesh of such a size that, after soldering, there is about 2 cm of overlap to the sides of the crack. You need to solder the mesh on the inside of the bumper.
If the bumper is split or a large missing piece needs to be soldered, secure the parts with plastic ties or metal plates before starting soldering.
Drill holes along the perimeter of the fault in increments of 2-3 cm through which you can stretch the ties. The plates are fastened with bolts and nuts using the same principle.
After tacking in several fragments and reliably connecting the screed sections, the plates should be removed in order to properly solder the fracture site. If the broken pieces are small, grab them from the outside with a heated soldering iron (the tip must be recessed to half the thickness of the bumper).
Soldering points must be cleared of old paintwork. After tacking, be sure to reinforce the structure from the inside with mesh or epoxy and fiberglass. To reinforce the mesh, use a heated soldering iron to press it down approximately to the middle of the thickness of the plastic. On the front side, try to leave the surface as smooth as possible, since you most likely do not have an orbital sander, and it is difficult to sand the plastic by hand.
How to create a product with your own hands
If it is impossible to purchase a ready-made plastic restorer, you can use other means to remove scratches:
- A technical hair dryer that has a thin nozzle and the ability to smoothly regulate the operating temperature can help. You need to direct a stream of warm air onto the scratch, increasing the operating temperature as the plastic melts. On flat, slightly inclined plastic surfaces, scratches may heal.
- You can erase scratches using carbon paper. Place the side on which the paint is applied on a plastic surface, and then rub it from the outside with a thin, blunt object.
In automobile stores you can purchase a special film for repairing damaged plastic. Self-adhesive film is applied to the damaged surface, and then heated and leveled with a roller, covering the scratch.
The best protective films
Today, protective film is one of the most expensive, but also the most effective methods of protecting a car’s paintwork from chemical and mechanical damage, as well as the influence of UV rays.
There are 2 key types of film:
- Vinyl.
- Anti-gravel, the use of which is also called lamination.
Vinyl-type film is not particularly resistant to damage and serves more as a decoration, which is why it costs less when compared to anti-gravel film.
Anti-gravel film can withstand such a powerful influence that it protects the paintwork of the car even from the consequences of minor accidents. It is possible to distinguish films from each other. To do this, you need to try to tear off a piece of the film or make a hole - with vinyl you can do this without much difficulty, but with anti-gravel it is almost impossible.
The treatment is carried out on individual parts of the body, so it is possible to apply the film exclusively to the parts that are most prone to mechanical influence - headlights, bumpers, pillars, hood, fenders and the outer coating of external mirrors. The film is applied to the part, which has been previously treated with a special agent, after which it is adjusted closely to the coating under a stream of hot air.
If the procedure is carried out correctly, the film will last for a couple of years, and then can be easily cleaned.
In addition to the protective effect, the film makes the car look better (there are brands with a matte, glossy and mirror effect, as well as with a personal design, which will be cheaper than airbrushing).
In view of technological conditions and the need to have specific experience, experts advise covering a car with such films in technical service salons.
The cost of the procedure is determined by the level of film, the dimensions of the machine and the number of surfaces to be treated. The most budget price tag for wrapping exclusively the front part of a car starts at 5 thousand rubles.
If you want to cover your car with such a film with your own hands, then experts recommend buying the so-called. "Autoskol." It differs from professional-type films in its increased elasticity properties, which makes it possible to avoid the appearance of wrinkles, as well as ease of application and ease of removal from the vehicle.
A roll of such film will cost an average of 1000 rubles.
1 place. Oraguard 270
Colorless anti-gravel vinyl self-adhesive film is made for complete car wrapping and protection of paintwork from scratches and chips. The product stands out from competitors due to its excellent resistance to mechanical influence and protects the car body from UV rays.
The German quality of this brand's products and positive customer comments only confirm the excellent results of use.
The average price is 950 rubles.
Oraguard 270
Advantages:
- colorlessness;
- protects the car body from powerful mechanical influences, as well as from possible damage to the car’s paintwork when hit by stones;
- protects the surface from UV rays;
- durability – 5 years.
Flaws:
- not detected.
2nd place. Solarnex Magnum Hybrid
This is a premium mixed-type anti-gravel film that has come to replace protective polyvinyl chloride films and surpasses them in all characteristics.
The developers of the Solarnex company managed to achieve excellent quality indicators and product stability, so this film is very similar in appearance to polyurethane-type films, but the cost is much cheaper.
Anti-gravel film differs from its competitors by the presence of a self-healing water-repellent layer that is resistant to damage. However, if the car owner was still able to scratch it, this can be easily eliminated using hot air or water.
Under the influence of hot air/water, a self-healing procedure begins, as a result of which the scratches disappear.
The average price is 1,950 rubles.
Solarnex Magnum TPH
Advantages:
- elastic;
- water-repellent effect;
- self-healing effect;
- top coat;
- adds shine.
Flaws:
- not detected.
Liquid glass for cars: what is it?
In fact, liquid glass is a special coating in the form of a transparent composition that does not allow air to pass through, quickly hardens after application, actively strengthens and partially protects the treated coating from chemical reagents and aggressive environmental influences.
Various liquid glasses are used in different fields (industry, construction, etc.). In general, liquid glasses are classified based on their base component (potassium or sodium liquid glass, lithium liquid glass, etc.).
As for cars, liquid glass for cars usually has a mono-alkaline composition and is a special protective and restorative polish (to restore shine and also to protect the paintwork). The use of liquid glass makes it possible to fill microcracks, which makes it possible to strengthen the car’s paintwork and slow down the process of cracking in already damaged areas.
We recommend watching a video of repairs performed by body repair specialists.
Video of remaking a previously repaired bumper, an excellent example of the work of a master with his “hands”.
Video example of repairing a large hole in a plastic bumper using a hair dryer, with a detailed description.
Video from a professional what ABS plastic is, how to repair it yourself, what seams to use, etc. Video example of Y-shaped seam repair.
Good day to you and happy holidays! Over the past few years I have observed, studied and applied various options for repairing plastic products. In the automotive field, the following types of work are common: Bumper repair, headlight repair, radiator repair (fender, molding, etc.), motorcycle plastic repair, snowmobile plastic repair, etc.
Before you begin repairing a product, you need to determine what material (plastic) it is made of. As a rule, the parts have designations for the type of plastic (PP, PPE, PPH (+ other variants of PP (Polypropylene)), ABS), but there are parts without designations, which will have to be determined experimentally. Since this post is still about repairs and not about how to determine the type of plastic, let’s continue.
1st method:
I’ll call it “Dedovsky is “
soldering plastic with a soldering iron and mesh
”
In my opinion, its main and only advantage is accessibility. Soldering iron price 100 rubles + mesh. The main disadvantage is that the material changes its properties (burns) and becomes brittle. As practice has shown, once a crack or hole has been repaired using this method, subsequent damage becomes very problematic or even impossible to repair. Conclusion:
it is worth using if there are simply no other options
. 2nd method:
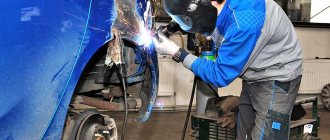
Currently,
plastic welding
.
Here the main rule is to weld the material in a similar manner; if PP plastic is to be repaired, then the electrodes (filler material) must be of a similar composition. At the moment, we have mastered the welding of plastics such as PP (and its modifications), ABS, Plexiglas (aka acrylic, polycarbonate, polymethyl methacrylate, plexiglass), Polyamide (PA is plastic in radiators). In general, all known plastics are welded except fiberglass (since it is a composite material.
The filler material, also known as the electrode, can be made independently from unnecessary spare parts, or you can use a special one (as the manufacturer claims, with increased adhesion). I was able to attend a seminar of one of them
3rd method:
Bonding plastic “
with reinforcing powder
”.
The technology is simple and toxic. Some businessmen position its components as “NANO-technological”
.
It is based on cyanoacrylate glue
one of the variants
Cosmofen CA 12
, 3M, Henkel also have similar adhesives, and even ordinary “super glue” has this base; the reinforcing material is ordinary tea soda. This method allows you to work where welding is simply not possible. Also, with this repair method, plastics of different compositions can be glued together. The repair seam is strong and holds tensile loads well, but do not forget that it is not elastic. Particular attention must be paid to respiratory and vision protection. Toxic both during gluing and during processing.
4th method:
Bonding plastic
with Dichloroethane
Dichloroethane or dichloroethane glue dissolves plastic to a “liquid” state. Thanks to its properties, it allows you to quickly and most aesthetically glue homogeneous compositions. The main thing is not to let the treated surfaces lose their shape. Can only be used with materials that dissolve (tested on PP and Plexiglass).