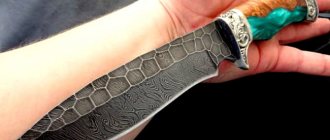
I welcome everyone who is interested in simple ways to sharpen knives at home. Why did I decide to cover this particular topic? Turning to a web search, I found a number of recommendations for professional sharpening. These methods are well suited for sharpening serious items such as hunting or professional knives made from high-strength steel. However, I was unable to find a decent tutorial on how to properly sharpen a knife with a whetstone. Today I will tell you how you can simply restore the sharpness of an ordinary kitchen knife with a sharpening stone by hand.
To sharpen a regular kitchen knife, professional equipment is not required.
How to understand when it's time to sharpen a knife
Everyone uses knives in the kitchen every day. And if a professional Japanese chef is able to carry out all operations with one knife, then in our kitchens you can find a whole arsenal. This can be a historical collection of samples from past generations or elegant sets where representatives of all sizes and purposes are present. Most often there are inexpensive sets purchased for the occasion.
Professional sharpening methods require the use of special equipment, which is not always appropriate to keep on hand. There, sharpening is carried out on wheels with diamond dust or on a special water stone. But why resort to such difficulties? After all, in reality everything happens completely differently. I picked up a knife and found out that it needed sharpening. I would like to correct the situation immediately, within a short time.
Finding out that it’s time to sharpen a knife is not at all difficult - you set out to finely chop onions or tomatoes for a salad, but you can’t do it - the knife doesn’t want to cut, but simply crushes the vegetables or slides over them to no avail.
Homemade whetstone for sharpening knives
If you're tired of your knife getting dull quickly or your sharpening stone chipping due to its softness, this article is for you. I will tell you how to make a homemade sharpening stone that will handle sharpening a knife no worse than Japanese stones. Epoxy resin will be used as a binder and silicon carbide as an abrasive.
What other abrasives are suitable? In addition to silicon carbide, you can use aluminum oxide powder, lapping powder for valves, or grinding powder, which is used in production for polishing hardened parts.
There are two options for making a whetstone for sharpening knives with your own hands:
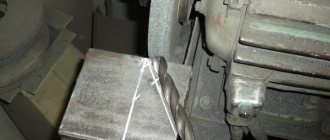
- Way. If you have a green Soviet block (it’s either silicon carbide or corundum), but it crumbles and becomes greasy, you can grind it into powder and get a ready-made abrasive. The photo shows one of these bars
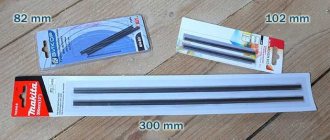
- ready powder. It will be enough to buy 100 grams for a bar measuring 160*65 mm. This is exactly what I will make.
A 15 mm thick board was chosen as the base on which the abrasive would be fixed. Cut the required part to size. We leave one side as is, sand the other side with sandpaper and make cuts with a wood saw to increase the grip of the epoxy resin.
We will pour the sharpening block into a cardboard box, which must first be glued to size and the inside covered with tape. This is necessary so that the resin does not stick to the paper.
Let's get to work. Attention! When working with epoxy glue, I strongly recommend using rubber gloves (ordinary medical gloves). It is best to measure the epoxy with a syringe. That is, you will need 2 syringes - one for the resin, the second for the hardener. Dilute the glue with the hardener according to the instructions (see the ratio of resin to hardener). I purchased resin by weight and know that the proportions of my glue are 1:5 (that is, 1 part hardener to 5 parts glue).
To begin with, I will mix 6 cubes of resin and 1.2 cubes of hardener.
I'll mix it and pour in a handful of abrasive.
I gradually add abrasive and mix until I feel that it is difficult to mix the glue. I add resin and silicon carbide again. I do this until the abrasive runs out.
I used 36 cubic meters per 100 grams of powder. resin and 7.2 cubic meters of hardener. These numbers will vary as different types of resins have different densities. If your glue is too thick, heat it in a water bath before use, just do not bring the water to a boil.
Pour the mixture into the mold and cover with a board (the side on which the notch is applied).
All that remains is to press it all down with something heavy. Since my box is high, the load does not reach the board, so I put a piece of wood on top. And I press down everything with 2 weights from the barbell.
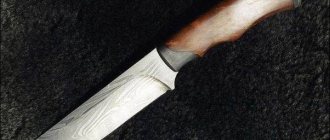
The glue drying time is 1 day at room temperature, but we will leave our boxes for 3-4 days so that the glue polymerizes well. 4 days passed, I printed the block. That's what came out of it.
We cut off the remaining glue on the sides of the block and remove the chamfers with a file.
As you can see in the photo, the stone is glossy. Therefore, we need to expose its grain (exhibit cutting properties). To do this, take a piece of glass, apply a little water and sprinkle with sand. We place the block on top with the abrasive down and perform movements as if we were drawing the number “8”.
Well, the homemade sharpening stone for knives is ready. In some places the abrasive was not exposed, since the resin layer was slightly smaller.
I recommend using a homemade whetstone with water (like an ordinary water stone) so that it does not become greasy. As a result, after all our efforts, we have a homemade whetstone for sharpening knives with a grit of about 5000-7000, which sharpens even a quick cutter (hardness of more than 65 Rockwell units). A knife sharpened with this stone shaves hair with ease. I wish that the cutting edge of your kitchen knives holds its sharpness for a long time.
17, total, today
Cooking stage
Of course, if you are going to sharpen a knife at home, you want it to remain sharp for as long as possible. For this reason, I decided to share a simple, accessible method that, without much preparation, will help make a dull blade as sharp as possible without returning to this issue for a long time.
Take a regular boat-type block, although this shape is not necessary. You can perform this operation on any sharpening stone you have at hand. The method I propose will allow the operation to be carried out quickly and as simply as possible, and it does not matter which bars were used.
It doesn't really matter what grit the sharpener you choose is. It may well be either a smoother or a completely rough abrasive stone.
Sharpening tools
First, let's look at what the market offers to solve the problem. As it turned out, there are 4 ways to sharpen knives. Each device comes with detailed operating instructions and descriptions. Therefore, here we will limit ourselves to the opinion of experts.
- The easiest and most inexpensive option for home use is to sharpen a knife using a mechanical sharpener. A simple device that does not require special effort or knowledge. It is enough to run the blade several times in the recess of such a knife sharpener. But the quality leaves much to be desired, and the knife will become dull much faster later on.
- Electric clippers are more effective. The case when everything goes quickly, easily and simply. But such devices also cost much more than their mechanical counterparts. In addition, you still won’t be able to achieve a razor-sharp blade.
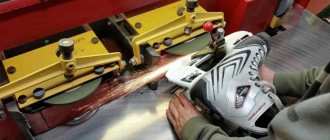
- Sharpening on a sharpening machine is unrivaled. Thanks to the high speed of rotation of the disc, you can easily turn a household kitchen knife into a razor. But for an amateur, this method is not only the most difficult, but also unsafe. And the price is steep.
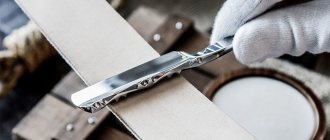
- Editing only with a whetstone and without a sharpener is a traditional method, most respected by professionals and worthy of a separate discussion.
Performance technique
I propose to consider a step-by-step sequence of actions that will tell you how to properly sharpen a knife using a sharpening stone.
- It is best to sharpen it on a wet stone in a sink near the water tap. To do this, moisten it with a soapy dish sponge. Then sharpening will occur smoothly, and there will be no jagged marks on the blade.
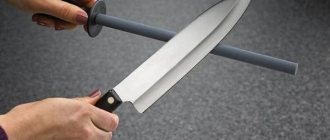
- To sharpen a kitchen knife according to all the rules, it must be moved along the sharpening stone, and not across. This will ensure the blade is sharpened to a razor sharpness. At the same time, how to direct the movement - away from yourself or towards yourself, depends on which direction the blade is tilted.
- It is necessary to constantly monitor the angle at which sharpening is carried out - the angle of inclination determines the shape of the resulting tip. The flatter the angle of inclination is chosen, the thinner the tip will be. This means that sharpening will be effective for a longer time.
- Next, you need to figure out which way to move the blade along the block. If the edge opposite the tip is tilted away from you, the knife must be pulled toward you and vice versa. The movement should imitate as if we are trying to scrape something off. Correctly move the knife along the block - in an arc.
At the very end of sharpening, it is better to make less effort. Using this rule, you can avoid the formation of burrs on the tip.
How to decide what is better to sharpen - a stone block or a diamond device. My answer is that correct double-sided sharpening of a dull knife can only be done with an emery stone. The sharpener that comes with the knives allows you to adjust the sharp blades from time to time, but cannot control the sharpening angle.
A diamond round sharpener is sometimes included in a set of knives.
Briefly about water stone
If you are already quite familiar with what this sharpening tool is, you can skip this chapter and immediately familiarize yourself with quality water stones or move on to sharpening techniques.
Perhaps Japanese water stones are currently a unique quality tool in the sharpening industry. There is no analogue to them yet and is not expected: despite the fact that they cope with wear-resistant steels* just as well as diamond bars, they do an excellent job of additional finishing and straightening, which our usual sharpening tools cannot do.
What is finishing, how is it done and why is it needed? During the sharpening process, we remove steel, forming a clear profile of the blade - two cutting planes, or approaches, converging at an acute angle. But at the same time, small scratches remain on them, which serve as a source of microcracks and damage to the cutting edge. To extend the longevity of the sharpening, these edges must be polished with the finest stones available. But water stones offer more than just the finest fraction. After soaking in water (from 5 to 25 minutes depending on the grain size), during the first steps of sharpening, a soft suspension is formed on their surface, which precisely polishes the forming surfaces - the leads. It has been experimentally confirmed that leads well polished with Japanese water stones “live” several times longer than those that were not polished or polished with slings.
To make it easier for the user to find the right stones, manufacturers produce the entire line at once with different grain sizes and always mark these values on the stones. For the convenience of users, two stones of the most common grain size are often glued together into one block (fine- and medium-grain, medium- and coarse-grain). This is very convenient, because for a full sharpening cycle we usually need 2-3 stones.
* The fact is that both dulling and sharpening are based on the same process - the gradual abrasion of the cutting edge when colliding with abrasive materials. The only difference is that when dulling, the abrasive material immediately affects the entire surface of the leads perpendicular to the cutting plane, while when sharpening, the impact of abrasive materials occurs alternately on the leads at certain angles.
Cautions
Sharpening knives in the house is a man's job. In any case, that’s what our women say. For this reason, sooner or later you have to learn it. For beginners, I want to leave a warning - please make sure that your fingers remain off the edge of the sharpening stone, not in the path of the blade. A knife sliding across a soap bar leaves deep cuts.
You can learn all movements by moving from simple to complex. It’s worth practicing on small knives, and then moving on to larger ones.
It is very important to acquire the skill of keeping the angle of inclination constant. To do this, you need to fix the hand that holds the knife in one position.
For high-quality sharpening, you need to keep the block tilted away from you.
I was glad to be useful to everyone facing this problem. Share your experience with your friends on social networks - let them also learn about my technique. If sometimes difficulties arise in solving everyday issues, follow my publications. I will always tell you how to find a simple way out.
Things to remember when sharpening
So, everything is prepared, now we get to work, following the step-by-step instructions.
- We place the soaked water stone on a rubber lining or in a clamp so that it is convenient for you to work with it. There is no single standard here, everything is determined only by your personal comfort.
- If necessary, attach a clamp to the butt, if there is one, and place the knife on the stone with leads. You can sharpen either with the cutting edge facing away or towards you, but practice shows that the first option is more convenient.
- We begin sharpening from the conditional first segment, located at the tip. We hold the handle with one hand, and place the other on the plane of the blade and use it to control the angle and force of pressing against the stone. We press (not very hard, especially loosen the grip towards the end of sharpening) the blade with the ring, middle and index fingers, and place the thumb on the butt and begin a smooth movement.
- The “jewelry” work of sharpening the tip itself is done by pressing the tip against the stone with the thumb or forefinger.
- When a uniform burr has formed along the entire length of the area you are sharpening, you can move on to the next area. A burr looks like a foreign, non-shiny formation along the cutting edge just below the edge.
- When the same burr is formed along the entire length of the blade, you can move to the other side and begin repeating all the steps on the other side if the blade profile is symmetrical. On an asymmetrical one, the burr can simply be carefully adjusted in the other direction. The burr will “roll over”, but will decrease. In fact, you can simply handle it endlessly; it will tend to zero, but will never turn into it: this is very fertile ground for training. Steel is most often malleable, and a burr is precisely an elongated elastic structure that can be returned to its rightful place using straightening tools (smooth musats, as well as improvised devices - using a piece of thick jeans or paper).
- A burr that can be “removed” by editing can be called acceptable. This is achieved by switching from coarse-grained abrasive stones to fine-grained stones - dressing and finishing stones. But first, you need to remove the risks left by the large stone from the supply lines with a medium-grained stone. Otherwise the edge will not be durable. If after straightening there are no marks on the leads (they are smoothly polished) and the cutting edge is not visible, then everything is done correctly.
The procedure for working with water stone - from soaking to removing the burr, in this case on thick paper
Well, in response to the main question of the article, we can only say - you need to sharpen, sharpen and sharpen. Mastery is achieved only by practice.
Grit of sharpening stones
It should be noted right away that even amateur sharpening on stones is far from simple. Those who have never used such abrasives may encounter certain difficulties at the very beginning of their journey - choosing a “tool”. What grit size of stone is needed for sharpening knives? Let's try to fully cover this topic, putting everything into detail.
The very first question, the answer to which will help you choose the right stone for knives, concerns the grain size, it is also called grit. The aggressiveness of the impact on the metal directly depends on the value of this parameter.
Large grains leave deep chips and gouges on the surface, which is unacceptable. An ideal job is considered to be a smooth, sharp, mirror-like cutting edge without any defects. That is why large grains are used only for working with workpieces, that is, processing a newly forged blade, or for restoration. Fine grains are responsible for grinding and final polishing. True, working with this stone takes an order of magnitude longer, but the result is worth it. Medium grain sharpens if the blade is slightly dull.
In your kit, it is advisable to have a minimum, if you sharpen infrequently or are just learning, three double-sided stones: with very fine grain, medium and coarse. It is worth working, moving from large to small.
Water stones for sharpening knives of various grain sizes.
Grit and Roughness Table
This table contains all the necessary information that will help you understand the different types of stones: markings, grain size, roughness and purpose.
| Class | Average grain size, microns. | Grit | Russia | Purpose | ||
| Japan (watermen) | USA | Germany | GOST 9206-81 (diamonds) | |||
| 14 | 0,025 | — | — | 0,1/0 | Editing and polishing, super finish | |
| 14 | 0,05 | — | — | |||
| 13 | 0,07 | 200,000 | — | |||
| 13 | 0,1 | — | — | |||
| 12 | 0,15 | 100,000 | — | 0,3/0 | ||
| 12 | 0,25 | 60,000 | 100,000 | |||
| 11 | 0,49 | 30,000 | 60,000 | 1/0,5 | ||
| 10 | 0,74 | 20,000 | 20,000 | |||
| 10 | 0,91 | 16,000 | 16,000 | |||
| 9 | 1 | 15,000 | 14,000 | 1/0 | ||
| 9 | 1,5 | 10,000 | 10,000 | 2/1 | ||
| 9 | 2 | 8,000 | — | F 1500 | ||
| 8 | 3 | 5,000 | 8,000 | F 1200 | 3/2 | |
| 7 | 5 | 3,000 | 4,500 | — | 5/3 | |
| 7 | 5,3 | — | — | — | 7/5 | |
| 7 | 7 | — | — | — | ||
| 7 | 8,5 | 1,800 | P 2500 | — | 10/7 | |
| 6 | 10 | 1,500 | — | F 600 | Removing grinding marks, fine sharpening and finishing | |
| 6 | 15 | 1,000 | P 1200 | — | 20/14 | |
| 6 | 18 | 800 | P 1000 | F 400 | ||
| 5 | 20 | — | — | — | ||
| 5 | 26 | 600 | P 600 | — | 28/20 | |
| 4 | 30 | 500 | P500 | F 320 | 40/28 | Removing traces of roughing operations, grinding |
| 4 | 35 | 400 | P 400 | — | ||
| 4 | 46 | 320 | P 320 | F 240 | 60/40 | |
| 3 | 53 | 280 | P 280 | F 230 | ||
| 3 | 68 | 240 | P 220 | F 180 | 80/63 | |
| 3 | 82 | — | P 180 | F 150 | ||
| 2 | 100 | — | P 150 | — | 125/100 | Roughing operations, intensive metal removal |
| 2 | 136 | 120 | — | — | — | |
| 1 | 260 | — | P 60 | F 60 | — | |