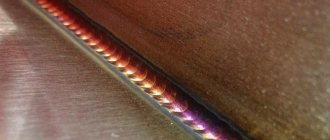
A seam joint is a permanent, but not rigid, butt joint of thin metal sheets. The word “rebate” comes from the German “Falz” and is translated as “groove, groove”.
This type of connection is most widespread in the roofing industry. The fact is that when joining metal sheets, one has to solve issues related to their thermal expansion.
Rice. 1
Changing geometric dimensions due to temperature changes does not allow for a rigid, hermetically sealed connection. At the junction site, tension occurs in the material, leading to significant deformation. That is why the best connection method is a seam connection.
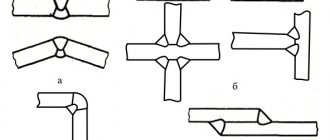
When folding, two roofing elements are connected, the edges of which are pre-processed so that when they are brought together, a fixing seam can be obtained (Fig. 1).
Seam seams come in three types:
- recumbent;
- standing;
- angular.
Structurally, seams are divided into two groups:
- single;
- double (a variety of slatted folds).
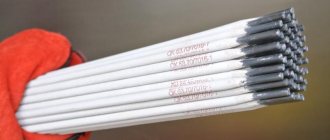
How to make a lock on a galvanized sheet
The joining of the edges of thin sheet metal is most often done in a lock - by clamping one edge to the other, but occasionally other methods are used, which may be needed more often in the work of a young master.
These are the methods. Double lock (diagram)
All kinds of tin products are most often connected with a double lock.
Tin rivet
Almost all work with thin metal is based on the plasticity of the metal, its ability to bend and flatten. But the master must skillfully use his tool, otherwise these same properties will be detrimental to the work. How and why will be seen later.
Therefore, folds should always be bent with a wooden mallet on the sharp iron edge of a crowbar, iron strip or corner of a scraper.
Then they bend the edge of the fold at a right angle, place it with the outer side on the anvil and straighten it with the inner side with blows of the mallet.
Let's assume that you need to bend the fold of a tin cylinder.
Making a fold on a cylinder
It is clear that the diameter of the outer edge of the folded fold will be larger than the diameter of its inner circumference. Consequently, the metal must be riveted along the entire fold, stronger at the outer edge and weaker towards the cylinder.
To such a cylinder with a rebate, you can already attach the bottom with a double lock, only at the circle for the bottom you need to bend the rebate or solder the bottom with solder.
Rebate fold on mug
Punching out on a mandrel
Sometimes the young master will have to knock out longitudinal grooves on thin metal plates. The cross section of such a plate will be shaped, and the plate will acquire rigidity.
Plate with longitudinal recess
Making a rectangular box
The work, as you can see, is not at all difficult, but it must be done carefully.
Cutting out and making cylindrical shapes will not present any particular difficulties. For the cylinder, you need to cut out a rectangle with a height equal to the future pipe, and a length of 3.14 times the diameter of this pipe, with an increase for rolling the seam.
Cutting diagram for the seam of a cylinder or rectangular box
When making conical products (bucket, funnel and others), all working techniques will remain the same, only when cutting you will have to remember the geometry. All conical objects must be correctly depicted in the scan, and this is the most important thing.
Cutting a truncated cone
Types of fasteners
There are also types of fasteners such as:
- galvanized and oxidized “self-tapping screws” made of steel with a drill - the products are used for fixing the sheet and sheathing (if the sheet thickness is no more than 2 mm, there is no need to pre-drill a hole);
- “bug self-tapping screws” made of oxidized or galvanized steel without a drill – used for attaching sheets to the sheathing structure;
- self-drilling self-tapping screws from the HILTI brand with a length of no more than 19 mm - used for fastening 2-3 sheets (if their total thickness is not higher than 2.7 mm);
- galvanized self-drilling screws of the HILTI brand with a diameter from 4.8 to 6.3 mm and a length in the range of 38-55 mm - used for attaching profile sheets to the base, both directly and through a layer of insulation;
- HILTI screws made of anti-corrosion steel with a cross-section from 4.8 to 5.5 mm and a length of up to 10 cm are used in aggressive conditions.
The choice of joining method for expanded metal sheets is determined based on the parameters of its thickness. For thick sheets, welding technology is used, for thin-sheet products - rivets or self-tapping screws.
Reclining fold
When connecting the end edges of roofing sheets running across the slope, a recumbent type of fold is used (Fig. 2), and for the side edges that are directed parallel to the roof slope, a standing type is used.
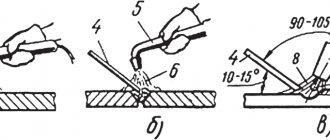
The rebated edge of the recumbent type is produced as follows (Fig. 3):
a) lay the canvas on the edge of the marking table, upholstered at the ends with a corner. Then a line is drawn along the bend line of the roofing sheet. The width of the bend depends on the thickness of the sheet - the thinner the sheet, the smaller the bend;
b) use a wooden mallet or rubber hammer to make a neat bend;
c) be sure to ensure the perpendicularity of the bend;
d) then the sheet is turned over with the fold up and they begin to “pile” it onto the sheet with the same mallet. The second workpiece is performed in a similar way;
e) the edges of the two canvases are connected into a lock, which is pressed with a mallet;
f) using a hammer and a metal block, cut the top sheet so as not to jam the seam seam.
Standing seam
Single
This type of fold has the simplest design. It is used on roofs with a large slope (at least 10°).
Rice. 4 (1 - scraper; 2 - block)
Installation procedure for a single standing seam:
1) From the side of the smaller edge, press the scraper tightly against the high edge. Adjust the height of the scraper until it matches the smaller edge. Bend the high edge toward the surface of the scraper with a mallet. Remove the comb bender.
2) close the low fold of the fold with a high one.
3) press the seam using a hammer and a comb bender, which is pressed tightly against the back side of the seam joint (Fig. 4).
Double
Compared to a single seam, a double seam is more secure.
Making it by hand can be difficult, but if you use special tools, such as seamers (Fig. 5), you can do the job quite well. Bending machines also make the work much easier, with the help of which you can quickly and easily bend an edge to give it the required profile. Double standing seam is the most commonly used method for joining two adjacent roofing sheets. Seam roofing is one of the most common types of roofing.
The production of this seam connection begins with the creation of an angular standing seam, after which it is bent down 90°. To compensate for temperature deformations, a gap of 3 to 5 mm wide is left at the base of the folded structure.
Rice. 5
Since in order to obtain a double profile it is necessary to increase the number of working operations, the time for installing the roof covering also increases accordingly. But these inconveniences are fully compensated by the reliability of a thoroughly closed seam - because it ensures the hermetic integrity of your roof during precipitation.
However, even such a strong joint will not save you from stagnant water on the roof, so the use of a double standing seam is permissible only on roofs with a slope of 10° or higher. It is believed that a special sealant can help the matter - a tape that is inserted into the fold before it is pressed with a seaming machine.
Rack and pinion
This type of connection of roofing sheets is more typical for European house construction, although, recently, the rack seam (Fig. 6) is gaining popularity among Russian roofers.
Rice. 6
The slatted fold is essentially reminiscent of a double vertical fold, but, unlike it, it has a wider joining edge due to the use of a wooden block.
The bent parts of the roofing sheets rise along the sides of the bar and are attached either here (Belgian version) or on the surface of the bar (German version). The peculiarity of using such a seam connection is that it can only be used on roofs with a slope of more than 3°, otherwise the water accumulated on the surface will penetrate into the under-roof structures.
Angular
Thanks to the volume and the shadow it casts, this seam joint looks quite elegant, which is why it is traditionally used for finishing large and easily visible surfaces. It is typical for the installation of roofs with a large slope. Fixing the fold occurs in just one step. The design feature of the corner seam prevents stress from arising in the metal, which means that deformation of the roof surface is minimized.
Self-locking fold
Russian specialists have developed a unique seam fastening scheme - a self-locking fold (Fig. 7). This invention is superior in manufacturability to all foreign analogues. The use of a “latch” saves roof installation time and does not require special seaming equipment.
Rice. 7
There are two shaped profiles on the roofing sheet, made in such a way that one of them acts as the base of the latch, and the second plays the role of its cover. The profile with the latch cover of one leaf snaps onto the base profile of the other leaf by simply pressing from above. This creates a strong and reliable rebate lock. It only takes a few seconds to snap the locking system into place. This means a noticeable reduction in the time required to install the entire roof.
The advantages of the “latch” fold include:
- waterproofness of the locking connection: no additional sealing is needed;
- ease of assembly and disassembly of roofing sheets: no professional skills are needed, and you can do without special tools;
- a single panel covering the entire roof slope, without additional joints;
- insensitivity to thermal expansion of metal, which eliminates deformation of roofing sheets;
- affordable price of roofing material and installation work;
- speed in roof installation;
- special connection strength.
Seam roofing is incredibly popular in low-rise construction. It is recognized as a simple, reliable and high-quality design at the same time. Affordable price also plays an important role. If you are the owner of a private home, perhaps this was your choice. We would be grateful for your story about how you covered the roof and what type of flange connection you used when installing it.
General provisions
Seam roofing is one of many roofing systems that reliably protects premises from atmospheric influences. It is the most hermetically sealed system and virtually eliminates the possibility of through corrosion.
By the way! It will be interesting to know: Methods for tying the gable of a gable roof: calculations and examples of a do-it-yourself device
Fig.1. Single and double fold
Fig.2. Seam roofing
Fig.3. Connecting paintings with a recumbent and standing seam
— checking compliance with the design slopes of the roof slopes;
— checking the correctness of the sheathing arrangement;
— sorting and checking the quality of supplied metal sheets.
Seam seams for joining thin-sheet metal
The type of seam connection is divided into the following types:
- double standing seam - in demand for pitched roofs, the slope of which is no more than 25°, providing the joint with moisture resistance, except for the influence of standing water (in such cases, high seams are used, equipped with reinforced gaskets, which allow the use of seam-rolling mechanisms;
- lying folds - for horizontal fastening of sheets;
- L-like rebate – used for roofs with a significant slope (over 25°);
- standing seam type - used for longitudinal joining of sheets.
How to make a castle out of cardboard?
- corrugated cardboard or a large box, for example, from under a refrigerator;
- scissors;
- stationery knife;
- scotch;
- glue;
- paints.
You can make a castle out of cardboard so that there are only walls. Take two sheets of this material and, using a stencil or by hand, apply elements such as a Christmas tree, clouds, snowflakes. It will be clear that this is an outside wall and it is snowing.
If you wish, you can then work with your children to paint the outside of these walls so that they resemble stonework. You can cut out the knight's coats of arms to also attach them. It will be interesting for a child to play with such a castle.
If you wish, you can use adhesive tape with a brick pattern to do this.
If you connect the coats of arms on a thread, you can hang them on the top of the structure. Print out the heraldry elements shown so you can cut them out and use them.
You can make a castle consisting of 2 boxes. Cut off the top of the square one, decorate the cut area, and make windows. Take the second box, which is narrower, put it in the first, also pre-decorating it.
You can take a white packaging box. It's brown inside. When you form the elements of this structure, you will get a beautiful two-tone color.
Draw some brickwork on yellow paper, cut it out and glue it in some places. Here's how to make a castle out of cardboard.
You can make a small one using scrap material.
How to make a palace with your own hands - master class and photo
Since childhood, girls dream of being princesses, and they will surely like such a beautiful house.
To make it, you will need:
- large cardboard box;
- scissors;
- stationery knife;
- adhesive tape.
You can use a box like this, making a slot on the side for the entrance, and a window on the other. To make the window openable, cut it on only three sides.
Now you need to cover it with self-adhesive film. If you don’t have self-adhesive film, then use washable or regular wallpaper with a brick pattern, decorated with flowers.
Glue film or wallpaper, decorate the window and entrance areas with strips of paper.
Here's how to make a palace to make it even more luxurious, you can cut out a crown from cardboard, paste it over and attach it to the top as a roof and decorative element.
And you can decorate the windows in such a way as to draw characters from your children’s favorite books and cartoons in them.
Snow Maiden's Palace - master class and photo
You and your child can make a picture of lace for the New Year.
- a sheet of red cardboard;
- lace of various widths;
- scissors;
- sequins;
- glue.
Then you need to connect the two pillars with a lace ribbon, the edges of which are folded and ironed at an angle. You will glue a smaller strip of sewing on top of two small rectangles.
Cut a 12 cm long strip from the lace ribbon and glue it on top of this palace. All that remains is to attach snowflake-shaped sequins to decorate the work.
The Snow Maiden can live in another castle. Or the child will place the princess here. This structure is also created using lace. Here's what you'll need to make the palace:
- Whatman paper, one or two;
- scissors;
- glue;
- lace;
- cotton wool;
- textile;
- pen or felt-tip pen.
By the way! It will be interesting to know: What is a parapet on a flat roof roof and what is its height according to SNiP
Making master class:
Here's how to make a paper castle in which the Snow Maiden, the Princess can live, or it will become Cinderella's habitat.
And if you want to make an edible gift, then arrange it in the form of a princess castle. This can be presented to a girl or woman for any holiday.
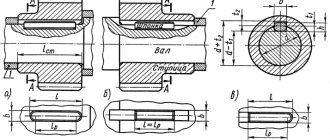
Connecting metal sheets with rivets
Rivets are made of steel, aluminum, copper, brass, they are semi-circular, flat, countersunk or semi-secret.
Stages of connecting sheets with rivets
- The sheets are placed on top of each other and secured in a clamp.
- The centers of the holes are marked and punched.
- Holes are punched with a punch or drilled simultaneously in both workpieces.
- Rivets are immediately inserted into the punched holes and flattened with a hammer.
- Crimping is used to give the final shape to the top head.
The length of the rivet rod is selected so that it protrudes approximately 1/3 above the metal surface. The rivets should be located at a distance of 9-12 mm from the edges of the sheets, and at a distance of 25-30 mm between themselves.
For sheets made of high-strength, thermally strengthened aluminum alloys, joining with rivets is the main method. Relatively new products are corrugated aluminum bolt rivets. The rod of such a rivet is grabbed by a special pneumatic tool and tensioned.
How to make a castle out of cardboard?
- corrugated cardboard or a large box, for example, from under a refrigerator;
- scissors;
- stationery knife;
- scotch;
- glue;
- paints.
You can make a castle out of cardboard so that there are only walls. Take two sheets of this material and, using a stencil or by hand, apply elements such as a Christmas tree, clouds, snowflakes. It will be clear that this is an outside wall and it is snowing.
If you wish, you can then work with your children to paint the outside of these walls so that they resemble stonework. You can cut out the knight's coats of arms to also attach them. It will be interesting for a child to play with such a castle.
If you wish, you can use adhesive tape with a brick pattern to do this.
If you connect the coats of arms on a thread, you can hang them on the top of the structure. Print out the heraldry elements shown so you can cut them out and use them.
You can make a castle consisting of 2 boxes. Cut off the top of the square one, decorate the cut area, and make windows. Take the second box, which is narrower, put it in the first, also pre-decorating it.
You can take a white packaging box. It's brown inside. When you form the elements of this structure, you will get a beautiful two-tone color.
Draw some brickwork on yellow paper, cut it out and glue it in some places. Here's how to make a castle out of cardboard.
You can make a small one using scrap material.
How to make a palace with your own hands - master class and photo
Since childhood, girls dream of being princesses, and they will surely like such a beautiful house.
To make it, you will need:
- large cardboard box;
- scissors;
- stationery knife;
- adhesive tape.
You can use a box like this, making a slot on the side for the entrance, and a window on the other. To make the window openable, cut it on only three sides.
Now you need to cover it with self-adhesive film. If you don’t have self-adhesive film, then use washable or regular wallpaper with a brick pattern, decorated with flowers.
Glue film or wallpaper, decorate the window and entrance areas with strips of paper.
Here's how to make a palace to make it even more luxurious, you can cut out a crown from cardboard, paste it over and attach it to the top as a roof and decorative element.
And you can decorate the windows in such a way as to draw characters from your children’s favorite books and cartoons in them.
Snow Maiden's Palace - master class and photo
You and your child can make a picture of lace for the New Year.
- a sheet of red cardboard;
- lace of various widths;
- scissors;
- sequins;
- glue.
Then you need to connect the two pillars with a lace ribbon, the edges of which are folded and ironed at an angle. You will glue a smaller strip of sewing on top of two small rectangles.
Cut a 12 cm long strip from the lace ribbon and glue it on top of this palace. All that remains is to attach snowflake-shaped sequins to decorate the work.
The Snow Maiden can live in another castle. Or the child will place the princess here. This structure is also created using lace. Here's what you'll need to make the palace:
- Whatman paper, one or two;
- scissors;
- glue;
- lace;
- cotton wool;
- textile;
- pen or felt-tip pen.
By the way! It will be interesting to know: Lightning protection mesh on the roof - a do-it-yourself device
Making master class:
Here's how to make a paper castle in which the Snow Maiden, the Princess can live, or it will become Cinderella's habitat.
And if you want to make an edible gift, then arrange it in the form of a princess castle. This can be presented to a girl or woman for any holiday.
Joining corrugated sheets
When laying profiled thin-sheet galvanized cold-rolled steel on the roof, the following connection rules apply:
- on steep slopes, there is enough overlap of sheets (more than 30°) - from 10 cm;
- with a tilt of 15-30°, the alignment is 15-20 cm;
- with a small slope - up to 14° - the joint width is 20 cm.
At the lower and upper edges of the roof, along the joints, fasteners are placed in each recess of the profile. At longitudinal joints, fasteners are placed in increments of 50 cm.
Case Study
Hacking a regular unit with a master key will prevent thieves from getting inside the motorhome. Before leaving the cottage, residents will open the electric lock by applying power to it, and thus unlock the gate, after which they will open a regular lock.
Electric locks on the garage should be installed so that it attracts attention to itself as little as possible. The solenoid unit is often supplied with a voltage of 24 V, a current of several amperes when activated, and an even smaller current to hold it in the open position.
It is possible to equip the electric lock with a latch with an electromagnetic control method. Or prefer an electromagnetic model with a beveled bolt, which locks the gate when closing.
The voltage source will be the same as for powering the solenoids. Next, cover the nichrome wire with a layer of fiberglass or a tin casing. Nichrome and copper wires are connected by welding and carefully brought out.
Making a garage lock with your own hands will provide reliable guarantees that an attacker will bypass the motorhome. Such garage doors are much more difficult to crack, since the homemade product is unique in its parameters.
The process of fastening rolled sheets with rivets
Rivets are made from alloys based on brass, aluminum, copper or steel compounds. There are products of flat or semicircular shape, secret or semi-secret design.
Fastening sheets with rivets is carried out in several stages:
- the corrugated sheet is overlapped and fixed in a clamp;
- the locations of the proposed holes are marked and marked;
- using a punch or drill, holes are simultaneously punched in both workpieces;
- rivets are inserted into the holes and flattened with a hammer;
- The upper head is given its final shape by crimping.
The length of the rivet rod is chosen so that it protrudes one third above the metal surface. The rivet elements are placed 9-12 mm from the edge of the profile, the distance between the products should be at least 2.5-3 cm.
Connection using rivets is in demand for rolled sheets made of high-strength aluminum alloys, thermally strengthened. Innovative products – bolt rivets with a corrugated surface – are becoming popular. The rod of such products is captured by special pneumatic equipment and tensioned.
Combination lock: features of insertion
The choice of an electromechanical lock is due to the increased degree of protection, which is extremely important for the country houses of wealthy owners. The widespread use of combination locks began in the mid-90s, when the need arose to reliably protect one’s property from ill-wishers.
The simplest option for installing a combination lock is to secure the box to the edge of a sheet of metal and connect the lock to power. Some models have a battery, eliminating the need for additional wires.