A table in the classical sense is a rectangular piece of wood that stands on four legs. To prevent the table from swaying and to be stable, you need to attach the legs correctly. It is also necessary to take into account the material from which it is made and the location of the piece of furniture. The tabletop, no matter what it is made of, is subject to deformation under the influence of humidity and temperature changes, which is why the choice of fixation method is so important. There are several ways to attach legs to a tabletop.
Fixation with surface plates
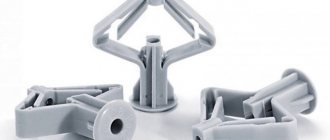
The plates are fastened with self-tapping screws on four sides of the tabletop. The bolt is screwed into the legs with the head facing inward. The legs are then screwed into the attached plates. One of the suitable plates is the platform for attaching the tlb60 leg. As a rule, they are made of chrome. They are reliable and easy to find in furniture supply stores.
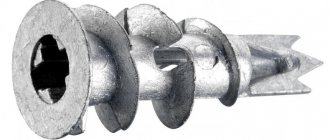
Fixing with T-nuts
This form of fastening is suitable for countertops that in the future will be covered with other types of wood or upholstered with material. In addition to the nuts themselves, it is necessary to purchase bolts with eyes and eyes. Four holes should be drilled into the tabletop at equal distances through the base. Then the T-nut is driven in with a hammer so that it is completely in the array. Screw bolts with lugs and eyes into the legs. For greater convenience, you can use pliers. All that remains is to connect all the elements of the table.
Screw mounting
If the table does not come with a side drawer, this method may not be suitable, or you should purchase this element separately. Fastening the drawer will provide additional stability and reliability to the table. The drawer is a fastening strip along the entire perimeter of the table, to which the legs are screwed. A special expansion in the form of a cone in the drawer helps ensure slight mobility of the screw with some deformation of the tabletop (this is typical due to changes in temperature and humidity).
Attaching table legs to the tabletop
A table is a necessary attribute of kitchen furniture. Today, manufacturers use a lot of materials to produce tables. There is a great variety of table leg shapes; there are more than twenty of them. The traditional version has four legs. In most cases, standard models have a square or rectangular tabletop shape.
Wooden rectangular dining table with four legs
A table with three legs is usually round. It can be used as a small coffee table or as a dining area.
Round wooden kitchen table with three legs
Tables are also produced with two legs; they can be of various types, but the most common models are those with two X-shaped legs or durable ones made of solid wood.
Wooden table with X-shaped legs complete with chairs for a summer cottage
Finishing
In order for the product to last for many years, it must be processed. Legs made of chrome cannot be processed in any way, but wooden products must be properly processed.
In order for a wooden leg to serve faithfully for a long time, after manufacturing it must be treated with sandpaper . This is the polishing stage. After sanding, open with varnish or stain . Wait until dry, sand again, then re-open. Repeat this algorithm of actions several times.
Advice . The processed product takes on a marketable appearance and lasts longer.
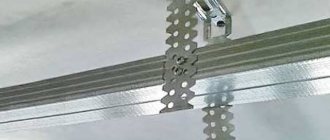
Mounting methods
The legs of the table are attached to the sides of the supporting frame, and the tabletop is, in turn, attached to them
Many craftsmen know that improperly secured legs are the root cause of the table swaying and tilting. There are adjustable mounts that can correct a large percentage of tilt, but quality assembly is paramount.
There are several options for attaching legs to tabletops:
Attaching the leg with surface plates
Attaching the Legs with T-Nuts
An option for attaching the table top to the table frames without using additional fittings using screws
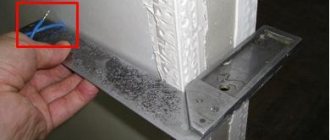
Using small metal Z-brackets is another popular way to secure a countertop.
| Fixation with surface plates | Let's say you bought legs without the appropriate fittings. To install them, you will need eye bolts for larger tables and threaded dowels for smaller ones. |
| Fixing with T-nuts | This mounting option is suitable if you intend to restore the front surface of the table and thus give the interior an updated look. You should have T-nuts, eye bolts and eye bolts available. |
| Screw mounting | This is a common and time-tested method of attaching the table surface to the drawers without the use of auxiliary fittings. Suitable for classic furniture. |
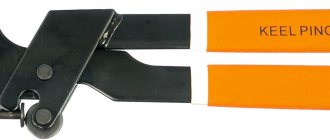
| Application of Z-shaped holders | The use of small iron Z-fasteners is another popular method of fixation. The main advantages of this method are low cost, simple and reliable installation. |
| Use of wooden clamps | An easy and durable method of attaching a tabletop without using commercial hardware. They are similar to Z-shaped holders. They are made from any scraps; it is enough to observe the orientation of the fibers. |
| Using Figure Eight Holders | These metal fasteners are widely used in securing countertops. They come in two types - with washers of the same and different sizes. |
| Application of spacers with grooves | In this case, 2 or 3 auxiliary spacers with rectangular grooves, the length of which is 10-15 mm, are attached to the frames of the kit. |
Using homemade wooden clamps is a simple and reliable way to attach a tabletop to a tabletop without purchasing hardware
Steel figure-eight fasteners - an option using inexpensive fittings
In this case, two or three additional spacers with rectangular grooves 10-15 mm long are attached to the side frames of the headset.
APPENDIX 2 (recommended). PROTOCOL
Head of testing organization
STATE STANDARD OF THE USSR UNION
Method for determining the fastening strength of furniture legs
Furniture. Method for determination of detachable legs fixing strength
Date of introduction 1975-01-01
By Decree of the State Committee of Standards of the Council of Ministers of the USSR dated November 11, 1973 N 2452, the introduction date was set from 01/01/75
Verified in 1984. By Decree of the State Standard of June 29, 1984 N 2283, the validity period was extended until 01/01/90** ________________ ** The validity period was removed according to Protocol N 4-93 of the Interstate Council for Standardization, Metrology and Certification. (IUS No. 4, 1994). — Note from the database manufacturer.
* REISSUE (February 1985) with Amendments No. 1, 2, 3, approved in January 1979, March 1983, June 1984 (IUS 2-79, 6-83, 10-84).
This standard applies to mounting legs up to 280 mm long for furniture products and establishes a method for determining the strength of their fastening.
The essence of the method is the effect of a static load on the connection of the mounting leg with the base of the product.
The method is used for type tests.
Necessary materials
The materials that are used to make tables are very different; we will tell you about some of them.
Solid pine for making a table with your own hands
Chipboard is an inexpensive material option for making a dining table
MDF is suitable for making a table, it is of higher quality and environmentally friendly
APPENDIX 1 (for reference)
Product weight when loaded, kg
Bedding cabinet, dressing table, trellis
A cabinet for television and radio equipment, a two-door wardrobe for dresses and linen, an armchair, a desk
Two-door wardrobe for dresses and linen with mezzanine sections, three-door wardrobe for dresses and linen, wardrobe for dishes, wardrobe for books, bed, chair-bed, sofa bed
Three-door wardrobe for dresses and linen, bookcase, tableware cabinet with mezzanine sections
(Changed edition, Amendment No. 1, 2).
Manufacturing process: step-by-step instructions
Drawing of a wooden table with four legs
First, you must make a drawing. Decide which legs you will attach - purchased ones or make them yourself. The form can be any.
Curly balusters or legs for a homemade table
If the tabletop is 0.8 m wide, then the legs should be 1.2 m long. To ensure the tabletop is smooth, sand it with a sander. There should be no gaps between the joints. To prevent the tabletop from deforming due to high humidity, the boards must be laid with a counter texture.
Tabletop boards at least 30cm thick
At the ends of the boards to be joined, you need to drill holes 8 cm deep, keeping the gap between them at 10-15 cm. We go through the prepared areas with sandpaper and lubricate the edges, dowels and holes with glue. We insert the dowels into the holes, thus connecting the tabletop. Remove excess glue.
Option for attaching legs to a wooden table
Using glue and screws, we connect the transverse and longitudinal boards to the legs. On top of the latter we make two recesses to attach the tabletop. We wait twelve hours and install it. We cover the structure with varnish, stain or paint.
Table with fixed top, frame and legs
Important! When using stain, consider the following: choose the thinner wisely, the surface before coating must be carefully sanded, the main thing is to properly adjust the gun (the shape of the torch should be oval, and the layer you apply should cover the existing one by half).
Cover with varnish or wax to protect the top layer
Having familiarized yourself with the options for attaching legs to the tabletop, it will not be difficult for you to make a table with your own hands, thereby updating the interior with such an original thing.
SAMPLING
1. SAMPLING
1.1. To determine the strength of fastening of the decoy legs, the following are made:
5 samples - if the leg is located perpendicular to the base;
10 samples - if the leg is located at an angle to the base.
1.2. Test samples must be part of the product base measuring 250x250 mm with a leg attached to it, manufactured in accordance with the technical documentation for this product. It is allowed to test samples that do not have paint coatings.
Samples of mounting legs for beds and sofa beds, which are fastened directly to the base frame bar, should be a part of the base bar 250 mm long with a leg attached to it.
Permissible deviations from the dimensions of the samples must be ±1 mm.
(Changed edition, Amendment No. 1, 2, 3).
Adjustable and non-adjustable legs for kitchen units: rules for selection and installation
It would seem that insignificant details often determine whether the furniture will be comfortable and durable or not. Choosing and installing the right legs for a kitchen unit is not as easy as it seems at first glance. Delving deeper into this question, it turns out that they are very different from each other: high and low, adjustable and not, plastic and metal... So which are better, and are they needed at all?
SAMPLING
1. SAMPLING
1.1. To determine the strength of fastening of the decoy legs, the following are made:
5 samples - if the leg is located perpendicular to the base;
10 samples - if the leg is located at an angle to the base.
1.2. Test samples must be part of the product base measuring 250x250 mm with a leg attached to it, manufactured in accordance with the technical documentation for this product. It is allowed to test samples that do not have paint coatings.
Samples of mounting legs for beds and sofa beds, which are fastened directly to the base frame bar, should be a part of the base bar 250 mm long with a leg attached to it.
Permissible deviations from the dimensions of the samples must be ±1 mm.
(Changed edition, Amendment No. 1, 2, 3).
Advantages and disadvantages
There are no advantages without disadvantages, but kitchen legs have many more advantages than disadvantages.
The positive points include:
There are significantly fewer negative aspects. The main disadvantages can be considered:
Most manufacturers of high-quality furniture make it with legs. Only budget models of headsets of not very high quality are produced on a non-removable base (a box made of MDF or chipboard). Such a support swells very quickly from moisture and loses its appearance. Even the silicone base covers (covers) that are sold to protect the box do not help.
TESTING
4.1. To determine the strength of fastening of the mounting legs located perpendicular to the base, the sample is loaded at a speed of (50±5) mm/min until destruction, after which the destructive load is recorded.
(Changed edition, Amendment No. 2).
4.2. To determine the strength of fastening of the decoy legs located at an angle to the base, five samples are tested according to the scheme (see Figure 3, a) in accordance with paragraphs 3.2, 4.1.
The other five samples are tested according to the scheme shown in Figure 3, b. To do this, the sample is rigidly fixed on the stand so that the angle of inclination of the leg lies in a horizontal plane, and is tested in accordance with paragraphs 3.2, 4.1.
How to choose?
The main job of kitchen legs is to support the weight of lower cabinets and their contents. Therefore, the main selection criterion should be the reliability and strength of the support. Flimsy models with thin walls can shorten the life of the headset.
When purchasing kitchen legs, they must be checked for defects. There should be no cracks or places with thin soft metal or plastic (the wood is usually solid, so such problems arise less often with it). If the product can be bent by hand, it is unreliable.
Depending on the width of the supported module, a different number of supports are required:
As for the height of the supports, there are no strict regulations, rather wishes.
In kitchens with low ceilings, a set with high legs looks disproportionate. But when choosing the height of the supports, you must first focus on your own height.
It will be inconvenient for a tall person to cook on a low countertop, just as it will be inconvenient for a short person to cook on an excessively high one. Choosing the wrong height can lead to back problems.
What to make of: wood or metal?
The first step when approaching the manufacture of legs for a future table is to choose the appropriate material . The material determines how functional and reliable the table will be, and these, by the way, are the two most important criteria for furniture.
What should you start from when choosing what to make legs from? There are three options:
Plastic .
It is very problematic to make supports for the tabletop from plastic yourself. In addition, plastic legs do not have a high level of strength and reliability - they may not withstand impact and may crack. This material is chosen as usual for children's furniture and for finished products.- Metal . As for metal, it is considered the most reliable, functional and aesthetic. Designer furniture is increasingly placed on chrome supports and looks very beautiful.
- Tree . It is as durable, reliable, looks designer as metal, and is also easy to process. But there is a risk that the wood will crack.
Advice . Most often, chrome supports are the best choice.
How to screw it to furniture?
Various manufacturers literally compete in a variety of shapes and designs. But when choosing a non-standard solution, you should remember that the method of fastening will depend on the shape of the legs. Conventionally, all installation options can be divided into three types:
Most ready-made sets that only require self-assembly (from Ikea, etc.) have counters - small diameter holes in the places where the legs are supposed to be installed.
Screw-in legs are installed directly into the countersinks. Other models of supports are fixed so that this hole coincides with the center of the leg.
If the furniture was made to order, and there are no mounting holes for supports in the bottom cover, then you need to choose at what distance to attach the legs of the kitchen set based on three simple rules:
Next, on the bottom cover, markings are made for the legs in the form of crosses (the intersection of the lines should coincide with the center of the support). If there will be a lot of supports, it makes sense to make a template through which it will be convenient to put marks and make holes. In this case, you need to ensure that all supporting elements are at the same distance from the edge.
If the legs are fixed using self-tapping screws, then the length of the fastener should be 3 mm shorter than the thickness of the bottom cover. So, in order to properly screw the legs to a base 18 mm thick, you need 15 mm self-tapping screws.
Source
Required Tools
The above methods require the use of your own tool. However, it makes sense to keep a complete set of everything you need on hand:
- Screwdriver, set of screwdrivers.
- Chisel: thin, wide flat, and also narrow semicircular.
- Drill with a set of drill bits for wood.
- Hammer, pliers.
- Hacksaw.
It is better to have all the necessary tools at your fingertips.
Master class – 6 steps on the path to a new life
In this tutorial on how to easily restore a dining table with your own hands, we will update, repair and repaint an old veneer table with a moderate number of defects.
So, to update your kitchen table you will need:
- a sander or sandpaper of coarse, medium and fine grain, as well as glasses, a respirator and gloves;
- alkyd enamel paint of the desired color (or other desired coating, such as stain), as well as a flat, non-fading paint or art brush;
- wood primer and a small roller/brush for priming;
- wax paste or varnish.
Step 1. Inspect and repair parts
We carefully inspect all fasteners in the structure and defects of the tabletop - how much the veneer has delaminated or the wood has been damaged.
If the table is a little loose, you just need to tighten all the screws. If it requires a more serious restoration, then you need to completely disassemble the table, re-fasten all the parts, or clean and sand all the grooves and joints so that the new glue adheres better, fix the glued parts with clamps or self-tapping screws, and then remove them after 15 hours. when the glue is completely dry.
- Sometimes the base needs to be replaced, not only because its parts are very worn out, but also because the legs can completely transform your old table. For example, if previously the legs were simple, now you can replace them with beautiful carved balusters.
- When disassembling furniture, do not forget to mark the installation location of each of the parts, this way you will not get confused and will complete the task faster.
On the structural influence of seasonal deformations
Any board, be it laminated board or solid wood, is subject to swelling and shrinkage depending on the time of year and fluctuations in humidity. Tightly fixed countertops, deprived of the ability to freely contract and expand, begin to deform under the influence of internal stresses - warp, bend, twist and eventually crack.
With seasonal changes in humidity levels, wood expands and contracts predominantly across the grain. The countertops of a room or kitchen set vary in width within 1 cm, depending on the size of the lid and the type of wood. Linear changes along the fibers are insignificant.
APPENDIX 1 (for reference)
Product weight when loaded, kg
Bedding cabinet, dressing table, trellis
A cabinet for television and radio equipment, a two-door wardrobe for dresses and linen, an armchair, a desk
Two-door wardrobe for dresses and linen with mezzanine sections, three-door wardrobe for dresses and linen, wardrobe for dishes, wardrobe for books, bed, chair-bed, sofa bed
Three-door wardrobe for dresses and linen, bookcase, tableware cabinet with mezzanine sections
(Changed edition, Amendment No. 1, 2).