One of the most inexpensive fences for a summer house or private home is made from corrugated sheets. Its design is simple - dug-in pillars to which transverse joists are attached. A corrugated sheet is attached to this grille using self-tapping screws or rivets. Everything is really simple, especially if you know how to use a welding machine. Although there is a technology without welding - on bolts or on wooden crossbars. In any case, you can build a fence from corrugated sheets with your own hands. If necessary, you can do all the work alone, but when installing sheets it is more convenient with an assistant.
Construction with metal posts
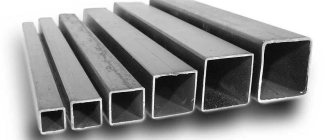
The simplest production is a fence with metal posts dug into the ground. You can use round or square pipes, but it is more convenient to work with square - profiled ones.
Construction of a fence made of corrugated sheets with posts
The length of the pillars is taken depending on the desired height of the fence, plus 1 to 1.5 meters are added for penetration into the ground. It is necessary to bury it in the ground below the freezing depth of the soil. For each region, the soil freezes to a different depth, but in central Russia it is about 1.2 m. When determining the depth to which you bury pipes, it is better to play it safe and make the holes deeper. Otherwise, the forces of winter heaving will simply push the posts out, and your fence will collapse (see photo).
Insufficient depth of the support posts led to the fence sagging
For pillars, a profiled pipe with a cross section of 60*60 mm and a wall thickness of 3 mm is usually used. The distance between the pillars is from 2 to 3 meters. The greater the thickness of the profiled sheet, the less often you can install pillars. If the soil is difficult to dig, it makes sense to make the distances larger, otherwise you can save on purchasing metal - the thinner, the cheaper and the difference in price is significant.
Logs for a fence made of corrugated sheets are made from a profile pipe 40*20 or 30*20 mm. The second option is wooden blocks 70*40 or so. When using wood, a significant amount is saved, but the wood disappears faster, and besides, it warps from moisture. Most likely in a few years you will have to change the logs, and they will already be metal. But it will work as an economical option for several years.
Fence made of corrugated board on wooden logs
When making a fence from corrugated sheets with your own hands with wooden logs, do not forget to thoroughly treat the wood with an antibacterial compound (for example, Senezh Ultra). It is better to do this in the bathroom - immerse the bars completely in the solution for 20 minutes. This way they will last longer.
The number of logs depends on the height of the fence. Up to 2 meters - two are enough, from 2.2 to 3.0 meters you need 3 guides, even higher - 4.
Read more about choosing and building a foundation for a fence here.
Methods for attaching joists to poles
Metal logs are welded either between the pillars or in front. The first method is more labor-intensive, and produces more waste: you have to cut the pipes into pieces. But with this arrangement of the logs, the structure turns out to be more rigid: each post serves as a support for the sheet and it “walks” less; if desired, a couple of additional fasteners can be placed along it.
If you weld pipes in front of a pole (from the street side), there is less work, but you will still have to cut and there will be waste: it is necessary that the weld of two sections falls on the pole. Unless you adjust the distance so that they lie flat. Then you purchase materials in advance, and then calculate the installation step of the pillars.
There are two ways to weld metal logs to poles
To fasten wooden blocks, holders are welded in front or on the sides - metal corners or U-shaped guides. Holes are then drilled into them and fastened with bolts or self-tapping screws.
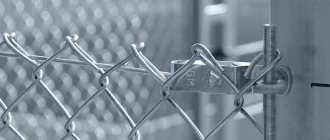
There is an option to assemble a fence from corrugated sheets without welding. For this there is a special fastening element called an X-bracket. This is a cross-shaped plate with curved edges, which is attached to self-tapping screws.
X-bracket for a fence made of corrugated sheets without welding
This is what everything looks like when installed
Corrugated sheeting for fences
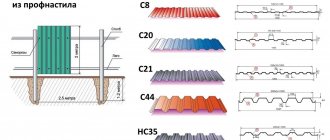
For fences, corrugated sheets marked C are used - for fences and walls. There are also N and NS, but they are not suitable for fences - these are more roofing materials. It is rare to see A and R markings; A profiles can be used for fences.
In the marking, after the letter there is a number - from 8 to 35. It indicates the height of the rib in millimeters. So C8 means that the profiled sheet is intended for a fence, and the wave height is 8 mm. The higher the wave height, the more rigid the surface will be. In strong winds, take at least C10, or even C20.
Sheet thickness - from 0.4 to 0.8 mm. The best option is a thickness of 0.45 mm or 0.5 mm. They are suitable for fences up to 2.5 m in height. If you need a higher one, take at least 0.6 mm.
The height of the sheet is usually around 2 meters, you can find 2.5 m. The width can be very different - from 40 cm to 12 meters. Different factories produce corrugated sheets of different formats.
Standard color palette for painting profiled metal sheets
Corrugated sheeting can be galvanized or painted (painted ones are 15-25% more expensive than galvanized ones). There are two types of paint applied: powder and polymer coating. Powder coating is more durable, but also more expensive.
There are sheets painted on one side - on the second there is galvanization, covered with a gray primer, there are sheets on both sides. Double-sided coating is naturally more expensive than single-sided painting, but it looks better and has a longer service life.
This is a view from the yard to a fence with double-sided painting
Support pipes and fence logs are usually primed and then painted. And somehow it became customary to paint them with dark paint. By then attaching a corrugated sheet painted on one side to them, you get a clearly visible “skeleton” on a light gray background. In a small area this can be critical. Please note that when building a fence from corrugated sheets with your own hands, paint the supporting frame light gray. The result will please you: it looks much better from the yard.
Types of welding used for the manufacture of fences
Today, welding a metal fence continues to be the most reliable way to construct a fencing structure.
A welded sectional fence is a high-quality connection of individual elements into a single whole. This is a modular sectional design. The main requirements for a finished fence are stability, strength and durability.
Drawing with the dimensions of a welded metal fence
The installation process for people who know how to work with welding equipment is not difficult. To choose the right type of welding, you need to compare them and choose the best option. The choice is closely related to the building material that is planned to be used. Return to contents
How to attach a corrugated sheet to a frame
The sheet is secured with self-tapping screws or rivets. Self-tapping screws for corrugated sheets are galvanized and painted. They are selected to match the color of the fence. Tighten with a screwdriver using an attachment.
The installation step depends on the wavelength and height of the fence. The higher the fence, the more often you need to install fasteners. It holds normally if you fasten it through a wave, to increase strength, with two lags you can fasten it in a checkerboard pattern, and not one above the other.
When installing, it is important to align the first sheet vertically. Then everything else will install without problems. When laying sheets, the next one goes onto the one already installed on wave 1. Attach to the bottom of the wave. The self-tapping screw must be installed strictly perpendicularly. Then the hole is blocked with a washer and precipitation will not cause the paint to peel off.
To see how one can attach a corrugated sheet to a fence, watch the video.
DIY corrugated fence: photo report
A fence from neighbors and a front fence were being built. The total length is 50 meters, height 2.5 m. Brown corrugated sheet is used on the front, galvanized sheet is used on the border, thickness 0.5 mm, grade C8.
In addition, the following materials were sent:
- for poles profiled pipe 60*60 mm, wall thickness 2 mm, pipes 3 m long;
- 80*80 mm with a 3 mm wall were installed on gate posts and gates;
- logs 30*30 mm;
- gate and wicket frame 40*40 mm;
One person built the finished fence from corrugated sheets with his own hands.
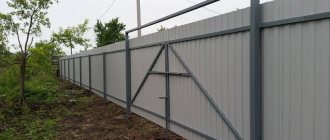
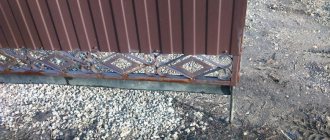
The fence is installed on metal posts, between which the base is then poured. The owners need it because they plan to plant a flower garden in front of the fence (you can see the fence made for it). It is also needed to prevent water from flooding the yard during heavy rainfalls. Metal sheets are not attached immediately from the ground, but slightly retreating. This gap is closed with a die-cut tape that remains in some industries. This was done on purpose so as not to block the access of air, so that the earth dries out faster.
Inside view of the finished fence
Metal preparation
The first stage is preparing the pipes. A rusty pipe arrives from a warehouse; in order for it to serve for a long time, you have to clean off the rust, then treat it with Anti-Rust and then paint it. It is more convenient to first prepare all the pipes, prime and paint, and then just start installation. The rust was removed with a metal brush mounted on an angle grinder.
Pipes need to be cleaned of rust.
There were only 6-meter pipes in the warehouse. Since the height of the fence is 2.5 meters, another 1.3 meters need to be buried, the total length of the post should be 3.8 meters. To save money, they cut it in half into 3-meter pieces, and the missing parts were welded with various scrap metal available on the farm: cuttings of corners, fittings, pieces of various pipes. Then everything was cleaned, primed and painted.
Installation of pillars
The two corner posts were installed first. The holes were drilled with a drill purchased from a store. The soil was normal; it took about 20 minutes to complete one hole 1.3 meters deep.
Post hole drill
The first pillar was placed horizontally and so that it rose above the ground to a height of 2.5 meters. To set the second one, it was necessary to recapture the height. A water level was used. You need to fill it in such a way that there are no bubbles - from a bucket, not from a tap, otherwise it will lie.
They placed the second post along the marked mark (they put it on a plank that was placed next to the hole) and concreted it. When the cement set, twine was pulled between the pillars, along which all the others were aligned.
The filling technology was standard: a double-folded roofing material was installed in the hole. A pipe was placed inside, filled with concrete (M250) and placed vertically. The level was controlled by a plumb line. It is very important to position the posts correctly, otherwise the entire fence will warp.
During the work, several times it turned out that the concrete was poured not inside the rolled up roofing material, but between it and the walls of the pit. It was a little pleasure to scoop it out from there, so the protruding part was cut into petals and nailed to the ground with large nails. Problem solved.
This is how the roofing material was fixed
After the concrete had set, we made portable formwork from boards covered with thick film. With their help, the basement was filled. To make it stronger, reinforcement bars are welded along the bottom to the pillars on both sides. Formwork was placed around them.
Formwork for plinth
Installing jumpers
Cleaned, primed and painted pipes for the crossbars were cut and welded. They cooked between the pillars. They also need to be leveled to make it easier to attach.
We cook jumpers
After the welding is completed, all welding areas are cleaned with a wire brush, treated with Anti-Rust and then painted.
Installation of corrugated sheets
Since the top lintel runs along the very top of the fence, and it is welded exactly level, there were no problems with leveling and installing the sheets. First they fastened along the edges, then installed intermediate screws. To make it easier to place them evenly, a thread was pulled between the outer ones.
Evenly installed fasteners are also beautiful
Afterwards the gates were welded and attached. As a final touch, additional elements were installed on top - a U-shaped profile covering the top of the fence and plugs for the pipes.
The final view of a fence made from corrugated sheets, made independently
As you understand, there is nothing particularly complicated. It is important to align the posts evenly and weld the frame. This is the main task. A lot of time - about 60% - is spent preparing pipes - cleaning, priming, painting.
Re-weld the hinges on the gate. Types of loops
It is important to choose the right fasteners, taking into account the weight of the door and its dimensions. For heavy metal doors, modern industry produces the following types of hinges:
- Cylindrical. The most popular because they make it possible to open the gate to the maximum angle. Disadvantages include difficulty in attaching to a flat surface.
- Teardrop-shaped. They are a type of cylindrical hinges.
- Hexagonal.
- Square. Used extremely rarely.
In this article you will learn how to properly weld hinges
Regardless of the cross-sectional shape, a door hinge is a part consisting of at least two elements. In the simplest hinges, the connection of these elements is made by a pin and a counter groove. Their main advantage is their low cost and ease of further maintenance (lubrication). At the same time, simple hinges fail faster.
In more complex designs, at the end of the pin there is a movably fixed ball (ball loops), the function of which is to replace sliding friction with rolling friction, which, as is known, is much less. This makes it easier to open and close the doors, and the hinges themselves will last longer.
There are also hinges equipped with ball bearings, but it is not recommended to use them for heavy doors, since the complex mechanism quickly becomes unusable. For massive gates and gate leaves, hinges are produced that are additionally reinforced with plates. Due to the plates, the weight of the door is more evenly distributed on them, which allows you to increase its service life.
Reinforced ball ones are considered the best option for heavy metal doors, garage doors and gates. They compare favorably with their cheaper counterparts in their long service life, ability to withstand significant weight loads and ease of installation.
For heavy metal doors, the welded method is recognized as the best. It allows you to fix the hinges as securely as possible, eliminating play and gradual loosening of connections.
Fence made of corrugated sheets with brick pillars
The corrugated sheet in combination with brick pillars looks solid.
Of course, a fence with brick pillars looks more decorative. If you wish, you can do it, but it will take more time. There are two options:
- Make a full-fledged strip foundation. But it is long and expensive. On well-drained soils, you can make a shallow foundation; on heaving soils, you will have to dig below the freezing depth of the soil. And although the tape will not be wide, there is a lot of work - digging a trench along the entire length of the fence, installing formwork, tying reinforcement, pouring it and then finishing it. Place brick pillars on top. Durable, reliable, but expensive.
- Make according to the scheme described above: load-bearing pillars with a base. Bricks are laid around the pillars. This method is less expensive. Read about how to lay brick pillars here.
Schematic representation of the structure of a fence with brick pillars.
The whole technology is the same, only more rigid reinforcement will be required - two belts of two rods with a diameter of 10-12 mm. It will be necessary to install embedded elements in the pillars to which the guides will be attached. They (mortgages) can be welded to the pipe after it has been exposed and the solution has set.
Gas shielded welding
This type belongs to arc welding. The process is carried out as follows. A jet of shielding gas or mixture is blown into the arc zone using a welding machine torch. The described method is considered one of the most common.
It has undeniable advantages:
- Possibility to visually or remotely monitor the welding process.
- Large selection of operating parameters for welding mode.
- Ability to perform welding work in various spatial positions.
- Mechanization or automation of the process; use of robotics.
The process of welding fences with a special robot
- Effective protection of molten metals; performing welding of materials of different thicknesses.
The described arc welding is perfect for carrying out a certain amount of work when it is used constantly.
When it is required for the manufacture of only one structure, its acquisition is not feasible from a financial point of view. The cost of the equipment is not included in the budget category.
Therefore, despite all the positive aspects, this method may not be suitable for the average summer resident. The high price can be considered as its main disadvantage.
Return to contents
Photos of the design of fences made of corrugated sheets
Often a profiled sheet is combined with forging, sometimes a frame is made from a profile pipe, a profiled sheet is mounted into it and the whole thing is decorated with metal patterns - forged or welded. Another option to make the fence non-standard is to install the wave not vertically, but horizontally. It would seem like a small change, but the appearance is different. Some ideas in the photo gallery below.
Horizontal fence made of corrugated sheets
Beautiful combination of stone, forging and red-brown sheet
Pillars made of a round metal pipe, strips are welded to them on the back side, to which the sheet is attached
Forged and polycarbonate inserts
More variations on the theme of forging
Color may not be uniform
You need to tinker with the non-linear top
Application area
Welded fences are fences with a wide range of applications. This is due to their reliability, attractive design and unpretentiousness to operating conditions. The building harmoniously combines with residential buildings or country houses, office centers and public organizations. They are also installed to limit the territory of cottage towns, car parks, service centers and enterprises.
Metal products are installed near objects that require increased security. Their popularity is due to the possibility of integrating full-fledged security systems.