What and how to make a mold from?
Previously, when casting tin and its alloys, gypsum was used to make molds. The development of chemical technologies has brought many new materials into the arena, among which silicone rubbers and sealants have taken their rightful place. It is necessary to determine the temperature of the sealant that it can withstand. It must correspond to the melting point of the alloy used - up to 240 degrees.
The softness of the sealant will also affect the quality of the resulting casting, increasing the risk of deformation of the mold material. The prototype must be covered with a separating layer of Vaseline to prevent sticking and you can begin applying silicone. It is better to use transparent silicone, as in this case it will be easier to control the thickness of the mold and the formation of air bubbles. When the prototype being copied is a light and thin design, questions arise: How to cast tin?, How to cast thin tin?, How to make a mold for thin casting?. To copy the surface relief of the prototype as accurately as possible and prevent the appearance of bubbles in the mold, silicone is diluted with a solvent (white spirit) or gasoline. The resulting liquid mass is applied in thin layers using a brush and allowed to dry overnight. After applying 3-4 layers of liquid mass, the future mold is coated with undiluted silicone.
After the mold hardens, a gypsum sarcophagus is made, in which conical locks are cut out, a vent groove is formed to release excess air, and a sprue is formed for pouring the alloy. Having made the sarcophagus, the silicone mold is carefully removed, the position of the vent hole is marked, the silicone is cut into halves in the form of a book, the intended hole is burned with a hot needle, and the prototype is removed. To clearly develop the relief of the casting being formed, the inner surface of the silicone mold is rubbed with graphite powder.
Properties of Sn
Stannum (Sn) is the Latin name for this flexible, ductile, fusible metal. It is number 50 on the periodic table.
In terms of chemical properties, the metal is similar to its “neighbors” - germanium and lead.
In reactions it exhibits oxidation states +2, +4.
Does not react with water or air. The reason for this is an oxide film on the metal surface.
Dissolves in dilute acids; Reacts with non-metals when heated.
Physical properties of tin:
- β-Sn density 7.3 g/cm3;
- density of liquid tin 6.98 g/cm³;
- specific electrical conductivity 8.69 MS/m.
The metal has a rare property: it melts at a low temperature (232°C) and boils at a high temperature (2620°C).
Natural tin contains 10 stable isotopes - a record among all elements in the periodic table.
| Properties of the atom | |
| Name, symbol, number | Tin / Stannum (Sn), 50 |
| Atomic mass (molar mass) | 118.710(7) a. e.m. (g/mol) |
| Electronic configuration | 4d10 5s2 5p2 |
| Atomic radius | 162 pm |
| Chemical properties | |
| Covalent radius | 141 pm |
| Ion radius | (+4e) 71 (+2) 93 pm |
| Electronegativity | 1.96 (Pauling scale) |
| Electrode potential | −0,136 |
| Oxidation states | +4, +2 |
| Ionization energy (first electron) | 708.2 (7.34) kJ/mol (eV) |
| Thermodynamic properties of a simple substance | |
| Density (at normal conditions) | 7.31 g/cm³ |
| Melting temperature | 231.91 °C |
| Boiling temperature | 2893 K, 2620 °C |
| Ud. heat of fusion | 7.19; kJ/mol |
| Ud. heat of vaporization | 296 kJ/mol |
| Molar heat capacity | 27.11 J/(K mol) |
| Molar volume | 16.3 cm³/mol |
| Crystal lattice of a simple substance | |
| Lattice structure | tetragonal |
| Lattice parameters | a=5.831; c=3.181 Å |
| c/a ratio | 0,546 |
| Debye temperature | 170.00 K |
| Other characteristics | |
| Thermal conductivity | (300 K) 66.8 W/(mK) |
| CAS number | 7440-31-5 |
How is casting done?
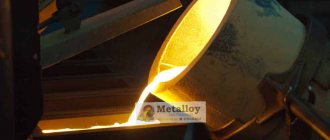
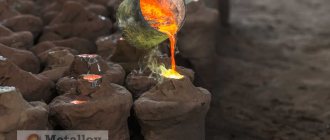
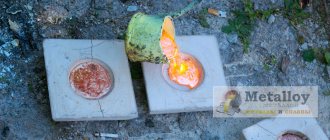
The silicone cocoon is inserted into a plaster sarcophagus, the halves are connected and tightened either with an elastic band or twine. Tin or its alloy is melted, held for 30 seconds after melting, and it is poured into the prepared mold through the sprue. Pouring continues until the molten alloy appears in the thrust hole.
After cooling, the casting is removed by the formed sprue, cleaned of excess tin that interferes with the removal of the silicone mold, and the casting is removed. The first casting will be unsuccessful, since gases will escape from the silicone and excess graphite will stick.
Source: olovok.com
Casting tin into silicone molds
October 15, 2022
Dear colleagues, friends!
We are starting preparations for the traditional annual virtual competition of bench models on the site Dishmodels.RU - DiSHow-2019.
For all the necessary information, see the section of our forum https://www.dishmodels.ru/forum/forumdisplay.php?159
Making molds for casting from tin. Metal casting
Sergey Slyshov aka sse2009
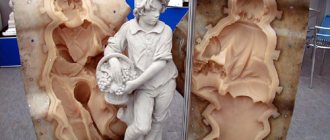
I will describe the technology for creating a form for copying Orc. In this case, he will act as a master model. The master model must be made in a one-piece mold (in principle, most models are cast in such molds). It is advisable to clean the master model from flash, clean along the parting line of the mold and eliminate defects if any. Our form will be single-part and two-component, that is, one parting line and two types of material.
Materials and tools for making molds. 1. Sculptural plasticine (all other silicone sealants are very corroded, and this one is a little too).
2. Silicone plumbing sealant with heat resistance of 180 degrees. 3. Alabaster or building plaster. Water.
4. Vaseline (can be bought at a pharmacy) and a brush.
5. Cardboard (better glossy, less wet) and scissors.
Work order.
1. Press the master model into the plasticine approximately along the parting line from the factory mold (Photo 1). I usually place the model facing out.
2. Apply a thin layer of sealant using a match or toothpick, trying to fill all the recesses (Photo 2). Leave until completely hardened (the time is usually indicated on the tube with sealant, approximately 5-8 hours, depending on the thickness of the layer).
3. Apply another 2-3 layers so that the total thickness of the mold in all sections is at least 5 millimeters.
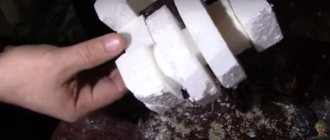
4. After complete hardening, it is easy to determine that the form becomes quite rigid, remove the master model from the plasticine and clean it of plasticine (photo 3).
5. Apply Vaseline to the resulting half; you don’t have to apply it to the master; the sealant does not stick to the polystyrene (although before starting work it would be a good idea to check the interaction of the model and the sealant, for example, on a piece of sprue). We repeat points 2 and 3.
6. Carefully cut the resulting cocoon around the perimeter (along the parting line), removing any irregularities (Photo 4). IN SOME CASES WE DO NOT REVEAL the form, even if we really want to see what happened.
7. Making formwork (boxes) for pouring alabaster. We make the box in such a way that there is approximately 5 mm between the silicone mold and the side walls, the length of the injection channel is 50-60 mm, and the height of the walls is 45 mm. This is not an axiom.
8. Pouring alabaster (Photo 5). All work must be carried out quickly, as alabaster hardens quickly. We dilute it with cold water to a creamy state and fill half the box, put the mold in and press it halfway. We form the injection channel, I use either plasticine or a core from a hot-melt gun. From my experience I can say that it is better to make the casting channel cylindrical rather than conical. The form should dry for at least a day. Apply Vaseline with a brush to the connector plane of the plaster mold; you don’t need to smear the plasticine and silicone mold. We spread and fill the second half of the mold. I usually wait about half an hour and separate the halves of the plaster mold (Photo 6). We dry the alabaster for at least 2-3 days (on a battery, 1 day is enough), otherwise the mold may break when pouring the metal.
Types of Liquid Silicone: rules for selection and purpose | Brands and characteristics of molding silicone
Silicone for molds is a liquid 2-component material for the manufacture of elastic molds. Matrices made from this material are tensile and suitable for reusable use.
You can buy inexpensive molding silicone and professional silicone compound with delivery throughout Russia in the online store Smola20.ru. The site presents two-component liquid silicone for pouring of different brands and series.
It varies in type and physical and mechanical properties.
The store stocks silicone designed to create soft and flexible yet durable shapes. It can be divided into two types depending on which catalyst it reacts with. Hardeners for the compound are made using tin or platinum.
Non-food grade silicone for tin based casting
Silicone for casting products from polymer, polyurethane and such inexpensive materials as concrete and gypsum is made from tin. Casting quick-drying liquid compound is a non-food type of composite used in the manufacture of matrices for making large numbers of copies from models during finishing and restoration work.
In the Smola20.ru online store, liquid silicone for elastic, tear-resistant molds is presented by the Master Mold brand. The two-component, fast-curing, tin-based material is sold with the S marking.
The number after the letter indicates the Shore hardness level. For example, molding silicone S15 is used for the manufacture of small-sized molds with small complex parts. S30 – for large shapes.
Another brand of liquid 2-component tin-based compounds is Smooth-On Mold Max series.
Molding silicone for creating food molds
Soft silicone for platinum-based molds is presented in the catalog under the brands Smooth-On and Sorta Clear. A liquid compound with varying degrees of Shore hardness is used to make food molds, but can also be used to fill other soft molds.
This casting silicone is also two-component. According to the degree of hardening, it is divided into quick-drying and slow-drying. The latter's working time allows you to spend 40-50 minutes working on small details of the form.
Scope of application of food and non-food molding silicone
Liquid molding silicone is used in finishing works for the production of artificial stone and other materials.
It is also used in restoration work, when it is necessary to restore part of a baguette or an architectural object. But these are not all areas of application of silicone for making molds.
With its help, you can create matrices for making copies from different art models.
In the food industry, molds made from this material are used to make shaped chocolate, ice cream, ice cubes and baked goods.
In light industry, silicone matrices are used for casting shaped soap and children's toys from plastic or rubber. This composite is also used in the automotive industry.
Lightweight plastic parts for vehicles are cast using silicone molds.
Buy on resin20.ru - it’s always convenient and profitable
Do you want to order durable silicone for making molds at a low price? We offer for purchase inexpensive universal composites and professional compositions for injection molding of our own production.
In the online store Smola20.ru.
There is a wide range of molding materials, which you can buy with delivery in Moscow, St. Petersburg, other regions of Russia, as well as Kazakhstan and Belarus.
The sale of poured silicone is organized in such a way that you can pick up your order at pick-up points. You will find their addresses in Moscow, St. Petersburg and other cities in the “Delivery” section.
You can pay for your order by cash on delivery when ordering by Russian Post. We have provided 10 more options for cash and non-cash payments for your convenience.
Payment of the full cost of the order upon receipt is also possible upon delivery by a transport company. Free delivery of molding silicone and other products from our website is provided for orders over 5,000 rubles.
But even if you buy for a smaller amount, it will cost less - when paying online, the price is reduced by 3%.
11 payment methods.
Choose any!
3% discount when
paying online by card
More than 630
pick-up points throughout Russia
Express delivery throughout Russia
,
to Kazakhstan and Belarus
Tin casting
Tin is a low-melting metal. It ranks fiftieth in the periodic table. It is quite widespread in nature, in particular, ore for its production is actively mined in the Laptev Sea.
Man began to use tin back in the Bronze Age. In particular, it was used to produce bronze. Nowadays, it is used as solder, coatings, etc. In addition, tin is used in jewelry and in the manufacture of toys, for example, tin soldiers, etc.
Tin casting process
The melting point of tin is only 231 °C. But its boiling point is within 2,300 °C. The temperature at which the metal will be melted can be achieved at home. That is, it is quite possible, of course, subject to certain rules and safety precautions, to perform tin casting at home. In industrial conditions, special centrifugal casting machines are used for tin casting. To make molds, gypsum, alabaster, epoxy resin, silicone and, of course, metal are used.
Tin casting process in industry
Creating a form is perhaps the most important process. First you need to create a sketch of the future model. After this, the model is made from polymer clay. To apply small parts you must use an awl. Another, no less important process is the production of injection molds. When manufacturing it, it is necessary to ensure that the correct connector is present. It is needed so that the finished casting can be removed without causing damage to the product itself.
Silicone tooling for tin casting
Making equipment from silicone will require more material and time. This is because it must be subjected to a vulcanization process. But as a result of all the hassle, multi-turn equipment for casting tin products will be obtained. If the future part is quite complex, then it will be necessary to provide for the presence of embedded parts. We must not forget about the air ducts; air must escape through them as the mold is filled with tin.
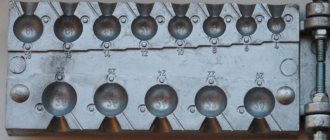
An important element of the design of the equipment is the hole through which the filling will be performed. If it is small, the metal will flow too slowly and the solidification process may begin before it is completely filled. Before casting begins, the mold halves must be joined together and placed between a sheet of plywood. The sheet must be at least 12 millimeters thick, and the size must exceed the dimensions of the metal mold. Upon completion of assembly, the entire structure is tied together with a rope.
Two half-forms between sheets of plywood, tied together with a rope
Casting technology is not very complicated; it makes sense to prepare the metal for pouring after the final assembly of the mold. To do this, it needs to be warmed up well. Once a yellowish film appears on its surface, we can assume that the tin is ready for pouring. If the metal is overheated, a blue or purple film will float on the surface of the melt. Molten metal is poured in a thin stream. In this case, you can lightly tap the housing to remove air. You can open the mold only after the cast part has completely cooled. To remove the casting, you need to use forceps. You must be prepared for the fact that the first product received will have some surface defects.
Removing excess tin (burr)
The machining sequence is as follows. First, the flash is removed. So, they call the excess melt that flows into the seam of the mold. A scraper is used for this. Side cutters are used to remove the sprues. For final processing of seams, use abrasive sandpaper with the finest grain (zero).
Everything you need to know about liquid tin, making your own solution
Tin is one of the chemical elements that has found application in various industrial areas and everyday life. It is a light metal, ductile, malleable and fusible. It has a silvery-white tint and shine. One form of the substance is liquid. Mainly used in radio construction. Liquid tin is ideal for chemical tinning of copper parts, in particular printed circuit boards. This treatment method significantly increases their service life and prevents the formation of corrosion.
Details about liquid tin
Liquid tin is a solution that is used to coat printed circuit boards. Thus, the part becomes protected from negative influences. In addition, the surface prepared using this method is completely ready for soldering, because The solder adheres to it much better.
The advantages of liquid tin are obvious:
- with its help you can tin a large board, with a complex circuit or with particularly thin traces and distances. It is sometimes very difficult to do this with a regular soldering iron, and sometimes completely impossible;
- the surface treated with liquid will not melt under the influence of high temperatures, because the melting temperature of tin is 220 degrees;
- The tinning process is safe and quite simple, so even a person who is far from working with chemicals can handle it.
What does liquid tin look like?
Liquid tin can be purchased at any specialized store or made yourself, especially since all components are completely accessible.
Composition and methods of using liquid tin
The chemical is sold in plastic bottles of various sizes. The composition of liquid tin includes: a reducing agent, a stabilizer, deionized water and tin salt.
Tinning is best done immediately before soldering the board. Before the procedure, the part is prepared. It is cleaned and degreased with alcohol. It is not recommended to sand the board, but if necessary, you can sand it with GOI paste and then clean it.
Next, the tinning itself is carried out directly. Tin in a liquid state is shaken well, poured into a prepared plastic container and heated to room temperature in a water bath. The board is immersed in the solution for 20-30 minutes. The result is a layer of 1 μm. If a thicker layer is needed, the tinning procedure is repeated. After this, the product is washed with running water and wiped dry with a clean cloth. Before use, the finished board is stored in a stationery file or plastic bag.
Tools and materials for casting
Tin is almost an ideal material for casting in both domestic and industrial settings. What materials and tools will be needed to produce the mold and perform casting. To make the mold you will need sealant and plaster. The first will be used to make the equipment itself, and gypsum will be needed to make the frame into which the technological equipment will be installed.
Tin Casting Tools
In addition to the materials mentioned above, you will need simple metalworking tools - files with different sections, pliers, a soldering iron, etc.
History of technology
According to historians, the bronze casting is 12 thousand years old. Initially, using this technology, jewelry and simple tools were made from bronze. Over time, this technology has been improved, and today it is a method by which many unique products are created from this alloy.
The current level of development of bronze casting makes it possible to produce various objects from this copper alloy not only in production, but also at home. Thanks to the invention of bronze, as well as the development of its processing technologies, the main of which is casting, we can still enjoy the sight of works of art that were created by masters back in the Middle Ages and ancient times.
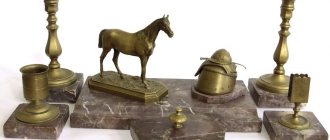
Antique bronze set of writing instruments
Bronze casting, as well as brass casting, another alloy based on copper, gained the greatest popularity in the era of classicism and European Baroque. It was in those days that people learned to use these materials to create unique interior elements and decor.
Such alloys created on the basis of copper are still actively used in the manufacture of:
- items used for interior decoration;
- gates and fences that perform not only a decorative, but also a protective function;
- sculptural compositions and souvenirs;
- bas-reliefs and design elements of lighting fixtures - chandeliers and sconces;
- elements of staircase structures and entrance groups.
Bronze casting for making knife handles
Tin casting molds
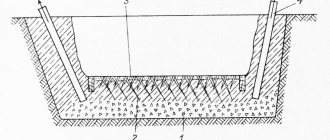
For the manufacture of injection molding equipment, materials such as gypsum or silicone are used. It all depends on the part and its purpose. The simplest one is gypsum. To make it you will need a wooden box, some plaster and a piece of metal tube.
Creating a snap-in is performed in several steps:
- Preparation of gypsum mixture. It should resemble thick sour cream in appearance.
- The mixture is poured into a pre-prepared box and leveled.
- To obtain a half-mold, you need to take the part and immerse it halfway in the prepared plaster. A similar operation must be performed with the second half of the part. As a result, 2 half-forms will be obtained.
- The halves must be connected, or fastened with locks, or simply tied together with a tight elastic band. A prepared metal pipe must be inserted into the place through which the molten tin will be poured.
In principle, the injection molding equipment is ready for use. The molten tin can be safely poured into the resulting mold.
What is the difference between gypsum forms and others - the main thing is that they have less durability. If their surface is not prepared, then such equipment can withstand one or two cycles.
At what temperature does brass melt?
Without knowledge of at what degrees brass melts and how to melt it, it will be impossible not only to cast parts from an alloy of copper and zinc, but also to laser cut brass. An incorrectly selected temperature for processing will lead to deterioration in the quality of the alloy and unnecessary energy consumption.
The melting point of brass is 880-950 °C. This indicator varies depending on the chemical composition of the alloy. The specific heat of fusion of brass does not coincide with the casting temperature. This is especially noticeable when melting lead brasses, which have reduced fluidity. The difference between their melting and casting temperatures is 145-185 °C. For example, brass grade LS59-1V melts at a temperature of 900 ° C, but casting can be carried out at 1030-1080 ° C. For grades LS59-1 and LS74-3, these figures are 885-895 °C / 1030-1080 °C and 965 ° C / 1120-1160 °C, respectively, etc. For two-component brasses, the melting and casting temperatures are the same. For example, for L60 it is 885-895 °C, L80 -965-1000 ° C, L96 - 1055-1070 °C.
The specific heat capacity of brass is 380 J/(kg °C). In other words, to heat 380 kg to a temperature of 1 °C, you need to spend 1 J of energy.
- processing modes for simple and lead brasses
Please note: the more lead and bismuth in brass, the more difficult it will be to melt. Brass, which contains a large amount of zinc, melts most quickly.
Alloys where the amount of this element reaches 32.5% can be processed without heating, using broaching or rolling.
Main methods of tin casting
In industrial conditions, there are several technologies that make it possible to quickly and efficiently produce castings from tin and its alloys.
The most popular is casting in a centrifugal machine.
The essence of this method is quite simple: molten metal is fed through a system of gates into molds located around the same axis and rotating at a certain speed. Their rotation causes the creation of a centrifugal force, which presses the incoming metal inside the mold. Thus, excess gases are eliminated from the body of the future casting. This engineering solution makes it possible to obtain metal with a fine-grained structure. Casting is performed in metal molds produced in a factory. Before pouring, compositions can be applied to the working surfaces to facilitate the removal of the finished casting from the mold.
Tin casting at home
As already noted, tin casting at home is used to produce fishing gear, figurines, for example, soldiers, etc. The procedure for performing tin casting is as follows:
- Making the mold.
- Casting products.
- Mechanical processing of castings.
To perform tin casting at home you will need:
- Kitchen stove;
- Tin.
- Casting mold.
- A file, a scalpel and some other simple tools.
Accessories made of aluminum or silicone can be used several times. To obtain a high-quality result, you will have to spend a lot of time, and it is advisable to have certain artistic skills. After the figurine is cast, it is advisable to paint it. Acrylic paints are used for this. In order for it to fit well, the figure must be degreased before starting work.
If you find an error, please select a piece of text and press Ctrl+Enter.
Source: stankiexpert.ru
How to Make a Tin Mold
There is no need to pay a lot of money in a gift shop for a coveted tin figurine or decoration. Due to the fact that tin has a low melting point, you can make tin products yourself at home. A set of tin soldiers will be a wonderful gift not only for a child, but also for a serious adult.
Making a mold for pewter is perhaps the most difficult question a beginner faces. However, there are no particular difficulties here either. Before you begin directly making the casting mold, you should stock up on the necessary materials and tools in advance.
You can buy gypsum or alabaster, as well as silicone heat-resistant sealant at any hardware store. A scalpel or sharp blade is easy to obtain. Plasticine is generally easier than that. A simple pencil, dishwashing liquid or liquid soap can be found in any home.
First of all, start applying silicone sealant to the product model prepared in advance for this purpose. Silicone is applied in several layers. Apply each subsequent layer on top of the previous one only after complete drying. The drying time of the sealant should be indicated on the packaging.
Apply the very first layer of silicone especially carefully so that there are no gaps left. Carefully handle all irregularities and depressions. After the first layer has dried, examine it for defects. If there are gaps, cover them, apply the next layer, dry it, etc.
In the end, you should have a fairly thick silicone shell through which the model itself can barely be seen. Don't forget that silicone and plaster molds must have one or more conical holes. These holes are located with the wide end outward “at the feet” of the figure and serve for pouring tin into the mold.
When the silicone mold has dried well, make formwork for pouring gypsum. The formwork is a rectangular frame that is placed on a sheet of glass. To prevent the gypsum solution from flowing out through the gaps between the glass and the formwork, they are covered with plasticine.
Now gradually add plaster into a small amount of cold water, stirring continuously. The resulting mixture should have a consistency similar to liquid sour cream. Pour this gypsum solution into the prepared formwork. Immediately after that, drown the figurine in a silicone shell in the not yet hardened plaster halfway along the entire length. This will be half of the pewter mold.
Instructions
How to make a paper soldier with your own hands
Making paper toys is accessible to basically everyone. You can make anything you want out of paper, for example, soldiers of all times and peoples - you just need to choose a suitable silhouette and figure out what uniforms the army is wearing. Designing paper soldiers can keep your sons busy for a long time, and many outstanding military figures began their careers with just such an activity. See also others in this section.
To make a paper soldier you will need thick paper or thin cardboard, felt-tip pens, pencils or paints, and a piece of thick cardboard. The uniform can be made from thin colored paper, or you can draw it. Also stock up on PVA glue, scissors, a sharp knife, a compass and a ruler.
Find a suitable picture with a soldier. He must be depicted in full height. It is very desirable for the soldier to stand straight. You can, of course, make a soldier in profile, on a horse, and with a cannon, but still paper is not the most suitable material for this, since the soldiers will turn out flat. Cut out the soldier figurine strictly along the contour lines.
Fold a sheet of Whatman paper or thin cardboard in half with the right side facing out. Place the soldier figurine on the sheet so that the top line of the shako or cap is on the fold line. Trace the figure strictly along the contour.
You can print out these little soldiers, and then just cut them out and glue them together.
Paper soldier blanks
In order for the soldier to stand, he will need a stand. To make it, draw a straight line where the soles of the soldier’s boots are. If the soldier is small, then it is enough to extend the line 2 cm from the toe of each boot. Divide the resulting line in half, place a compass needle in the middle of the line and connect the ends of the line with a semicircle whose radius is equal to half the line. On a piece of thick cardboard, draw a circle of the same radius and cut it out.
Cut out the soldier. The sheet of cardboard is folded in half in the same way as when you traced the figure. The further order of work depends on you. You can paint the soldier first and then glue it together, or you can do the opposite. Do not paint or glue the semicircles intended for the stand. On one half of the blank, draw the soldier’s face, hair, shako visor, make buttons and aiguillettes. On the other, depict the rear view - the shako is completely painted over, the uniform and everything else too. You can make a mentik or tunic with an appliqué by tracing the design again, cutting out the clothing along the contour and gluing it onto the workpiece.
Bend the stand so that one semicircle is in front and the other is in back. Apply glue to the stand and glue it to a circle of thick cardboard.
Pistachio tree. Miracle tree
A paper soldier is a great idea for creative leisure time with children on the eve of Defender of the Fatherland Day. This is good not only for developing fine motor skills, but also for instilling patriotism in the younger generation.
Today we have made for you a large selection of master classes, after watching which you will know how to make a paper soldier
Are you looking for ideas for children's crafts for February 23 or May 9 for a creative activity or for kindergarten? Today we invite you to make a soldier with your own hands from paper
An excellent material for needlework, inexpensive and accessible to everyone. From ready-made soldiers you can make a thematic installation (spatial composition) with your own hands, decorate a postcard for May 9th with your own hands, or make a gift to a veteran. And, of course, every dad will appreciate such a wonderful gift from his baby, like a DIY paper soldier
In today's selection you will find paper soldiers for every taste - flat and three-dimensional origami, paper-plastic ideas, complex crafts for May 9th from corrugated cardboard, and simple do-it-yourself soldiers, which even the smallest can handle making. Let's watch photo and video master classes: