Advantages and disadvantages
Advantages of using a furniture euroscrew:
- Low cost;
- Fast and reliable connection of parts;
- Possibility of fastening different types of parts;
- High withstand bending and tearing loads;
- Easy to install, does not require additional special devices;
- Does not destroy mounting holes, thus interior items can be assembled and disassembled.
The disadvantages of Euroscrews include the fact that they are not hidden fasteners. In order for the products to have a neat appearance, they have to be hidden using special plugs or plastic covers. Another disadvantage of using fasteners is the limitation of furniture assembly. The Euroscrew does not allow the process to be carried out more than 3-4 times. This is due to the fact that with frequent disassembly of furniture, the threads can wear out or break off.
Scope of application
The use of Euroscrew is directly related to the manufacture and assembly of furniture and carpentry. Simplicity, reliability and high speed when working using familiar tools made this confirmation a leader among analogues . It is necessary to distinguish several areas of work where this fastening element is widely used:
- production of furniture in production;
- repair;
- making cabinet interior items with your own hands;
- assembly of finished products.
The design features of the European furniture screw allow it to be used with materials of different compositions:
- wooden sheets and boards;
- chipboard;
- laminated chipboard;
- Fiberboard;
- plywood.
Before starting furniture manufacturing or assembly, the craftsman should take care of purchasing plugs. They completely cover the caps and give the product a finished look. There are two types of plugs: self-adhesive and plastic. Both can be matched to the color of the furniture. Due to convenience, self-adhesive options are more used. The cost of the plugs is almost the same.
laminated chipboard
Tree
Fiberboard
Repair
Industrial furniture assembly
Manufacturing of cabinet objects
Making furniture yourself
Wood style plugs
Dimensions and materials of manufacture
The sizes of confirmations are as follows: 5x40, 5x50, 6.3x40, 6.3x50, 7x40, 7x50, 7x60, 7x70 mm. The most common are single-element ties with a thread diameter of 7 mm and a length of 50-70 mm.
| Designation | Europrop 7x40 | Europrop 7x50 | Europrop 7x60 | Europrop 7x70 |
| Head height, mm | 10 | 10 | 10 | 10 |
| Length, mm | 35,5-40 | 48,5-50 | 58,5-60 | 68,5-70 |
| Key size, mm | 4,02-4,12 | 4,02 | 4,12 | 4,02 |
| Flange diameter, mm | 9,5-10 | 9,5 | 10 | 9,5 |
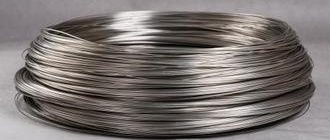
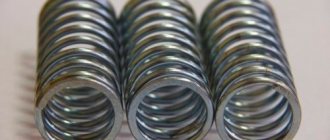
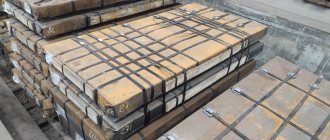
Fasteners are made from high quality materials, often carbon steel. They are coated to prevent corrosion. The coatings are:
- Brass;
- Nickel;
- Zinc.
Euroscrews made of aluminum alloy are quite flexible; they do not break during furniture assembly. Thanks to these properties, the fastener can bend; if installed correctly, it can also be easily removed.
Galvanized
Nickel
Brass
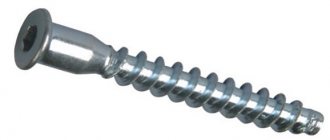
Design Features
Euroscrews for connecting furniture parts are a single-element tie. In essence, they are the same screws, only their body is more massive. The confirmation threads have a wide pitch, the head is elongated, and the head has a hidden design. The slots for the tool are different. Some are suitable for a curved screwdriver, others for a hex key. Unlike other hardware, the ends of Euroscrews have a straight cut with a round cross-section.
Using a confirmed hexagon is considered more practical and reliable. After connecting the parts together, you can further tighten them using a hex bit, screwdriver, drill or special wrench. Fasteners for a Phillips screwdriver cannot provide such secure fastening, since it will not be possible to tighten the parts tightly. Subsequently, this will affect the strength of the structure; it may become loose and lose stability.
Confirmats are used to connect parts made from:
- MDF;
- chipboard;
- wood;
- plywood.
Euroscrews can replace standard angles. They easily withstand all bending loads. This feature allows the confirmata to perform not only a fastening function, but also a frame-forming function. To disguise the fasteners, plastic plugs (diameter 12 mm) are used, similar to the general color of the interior items. They are made of plastic. There are also special round stickers on sale. The thickness of the plugs does not exceed 0.4 mm. They can be chosen in the same shade as the furniture itself. Interior items take on a finished look, and the Euroscrews on them become invisible. Self-adhesive elements are more common; they are convenient and easy to use.
Installation rules
Before installing the fastener, you must make the appropriate markings. For these purposes, there are special conductors or templates. They significantly speed up the process and make the work more accurate. Conductors eliminate marking errors and are used mainly for large volumes of work. If you need simple markup, you can do without templates. If all stages of the work are done correctly, connecting parts in this way will be the most reliable, durable and at the same time convenient.
In order to correctly install the confirmat, you need to know some nuances regarding the material of furniture and the design features of the fastening element. It is necessary to drill three holes: for the threaded part, for the smooth head and for the cap. For each of them, drills of different diameters are selected. Drilling multiple holes significantly increases the time required to connect elements. In this case, a special drill designed specifically for the Euroscrew comes to the rescue. It is manufactured in such a way that a hole is drilled at one time to fit all three parts of a single-piece screed.
Installation process:
- The first step is to drill a hole for a single-element screed. To do this, use a drill with a diameter of 4 mm to 7 mm;
- Step cutters will make it easier to make holes intended for placing the head in it. The cutters are attached to the drill. Using this particular method facilitates the simultaneous formation of the correct hole in two elements at once. The diameter of the hole for the Euroscrew, or more precisely for the threaded part, is 5 mm, for the head - 7 mm;
- A through hole is made on the first part where the smooth head and Euroscrew head will be placed;
- A blind hole is drilled in another part, in which an internal thread is formed by drilling the threaded part of the confirmat at the end;
- For a more precise connection and to prevent shifting, the elements are firmly fixed with special devices (furniture vices, clamping machines, etc.).
It is important to use tools that can operate at high speeds. They will ensure that the most accurate and correct holes are drilled.
Euroscrew is a reliable modern hardware that greatly simplifies the process of assembling hull structures. At the same time, you can abandon unsightly corners and other usual fasteners. Correct installation ensures the stability and durability of furniture elements and extends their service life.
Making markings Making a hole at the end
Drilling the front part
Installing fasteners
Drilling holes for confirmations
Such connecting elements are used in various fields of activity, as they are compatible with many working materials. But before screwing them in, it is necessary to drill holes of a certain diameter.
They are coated to prevent corrosion.
In practice, the drilling itself occurs as follows: an opening is made in the thickness of one product, in the end of another workpiece, and subsequently they are fastened together. The diameter of the holes has stepped transitions - this is due to the design of the fasteners. Since there is a thickened cone under the hat, the size of the hole should increase there and decrease along the thread itself.
For each of them, drills of different diameters are selected.
The work process can be divided into several ways:
- Three stages. An opening is made in two objects for a certain length of a European screw. (when drilling, the threaded diameter is not taken into account, only hollow elements and curls make their way into the product themselves). The second drilling is to fit the size of the cone under the cap. Working with a countersink to deepen the head.
- Working with a cutter (confirm drill). With this method, there is no need to work in several stages; the design of the equipment itself is of a stepped type. Going through the drill once is enough. This type of work is precise; there will be no deviations to the side. This is one of the common methods for installing screws.
A special drill designed specifically for the Euroscrew comes to the rescue.
Additional Information. Any displacement during work carries a risk to your safety and destroys the sample. It is necessary to use clamps when drilling. A well-known clamping equipment is the angle clamp.
Necessary tool
If a person plans to start working with these clamps, you need to stock up on the following tools:
- roulette;
- pencil;
- awl;
- bat;
- screwdriver, various drills;
- and of course, Euroscrews.
Hole depth and width
The most popular product is size 6.4 (diameter with thread, and without it - 4.4 mm) by fifty. Conclusion: the normal depth with such a screw is fifty millimeters, and the width is four and a half or five.
It is screwed in with pre-drilled holes.
If you make it a little larger in size, the fastener will not cope well with fixation; if the hole is narrowed, the part may split the sample.
Important. It is best to use a confirmed drill - 4.5 mm. (universal products).
Marking drilling locations
The preparatory stage is no less important than the work itself. First you need to correctly mark the surface where the drilling will be done. Two measurements are taken on the end piece: height (varies from five to ten centimeters), and measurement from the edge of the workpiece (about eight mm).
Before installing the fastener, you must make the appropriate markings.
On another object on the facade, a point of contact is drawn. The measurements are virtually identical to the first option.
Any craftsman must clearly mark the surface of products - this will make it possible to avoid mismatch of parts during assembly.
If all stages of the work are done correctly, connecting parts in this way will be the most reliable, durable and at the same time convenient.
Note. In practice, craftsmen recommend making a through opening in the first object, and using the drill itself to mark a point in the second (attaching two parts).
Drilling into the layer of a part
The first thing you need to do is make a hole eight millimeters (from the edge). Place a piece of old board under the sample. Then, using a drill, holding the drill perpendicular to the ground, we make a through opening.
Before making a through hole, place a piece of unnecessary chipboard under the part, this will prevent chips from appearing on the back side.
Drilling at the end of a part
Face drilling means that the drill must be placed in a perpendicular position to the end of the object. This way the equipment is properly fixed and the sample will not be damaged. Try working in several passes, while knocking out the chips.
The main rule is that when drilling at the end, the drill must be strictly perpendicular to the end of the part.
Drilling in two parts at the same time
We fix the product tightly (in a vice) and drill. This is the most accurate method, and a noticeable saving of time when working.
This option is considered the most accurate and, moreover, the fastest.
Choosing the right drill
How to choose the perfect drill for the job?
- Always select the exact dimensions of the part.
- When purchasing, you need to pay attention to the material (what kind of steel).
- Take the time to read reviews about the manufacturer. The quality of work depends on this.
- Particular attention must be paid to price. A quality product cannot cost a penny.
If the master has been working in the field of furniture production for a long time, practical experience will tell you which product to purchase.
For drilling, use a confirmat drill with a diameter of 4.5 mm, which is equipped with an additional head for drilling an enlarged hole for the neck of the confirmat, which also makes a countersink for its head.
Additional Information. There are several secrets when choosing: the lower the roughness, the better (feather), the dimensions of the cone (the part under the cap) should be identical to the landing segment, the supporting part for the countersink is forty-five degrees and a measured transition, etc.
Confirmat is a popular product today, especially for working with furniture samples. When assembling various items, it is recommended to use high-quality equipment. With a little patience, any item will come together pretty quickly after a few practice sessions.
Using this fastening method, you can assemble and install furniture yourself.