To prepare bearings for installation, first check the labels on the packaging and the bearings themselves.
Unpack the bearings immediately before starting work with them.
Re-preservation of bearings is carried out in accordance with the current instructions for storage, re-preservation of bearings and their parts and handling of them. As a rule, bearings are re-preserved in hot (80-90 °C) mineral oil, thoroughly washed in a 6-8% oil solution, in gasoline or in hot (75-85 °C) anti-corrosion aqueous solutions, for example, the following compositions ( in %):
It is not recommended to store unpreserved bearings for more than two hours without corrosion protection.
After re-preservation, the user of bearings must ensure their protection against corrosion during inspection, installation, assembly and storage of products in accordance with the relevant in-plant instructions.
Before installation, the bearing should be checked to ensure that its appearance, ease of rotation, and clearances comply with the requirements of regulatory and technical documentation.
Open type bearings must be visually checked for nicks, traces of contamination, corrosion, a complete set of rivets, tightness of their installation or other connecting elements, a complete set of rolling elements, and damage to the cage.
For closed type bearings, check whether the seals or shields are damaged.
To check the radial clearance, one of the bearing rings is secured with the axis in a horizontal position and the clearance is determined using an indicator, displacing the free ring under the action of a measuring force in the radial direction into two diametrically opposite positions. The difference in instrument readings corresponds to the radial clearance value. Three measurements are taken by rotating the free ring relative to the initial position of the bearing axis. The axial clearance is measured similarly, but with the bearing axis in a vertical position. When fixing one of the rings, the other is shifted in the axial direction to two extreme positions under the action of the measuring force and the difference in the indicator readings is recorded. Radial clearances in radial double-row spherical roller bearings and bearings with cylindrical rollers without flanges on outer rings with a bore diameter greater than 60 mm can be measured using a feeler gauge.
Immediately before installation, it is necessary to check the mounting surfaces of the housings (holes and ends) and shafts (seating surfaces and ends) for the absence of nicks, scratches, deep processing marks, corrosion, burrs and contamination.
Shafts, especially with length to maximum diameter ratios greater than 8, should be checked for straightness of the axis (no bending). It is advisable to carry out the check when rotating the shaft in centers using dial indicators. An increase in eccentricity from the edge to the middle indicates a curvature of the shaft.
It is necessary to check the deviation from the alignment of all seating surfaces located on the same axis for compliance with the standards specified in the technical documentation.
If bearings supporting one shaft are installed in different (separate) housings, the alignment of the housings, in accordance with the requirements of the technical documentation, must be ensured using gaskets or other means.
When installing two bearings (radial: ball, spherical roller and cylindrical) on one landing journal, the difference in radial clearances should not exceed 0.03 mm, and in the inner and outer diameters of the rings - no more than half the tolerance range.
The surfaces of the shafts and housings mating with the bearings must be thoroughly washed, wiped, dried and lubricated with a thin layer of lubricant or anti-fretting paste. The channels for supplying lubricant must be cleaned of chips and other contaminants and purged with compressed air.
When installing a bearing, the pressing force must be transmitted only through the pressed ring - through the inner ring when mounted on the shaft and through the outer one into the housing. It is prohibited to carry out installation in such a way that force is transmitted from one ring to another through the rolling elements. If the bearing is simultaneously mounted on the shaft and in the housing, the forces are transmitted to the ends of both rings.
Application of installation forces to the separator is not allowed. Do not strike directly at the ring. It is allowed to apply light blows to the ring only through a bushing made of unhardened structural steel.
When mounting bearings with a cylindrical bore on a shaft with an interference fit, it is advisable to preheat the bearing using an induction heater.
The heated bearing is placed on the shaft and brought into place with a little force. In this case, the side of the bearing on which the factory mark is applied must be on the outside.
For the installation of large-sized bearings, the most appropriate is the use of hydraulic thrust, which ensures the highest quality installation of the bearing, the absence of any damage to the mounting surfaces and high performance. This method is especially suitable for mounting bearings with an internal tapered hole with a diameter of more than 120-150 mm.
When fitting a bearing into a housing with an interference fit, it is recommended to pre-cool the bearing with liquid nitrogen (-160 °C) or dry ice, or heat the housing before installation.
The most appropriate installation methods are those that apply simultaneous and uniform pressure along the entire circumference of the mounted ring. With such methods, there is no distortion of the mounted ring. To implement such methods, pipes made of unhardened structural steel are used, the inner diameter of which is slightly larger than the diameter of the ring hole, and the outer diameter is slightly smaller than the outer diameter of the ring. At the free end of the pipe, a plug with a spherical outer surface should be installed, to which force is applied during installation.
The installation force should be created using mechanical or hydraulic presses and devices.
In the absence of mechanical and hydraulic devices and installation of small-sized bearings with low interference, it is permissible to apply light blows with a hammer through the mounting pipe with a plug.
For any installation method, especially when installing with a hammer, it is necessary to carefully ensure uniform, without distortion, axial movement of the ring. The presence of misalignment during installation leads to the formation of scoring on the seating surface, incorrect installation of the bearing, leading to a reduction in its service life, and in some cases, to rupture of the mounted ring.
Double-row spherical ball and roller bearings with a tapered bore are mounted on a cylindrical shaft using adapter and withdrawal sleeves, and on shafts with a tapered journal - directly on the shaft journal. It is advisable to install bearings with a hole diameter of up to 70 mm and normal interference using a mounting sleeve screwed onto the threaded end of the shaft. The pressure part acts on the end of the adapter sleeve or directly on the end of the inner ring (when installed without adapter and withdrawal sleeves). Bearings with a bore diameter greater than 70-100 mm should be mounted using hydraulic methods. Since the inner ring of the bearing deforms (expands) as the adapter sleeve moves axially, the radial clearance decreases. The radial clearance must be checked using a feeler gauge. The permissible minimum value of the radial clearance in millimeters after assembly of the unit for bearings manufactured with clearances of the normal group according to GOST 24810 can be approximately determined by the formula
Theory
In order to make your work as easy as possible and reduce the risk of damage to parts to a minimum, and at the same time ensure high quality repairs, you need to follow several important rules:
- The bearing must be pressed in using a mandrel only. It is strictly not recommended to apply force to the bearing through its working elements! If you need to press a bearing into a seat, then the pressing force must be applied strictly to the race with which you are pressing or pressing it. And in no case should you do the opposite: drive the bearing onto the shaft by hitting the outer race or hammer it into the socket by hitting the inner race, that is, apply force through the working elements
- In order to facilitate work and minimize damage to sometimes very expensive parts, the mounting sockets must be heated to a temperature of 100-110 degrees. It is best to heat it with a hairdryer or in the oven according to the principle: if we press the bearing into the socket, then we heat the socket, if we seat the bearing on the shaft, we warm the bearing
- For greater effect, heating can be supplemented with freezing in the following combination: if you need to press a bearing into a seat, we heat the seat and freeze the bearing. If the bearing needs to be mounted on a shaft, we heat the bearing and freeze the shaft. Unfortunately, freezing for various reasons is not always possible and you have to limit yourself to heating only. If possible, the bearing should be pressed in using an industrial press. This method provides a lot of advantages: only a linear load will be applied to the bearing, and not an impulse load if hammered in
Installation of tapered roller bearings
A design feature of a tapered roller bearing is that the cage protrudes beyond the outer ring by m and n (Fig. 3, a). This should be taken into account when installing parts adjacent to the bearings, for example, spline nuts (Fig. 3, b), or when installing two adjacent bearings (Fig. 3, c).
The adjacent part must be spaced from the end of the outer ring of the tapered roller bearing by b=4...6 mm. To ensure that the cylindrical surfaces of adjacent parts do not touch the separator, the heights h1 and h2 should not exceed the following values: h1=0.1(D–d); h2=0.05(D–d).
Rice. 3. Installation of tapered roller bearings
That is why, in the very common fastening of a tapered bearing with a spline nut (Fig. 3, b), a spacer sleeve 1 is installed between the ends of the inner ring of the bearing and the nut. Approximately half of its length, sleeve 1 fits onto a shaft with a diameter d made for installing the bearing, and with the remaining length it covers groove for the tool to exit when cutting threads.
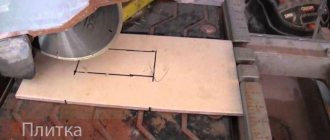
Mandrel
It is not at all necessary to buy a mandrel; you can make it yourself in a few minutes from a scarce material: from the same bearing that needs to be pressed into place. If you are too lazy to bother, you can buy a mandrel or even buy a whole set and use it for your health. Whatever is more acceptable to you, then choose.
We take an old unnecessary bearing that is still capable of rotating. We bring the bearing to the wheel of the sharpening machine and grind the cage a little: if the bearing is turned across the stone, the work will go much faster
There is no need to sharpen the clip, literally a tenth of a millimeter is enough
We cut out the inner ring by welding
For ease of operation, we weld a washer onto the holder
Hub repair kit
The principle of operation of the kit for pressing out wheel bearings is quite simple; to do this, just select the diameter of the thrust ring to match the outer diameter of the ring, install the thrust sleeve and tighten the threaded screw and tighten the nut to pull the outer race out of the sleeve. Using a device for pressing out a wheel bearing helps to avoid inevitable defects in the seating surface of the bushing for the outer race when knocking out the race manually with a chisel or other devices. When landing on a defective surface of the bushing, uneven compression of the inner and outer races occurs - this can lead to their ellipse, which accelerates the development of roller defects. Using the device will help you avoid the big troubles and costs of replacing the entire part due to incorrect installation of the clips.
Manufacturers of the most popular and high-quality components
Press-fitting
We heat the seat, position the bearing, place a mandrel on the bearing and use a hammer to drive it to the required depth. You need to hammer in several gentle blows, constantly monitoring so that the bearing does not become distorted.
It is even easier to install a bearing on the shaft: we cut off a piece of a suitable size pipe, heat the bearing, put it on the shaft, place the pipe on the inner race and hammer it in
No, well, in theory, the bearings don’t sit that much. It is better to freeze the bearing itself (in the freezer for the whole night or more), and warm the seat itself, warm it well. Then this cold bearing flies into the seat like clockwork. It’s not very easy to press bearings into a cold one..
Pocik29: what you are talking about is a good method. But have you seen anywhere where bearings are pressed in at a factory in this way?
In factories they freeze liquid nitrogen, I use it myself.
Dmitry, not every garage has liquid nitrogen. Therefore, we proceed from what is available.
Thanks for the info.
Oh, nothing, so, in principle, it’s impossible to hammer the bearings with a hammer (sledgehammer) at all?! The term “pressing” itself implies crushing. The application of shock loads to bearings is strictly undesirable!
Yes, no one argues with you. Actually, precisely in order not to hammer the bearings with a sledgehammer, I heat them or freeze them (an old and generally accepted method, even recommended in many publications). And then they go very easily, almost by hand, and I use the hammer more for props. You need a good press, and not one that increases the force step by step: based on all kinds of jacks. It is needed with a uniform feed and with a pressure gauge - to control the force. You probably have a press like this at home? Unfortunately, I don’t, so I have to adapt. Perhaps someday I’ll buy it, and then I’m sure you and I would find common topics for conversation.
Typically, bearings do not fail unexpectedly. This is preceded by many signs. How to determine when it’s time to change a bearing, and how to make it last long?
000_moto_0611_070
“Bearing” stands for lining under a tenon (axle), and its purpose was once to reduce friction between the axle and the carriage wheel. Today, the first thing that comes to mind when thinking about a bearing is two rings with balls between them. But there are many types of bearings - tapered roller, rotary, and plain bearings (the latter in design resemble that very “spike lining” and are used mainly in the engine - in conjunction with the crankshaft). But today we will focus on those that most often fail on a motorcycle, and which, in principle, can be changed independently. And sometimes on the road there is no other way out!
The most vulnerable parts of a motorcycle are the wheel bearings. When driving through puddles and fords, the hub cools and water tends to get in there. Equipment owners also help this process by washing hard-to-reach areas of the motorcycle with a jet of water under pressure. If you drive off-road, grass often wraps around the axle, squeezing out the seals and again opening the way for dirt and moisture to the bearings. And road dust slowly wears away rubber and steel, breaking through. The main sign of wheel bearing wear is play, which can be easily assessed by shaking the suspended wheel in the transverse direction. The howl of such a bearing, as a rule, is drowned out by the noise of the engine and transmission.
By the way, on parts of the enduro the seals are installed with springs outward - it is believed that this way they better block the path of water when a vacuum occurs in the hub. To ensure your wheel bearings last a long time, keep the protective seals in good condition. Wheel seals are the first to fail on off-road motorcycles, so their owners should pay special attention to their condition and promptly replace them with new ones. At the same time, take the time to inspect the mating surfaces of the bushings. Worn metal (and it is quickly and inevitably pierced by the springs of worn oil seals) will immediately ruin the new oil seal. You can try to polish minor defects, but it is best to order new bushings to replace the worn ones in advance, before replacing the bearings, otherwise you will soon have to buy a set again - bearings, seals, bushings. It is equally important to be careful when replacing wheels and make sure that dust or sand does not stick to the axle and bushings that are removed for a while. The required amount of lubrication on the wheel axle is also vital for the normal operation of the unit. Typically, aluminum or copper-filled greases are recommended for lubricating motorcycle axles.
Determining the condition of parts
To determine the condition of the hub parts, it is necessary to lift the car wheel so that one or more wheels are above the ground. And shake them simulating vertical and horizontal load. Before checking the wheel, it is necessary to check the stability of the body; to do this, push the body from the side; the body must stand securely; if there are vibrations, it is better to shift the safety pad. If the wheel play is no more than 2 mm, then you can try to adjust the gap in the rolling elements of the product.
001_moto_0611_070
Such a tool is available in every properly equipped workshop. Before removing the bearing, it is necessary to thoroughly clean the surrounding surfaces so that dirt, residues of old grease with sand or oxidized aluminum do not prevent the bearing from coming out. On some motorcycles (where the bearing fits tighter than normal), it is recommended to heat the hub to 100°C.
You can also use a hammer to press in a new bearing. But only in combination with a mandrel with a diameter half a millimeter smaller than the outer race of the bearing. It could be, for example, a used socket head. The main thing is that the load falls only on the outer ring. A more civilized, but not always more effective tool is a device consisting of disks of various diameters and a long threaded rod. Using a disc of the required diameter, any bearing can be carefully pressed into place. Both methods require great care at the very beginning of the process, when the bearing has only slightly entered the hub. The outer race of the bearing must fit into the mounting hole without distortion. If the bearing nevertheless deviates from the desired direction, it can be directed with very light blows of the mallet. And also, before pressing the bearing, be sure to lightly lubricate the seat and the outer edge of the bearing with engine oil. After installing the bearings, make sure they rotate freely.
It happens that the internal spacer sleeve in the hub
A quick overview of wheel ball bearing pullers
It is impossible to choose a universal kit for all types of car repairs, since the range of actions is limited:
- a variety of shapes, sizes for charging to the starting position;
- limited work space.
Cup – “Forse 9T0311”
- Internal mandrels 34-80 mm.
- External mandrels 44-90 mm.
- The dimensions of the outer diameter of the cups are 44-90 mm.
- Rod (stud) with nuts.
- The plates fit a wide range of sizes.
- The steering knuckle remains in place.
- The set is included in the workshop press kit.
- Pressing-pressing takes place in one step.
Three-jaw – “KS TOOLS 630.3002”
Garage tool. Suitable for use in restricted access work areas.
- Long life if you follow the manual.
- The articulated design of the paws engages securely.
- Removing stuck parts from shafts and machine axles.
- Wide grip range - 20-230 mm.
- Maximum force - 4.5 tons.
- Screw rod dimensions: M18 x1.5 x 240.
- The dimensions of the bolts for the hinges are 19 mm.
Two-grip universal – “Kukko K-2030”
The tools from the set of the German manufacturer Kukko are well-thought-out forms of gripping mechanisms. On the traverse, the paws move along guides, and the suspension screws fix the specified position.
- Grasp the paws at an angle parallel to the axis of the tension force.
- Reliability of engagement.
- Maximum tension - 5.5 tons.
- The legs rotate 180 degrees.
- Wide grip range.
- Double acting.
- Suitable for use in confined spaces.
Hydraulic pullers
You can also find hydraulic pullers on the market. The operating principle of hydraulic SSPs is similar to jacks. Designed for repair shop mechanics, no muscle power required, speeding up the repair time. Pay attention to the quality of the metal, the rotation of the screw rod, and the condition of the hinges.
- the force of influence on the pressed-in unit reaches 20 tons,
- operation time is reduced,
- the share of physical costs is reduced.
- limitation of the working area of application,
- the price is higher than a mechanical tool.
002_moto_0611_070
a fraction of a millimeter longer than necessary, resulting in excessive friction inside the bearing and the bearing becomes difficult to rotate. To correct this situation, it is necessary to slightly loosen the bearing by moving it outward. When assembling the wheel, pay special attention to the outer bushings between the bearings and the fork stays. If you forget one of these bushings or mix them up, the entire system will not work correctly, which can lead not only to rapid wear of the parts, but also to a fall.
Cups for bearings
To accommodate shaft supports consisting of several bearings, cups are used (Fig. 12). Glasses are usually made of cast iron grade SCh15 and steel, which are used in a cast iron or silumin body under significant loads.
Rice. 12. Designs of cups for bearings: a – for universal assembly; b – for two tapered bearings (inside the cup); c – for two tapered bearings (one outside and one inside); g – for two tapered bearings with collars
The wall thickness of the cups δ, mm, is taken depending on the diameter D of the hole in the cup for the bearing. The cups for the bevel gear shaft bearings (Fig. 12, a) are moved during assembly to adjust the axial position of the bevel gear. To do this, use the fit of the glass in the H7/js6 housing. Other glasses, after they are installed in the body, remain motionless. Then plantings of type H7/k6 or H7/m6 are used.
003_moto_0611_070
Often you have to deal with the steering column bearings. The main thing is to tighten them in a timely manner, without allowing it to play. In the steering columns of modern motorcycles, thrust ball bearings are often found, primarily supporting loads directed parallel to the axis of the steering column. If play appears in such a bearing, it begins to break quickly. At first, a slight click appears when braking, but if the situation is not corrected in time, the steering wheel will begin to rotate worse and may jam at the most inopportune moment. To tighten the steering bearing, you first need to find the nut that holds it in place. As a rule, it is located under the upper traverse and sometimes it is supported by a second one of the same kind. Often these nuts have a castle crown and require a special wrench. The motorcycle must be positioned so that the front wheel hangs in the air and the steering wheel rotates freely. Remove the upper crossbar and begin to tighten the bearing nut little by little, while checking that the system rotates easily. As soon as there is a force during rotation, stop tightening the nut and turn it back about a quarter of a turn. The steering wheel should rotate freely, and the play should disappear.
An important point: if clicks from the steering column appeared on a completely new motorcycle, it is possible that the bearing did not fully fit into its seats during assembly at the factory. In such cases, it is useful to first tighten it with a fairly large force, about 25–30 Nm, and only then loosen it and perform the procedure described above.
Replacing steering bearings is sometimes a difficult task and requires good equipment and skills. And if you can still handle wheel bearings in a garage, then you can’t do without the right equipment to work with steering bearings. Driving with worn bearings - no matter the wheels or steering column - is dangerous!
Every motorcycle has many other components where bearings work, but most of them are in the engine, and thanks to excellent lubrication and cleanliness, they last a long time and do not require replacement. And if it so happens that one of the bearings of the engine or gearbox fails, then there was a very serious reason for this (usually a problem with the lubrication system) and replacing the bearing alone will not end the matter. But let's not talk about sad things. After all, if you regularly monitor your motorcycle and maintain it properly, nothing bad will happen to it.
Replacing wheel bearings (using the example of Suzuki DR-Z 250):
Replacement procedure
Some car enthusiasts just need to look at the video and understand how to replace such an element themselves.
In practice, there is nothing difficult about replacing a wheel bearing. But the main problems for motorists arise precisely because of the lack of a special tool, or due to a lack of experience in carrying out such operations. There are also differences in replacement on different brands and models of cars. Therefore, you should not count on universal instructions for all machines. It’s better to look at the owner’s manual and figure out how to change the front wheel bearing specifically for your vehicle.
In the case of domestic cars and foreign cars, replacement has its own subtleties and nuances. Sometimes you even need to use different sets of tools.
In most cases you can't do without:
- socket heads;
- socket wrenches;
- hammer;
- bench vice;
- pliers;
- shaped screwdriver;
- flat screwdriver;
- puller for pressing and removing the hub;
- gloves;
- new bearing;
- locking wheel;
- lubricants, etc.
An alternative to a puller can be a regular hammer, with which the bearing is knocked out and hammered. But only an experienced master can afford this, and it’s unlikely that he works in a leading car service center. This is considered an artisanal method.
Current methods
There are two main methods for changing the wheel bearing on the front wheel.
- The first does not involve dismantling the steering knuckle. The advantage of this method is that after completion of the repair and restoration work there is no need to adjust the wheel alignment. After all, the camber bolts themselves were not removed. But here you cannot do without an inspection hole, which not all car owners have;
- The second method involves removing the fist. A more convenient option, since after dismantling it will be possible to carefully press out and install a new hub bearing, working on the table. But then the wheel alignment will be disrupted. To minimize additional adjustments, be sure to mark the fasteners and knuckle during disassembly.
Decide for yourself which path to take.