The sinker is one of the consumable components of the tackle and often disappears along with the hook when biting large and strong prey. In stores, the cost of sinkers increases in direct proportion to their weight. Therefore, if catching large fish is carried out using several tackles, then purchasing sinkers becomes quite expensive.
At the same time, this element of equipment is quite simple to manufacture and practically does not require careful processing and complex preparation for use.
The material for the sinker is also quite common and accessible, so even complex sinkers can be made independently using appropriate blanks.
Simple options
The simplest thing is to make lead weights using a plaster or sand mold. This method has a number of undoubted advantages:
- accessibility and prevalence of material;
- lead melts at a relatively low temperature - 320°C;
- ease of manufacture.
The use of lead and gypsum when making sinkers yourself has several significant nuances:
- at a temperature of about 200°C, water begins to actively evaporate from gypsum , which leads to destruction of its structure and splitting of the product;
- Lead, when hardened, is pressed into plaster , which makes it almost impossible to remove the sinker without destroying the mold;
- a gypsum workpiece has a large number of micropores , which leads to the need to polish the finished product.
When using sand instead of gypsum, the process of preparing the mold is greatly simplified, however, the requirements for the material of the box in which the workpiece will be located when pouring lead are increased; it is advisable to use a metal support. The product itself will be somewhat less aesthetically pleasing and will require serious polishing.
Main lead ores
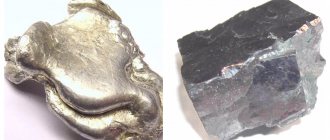
Galena is the main source of lead, mentioned in the works of ancient authors. It is characterized by a cubic crystallization structure and a classic “lead” color. It has a metallic luster, but in air it actively reacts with oxygen and becomes dull-matte. Among the impurities, cadmium is noted, a metal valuable for industry.
Cerussite - formed from the weathering of galena, also a valuable source of lead. It is distinguished by its high transparency, which is why it can be easily confused with more valuable species. A couple of centuries ago, powdered cerussite was used as a cosmetic product, and the crystals were cut and traded under the guise of precious stones.
Andorite - stands apart among the numerous ores containing lead, due to its equal silver content, and is mined to obtain both metals. Distributed in Central Asia and mountainous regions of South America.
Crocoite is one of the few lead minerals that has no industrial value or use, but is used as a decorative or collectible item. "Red Lead Ore" has a unique appearance and structure, reminiscent of pressed saffron (from which it gets its name from the French name). Although the mineral was discovered in Russia, in the Urals, and was originally called “Siberian red lead.”
Making simple disposable molds
The fragility and destruction of the gypsum structure when water evaporates makes it difficult to use this material for reusable use. However, as a disposable and easy-to-make mold, gypsum is ideal.
To make a shape for a simple sinker you need:
- Prepare a box for filling the mold; it should consist of two parts , tightly mounted on top of each other; you can use small boards fastened with screws;
- Dilute the gypsum to a creamy state , while trying to ensure that there are no air bubbles in the resulting mixture, since voids then appear in their place;
- The first layer of gypsum is poured into the lower part of the box , which should harden a little;
- The required sinker is immersed halfway into the plaster and, using a drill , on the side of the workpiece, a hole is made in the plaster for pouring lead (it is better to insert cylinders of suitable size into these holes);
- The surface of the frozen layer is greased with vegetable oil so that the halves of the mold can then be easily separated;
- The second part of the box is installed on top , into which gypsum is poured;
- After the entire structure has hardened, the box is disassembled , both parts of the mold are separated and the sinker and cylinders of the filling channels are removed;
- The mold is cleaned and covered from the inside with a layer of soot using soot from a burning candle;
- The ears and loops for the sinker are attached , the mold is assembled and secured with wire;
- The finished form should dry well ; to do this, you need to place it in a dry place for 1-2 days or use the oven.
The easiest way to make a cone-shaped sinker is to use a paper cone in the sand:
- A paper blank (a piece of paper rolled into a cone) is inserted into any container tightly filled with sand; a metal loop for a sinker is inserted into the sharp end of the cone;
- Lead is melted and poured into a paper cone;
- Part of the cone burns, but during this time the lead has time to cool a little and begin to harden;
- The cooled workpiece is removed from the sand and processed with a file.
You can use aluminum foil instead of paper.
The material for the sinker is also quite common and accessible, so even complex sinkers can be made independently using appropriate blanks
Do-it-yourself lead products - Metalworker's Guide
Most anglers, when equipping their fishing rods, are faced with the need to load the bait. Both bottom fishers and spinners have to weigh down their rigs or artificial fish so that they quickly reach the bottom or fly far.
Sometimes during a fishing trip you can leave your entire arsenal of fishing weights in a catchable but snagged area of the reservoir.
Some amateurs do not have the financial means to constantly replenish lead supplies, while other fishermen find it difficult to get to specialized stores. In such cases, molds for casting sinkers will come to the rescue.
Due to the low melting point of lead and its availability, the necessary cargo can be cast directly on the shore of the reservoir. What types of weights are there?
Molds for casting from different materials
Fishermen make lead sinkers with equal success with their own hands, using factory-made or homemade molds. Basically, most designs differ in the material of manufacture. The most commonly used materials are plaster, wood, aluminum or steel.
- Disposable forms can even be made from thick paper. Many novice anglers know how to make a lead sinker for bottom fishing using a tablespoon. It is enough to pour molten lead into the concave part of a tablespoon to get a neat workpiece. All that remains is to make a hole, and the load can be installed on the bottom.
- The simplest mold for casting sinkers can be made from a piece of wooden lath 5-10 mm thick. Using a hacksaw and a knife, you need to make two halves of the future shape in the form of an oval or diamond. Now all that remains is to place both halves on a flat wooden or metal surface and secure them with clamps or simple stands. In the case of a sliding load, it is necessary to place a steel wire with a thickness of 0.8-1.0 mm inside. You can pour lead.
- Often fishermen are faced with the problem of how to make a mold for lead sinkers according to an existing sample. For example, every spinner should have a popular type of jig head called “Cheburashka”. And it’s not difficult to make an eared sinker based on a store sample if you make a plaster mold. To pour the creamy solution, you can use 2 ordinary matchboxes. First, one box is filled with the dough-like mass, after which up to half of the “Cheburashka” is immersed in plaster.
Recommendation!
The wire ears of the sinker should be located on the surface of the plaster.
- As soon as the material dries, a similar operation should be done with the second part of the mold. When the plaster dries in it, all that remains is to combine the two halves, make a hole for pouring and a side hole for air to escape. In opposite corners of the matchboxes, through holes are made for wire pins or a nail. After such fixation, the halves will not move, maintaining an even spherical figure.
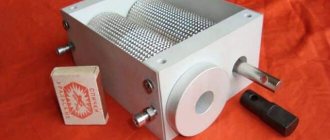
- The most durable sinker molds are made from aluminum or steel. But you won’t be able to make it well on your own. The help of experienced millers and mechanics will be required. Let's look at the technology for making a steel mold for your favorite Cheburashka.
- First of all, you will need 2 metal bars with a thickness of 20-25 mm. The width and length depend on the size of the future load and the number of simultaneously cast products. The joining surfaces must be made even and smooth.
- Hemispheres can be made using special spherical burrs. After this, it is important to accurately align both halves, for which you can use ball bearings.
- Next, holes are made on a drilling machine for the pins, “bleeders” and filler necks. Inside one of the halves it is necessary to make recesses for the wire ears.
Sinker casting process
When a mold for casting sinkers finally appeared, questions related to pouring lead appeared. The ease of making a weight depends to some extent on the quality of the mold. But if you know some of the nuances of working with lead, then everything will work out with both a homemade and a Chinese form, as well as with a product from the Spinmag company.
Before you begin heating lead, there are a few preparatory steps you need to take.
If there are wire elements, it is necessary to cut the required section, bend it and carefully place it in the mold.
The internal surfaces of the mold into which the molten lead will fall must be lubricated. Then it will be easier to remove the cooled sinker.
Tested in practice!
The best lubricant is lard. It is enough to rub a piece of sandpaper over all the depressions to make it easier for the finished product to come out of the mold.
All that remains is to assemble the structure and secure it with special clamps, bolts or pins.
Attention!
You can disassemble the mold only after it has completely cooled. This primarily applies to metal structures.
DIY lead jigs - Materials for lead jigs
Using my method, you can make jigs of almost any shape from lead, but it’s easier to make vertical lures, such as the devil and the fool.
The photo shows several dozen homemade jigs. More than half of them are made using cold machining of lead.
A couple of homemade lead lures are common ones left over from old Uralka stocks, made by casting into molds. The rest of the lead jigs are made by forging (click on the picture).
The crowns of shiny homemade jigs called “moon”, “pellet”, “droplet” and mini-balancers are filled with lead. These jigs can also be made with your own hands, but using a slightly different technology.
If a lead rod in the shape of a cone with a truncated top is cut into blanks equal to its cross section, and then each section is rolled out on the slab in a circular motion with a metal plate (frying pan) placed on top, then the bodies of spherical jigs of different diameters can be made from the lead blanks.
From the same blanks you can make lead jigs called “pellets” with your own hands. (Using a similar method, hunters, if necessary, roll shot and round bullets for cartridges.)
If round lead blanks are slightly flattened with a hammer, then we will have the opportunity to make lead bodies for various jigs with straight edges, for example, in the shape of a “hexagon”.
By cutting an oblong piece from a round thin rod, and then rolling it out on both sides into a cone, we can make an “ovinka” shaped jig with our own hands.
From the “ovinka” bent in the middle, you can make a jig blank in the shape of a “crescent”, which is also called a “rocker”. If the ends of the “ovinka” are bent in different directions, then the resulting lead jig blank can be safely called a “snake”.
An oblong, rounded piece slightly flattened at the top will make it possible to make jigs with your own hands from lead in the shape of a “bug”, “tetrahedron”, “trapezoid”, “ant”, “coffin” and so on.
DIY lead jigs
Those who want to make their own lead jigs for summer and winter fishing can get acquainted with the technical process of making baits from soft, free lead in the simplest way I know.
The method of making jigs with your own hands is indeed very simple, not related to casting lead into molds. And, nevertheless, the output is lead jigs of the most varied shapes, weights and action.
Using the proposed method, you can correct purchased lead jigs, bringing their structure to perfection.
The method of making lead jigs with your own hands using a cold method causes incomparably less harm to our health and the health of those around us than when casting lead into molds, since there are no toxic fumes accompanying the melting of lead.
To begin with, I will list the advantages of the proposed technology for making lead baits with my own hands, including the reelless jigs shown in the photograph, some of which are covered with polished crowns using the technology discussed on the previous pages of the topic.
The ease of making lead jigs of any size and shape with your own hands. There is no need to look for tools for casting lead baits from friends and acquaintances.
You can choose any hooks to make lead jigs with your own hands, while when casting lead into molds, hooks are used of a certain size and configuration.
Defects in the production of lead jigs using the cold method are reduced to zero; any homemade lead bait can be remade or corrected if desired.
To make lead jigs with your own hands using the method proposed below, you need a minimum set of tools common in every household and you do not need any special devices.
And that's probably enough. You will learn the rest of the advantages as you get acquainted with the technology for making lead jigs.
But first, for novice fishermen, a few words should be said about the consumables used that will be needed when making lead jigs at home.
Lead for homemade jigs
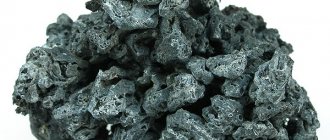
The photograph shows a lead casting. This is the most common metal from which jigs can be made at home using one of the simplest methods.
Taking into account the re-melting of the waste, the lead pancake shown is enough for us to provide ourselves with homemade jigs for many years.
Lead scraps and cut-off terminals of old car batteries (not all) are suitable as starting materials for making jigs with your own hands.
You can get hold of lead for homemade jigs by removing the braid from some brands of power electrical cables. There, lead protects the wire insulation from mechanical damage.
The material for homemade baits can be bulk lead weights purchased in a store. The most suitable (malleable) material for making jigs with your own hands is considered to be lead with a minimum content of impurities.
Hard lead alloys also make good, durable homemade jigs, but they will require longer machining.
Materials for making lead jigs
The main consumables for making jigs will be lead bars, which will be discussed below.
The material that binds the lead jig, hook and crown together, if it is soldered onto the bait, is tin-lead solder. For reliable flow and filling of cavities in a lead jig, it is better to take low-melting solder of the POS-90 or POS-61 brand.
Forms for regular use
A plaster mold, even a very well made and dried one, will sooner or later collapse and you will have to make a new one or use a product suitable for frequent use.
Of course, for repeated use, molds made of heat-resistant steel or cast iron are best suited, but making these yourself is almost impossible. But cement is good for creating a melting mold, although this will require a little work.
Materials and tools for reusable uniforms:
- formwork material (wooden boards);
- liquid soap;
- cement;
- round file;
- fine sandpaper;
- clamp;
- cylinders for inserting into the filler hole;
- wire for making loops for the sinker.
For repeated use, molds made of heat-resistant steel or cast iron are best suited, but making them yourself is almost impossible.
How to increase your fish catch?
Over 7 years of active fishing, I have found dozens of ways to improve the bite. Here are the most effective ones:
- Bite activator . This pheromone additive attracts fish most strongly in cold and warm water. Discussion of the bite activator “Hungry Fish”.
- Increased gear sensitivity. Read the appropriate manuals for your specific type of gear.
- Pheromone -based lures .
Making a reusable cement mold
Creating a cement mold is quite time-consuming, this is due to the relatively long hardening of the mixture.
The process of creating the form itself looks something like this:
- Formwork is made , preferably collapsible;
- The inner surface of the formwork is covered with liquid soap and installed on a flat surface, also treated with a soap solution;
- The formwork is filled with cement mortar;
- in the not yet hardened cement ;
- The cement must harden completely , this may take 1-2 days;
- After the cement has completely dried , the formwork is disassembled and reassembled for the next filling;
- The first, frozen half , together with the protruding workpiece, is smeared with soap;
- The second half of the mold is prepared , cement is poured into it;
- The first half , with its surface covered with soapy water, is placed on the second part of the mold;
- The cement hardens again;
- After the cement has dried in both halves of the mold , the central cone-shaped holes in each half are bored with a round needle file for pouring lead, and two side channels are also made for air removal;
- The surface of the sinker mold is sanded;
- Before pouring, the mold halves are tightly held together with a clamp.
Blitz tips
- The porosity of a plaster mold and the tendency of lead to stick when curing can be greatly reduced by using chalk or talc on the inside of the mold to fill voids and create a layer between the lead and the plaster.
- To increase the service life of a plaster mold, you can impregnate and treat it from the inside with a sealant to reduce water evaporation when pouring metal. It won't be durable, but it will probably last a few more uses.
- When making small sinkers, regular matches or nails can be used to create outlet channels by simply sticking them into the mold material before it hardens.
- Instead of soap solution and vegetable oil, you can use silicone grease.
Source: lakeking.ru
I offer my original and effective method of making molds for smelting products (sinkers, jig heads) from lead.
We take ordinary plastic bottle caps as a basis. Fortunately, there are now a lot of them and of different sizes. Then we take the original product for which we will make a mold (sinker, jig head, etc.).
We prepare the original: To do this, we make spacers in those places where you consider it necessary, so that during the filling nothing will wobble or spin (see photo). Then we put it on the cork and adjust everything. In order for the other half to fit tightly, we lower the hook (if it’s a jig head) or your spacers a little into the side of the lid. This can be done in different ways: cut out grooves or press a little with a hot iron.
When everything is adjusted, you can proceed to the main action: Take a beer can (we also have enough of them), cut off a third from the bottom. It turns out to be a very convenient jar to work with. In this jar, melt wax (paraffin or a regular candle) on the stove, and dip our original with spacers into the hot wax. When lowering it into the wax, you need to chat quietly so that the wax covers absolutely the entire surface.
We take it out. We try to do it carefully so that there are no drops or smudges, otherwise all this will be reflected in the form.
When the wax hardens, we place our original on the lid according to the grooves and fill it with ordinary epoxy (you can add fillers). When the epoxy hardens, you can consider half the job done. I'm sure many people will want to take the original out of the mold and see what happened. I answer: it is possible. But in this case, you will tear off the wax coating and have to re-coat it, then install it and adjust it into place. You can also remove it to make sure it’s not stuck. I assure you that if you covered the original with wax properly, the product will not stick.
Next, you should carefully scrape off the wax from the outside of our product. Because we will cover again, and the second layer is unnecessary. You don’t have to scrape it off, but then when dipping again, keep it in the hot wax longer, the first layer will melt). We take our half-mold and just as carefully dip it into the melted wax so that everything is covered. After this procedure, set the workpiece aside. We take the second plug and cut a hole in the bottom for filling. We place this plug on the first one from the top, with the hole facing up. It turns out to be a barrel. To keep the shape, I take this barrel and also dip both sides into wax. This is instead of glue. Holds up well. Pour epoxy into the hole. In principle - that's all! I think everyone understands.
After drying, cut off the plastic from the side and drill a hole for filling. I personally clamp it in a vise and work. The rest are quite capable.
Remember to take precautions. Tin sometimes shimmers, and this is not good. Be careful. Go for it. Hi all!
» />
» />» />» />» />» />» />
Source: fisherman2000.mirtesen.ru
Is it possible to sell lead for scrap?
Due to its unique properties, the scope of use of lead is quite wide, both in heavy and light industry. One of the advantages of this metal is that its scrap metal can be recycled and used as recyclable materials. Thus, the toxic alloy does not remain in the environment and is constantly used by humans. Ordinary citizens and legal entities can hand over lead in specialized reception areas, where the metal is sorted, cleaned and sent to the enterprise for subsequent smelting. At the following link you can find out the cost of lead for 1 kg of scrap in Moscow, as well as get other information about how to properly sell this metal and where it is accepted offering the best conditions.